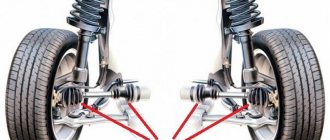
Replacing the boot on the external CV joint of a VAZ 2112 car
Torque is transmitted to the drive wheel from the gearbox using the vehicle's constant velocity joint - CV joint. The operation of the running system depends on how well the unit is in good condition. Although the elements of CV joints are made of durable materials, signs of their malfunctions can appear even in cars that have recently left the assembly line of a car plant. The most common causes of breakdowns are:
- Poor quality of VAZ 2112 CV joints, use of fakes or defective parts.
- Complete absence or low quality of lubricant materials.
- Damage to the boot and, as a result, abrasive debris and moisture entering the unit.
- Aggressive car driving style.
- Poor condition of roads.
All this affects the reduction of the period when it is necessary to replace the boot of the VAZ 2112 CV joint. The article suggests how to perform the operations yourself, without the involvement of car service specialists.
Diagnostics of CV joint performance before installation
- The CV joint should be inspected visually, as well as by rotating it relative to the position of the bearings.
- If no crunching or crackling noises are detected when turning, and the presence of dirt and sand on the lubricant is minimal, then the joint can be cleaned in gasoline by soaking and cleaning.
We fill the grease into the CV joint
- Then we dry it and squeeze new lubricant into its body. This also applies to the CV joint boot, which also needs to be coated with the body.
Replacing CV joints and their boots (inner and outer constant velocity joints)
If you hear knocking noises in the front-wheel drive while driving when turning the car, check the constant velocity joints. If, when rocking the drive shaft by hand, you feel play or the dirt-proof covers are torn, such a hinge must be replaced. There is practically no point in disassembling the hinge. This is labor-intensive work, and if the cover is torn, dirt that has gotten into the hinge has already rendered the hinge parts unusable. The hinge parts cannot be replaced individually, and therefore the most optimal thing is to replace the hinge assembly, as well as its dirt-proof cover (boot). The appearance of traces of grease on the hinge indicates that the cover is torn.
For information: About the choice of CV joints on the modern market
Amount of lubricant in CV joints: - internal - 80 cm3 - external - 40 cm3
If during operation traces of oil leakage were noticed at the points where the front wheel drive is connected to the gearbox, replace the inner joint oil seal.
Inner CV joint
| 1. Remove the front wheel drive from the car |
| 2. Clamp the drive shaft in a vice and remove the outer and inner clamps of the inner hinge. | 3. Slide the dirt boot over the shaft and turn it inside out. | 4. Using a drift, knock the inner CV joint off the shaft, applying force to the joint cage. |
| 5. Please note that there is a plastic plug installed on the inner end of the drive shaft. forks and remove them along with the washers. | 6. Check the presence of grease in the new joint. It should contain CV joint-4 lubricant in the amount of 80 cm3. If it seems to you that there is not enough lubricant, add more - extra lubricant will not hurt. | 7. When installing the hinge, hammer it with gentle blows of a hammer through a wooden spacer along the outer end of the shank along its axis until the hinge is fixed to the shafts. When installing the hinge, make sure that no dirt gets into it. |
| 8. Install the dirt-proof cover (boot) on the hinge body and press the edge of the cover with a screwdriver so that the air straightens the cover (to equalize the pressure inside the cover and outside). | ||
| 9. When installing the inner joint cover, maintain the size from the end of the shank to the small edge of the dirt cover (boot) equal to 210 mm, and carefully tighten the clamps using special pliers. |
Outer (external) CV joint
| 10. Remove the outer and inner outer joint clamps. | 11. Slide the dirt boot over the shaft and turn it inside out. | 12. Using a drift, knock the outer CV joint off the shaft, applying force to the joint cage. |
| 13. Install the outer hinge in the same way as the inner hinge. The difference is that the hinge must contain 40 cm3 of CV joint grease and there is no need to maintain the size when installing the dirt cover. |
Additionally
What are CV joints and how do they work?
Once upon a time, car owners were afraid of CV joints like fire. Today we are used to them, but not everyone understands what they are.
In cars with a classic rear-wheel drive layout, cardan joints were traditionally used to transmit torque to the wheels. But with the massive transition to front-wheel drive, the use of such a transmission has become almost impossible. Crosspieces with four needle bearings can only work in pairs (two pas for each shaft), since the cardan transmission does not ensure equal angular velocities of the drive and driven shafts. This significantly complicates the design and makes it more cumbersome, but even with this scheme, the process of transmitting torque is accompanied by its pulsation, which increases with increasing angle between the axes and the shaft.
Keep up with the times
In a word, life forced us to invent a new transmission using Constant Velocity Joints (CV joints).
Initially, CV joints contained a fairly large resource, comparable to the service life of a car, but in practice it turned out that trouble usually comes not from the inside, but from the outside. It turned out to be difficult to protect such a transmission: you need a boot made of flexible, moisture- and frost-resistant material. Such a “soft” part in the most unfavorable place from the point of view of the influence of external influences, by definition, cannot serve for a long time. This is due to constant deformation, a large amount of abrasive and moisture, which tends to increase in volume when it freezes... In addition, on the road there is a possibility of direct damage to the boot (on a curb, uneven surfaces) or during repairs (a key or chisel has slipped off). As soon as a crack appears on the protective rubber band, the hinge will be condemned to replacement. A similar diagnosis will be made by specialists if the shaft leading to the CV joint (also known as “crowbar” or “stick”) is damaged, which often occurs in serious accidents. The defect is usually invisible to the naked eye, but normal operation of the unit with a crooked shaft is impossible.
The service life of the CV joint depends almost more on the integrity of the protective cover than on its workmanship
However, not everything is so sad. The good news, for example, is that the CV joint never fails instantly. Before its “death”, it will warn for a long time about the need for replacement by crunching, especially when the wheels are turned out. The entire hinge should be replaced (or, as it is also called, a “fan”). Trying to assemble one from two faulty units or using other very popular repair methods in our country is not worth it: this unit is precision. When selecting all its components, even deviations from the specified dimensions are taken into account, despite the fact that they are all within tolerance.
It is also useless to separately replace the boot with a new one. In this way, it is simply possible to stop the access of moisture and abrasive from the outside, but the particles that managed to get to the contacting parts through cracks or breaks will continue to “work” in friction pairs. To prevent this from happening, after dismantling the hinge must be disassembled and washed, and during reassembly it must be filled with new lubricant.
What does a torn boot threaten the car owner with?
And if a rupture occurs, or cracks are already found on it, then one way or another moisture with elements of sand and dirt begins to seep inside. This will not have the best effect on the operation of the front-wheel drive system as a whole. Despite the fact that the elements are assembled from high-quality and durable materials, rupture can occur at any time.
Reasons for boot failure
Among all the reasons for the premature failure of the boot, the following can be distinguished:
- Low quality spare parts, possible presence of fakes or defective parts.
- The amount of lubricant inside is minimal , therefore, the material dries out over time.
- The driving style of the car is harsh, therefore, the boot breaks due to strong and sudden turns of the steering wheel .
- Poor quality of the road surface negatively affects the condition of the front suspension as a whole, and in particular the constant pressure on the CV joint boot.
All of the above reasons in one way or another have a negative impact on the general condition of the CV joint boot, and below we offer you a way to replace it yourself without resorting to the help of a car service center.
Why is it necessary to replace the boot?
It is known that any part is subject to wear during operation and this is due to the appearance of various cracks and gaps on its surface. These are exactly the symptoms that are characteristic of the CV joint boot. But what is a CV joint?
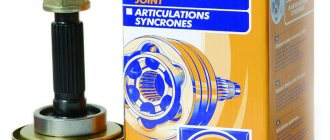
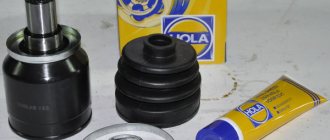
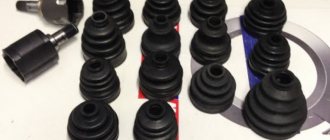
This is what the new CV joint and boot look like
CV joint (constant velocity joint - approx.) is a special joint equipped with transverse grooves and able to change the angle between the driven and driven axle shafts. In other words, thanks to this element, the car transmits torque from the gearbox directly to the wheels.
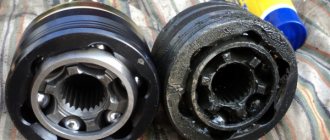
And over time, when the boot wears out, dust and dirt get inside the CV joint, thereby mixing with the lubricant, which leads to the formation of a kind of “crunch” when turning the steering wheel or sharply accelerating the car. In this case, the grenade itself will need to be replaced.
Additional factors that may indicate CV joint wear:
- When the car starts to move, or when the moment of movement changes, small jerks appear.
- There is play on the shaft between the inner or outer CV joint.
SHRUS device diagram
In order to study in more detail the structure of CV joints and their anthers, we offer a detailed diagram:
This is what the diagram looks like.
Thus, long-term driving with a torn boot, and even more so with a faulty CV joint, is highly not recommended. Can knock out a grenade.
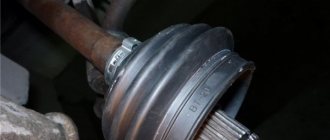
Dismantling drive shafts of a VAZ 2112 car
During repair work on the steering mechanism, chassis elements of a VAZ, or during a routine inspection, you can detect cracks appearing on the boot of the outer CV joint. Over time, the boot breaks and dust and dirt enter the body, which leads to the replacement of the entire hinge. The price of such a replacement is quite high and unreasonable. Timely replacement of the CV joint boot on a VAZ 2112 will prevent such operations. To work you will need:
- The key is “17” millimeters.
- 30mm wrench.
- Balloon wrench.
- Mount.
Replacing the boot on a VAZ 2112 CV joint is easier to do on a dismantled drive shaft. For this:
- Wheel chocks are installed under the rear wheels, and the car is placed on the handbrake.
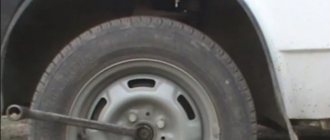
- By holding down the brake pedal (with the help of another person), the nut holding the drive shaft to the wheel hub is unscrewed.
- The bolts securing the wheels break off.
- Using a jack, the desired side is raised.
- A special support stand is placed under the car.
- The protective cap is removed by prying it off with a screwdriver.
- The engine compartment splash guard is removed.
- The plug for draining the transmission oil is unscrewed from the gearbox.
- The oil is drained.
- The bolts securing the ball joint to the steering knuckle are unscrewed, as shown in the photo.
Unscrewing the bolts securing the ball joint to the steering knuckle
- The thrust washer is removed.
- Depending on the side of the repair work, the wheels are turned to the left or right extreme position.
- The outer CV joint is squeezed out of the wheel hub.
- The condition of the boot is visually checked.
Tip: To prevent moisture from getting on the surface of the shaft assembly, it must be suspended by a suspension element using a wire.
- Holding the drive shaft with one hand, with the other, using a pry bar, the inner CV joint is pressed out of the gearbox.
Advice: If it is necessary to remove both drive shafts, before pressing out another shaft, instead of the dismantled first one, you must insert the old housing from the inner CV joint into the gearbox. Otherwise, the installation of the side gears can be disrupted, and this will make it impossible to install the drive shafts.
Replacing the CV joint boot on a VAZ 2112 car
To work you will need:
- Special lubricant.
- Hammer.
- Pliers for removing clamps.
- Screwdriver.
Replacement of anthers on VAZ 2112 CV joints is carried out using a bench vice.
- The drive shaft is very carefully fixed in a vice.
- Using a screwdriver, loosen the clamps holding the boots to the housings of the inner and outer CV joints.
The clamps are released from the CV joint housing
- If the boot needs to be replaced, it can be cut.
- Using a special bronze guide, the outer and inner CV joints are knocked off the drive shaft.
- The joints are washed with gasoline, kerosene or diesel fuel.
- The presence of damage is visually determined. If necessary, defects are eliminated.
- New boots are installed on the shaft.
- The outer CV joint housing is filled with lubricant.
- The housing is placed on the drive shaft.
- The hinge is hammered until the thrust ring is fixed.
- A special tool is used to clamp the clamp, which secures the boot to the drive shaft.
Tip: After installing the boot on the body, you need to pry it with a screwdriver and squeeze it so that all the air comes out. After this, the fastening clamp is installed and tightened.
- The boot and inner CV joint are installed on the shaft in the same way.
- A plastic plug is installed on the end of the shaft on the side of the internal hinge.
- The boot clamps are tightened.
How to replace CV joint boots on a VAZ 2112 is clearly shown in the video.
Drive Shaft Installation
So:
- The CV joint retaining ring is replaced with a new one.
- Graphite lubricant is applied to the splines.
- Carefully, without damaging the sealing collar, the hinge is inserted into the gearbox housing.
- The shaft is finally fixed in the side gear. To do this, apply a wooden block to the shaft and apply blows with a hammer along the axis of the shaft.
- The drive shaft is installed in the wheel hub.
- Next, the operations are repeated in the reverse disassembly sequence.
If the instructions are followed when replacing the anthers, then any car owner will replace the elements correctly and quickly enough. After all the operations performed, do not forget to top up or change the oil in the gearbox.
Grenade replacement
Tool for the job
What is needed to ensure that the replacement of the VAZ 2112 CV joint takes place as quickly and efficiently as possible:
- Sockets and spanners
- 30mm head (not available in some sets)
- WD-40 or similar product
- Hammer
- Collar - the longer the better
- Pliers
- Jack
- Screwdriver
- Vise
- Gasoline and brush for cleaning surfaces
- Metal brush
- Attachment (bronze, copper)
- Metal brush
- Can't do without a partner
- And, of course, a CV joint complete with lubricant (if it is missing, you should purchase it - the price is reasonable)
Removing the axle shaft (wheel drive)
Removing the axle shaft from the hub
- The first stage is standard. We drive the car into the pit, put wheel chocks, put the car in handbrake and neutral, pray (optional) and go!
- When the internal grenade is changed, the oil is necessarily drained from the variable gearbox housing! To do this, unscrew the required plug, place a container for oil, wait for the drain to finish and screw the plug back.
- We remove the cap, if there is one, put a friend behind the wheel and ask him to press the brake hard.
- At this time we take a 30mm head and a larger knob. Using this tool, unscrew the hub nut, which is located in the middle of the wheel.
- The tightening force of the nut is large, therefore, the longer the knob, the easier it will be to unscrew it.
- After unscrewing the nut, the car should be raised with a jack. Raise the car and remove the wheel. Be sure to place a stand under the car in the form of, for example, hemp. Do not work on a vehicle that is on a jack!
- Unscrew the wheel bolts and remove the wheel from the car.
- We completely unscrew the hub nut, remove the metal washer and spray the splined connection of the hub with the outer grenade with WD-40 rust cleaner.
- In order to remove the axle shaft from the car, it is necessary to free the hub. Using the required wrench or socket, unscrew the two bolts securing the VAZ 2112 ball joint to the hub.
- After this, using a bronze or copper adapter, in order not to damage the thread on the outer grenade, we try to dislodge it (the grenade) from engagement with the hub, adding a rust preventative to make it easier.
- When the parts are disengaged, you can move the shock absorber strut to the side and remove the axle shaft (remember, you need to drain the oil, otherwise it will simply leak onto the floor).
Replacing the internal grenade of a VAZ 2112 - how to do it yourself?
Replacing CV joints on a VAZ 2112
Rear-wheel drive cars are being replaced by cars with front-wheel drive. In this regard, the crosspieces are replaced by hinges of equal angular velocities, which are called grenades. This article is instructions for replacing the internal grenade on a VAZ 2112 car and other cars from this family. Here you will find a video describing the process, as well as photos of some of the process steps. So, let's begin:
- Tool for the job