Self-replacement of the exhaust and intake manifold gasket on a VAZ 2109
Burnout of the gasket under the exhaust manifold is a rather unpleasant and common malfunction on the VAZ 2109.
A product that has become unusable will allow exhaust gases from a running engine to pass under the hood, and the characteristic chattering sound when the engine is under load also does not greatly contribute to a comfortable ride. Replacing the manifold gasket on a VAZ 2109 will help avoid such problems.
The collector gasket is made from a specially compressed asbestos mixture reinforced with steel thread; it can be purchased at any spare parts store. The price of the product, depending on the manufacturer, varies from 50 to 200 rubles. For a VAZ 2109, replacing the intake manifold gasket at a car service center will cost approximately 1,500 rubles and more, not counting the cost of the gasket itself.
Dismantling of collectors
Now comes the turn to remove the intake and exhaust manifolds. Having dismantled them, you can understand whether it is possible to get by with replacing the gasket, or whether the collectors themselves will need to be completely replaced.
The gasket is a consumable item, the purchase of which will literally cost you 50-250 rubles, depending on the manufacturer and region. Services for replacing the gasket at a service station cost more than 1,500 rubles. Add to this the cost of a high-quality gasket and you will get quite a lot of money. Such costs can be avoided if you do everything yourself.
Dismantled unit
Intake manifold
By removing the air filter and carburetor, you will gain access to the intake manifold.
Preliminary work
Replacing the VAZ 2109 intake manifold gasket with your own hands is not very difficult and does not require specific knowledge or expensive tools - the required set of keys is usually present in the trunk of every car enthusiast.
But before replacing, you should try to tighten the fastening of the intake unit - if the gasket is not burned out, it is the loose fastening that may cause exhaust gases to get under the hood. If tightening the fastening does not help, it means that the gasket is completely burned out and needs to be replaced. Replacing the VAZ 2109 manifold gasket will require preliminary work to dismantle the air filter, remove the carburetor and the manifold itself. All of the above work is carried out exclusively on a cold engine.
Removing the air filter with housing
On the injection engine of a VAZ 2109 car, to remove the air filter, it is enough to unscrew the four self-tapping screws securing the cover of the filter element housing - for this, use a 10mm wrench or a ratchet. There will be a filter element under the cover. If the cover is difficult to lift, you can disconnect the mass air flow sensor from the plug.
On a carbureted engine, there are three latches under the hood that can be easily opened. There is a screw in the middle of the metal cover, which can also be unscrewed by hand, after which the cover is removed. Under the cover there is a filter element that must be carefully removed. Subsequently, during reassembly, the filter element can be replaced - if the time has come or if the filter element is very dirty.
Removing the carburetor
After the air filter has been removed, you can begin to remove the carburetor. To remove the carburetor on a VAZ 2109, you will need the following tools:
- two screwdrivers - flat and Phillips;
- 13 open-end wrench;
- head at 8;
- ratchet.
Instructions for dismantling the carburetor will be as follows:
- The coolant supply hose to the carburetor starter is disconnected from the fitting by unscrewing the fastening clamps. The coolant itself is drained into a previously prepared container.
- The exhaust pipe coming from the exhaust manifold and from the cylinder block bracket is disconnected.
- Then the throttle cable bracket is disconnected. To do this, first remove one end of the spring from the throttle control rod, and then remove the entire spring, then loosen the nut on the bracket and remove the cable from its engagement.
- The EPHH screw sensor is disconnected from the power plug.
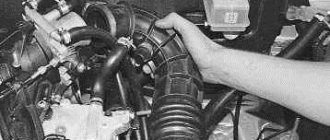
- Two hoses and a vacuum tube are disconnected from the carburetor heating unit.
- The crankcase ventilation hose is removed.
- Unscrew the 4 nuts securing the carburetor to the intake manifold.
- The carburetor is removed carefully and without jerking - by lifting it from the studs.
The work of removing the carburetor is completed. The presented photos and videos will help you clearly follow the process of removing the carburetor.
Removing the intake manifold
After the work of removing the air filter and dismantling the carburetor is completed, you can begin to remove the intake unit. To do this you will need the following set of tools:
- open-end wrench 13;
- head 13 - regular and deep;
- ratchet and crank;
- ratchet with 10mm head.
Preparation for repair
Before replacing the manifold gasket, it is necessary to understand how the process itself proceeds. You don't need special tools or the experience of a great 80-level mechanic. A standard set of tools that are found in every garage is sufficient. And you shouldn’t immediately blame the fact that a breakthrough has appeared in the gasket. Try tightening the nuts first. It is possible that they have weakened a little. But if it is not possible to get rid of the passage of gases, you need to start repairs. The work order can be briefly divided into several stages:
- removing the air filter;
- dismantling the air filter housing;
- removing the carburetor;
- removing the intake manifold;
- replacing the manifold gasket;
- assembly of units.
Once you have decided on the order, get to work. The simplest thing is to remove the air filter and its housing. First, unscrew the nut in the middle with a “10” wrench and unfasten the latches. Then, removing the cover, take out the filter element. Using a key “8”, unscrew the nuts from the studs and use a screwdriver to loosen the clamp of the pipe fitting to the cylinder head cover. Then remove the air filter housing. And now about how to remove the manifold on a VAZ 2109 with your own hands.
Replacing the gasket
After the preparatory work is completed - the air filter, carburetor and intake and exhaust manifold are dismantled, you can begin the main work, for which all previous steps were done - directly replacing the gasket itself.
The work order will look like this:
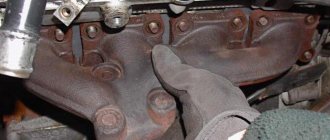
- We remove the old gasket - this can be difficult, since, most likely, it is tightly burned to the cylinder head - in this case, you need to use a thin screwdriver or knife. To make the work easier, you can use special aerosol solvents in cans, sold in auto parts stores. It is also necessary to carefully remove carbon deposits from the mating surface of the block - you can use sandpaper for this.
- The new product is installed on the exhaust manifold, then all work is done in the reverse order. Replacing the intake manifold gasket on a VAZ 2109 is carried out in a similar way.
Replacement of the exhaust manifold gasket on the VAZ 2109 has been completed. The exhaust pipe of the muffler is secured with brass nuts, preferably new ones. And don't forget to fill in the coolant that was drained when dismantling the carburetor!
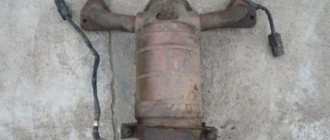
Exhaust system
The main elements of the exhaust system on these cars are the exhaust pipe, additional and main mufflers, as well as a converter. The exhaust pipe on the VAZ 2114 is connected to the converter using a special hinge. A similar design was already used on the VAZ 2109.
To ensure a more reliable and tight connection, there is a graphite ring between the flanges. In order to prevent the car body from heating up, engineers provided a special gasket above the neutralizer. It plays the role of a heat sink element.
VAZ developers installed a special oxygen sensor at the inlet part of the neutralizer. Car enthusiasts know it as a lambda probe. What functions does it perform? Everything is quite simple here. This part is needed in order to determine as accurately as possible the amount of oxygen in the exhaust gases.
So, the information received from this sensor is fed to the ECU and is then used to quickly adjust the amount of fuel that will then flow into the cylinder block. As in many other VAZ models, the mufflers are securely fixed to the underbody of the car. For this, engineers used special suspensions.
The vibration that accompanies the release of gases is significantly reduced with the help of these suspensions. This ensures silence in the car interior.
Preparation stages
To replace the manifold or its gasket, in any case you will have to dismantle the VK. But before you get to the element you are looking for, you will first need to go through some preparatory steps. Namely, tighten the fasteners, and then remove the air filter and carburetor if the first stage does not help.
Stage of work
Your actions
Often, loose manifold fastenings caused the entry of contaminants, which disrupted the performance of the exhaust system. If the tightening did not give any result, then the gasket is definitely burned out or the collector itself is damaged, which is less likely
Removing the air filter
Removing the carburetor is carried out in the following sequence:
Dismantling the unit
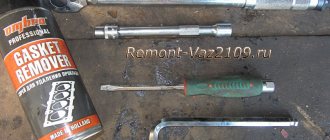
Required tool for replacement
Before you begin the process itself, you need to decide on the necessary tools. So, what will you need: a ratchet and sockets for 17, 19; screwdrivers with flat and Phillips tips; a set of keys and the gasket itself.
Now that everything is prepared, you can start working directly. In order for the manifold to be removed without any problems and rusted bolts not to create trouble, everything must be lubricated with WD-40 before performing the operation. It is advisable to do this several times. Before performing the operation, you need to think again, weigh everything and calculate your strength.
Causes of malfunctions
The gasket is placed between the exhaust manifold and the cylinder head. The stamped asbestos gasket is resistant to high temperatures, can be compressed (creating the necessary impermeability) and has increased strength. To enhance the latter quality, the exhaust manifold gaskets are additionally reinforced with steel.
IMPORTANT! The main task of the gasket is to prevent exhaust gases from penetrating under the hood, where they can cause ignition of parts/assemblies of the engine compartment.
The gasket is recognized as the most vulnerable point of the exhaust manifold, which operates under extreme loads in both temperature and pressure. It is not surprising that gaskets have to be changed not only on cars with significant mileage, but also on almost new cars.
Gaskets need to be rotated for several reasons:
- poor factory quality;
- engine overheating due to intensive use;
- engine repair (a used gasket loses its properties when dismantled).
Exhaust manifold functions
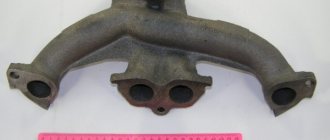
It consists of several pipes that merge into one, but has different mountings and configurations for different engines. To produce VC, high-carbon cast iron, stainless steel and titanium are used, sometimes coated with ceramic/chrome.
The task of the “spider” (as the exhaust manifold is called in the Russian Federation) is to transfer combustion products collected from all cylinders to the exhaust pipe. Gases from the AC enter the catalyst or directly into the exhaust pipe and then to the muffler. The exhaust manifold is attached to the engine, or more precisely to the cylinder head (cylinder head), sealing the joint using a special element.
Replacing the Exhaust Manifold Gasket VAZ 2109 Injector
Replacing exhaust manifolds and gaskets on a VAZ 2114
An exhaust manifold. This is the unit responsible for driving performance, without which comfort is impossible. It is quiet here, and under the hood there is no smell of exhaust gases that can enter the cabin through the hole in the filter. Exhaust manifold leak repair
VAZ 2114 needs repair. Modern, it is not urgent, there is an opportunity to prepare in advance and choose the right moment.
Exhaust manifold for VAZ 2114
Causes of malfunctions
The main factor causing 90% of defects is the exhaust manifold
on VAZ 2114 cars the highest temperature. Not the highest quality materials where the parts are made. During use, the steel is repeatedly heated and cooled, which leads to the appearance of cracks in the body. This is a common occurrence for VAZ cars older than 7-8 years.
The car service offers argon welding of cracks. But, for a number of reasons, this lesson is useless for a car older than 7 years.
1) Simply removing and installing the exhaust manifold will cost approximately 4.5.5 thousand rubles. Taking into account the work of the welder and other actions, the cost of repairs can be 4-5 thousand rubles. If you are doing the job without help, it will be cheaper to purchase the latest parts.
2.4) Welding, even argon welding, destroys the structure of “tired” metal. The cooked piece sometimes lasts longer than a year, after which new holes appear. The older the car, the faster the problem returns and the manifold must be removed again.
Replacing the cylinder head gasket with video injector.
If the car is more than 8 years old and there are problems with cracks in the manifold, it is better to remove the part and replace it with a new one.
symptoms
exhaust manifold gasket
One of the main leaks in the system is a "sporty" wheezing sound when adjusting the engine speed. This is likely a symptom of various defects in the exhaust system. To check, it is better to take an assistant and go to a garage with an opening different from the overpass. In most cases, they are determined approximately; a problem arises in the muffler, in the cavity, as it is called, the exhaust.
Gasket wear may occur during installation. Open the hood and start the car. a white-gray haze rises differently than an unfamiliar manifold during warm-up, indicating a leak. Owners of VAZ cars usually encounter this problem every 3-4 years. Use of low-quality spare parts and 30 years of advertising. The output will be a custom made metal strip. It will last as long as the collector.
Preparation stages
To replace the manifold or its gasket, in any case you will have to dismantle the VK. But before you get to the element you are looking for, you will first need to go through some preparatory steps. Namely, tighten the fasteners, and then remove the air filter and carburetor if the first stage does not help.
Stage of work
Your actions
Often, loose manifold fastenings caused the entry of contaminants, which disrupted the performance of the exhaust system. If the tightening did not give any result, then the gasket is definitely burned out or the collector itself is damaged, which is less likely
Removing the air filter
Removing the carburetor is carried out in the following sequence:
All dismantling work must be carried out only on a cold engine. To make it easy to unscrew all fasteners, you can pre-treat them with WD40, several hours or even a day before the repair begins.
Also check out
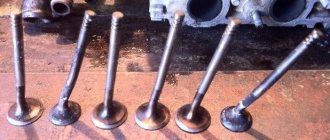
- When disassembling the valve mechanism, it is necessary to place a wooden block under the valve plate.
- Dry the valve. Remove it from the cylinder head guide bushing.
- Using a key “13”, unscrew the 2 nuts securing the inlet pipe.
- Remove the gasket and pipe.
Assemble and install the cylinder head in the reverse order.
Recommendations :
- Valve stems with engine oil. The same applies to guide bushings.
- Before installation, remove dirt, oil, and remnants of the old gasket from the surface of the cylinder block.
- The cylinder head gasket should be replaced using two special centering bushings.
- Install the mounting screws; the diagram below shows 4 steps on how to tighten them.
- The first tightening torque of the screws is 20 N.m (2 kgf.m);
- The second - with a moment of 69.4–85.7 N.m (7.1–8.7 kgf.m);
- The third - with an extension of 90°;
- The fourth is to turn the screws 90°.
Removing and installing the intake manifold
The intake manifold of the VAZ 2109-2108 has to be changed in exceptional cases, but it needs to be removed more often, for example, when completely disassembling the engine, or, for example, when replacing the gasket between two manifolds and the cylinder head.
First of all, you need to do the following:
After all the work described above has been done, we can proceed further and for further actions we will need:
- open-end wrench 13
- the head is deep and regular at 13
- ratchet handle and crank
- extension
- head 10 with ratchet
The first step is to unscrew the platform that is located under the carburetor by unscrewing the two nuts securing it, as shown below:
Then you can bend it back:
We also disconnect all the hoses that fit to the intake manifold and then you can begin to unscrew the fastening nuts, of which there are 6 in total, shown in more detail below in the photo:
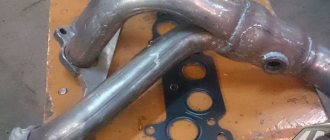
All that remains is to remove the collector from the studs, slightly shaking it from side to side, as it sometimes sticks tightly to the gasket:
Usually, both manifolds have to be removed at once, after which the gasket between them and the cylinder head at their junction must be changed, but this procedure will be discussed in the following articles. Before installation, be sure to thoroughly clean the surface, removing traces of the old gasket. For this I used a special bodyaholic from Ombra “Spray for removing gaskets”, which removes all slag from the surface in 15 minutes:
And finally you can sand it with the finest sandpaper - zero sandpaper:
Installation of the intake manifold occurs in the reverse order. If anyone is interested in the price of this part, it is about 1,500 rubles, but the same thing, only used, can be easily found for 500 rubles at any disassembly site!
VESKO-TRANS.RU
AutoNews / Reviews / Tests
How to Remove the Exhaust Manifold of a VAZ 2109 Injector
The exhaust manifold is part of the exhaust gas metering system, which makes the process of removing exhaust gases from the cylinders of the unit into the exhaust pipe.
If the manifold is not working properly, the culprit is both the element itself and its gasket. Replacement of gasket (exhaust manifold). a common occurrence when performing repairs on a VAZ 2109.
To replace the manifold or gasket, the LCD must be removed in any situation. But until you get there, you will first need to complete a few preliminary steps. Specifically, tighten the fasteners, and then remove the air filter and carburetor if the first step does not help.
Your actions
Often, loose manifold fastenings became a prerequisite for contamination, which led to a malfunction of the exhaust system. In this case, lifting did not give any result, then the gasket or the manifold itself was damaged, which is the least possible
Disassembling the air filter
- If the engine is a fuel injector, you will need to remove the four filter housing cover mounting screws to remove the air filter. Under the cover is the filter itself. If you have trouble lifting the cover, turn off the MAF sensor and remove the filter.
- If there is a carburetor installed under the hood, the filter housing will be held in place by 3 clips. In the center of the iron cover is a screw, often loosened by hand. Removal allows the cover to be lifted easily. Below is a filter that should be removed carefully. Examine its condition carefully. If the filter has been in use for a long time, it is recommended to replace it during assembly.
Signs of a burnt gasket
The easiest way is for the owner of a car with an injection engine, the operation of which is monitored by an ECU (electronic control unit). It sends a signal about a gasket failure to the dashboard, where the Check light comes on. This means that the lambda probe, which is usually equipped with the manifold, detected a change in the volume of oxygen in the exhaust, informing the ECU. The engine begins to operate in emergency mode until the defect is eliminated.
“Symptoms” of a burnt gasket:
- the engine is unstable;
- makes an uncharacteristic sound during operation;
- The cabin smells like exhaust gases.
ATTENTION! The fact that the exhaust manifold gasket has burned out is indicated by a recognizable chirping sound created by gases that break through the seal. Motorists often say that the engine “cuts”
Exhausts through ventilation and heating systems quickly penetrate into the cabin, which is fraught not only with a deterioration of the microclimate, but also with negative consequences for health. This is why replacing the exhaust manifold gasket becomes a forced but necessary measure.