What is a backstage
The term appeared along with the first multi-speed gearboxes. It meant some kind of hidden mechanism connecting the driver and the transmission, with the help of which the driver gave a signal to the manual transmission about the need to change to the next or previous speed.
The term “scene” is not specified in any regulatory documents. This is the popular name for a mechanism or a specific part. Even drivers with many years of experience often use it differently. Some call this the gear selection mechanism located under the bottom of the car and connected to the gearbox by a lever (sometimes two levers) or cables. Others are the rod connecting the gearbox lever and the gearbox.
We propose to call the entire mechanism connecting the gear lever and transmission a “slide”. This makes it somewhat difficult to divide mechanical transmissions from AvtoVAZ into rocker and cable ones, but it allows us to perceive the gear shift mechanism as a single unit.
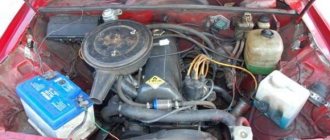
Installation of CC and cardan from Lada Kalina
The best solution would be to buy parts from Kalina, but some drivers prefer to take KK from a VAZ 2114, that is, a “native” part. In addition to the standard set of tools, you will also need a grinder. Replacement is carried out as follows:
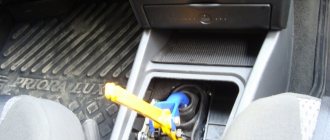
- Inside the car, it is necessary to remove the platform, which blocks access to the transmission and gearbox parts. The platform is held in place by 5 bolts;
- From the bottom of the car, loosen the clamp that presses the cardan and the rocker;
How does the backstage work?
The principle of operation of any scene is the same: moving the manual transmission lever in two planes (forward - backward, left - right) through a system of levers and rigid or flexible rods leads to the movement of the corresponding forks inside the gearbox. In turn, the forks displace the clutches of one or another gear, due to which they engage with the secondary shaft, forming a full-fledged gearbox with a given transmission ratio.
Backstage on the Priora
In first gear, the ratio of the rotation speed of the secondary and primary shafts is minimal, due to which 3-4 revolutions of the primary shaft account for 1 revolution of the secondary. In direct (fourth) gear, the rotation speeds of both shafts are approximately the same. But at the highest gearbox it turns from a reduction gearbox into a step-up gearbox, because for 2 revolutions of the primary shaft there are approximately 3 revolutions of the secondary shaft.
What kind of scenes were installed on the Priora?
Three types of scenes were installed on the Lada Priora (one for each box):
- long-stroke with rigid rod and flat lever (for 2170 (aka 2110));
- short-stroke with rigid rod and round lever (for 2180);
- cable (2181).
The gearbox 2170, which Priora inherited from the tenth family (the entire VAZ 2110 line), was distinguished by a large lever stroke: it was difficult to quickly change gears. When developing the gear shift drive for the 2180 gearbox, engineers took into account the criticism of car owners and created a short-throw mechanism that made it possible to change gears much faster. In addition, both scenes inherited from the “ten” a not very reliable mechanism for transmitting force to the box, which is why it had to be adjusted from time to time. Another common problem was the vibration of the lever, which irritated many owners of this car.
Also, a common disadvantage of both transmissions was the lower location of the gear shift mechanism, because this led to:
- leaks of the gear selector rod seal;
- Difficulty switching gears in the cold.
When developing a new type of gearbox switch (2181) for the Lada Priora, engineers took into account previous mistakes. The gearshift mechanism was moved to the top, and Bowden cables were used as rods. This immediately solved many of the problems of the previous units. But the price for this improvement was the low reliability of the mechanism connecting the lever and the cables, because it is made of plastic. However, with careful operation, its service life exceeds 100 thousand km.
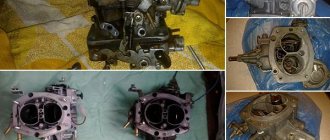
Making a short-stroke slide with your own hands
So, let's begin the modernization process:
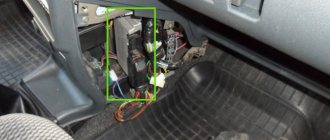
- We raise the place of attachment of the piece of iron that goes from the gearbox to the lever inside the VAZ 2110 interior.
- You can do without dismantling the rocker, the main thing is to disassemble the ball joint.
- Now we need to ensure that the plastic paws release the ball. To do this, you need to unclench the metal ring. We disconnect the rod and carefully drag it inside through the cover, which is responsible for protecting it from dirt. It will be much more convenient to work if the clamp near the gearbox is loosened.
Replacement is carried out according to the same scheme. Only instead of welding, a freelance short-stroke rocker from another car is installed. Replacement is a more expensive solution, so doing it yourself is problematic. If you have experience working with gearboxes, then replacing and purchasing a new part will cost about 1,000 rubles.
Main malfunctions of the scenes
All malfunctions of the Lada Priora gearbox and how to eliminate them:
| Symptom | Malfunction | Gearbox model | Way to solve the problem |
| Unclear gear shifting | Worn bushings | 2170–2181 | Replace all bushings |
| Damaged pillow | 2170–2180 | Replace pillow | |
| Cables stretched | 2181 | Replace cables | |
| The tension of the traction clamps is loose | 2170–2180 | Adjust then tighten | |
| The lever has failed | The pillow tore | 2170–2180 | Replace pillow |
| Lever travel too long | Worn bushings | 2170–2181 | Replace all bushings |
| Cables stretched | 2181 | Replace cables | |
| The tension of the traction clamps is loose | 2170–2180 | Adjust then tighten | |
| One or more speeds do not turn on the first time | Forks are deformed | 2170–2181 | Replace plugs |
| The tension of the traction clamps is loose | 2170–2180 | Adjust then tighten | |
| Cables stretched | 2181 | Replace cables |
The main malfunctions of the Priora gearbox are the same for any transmission and are determined by their design. The lever and rigid drive are made of steel, so they do not break. The remaining parts, all kinds of plastic bushings and cables, clamps that secure the rods, often fail (their nuts have a bad habit of becoming loose). In addition, on the so-called rocker boxes, that is, gearboxes 2170–2180, the rubber band (the rubber support of the lever) often fails, which also leads to problems with switching on the required speeds.
One of the rare defects is the rattling of the 2014 Priora gearbox, although it also occurs on cars of other years, but always with a rocker transmission. It is caused by contact between the torque rod and the gear shift rod. Due to the running engine, the contact becomes vibrating, and the collision of parts generates ringing. To eliminate it, just slightly move both rods away from each other.
Spare parts and repair kits
AvtoVAZ does not offer ready-made repair kits for repairing gear selection mechanisms: you can purchase a repair kit for the Priora gearbox rocker from third-party manufacturers or assemble them yourself.
List of parts for each box that most often fail:
| checkpoint | Detail | vendor code | Quantity | Price, rubles per piece |
| 2110 and 2170 | Gearbox ball lever support cage | 2110-1703190/86/91 | 1 | 500 |
| Lever axis | 2110-1703219 | 1 | 80 | |
| Lever axis bushing | 21100-1703226-00 | 2 | 7 | |
| Remote gearshift lever axis bushing | 2110-1703227 | 1 | 40 | |
| Overlay | 2110-1703317 | 1 | 60 | |
| 2180 | Gearbox ball lever support cage | 2110-1703190/86/91 | 1 | 500 |
| Lever axis | 21700-1703219 | 1 | 80 | |
| Thrust washer | 21700-1703371-00 | 2 | 20 | |
| Bushing (spacer, gasket) of the hinge | 21700-1703226-00 | 2 | 20 | |
| Remote bushing | 11180-1703227-01 | 1 | 45 | |
| 2181 | Rocker assembly with lever | 21901-1703010-20 | 1 | 2000 |
| Transmission shift cables (set) | 21901-1703113-00 | 1 | 4000 |
Backstage repair and adjustment
In this section we will describe the replacement of all consumables, as well as all the adjustments to the Priora gearbox that can be carried out on a particular transmission.
Backstage repair kit
To repair a Priora gearbox of any type, you will need:
- pit;
- overpass;
- lift;
- jack with safety stands.
In addition, you will need the following tools:
- a set of spanners and open-end wrenches;
- flat and Phillips screwdrivers;
- ratchet with extension and set of bits.
If you work from a jack, be sure to use safety stands. And after installing the car on them, shake it strongly in all directions. If it falls off the stands, it means you installed them incorrectly. But it’s better if the car falls while you’re not under it.
Sports
We noted that for the VAZ 2114 you can install a sports short-throw rocker. Outwardly they are quite similar, but the difference in work is felt immediately. On a sports unit, gears shift faster and smoother. It's all about the design of the backstage itself. Unfortunately, it is precisely because of this that the process of independent replacement becomes almost impossible.
Sports model
If you decide to install a short-throw rocker on your VAZ 2114, contact trusted car services, or even better, a studio that specializes in tuning. Such events are classified as technical improvement, which is why no one understands this better than tuning specialists. Even official AvtoVAZ car services.
Rigid traction mechanisms
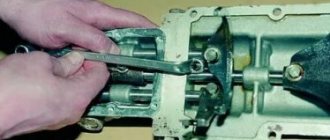
For both “screw” mechanisms, the procedure is completely identical. So do this:
- Raise or hang the machine.
- Remove the cover and gearshift lever knob.
- Unscrew the nuts and bolts securing the reverse lock plate (bracket), then remove the bracket.
- Unscrew the lever axle nut. Be careful not to lose the nut and lock washer.
- Unscrew the bolt securing the lever axle, then pull out the axle.
- Go down under the car and unscrew the nuts of the rocker pad bracket (this is convenient to do with a ratchet and an extension).
- Unscrew the bolts securing the torque rod to the car body.
- Pull down the pillow with the lever.
- Remove the retaining ring from the cushion.
- Lubricate the ball joint of the new cushion with any grease.
- Insert the lever into the pillow and make sure that it rotates freely and does not fall out of it.
- Place the pillow with the lever in place and secure it.
- Lubricate the new bushings and insert them into the lever.
- Replace the lever shaft.
- Have an assistant sit behind the wheel and go under the car yourself.
- Ask an assistant to engage first gear. If the lever is where it should be, then the repair and adjustment is complete. If not, then loosen the nut and bolt that tighten the clamp on the rod next to the driveshaft. While holding the rod, have an assistant place the lever in place corresponding to first gear and tighten the clamp.
Ask an assistant to engage all gears in order. If they turn on clearly and there is no strong play in the lever (on the rocker boxes), then you have done everything correctly and the repair and adjustment are completed.
Attention!
If you first assemble the reverse gear locking mechanism, the long rod will not allow you to put the rod on the cardan shaft. The problem can be solved by shortening it. It is important not to forget to put the boot on the driveshaft.
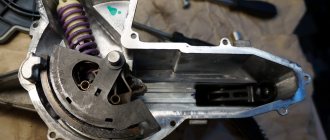
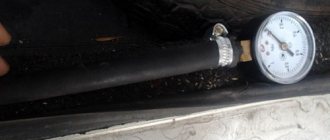
Adjust the reverse gear locking mechanism, since the consequence of adjusting the scenes is that the mechanism does not match the plate to which it clings. The problem can be solved by removing the plate and adjusting the hook (it is a cutout on the mounting bracket). You can sharpen it with sandpaper or a file.
The photo shows the adjusted toe.
To complete the procedure, you need to put on a manual transmission cover with a knob.
Replacing the oil seal
On a Lada Priora car, replacing the gearbox seal does not cause serious difficulties. Since we have already talked about performing this operation in the article (Replacing the Kalina gearbox oil seal), we will repeat here only the general principles.
To replace the oil seal, do the following:
- Place the machine on a pit, lift, overpass or jack, observing all safety measures.
- Disconnect the jet rod from the box.
- Disconnect the gear shift rod from the driveshaft.
- Remove the boot.
- Disconnect the driveshaft from the gear selector rod.
- Pull out the bushing with the oil seal.
- Clean the seat in the transmission housing.
- Replace the seal in the bushing.
- Insert the bushing into the box, seating it on the sealant.
- Assemble the car.
Check the gearbox oil level and, if necessary, add the appropriate transmission fluid.