Modern cars have a hydraulic clutch, which involves transmitting force using fluid in hydraulic cylinders.
The main function is performed by the working fluid, which is the same in composition as for the brake system. It does not shrink under pressure, which is why it works.
Below we will look at how to bleed a car’s clutch, when and why it is necessary, and what signs indicate the presence of air in the system.
We will separately analyze what is required from the tool, and how the process goes if you act independently or with the involvement of a friend.
Leveling procedure
You must first prepare the tool. In this case, you can do the work yourself or with the help of a friend.
Required Tools
You will need:
- Clutch fluid. There are several options here. For example, DOT3 is relevant for earlier versions of cars, DOT4 is the most common option for modern cars. As for DOT5, this liquid is not afraid of moisture, but has the highest price. If the car is equipped with ABS, the appropriate product is used. Please remember that mixing different DOT colors is prohibited. To avoid mistakes, you need to be guided by color. For example, DOT 4 is most often yellow/clear, and DOT 5 is pink/red.
- Saddle/open-end wrench. Used to unscrew the cylinder fitting. For most cars, size eight to ten is suitable. Alternatively, you can use a socket and drive, but this solution is less convenient.
- Empty container for draining old liquid.
- Flexible tube of the required length and diameter (usually 5 mm). It is pulled onto the fitting and helps remove air. It is important that the tube is transparent, because in this case the process can be controlled. As an option, a product from a dropper system, which is easy to buy at a pharmacy kiosk, is suitable, but it will not fit on every fitting.
Bleeding the clutch with two people
If you have an assistant, it is easier to bleed the car’s clutch; to do this, take the following steps:
- Turn off the engine and open the hood of the vehicle.
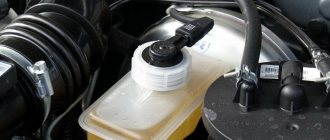
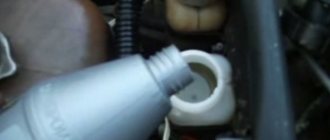
- Find a container with working fluid.
- Unscrew the cap and add the required volume so that there is 20 mm left to the neck. Having a reserve is only a plus, because some of the working fluid will spill out during pumping.
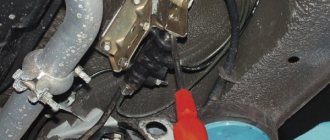
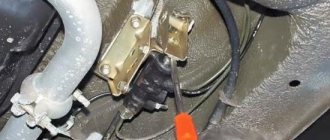
- Near the clutch, find the slave cylinder, which pushes the fork with the release bearing. At the top of the housing, find a fitting that is covered with a rubber cap to protect it from clogging.
- Remove the cap from the fitting and pull the prepared tube onto it (first make sure that it is suitable in diameter).
- Prepare a cut plastic bottle, pour 150-200 ml of working fluid into it and lower the end of the tube into it.
- Have an assistant press the clutch twice and leave the pedal in the fully depressed position a third time. This is necessary to create the required pressure in the system.
- Using an open-end wrench, unscrew the fitting one turn. In this case, liquid with bubbles will flow through the transparent tube. This can be seen in the container itself. As a result, the fork returns to its original position and connects the discs due to the decrease in pressure.
- Tighten the fitting and repeat the procedure twice more. If there is still air coming out of the tube after the process is completed, there is a lot of air and it will take more pressing cycles to solve the problem.
- Add hydraulic fluid until it is at the Max mark.
- 11. Completely tighten the fitting and put on the protective cap.
One man
The situation is more complicated when you need to bleed the clutch yourself. The algorithm of actions is somewhat similar to bleeding the brake system without an assistant.
If you follow the scheme discussed above, you will have to constantly move or use some kind of heavy object to press the pedal. But you can do it easier and use the opposite method.
Take the following steps:
- Open the hood to access the brake fluid reservoir.
- Unscrew the cap and remove a small volume using a ten-cube syringe.
- Remove the plug on the fitting and connect the previously prepared tube.
- Insert a syringe with a “brake seal” inside into the second part of the hose.
- Turn the fitting once using an open-end wrench to open the outlet.
- Slowly squeeze out the liquid that is in the syringe. In this case, the air is squeezed out in the opposite direction and exits through the tank. In this case, the pressure is generated by the syringe itself, so the pedal is not fixed.
- Tighten the fitting and check that the fluid level is normal. If necessary, top up.
The use of such an algorithm of actions allows you to complete the work without involving a second person. At the same time, it will take the same amount of time to resolve the issue.
Step-by-step instruction
Bleeding the clutch cylinder can be done with an assistant or independently, which determines the sequence of actions. It is important to do everything correctly, otherwise the hoses and hydraulic drive will become even more airy.
Leveling with the help of a second person
Let's take a step-by-step look at how to bleed the clutch in the easiest way with an assistant:
- Open the hood of the car. All actions are performed with the engine turned off.
- Closer to the partition of the engine compartment and passenger compartment there is a fluid reservoir. Remove the lid and add the missing volume so that there is 2 cm left to the neck. The reserve will be needed, since part of the fuel fluid will be poured out during pumping.
Adding fluid to the reservoir in the engine compartment
- Next to the clutch, locate the slave cylinder that pushes the fork with the release bearing. There will be a fitting on the top of the unit body. It is closed with a rubber cap to prevent clogging.
- Remove the cap from the fitting and place a transparent hose of the appropriate diameter on it.
- Take a cut plastic bottle, fill it with 150–200 ml of TJ and dip the free end of the hose into it.
- An assistant pumps the clutch pedal 2 times and on the third presses it in the maximum depressed position. This helps build pressure into the system.
- Using an open-end wrench, unscrew the fitting one turn. Through the transparent hose you will see liquid and air leaving the system. The latter will appear in the form of bubbles in the receiving container.
Features of bleeding the clutch on a VAZ classic
In fact, for all VAZ classics, 2106, 2107 and other models, all the same steps listed above are performed.
But you can apply other methods obtained from the practice of servicing these cars.
Work can be done without a pit.
Procedure:
- Prepare an 8/10 spanner.
- A container with brake fluid into which the waste will be drained.
- Open the clutch reservoir and add fresh brake fluid to the level.
Then you can use several methods.
Method 1 - by gravity:
- Remove the cones from the bleeder fitting.
- Using a size 8 spanner, unscrew the fitting ¼ turn.
- Observe whether the liquid flows out of the fitting by gravity or not. It is important to ensure that the tank is not empty and the system does not “grab” air.
Disadvantage of this method: it takes more time.
Method 2 - use a device with a nipple.
For this:
- We perform all the same steps described in method 1.
- Instead of the standard cap, we screw a special device with a nipple onto the neck of the tank (see photo).
- We connect the spool in the tank using a hose of a suitable diameter with a pressure source of 1.5 - 2.0 atmospheres. This could be a spare tire, inner tube, pump, compressor, etc.
- The created pressure in the system will speed up the process of bleeding the clutch.
Method 3 – use clean rags.
For this:
- Place a clean rag over the neck of the tank.
- Blow into the tank, thereby using your lungs to create a slight pressure.
- Observe the intensity with which liquid flows out of the fitting and how much air comes out with it.
- We do two or three approaches until the air is completely removed from the system.
- We tighten the fitting.
The methods listed above allow you to bleed a car’s clutch without an assistant.
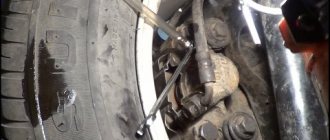
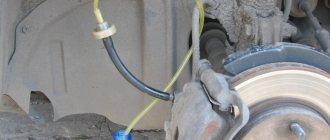
Where is the working hydraulic cylinder fitting located?
On passenger cars with a transverse or longitudinal engine, the fitting of the working hydraulic cylinder should be looked for next to the box. Since the clutch is located between the engine and transmission, the hydraulic drive will also be here. The fitting itself is located on top of the housing to naturally collect and remove air from the system.
Example of the location of the trigger element on a Renault Megane
For an easier search, you can “follow the trail” from the pedal and rod leading from the passenger compartment to the mechanism for separating the two discs. It is convenient to accurately find the air release point when you are in a hole under the car. But connecting the hose and bleeding itself is easier to do from above.
Features of pumping on UAZ
Problems in pumping the clutch of a UAZ car are caused especially by the design of the hydraulic drive.
The main difficulties, as a rule, arise in removing air from the main cylinder.
The essence of the problem is that when you press the clutch pedal, the pressure from the rod is transferred to the piston in the master cylinder. The latter, shifting, presses on the hydraulic (brake) fluid, which goes under pressure into the working cylinder.
When the piston moves, there is an empty air-filled cavity behind it (when the cylinder is not pumped).
During pumping, this air circulates from one cavity of the cylinder to another, thereby slowing down and complicating the process of eliminating inspiration, and sometimes even making it impossible.
To solve the problem, remove the master cylinder and disassemble it (for this you will need a 32-mm open-end wrench).
Press the rod, thereby displacing the piston, and use a syringe to inject brake fluid into the latter.
Do the same with the working container, but through the end hole.
Then we assemble everything and bleed the system.
To speed up the process, using any pressure source (compressor, pump, chamber), we create pressure through the hole in the tank lid.
Folding towbar: principle of operation, car models
- UAZ Patriot;
- VAZ 2106;
- Chevrolet Lacetti;
- Chevrolet Niva;
- Gazelle;
- KAMAZ;
- Deo Nexia;
- Renault Logan;
- Audi 80;
- Skoda Octavia;
- Renault Duster, etc.
There is absolutely nothing scary about pumping. You can do everything right if you follow the instructions and also rely on the owner's manual for your specific vehicle.
First of all, you will need to prepare a certain set of tools and necessary materials. Yes, everything can be done in absolutely field conditions, but it is better to choose a garage for pumping.
You will have to buy what you need for pumping in small ways. The procedure is not expensive for any car, regardless of its market value. But you still have to make some purchases if you don’t have what you need in your garage.
Let's start the preparatory stage. Tools and materials used:
Why do you bleed the clutch?
The purpose of bleeding is to eliminate air pockets in the system and ensure its performance. To understand the relevance of the process, it is important to know its design features and connection options with the pedal installed inside the machine.
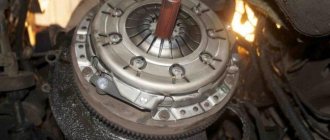
The mechanism includes a number of main components, such as a basket, release bearing, friction linings and others. But the main function is assumed by the hydraulic drive, which ensures the operation of the mechanism.
In the compartment along with the engine there is a special container with brake fluid, which is used to operate the brakes/clutch.
In a number of models, these systems operate separately from each other, and each of them has its own capacity.
The main cylinder is used to create the required pressure.
The very principle of operation of the clutch, built on a hydraulic drive, works as follows:
- Activation of the clutch pedal in the cabin.
- Transmission of force using traction to the hydraulic unit.
- Creating pressure of the working fluid on the main cylinder.
- Pushing out the working cylinder and fork associated with the release bearing.
- Sliding the disks apart and providing the ability to turn on the speed.
- Release the pedal.
- Reducing the pressure in the system and returning the disks to their working position.
- Squeezing excess fluid from the slave/master cylinder back into the reservoir.
If the system works correctly, everything goes quickly and without problems. But if there is air, difficulties arise, including with the subsequent inclusion of speed. That's why you can't do without bleeding the clutch.
Materials and tools
We have already worked with you to restore the battery, understand the issues of engine decarbonization, and even repair the windshield washer motor. And do you really think that after all this you won’t be able to cope with bleeding the clutch?! Everything will work out. Rest assured.
Similar operations can be carried out on any machines, regardless of their price and manufacturer. But more often, owners of domestic and inexpensive imported cars, such as:
When to bleed the clutch
Bleeding the hydraulic clutch system is recommended in the following situations.
Removing old fluid and adding new fluid
During operation, the working composition loses quality and needs to be replaced.
The declared shelf life of the brake fluid used in the clutch circuit is one or two years, depending on the storage location (plastic or metal container).
This means that it can lose its qualities even without being poured into the system.
As for the service life in the car itself, here you need to focus on the recommendations of the vehicle manufacturer; as a rule, this is two years.
Airiness of the system
As noted, air entering the system can have negative consequences on clutch performance. The problem may arise during the process of repairing the unit, replacing the fluid, or due to mechanical failures.
In the latter case, the cause may be damage to the tubes, poor tightening of connections, wear of oil seals / cuffs in the main / working cylinders, etc.
Repair
During operation, the vehicle's clutch system tends to wear out, which is why it needs repairs. It may touch cuffs, seals, cylinders, tubes, etc.
When performing such measures, the system depressurizes and air pockets appear in it. They require removal by pumping.
Precautionary measures
Clutch diagram
When performing work, use hand protection. The easiest way is to wear medical gloves. The composition of brake fluid can damage the skin of your hands, as well as paint, rubber coatings and plastic in exposed areas of the car. Make sure your tools are clean. The system should be free of dirt, dust, metal shavings, and the like. If you are working with a previously used hose and syringe, rinse them as much as possible. Wipe the wrench that you will use to unscrew the fitting valve. Many expansion tanks have a fine mesh around the neck to automatically prevent dirt from entering the system.
Signs of airiness in the system
It is important to recognize the presence of air in the clutch in a timely manner; this can be done by the following characteristic signs:
- Pressing the clutch pedal too lightly. In this case, the speed is turned on normally or with the need to create additional force, with obvious vibration/crunching. Sometimes there is a strong blow to the hand. After the pedal is activated again, everything turns on without problems.
- The clutch is released easily, but it is no longer possible to change gear.
- The pedal does not return to its original position after being pressed. In this case, the cause may be a breakdown of the return spring, for example, its damage. But another situation is also possible, when there is air in the liquid. When pressed, it comes out and the pedal continues to fall, although previously it seemed that it was pressed all the way.
- Increasing fluid level in the tank. If the workforce has always been at the same level or gradually decreased, this is not a problem. If the opposite situation occurs and the level increases, this indicates the appearance of air and the need for pumping.
Also note that clearly darkened liquid in the tank indicates that one, or maybe several cuffs in the system, are working at the limit and there may soon be problems with air in the system.
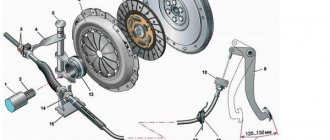
Briefly about the design of the unit
The clutch mechanism consists of the following elements:
- pedal located under the driver’s left foot;
- master cylinder with piston and expansion tank for fluid;
- a working cylinder mechanically connected to the release bearing lever;
- connecting line.
The pedal is directly connected to the master cylinder rod. When pressed, the piston pushes the brake fluid into the line, transmitting force through it to the drive of the working cylinder. He turns the lever, the bearing presses the petals of the basket, causing the driven clutch disc to move away from the driving one.
Over time, the parts and seals of the assembly wear out, and the brake fluid becomes saturated with moisture. The efficiency of the unit decreases, leaks occur, and air penetrates into the system. Since the gases are compressed, the resulting air lock prevents the working fluid from pressing the clutch. As a result, the engine crankshaft is constantly connected to the gearbox, and it is impossible to engage any speed.
Performing the procedure without an assistant
If necessary, you can bleed the hydraulic clutch yourself using a homemade device. You will need a small car compressor, a second cap from the expansion tank and a valve for tubeless tires (sold in car stores).
Carry out the repair work and start pumping according to the instructions:
- Make a hole in the lid of the container and install a valve there. Screw on the product instead of the standard plug.
- Fill the reservoir with as much liquid as possible and connect the compressor hose. Turn on the unit for literally half a second so that the pressure in the circuit rises to 0.5 Bar. There is no need to pump harder.
- Go down into the ditch and perform the manipulations to drain the working environment, as described in the previous section.
- Go upstairs, pump up the pressure again and drain some of the air-saturated “brake fluid”. Make sure there are no bubbles at all.