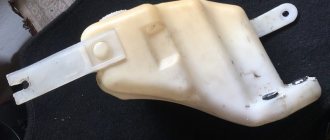
VAZ 2109 cars use a liquid cooling system, which includes a block jacket, a liquid pump (pump), pipes, an expansion tank, a thermostat, a temperature sensor and two radiators - the main one and the interior heating system.
Although this system performs a serious function - maintaining the optimal temperature regime of the power plant, all elements are structurally quite simple.
One of the most common problems with this system is bursting or jumping of pipes and radiator leaks. Less often, but it also happens that the thermostat gets stuck in one position, the temperature sensor malfunctions, and the pump fails.
What is a pump
A water pump unit responsible for removing heat from the engine using antifreeze. It is also called a centrifugal pump. If a car can use an injector or fuel injection is carried out by a carburetor, then the pump is always the same in design. With the help of this unit, coolant circulates through the system, removing heat from the vehicle's power plant to the radiator, which is responsible for cooling.
The pump must be changed after every 90,000 kilometers. This way you will have less trouble with the engine of your vehicle. VAZ-2109 models are no longer produced today, so they are all older than seven years, so you need to take care of the car more carefully. Their timing belt is changed after 45,000 kilometers, and the pump should be changed after one installation.
It is convenient to replace the pump when installing a new timing belt, since this pump is located in a casing under the camshaft gear.
Necessary equipment
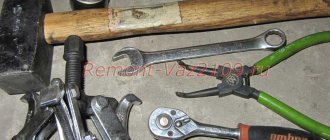
To carry out the work of replacing the liquid pump on a VAZ-2109, not much equipment will be required. All you need to have is:
- Open-end and ring wrenches for “10” and “17”;
- Heads with collars of the same sizes;
- Powerful flat screwdriver;
- Knife;
- Container for draining working fluid;
- Rags;
- Sealant;
- Jack;
- New liquid pump and gasket;
It is also better to carry out all work in the garage. Having collected the necessary tools and purchased a new pump, you can begin the replacement.
Where is the VAZ 2109 pump located?
An automobile pump consists of a metal cast body, which is made of aluminum or cast iron, a moving shaft, bearings and an impeller . The tightness of the unit is ensured by a special seal. Under the action of rotation of the impeller, pressure is created in the mechanism, pushing out the antifreeze, which does its useful work by heating up in the channels of the cooling system and cooling in the radiator to again enter the engine cooling jacket. This process is regulated by a special device - a thermostat.
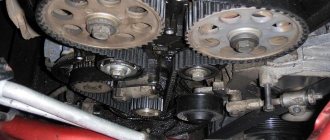
The pump is located under the timing housing, slightly below the camshaft gear.
Assembly Features
When installing the drive belt, you must again make sure that all the marks match, otherwise the gas distribution and ignition system will be disrupted. After installing the tension roller back, it is important to properly tension the belt.
If the car does not start after complete assembly or starts poorly, it means that the belt on the camshaft gear is misaligned by one tooth . To eliminate such a malfunction, you will have to remove the belt from the gear again, turn the gear a little so that it moves relative to the belt by one tooth, and then put the belt back.
The operation of replacing the liquid pump is shown more clearly in the video:
Loading …
Replacing the water pump (Pump) on VAZ 2108, VAZ 2109, VAZ 21099
Welcome! Pump - people called it that, in fact it is a water pump thanks to which the coolant (Let's call it coolant for short) runs through the cooling system and cools the engine. If the pump fails, the liquid will not stop circulating, but a small nuance will appear, it will ring and all this will happen until you change the pump on the car, but if you ignore this sound and continue to drive with it, then soon the pump bearing (When it wears out and this characteristic sound appears) it will simply jam and it will suddenly become stuck (this will, of course, happen when the engine is running), and since the pump is connected by a timing mechanism, the belt will break (If the valves on your car bend, then get ready for expensive repairs).
Note! To replace the water pump, stock up on a number of tools in advance, namely: All kinds of wrenches, screwdrivers, well, empty containers for draining coolant from the car engine, if possible, also stock up on a new good tension roller, because it will still be removed and if it has been in place for a long time yours hasn’t changed and it’s starting to jam, then put a new, working roller in its place!
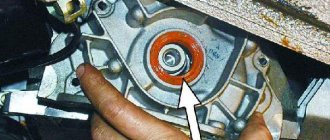
Where is the water pump located? It is hidden under the timing cover (see small photo, it is indicated by a blue arrow), of course you will have to remove it to see the water pump, and even more so, in order to change it, it can be removed very easily, it will be enough to just unscrew three small bolts that on the sides (There are two nuts) and in the middle (There is one nut), attach the cover, and when it is removed, immediately find the water pump (Indicated by the red arrow) and proceed to check it (Read below about how to check it).
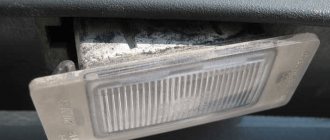
When should you replace your water pump? If you hear extraneous sounds in the engine, then first of all understand where they are coming from, for this, of course, you will have to open the hood and listen, if the sounds are heard through the timing mechanism cover, then first of all turn off the engine (This is a must, otherwise you will hit the pulleys with the cover ) and remove this cover, when it is removed, start the car and listen, if the sound comes from the water pump, it means the bearing has failed and the water pump needs to be replaced, then turn off the engine and pump the pump (its pulley) with your hands. , it shouldn’t have any play, it should stand firmly, if it does, then the pump needs to be replaced (By the way, this play can be treated by tightening the locking screw located on the pump, see the photo under number 2 for more details), and finally, the drainage hole inspect (see photo 1, it is indicated by an arrow) not a drop of coolant should flow through it; if it suddenly flows, then again the pump is not working properly and it must be replaced with a new one.
Note! When the timing belt is removed from the upper pulleys, do not under any circumstances turn the pulleys, otherwise you will disrupt the valve timing (In principle, you can install them, but it’s better not to touch them, but they are placed according to marks, you will learn more about these marks when you read one of the articles to which a link is given in this article), well, even if the valve timing can be set again, this does not mean that the pulley can still be turned, there are simply some engines (They were installed on nines) that bend the valves, so if If you sharply turn the pulley on the removed timing belt, the valves will be slightly deformed, and this will cost a lot of money!
We recommend: How to remove the window regulator on a Priora
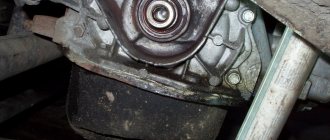
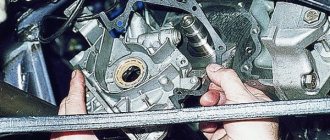
Removal: The pump is not easy to change, but if you have the skill, then everything is simple, if you don’t have it, then most likely you will be replacing it more than once, in general, let’s start by first removing the minus terminal and then draining the coolant from the engine (How to drain liquid, read the article: “Replacing the coolant on a VAZ”, and about how to remove the minus terminal, read the article: “Replacing the battery on a car”), when this operation is done, remove the timing belt from the tension roller and then the roller from the car (You will find how to remove the roller in the article entitled: “Replacing the tension roller”), then remove the camshaft gear (How to do this, read “here”) and unscrew several bolts and nuts (There are about five of them, all of them on the photos below are shown) that secure the back cover and then separate it from the base so that there is access to the pump (there is no other way to remove it), and as soon as access appears, use a screwdriver to remove the pump by picking up its pulley as shown in the small photo .
Note! If the pump comes out, but the body gets in the way or something else (you can’t remove it completely, for example), then in this case ask an assistant to move the engine a little, to do this, just let him grab a convenient place (It must be made of metal ) and using force, tilt the engine in the desired direction, and at this time you pull the pump out of the hole in the car engine!
Installation: The new pump is installed in the reverse order of removal, before you buy it, be sure to compare the markings with the old one, we recommend that you take exactly the same one and don’t forget about the gasket that is between the pump and the engine (see small photo), be sure to look at that the place where the pump was adjacent to the engine, if there are pieces of this gasket left there, then you can scrape them off with a screwdriver and buy a new gasket, putting it on the pump instead of the old one.
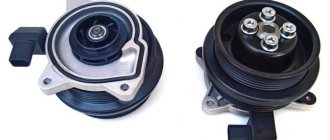
Note! When you buy a pump, we recommend taking one with an impeller made not of plastic but of metal, look at the top photo in this article, it clearly shows the impeller and you can clearly see that it is made of metal, and by the way, if you suddenly notice that the impeller has changed its color (For example, it has started to rust), then in this case, replace the pump with a new one. When installing, keep in mind that the marking should be directed upward (see photo 1), and the camshaft pulley must be installed with the protruding part towards the car engine (see photo 2) , well, after that, align everything according to the marks, tighten the timing belt (it is tensioned with a tension roller) and pour coolant into the car engine!
- First you need to set the first cylinder to the top dead center position of the compression stroke;
- Unscrew and remove the front timing cover;
- The generator drive belt is removed;
- Unscrew the tension roller;
- Remove the timing belt and camshaft pulley;
- The back cover is secured with a nut and 4 screws. They are unscrewed and the cover is removed;
- The pump is pryed up with a slotted screwdriver and pulled out from its seat;
- The gasket is removed from the pump. It is recommended to replace it regardless of the condition.
- Natural wear and tear. Like any other part, the water pump has its own resource. This figure is usually estimated at 70,000 kilometers;
- Operating the engine at extreme conditions. The pump is driven by the crankshaft. Accordingly, the number of revolutions directly depends on the engine. Those who like to drive at high speeds wear out the pump bearing much faster. If you want to change the pump less often, then it makes sense to stick to a more relaxed driving style;
- Cooling system contamination. During engine operation, salts and rust are deposited in its coolant passages. The same applies to the pump. There were cases when the pump was simply clogged with various dirt and it could not cope with the job. This caused the bearing to break. Also, if the system is clogged, the operation of the pump becomes more difficult, which can lead to problems. To avoid problems, periodically flush the cooling system.
When should you change the oil pump? If the oil pump malfunctions, the following occurs:
• Firstly, the oil pressure in the system decreases, which is indicated by the oil pressure light.
• And secondly, oil consumption in the system will most likely also increase, which will lead to constant addition of engine oil to the engine.
How to replace the oil pump, also known as the oil pump, on a VAZ 2108-VAZ 21099?
Note! Before you get started, stock up on the following list of tools: a set of basic wrenches, sockets, universal joints, and lastly, an extension cord will come in handy!
Removal: 1) First, if you do not have a carburetor but an injection car, then remove the crankshaft position sensor from its engine. (How to remove the sensor, see the article: “Replacing the crankshaft position sensor”)
2) Then drain all the engine oil in the car engine. (How to drain the oil, see the article: “Changing engine oil”)
3) After draining the oil, remove the crankshaft timing belt. (How to remove the timing pulley, read the article: “Replacing the front crankshaft oil seal”, in paragraphs “1-4”)
4) Next, you will need to remove the oil pan and then unscrew several bolts securing the oil receiver, and after unscrewing the bolts, remove the oil receiver from the car. (You can learn how to remove the pan and how to remove the oil receiver from the article: “Replacing the oil receiver on a VAZ”)
Note! There are flat washers under the bolts that secure the oil pump, so unscrew the bolts carefully without losing them!
We recommend: Effective measures to eliminate problems of poor operation of the stove on a VAZ-2114
6) Now, using a thick screwdriver, slightly move the oil pump, inserting it between the main bearing and between the oil pump itself.
7) And as a result, carefully remove the oil pump from the crankshaft.
Installation: 1) Before installing a new oil pump, be sure to remember an important thing: when installing it, the drive gear that is located on it must be turned in this way... (Continued in point “2”)
2) So that it matches the flats that are present on the crankshaft.
3) To install the oil pump, first lubricate the working edge of the crankshaft front oil seal with engine oil.
4) After lubricating the oil seal lip, install the new oil pump on the crankshaft. During installation, carefully, using a wooden stick or the blunt part of a pencil, tuck the working edge of the oil seal inside, and then tighten all six bolts that secure the oil pump.
5) Next, install all the parts that were removed earlier in the reverse order of removal.
Important! When the “Gas Timing Mechanism” belt is removed, try not to rotate the crankshaft and camshaft, otherwise, when turning sharply, the pistons may hit the valves and, as a result, deformation of one or more valves may occur!
When do you need to change timing rollers?
Most motorists cannot determine in time that the timing belt rollers need to be replaced. It's not the motorists' fault. After all, most of them are accustomed to the fact that the on-board computer informs the driver about the need to replace consumables. It processes data received from various sensors. If necessary, displays a corresponding notification on the dashboard.
In most foreign cars, it is the on-board computer systems that monitor the general condition of the engine. But in this case, the car owner will have to monitor the technical condition of the consumables. The VAZ 2109 does not provide any kind of on-board computer. Everything is the old fashioned way here!
Therefore, you should listen to experienced owners of a car of this model! They recommend replacing rollers when the following symptoms appear:
- When the engine starts, a whistle is heard, after which the smell of melted rubber may come from under the engine compartment shield.
- At high engine speeds, a sharp drop in speed may occur. In ordinary cars, this may indicate some kind of malfunction in the gearbox. However, in the VAZ 2109, this indicates an idle rotation of the rollers, during which the shaft rotation speed drops.
- While driving, a metal grinding sound is heard from under the hood. This happens because the rollers are jammed. As a rule, this happens when they are over-tensioned, or the spacer rings and washers are worn out. In this case, you will also have to replace the rollers, since if such parts are damaged, the roller itself is damaged. Therefore, you will have to replace them with a set. There is an important thing to consider here: additional timing roller parts are not sold separately. They can only be purchased complete with a set of rollers.
- Also something to consider! In the case of an installed modification shield, the motorist will have to spend a much more impressive amount than 3,500 - 8,000 rubles.
- If noise is heard when the engine is running, and when removing the protective casing, the owner sees that when the engine is running, the belt moves not only in a circle, but to the sides along with the roller, then an urgent replacement is necessary.
- If you hear a squeaking sound when starting the engine, then most likely the cause will be either excessive tension on the rollers or damage to their bearings. In this case, it is necessary to urgently remove and check. If during inspection it is discovered that the bearing moves with play, or lubricant is leaking from it, then it must be replaced. Fortunately, the cost of bearings varies from 145 rubles to 356 rubles.
- If, when inspecting the engine, oil smudges are found on the belt, it means either the bearing is leaking or the attachment rings have ruptured. As a result, lubricant from the roller bushings got onto the belt.
We recommend: Lada Vesta head unit - price, replacement, connection and pinout
Don't be lazy, in this case it is best to carry out a detailed inspection of the rollers, belt, shaft gear, generator gear. It will take about 30 minutes and can save you up to 50,000 rubles. Since ignoring problems with the timing system can completely damage the engine.
The cost of restoration work on the model 2109 engine varies from 45,000 rubles to 78,000 rubles.
modified timing shield
regular timing belt
option of a modified timing system panel
There are also cases of installing a special double chain instead of a rubberized belt. As a rule, for the operation of this type of system, the installation of a turbine is necessary. Otherwise, it will not have enough power to rotate the chain. Since the chain requires 0.56 times more power to operate than a standard engine produces.
As you can see, the modified timing shield is slightly wider than the usual one. This change in design is due to the presence of an additional number of timing belt tension rollers. As a result, the size of the shield increases.
The modified shield is installed in the form of an overhead panel on the engine. In this case, all gears are removed. Their bushings are inserted into special grooves on the panel. Then the gears return to their place. The panel itself is fixed with 5-8 bolts, depending on the model.
To avoid serious problems and any malfunctions in the engine, you should replace the rollers on the VAZ 2109 in a timely manner. The manufacturer recommends updating these consumables at intervals of 40,000 - 50,000 kilometers.
The actual condition of the rollers must be checked every 19,500 kilometers.
Compliance with intervals:
- checks;
- replacements.
Allows you to extend:
- timing belt service life;
- the operation of the entire engine as a whole.
It is worth considering the following things that affect the wear of timing rollers:
- use of low-quality bearings;
- the car owner uses rollers from one manufacturer and bearings from another;
- use of low-quality lubricant for roller bushings;
- excessive tension on the rollers, as a result of which excessive pressure is exerted on them - this can lead to their breakage;
- use of parts made from low-quality materials.
Signs of pump wear
As for the latter, the main problems with the pump are leakage of working fluid from under the housing and severe wear of the bearing.
And if the presence of leaks only affects the fluid level, in the presence of such a malfunction you will have to constantly monitor the fluid level and periodically top it up. Moreover, over time the leak will increase.
But bearing wear can lead to more serious consequences. With slight wear, at first there will only be increased noise. If you do not pay attention immediately, wear will quickly increase until the bearing fails. In this case, the pump will jam and a strong grinding noise will appear. All this can lead to rupture of the drive belt and damage to the valves.
The design of the pump is such that it is non-repairable, and if any malfunction occurs, it must be replaced.
A positive fact in the design of the power plant of this car is that this element is external equipment, so replacing the VAZ-2109 pump is not a particularly complicated operation and does not require significant disassembly of the engine. Almost no other elements of the power unit, for example, a carburetor or generator, are affected.
Resource
The pump does not seem to be a consumable, but still it is also subject to periodic replacement. But unlike consumables, it does not have a specific resource.
One pump can run 100 thousand km, but the other won’t reach 20 thousand km. It all depends on the quality of manufacture of the part itself, as well as on the correctness and frequency of maintenance, namely, checking and adjusting the tension of the timing belt.
An overtightened belt can shorten the life of the pump, significantly.
Reasons for failure
A centrifugal pump does not always survive until scheduled replacement, since there are many other reasons for its failure. First of all, the malfunction is a decrease in the level of antifreeze in the system, which often happens when the oil seal is damaged. The reasons for this may be the following:
- sudden changes in temperature;
- contamination, for example, liquid dirt that accidentally gets under the hood;
- rare changes of antifreeze (it may contain a lot of oil and combustion products);
It is possible to detect oil seal leaks by characteristic leaks that are visible during external inspection. If you notice a knocking sound from this unit, this may indicate bearing failure. With this symptom, it is necessary to immediately replace the VAZ-2109 pump, since driving such a car can lead to jamming of the pump or displacement of its shaft.
The following signs may indicate that the pump is faulty:
- traces of antifreeze on the ground after parking the car;
- Howling sounds are heard while the engine is running;
- engine overheating (usually this happens due to rotor failure).
If you are not sure whether to replace the pump, it is advisable to feel the upper hose going to the radiator. If it is warm, then it is necessary to urgently replace the failed part.
When you change the timing hose, remove the casing from the unit and inspect it for integrity. In some cases, the water pump fails due to defects or cracks in the housing.
Methods for checking device status
Checking the condition and presence of a pump malfunction can be done using several methods:
- The first hose, which is located near the radiator, is compressed when the engine is heated to the desired temperature. If the device is working properly, you will notice shocks of the coolant. However, it should be remembered that when doing such a check, you should be very careful, since there is a possibility of touching the fan wings in the cooling system device and injuring your hand.
- If a breakdown of individual bearings on the pump shaft suddenly occurs, then such a problem can be noticed during operation. A long hum will be heard from the front of the engine. To find out the degree of bearing wear, you should check the shaft play when swinging the drive star at the pump.
- If the oil seal deteriorates during operation, liquid oozing from a special test valve or hole will be noticeable. In this case, you need to remove the timing cover and look at this hole. If there are brownish smudges and deposits near the valve, the seal must be replaced. This operation is quite simple, but, nevertheless, it is very important for the operation of the entire system.
- If there are no visible signs, this does not mean that there are no problems. In any case, you must remove the device. This procedure is carried out specifically for external visual inspection and inspection of the unit. It often happens that there is large damage on the back side of the rotor due to corrosion of the blades. This problem significantly degrades the operation of the node.
Return to contents
Signs that the water pump needs to be replaced
The most vulnerable point of a centrifugal pump is the oil seal - the same sealing part that prevents antifreeze from leaking . Over time, the seal wears out and leakage becomes inevitable. There are enough reasons for the oil seal to wear out: these are wild temperature changes, and the ingress of pollution from outside under the hood of the car, plus antifreeze always absorbs some of the combustion products of fuel and engine oil. Such an aggressive environment cannot but affect the tightness of the VAZ-2109 pump.
Water pump bearings often become unusable. At such moments, a characteristic knock appears under the hood of the car. If you do not resort to “surgical” intervention in the engine compartment, it is not far from jamming or distortion of the pump shaft.
We can briefly list the following symptoms of a malfunctioning centrifugal pump:
- Coolant leak.
- Howling sounds that appear when the engine is running.
- In critical situations, if the problem goes unnoticed after the first two signs, the motor may overheat, especially when the pump rotor is damaged.
Timing and frequency
According to the regulations for carrying out technical work, on the VAZ 2114 the procedure for replacing the timing belt and rollers should be carried out every 120 thousand kilometers. However, in reality this deadline usually comes earlier. Many car enthusiasts advise preparing for replacement after 90 thousand kilometers. Do not forget about regular inspection of the components of the gas distribution system. If you notice the slightest problem, the defective components should be replaced immediately. Failure to promptly replace faulty parasitic rollers will sooner or later lead to a broken timing belt. During a break, desynchronization of the valves and piston occurs, which leads to breakdowns and deformation of these components.
Replacing the water pump (Pump) on VAZ 2108, VAZ 2109, VAZ 21099
Welcome! Pump - people called it that, in fact it is a water pump thanks to which the coolant (Let's call it coolant for short) runs through the cooling system and cools the engine. If the pump fails, the liquid will not stop circulating, but a small nuance will appear, it will ring and all this will happen until you change the pump on the car, but if you ignore this sound and continue to drive with it, then soon the pump bearing (When it wears out and this characteristic sound appears) it will simply jam and it will suddenly become stuck (this will, of course, happen when the engine is running), and since the pump is connected by a timing mechanism, the belt will break (If the valves on your car bend, then get ready for expensive repairs).
Note! To replace the water pump, stock up on a number of tools in advance, namely: All kinds of wrenches, screwdrivers, well, empty containers for draining coolant from the car engine, if possible, also stock up on a new good tension roller, because it will still be removed and if it has been in place for a long time yours hasn’t changed and it’s starting to jam, then put a new, working roller in its place!
We recommend: Runflat tires: what are they and what are their features
Where is the water pump located? It is hidden under the timing cover (see small photo, it is indicated by a blue arrow), of course you will have to remove it to see the water pump, and even more so, in order to change it, it can be removed very easily, it will be enough to just unscrew three small bolts that on the sides (There are two nuts) and in the middle (There is one nut), attach the cover, and when it is removed, immediately find the water pump (Indicated by the red arrow) and proceed to check it (Read below about how to check it).
When should you replace your water pump? If you hear extraneous sounds in the engine, then first of all understand where they are coming from, to do this, of course, you will have to open the hood and listen, if the sounds are heard through the timing mechanism cover, then first of all turn off the engine (This is necessary, otherwise you will hit the pulleys with the cover ) and remove this cover, when it is removed, start the car and listen, if the sound comes from the water pump, it means the bearing has failed and the water pump needs to be replaced, then turn off the engine and pump the pump (its pulley) with your hands. , it shouldn’t have any play, it should stand firmly, if it does, then the pump needs to be replaced (By the way, this play can be treated by tightening the locking screw located on the pump, see the photo under number 2 for more details), and finally, the drainage hole inspect (see photo 1, it is indicated by an arrow) not a drop of coolant should flow through it; if it suddenly flows, then again the pump is faulty and must be replaced with a new one.
How to replace the water pump on a VAZ 2108-VAZ 21099?
Note! When the timing belt is removed from the upper pulleys, do not under any circumstances turn the pulleys, otherwise you will disrupt the valve timing (In principle, you can install them, but it’s better not to touch them, but they are placed according to marks, you will learn more about these marks when you read one of the articles to which a link is given in this article), well, even if the valve timing can be set again, this does not mean that the pulley can still be turned, there are simply some engines (They were installed on nines) that bend the valves, so if If you sharply turn the pulley on the removed timing belt, the valves will be slightly deformed, and this will cost a lot of money!
Removal: The pump is not easy to change, but if you have the skill, then everything is simple, if you don’t have it, then most likely you will be replacing it more than once, in general, let’s start by first removing the minus terminal and then draining the coolant from the engine (How to drain fluid, read the article: “Replacing the coolant on a VAZ”, and about how to remove the minus terminal, read the article: “Replacing the battery on a car”), when this operation is done, remove the timing belt from the tension roller and then itself roller from the car (How to remove the roller, you will find in the article entitled: “Replacing the tension roller”), then remove the camshaft gear (How to do this, read “here”) and unscrew several bolts and nuts (There are about five of them, all of them on the photos below are shown) that secure the back cover and then separate it from the base so that there is access to the pump (there is no other way to remove it), and as soon as access appears, use a screwdriver to remove the pump by picking up its pulley as shown in the small photo .
Note! If the pump comes out, but the body gets in the way or something else (you can’t remove it completely, for example), then in this case ask an assistant to move the engine a little, to do this, just let him grab a convenient place (It must be made of metal ) and using force, tilt the engine in the desired direction, and at this time you pull the pump out of the hole in the car engine!
Installation: The new pump is installed in the reverse order of removal, before you buy it, be sure to compare the markings with the old one, we recommend that you take exactly the same one and don’t forget about the gasket that is between the pump and the engine (see small photo), be sure to look at that the place where the pump was adjacent to the engine, if there are pieces of this gasket left there, then you can scrape them off with a screwdriver and buy a new gasket, putting it on the pump instead of the old one.
Note! When you buy a pump, we recommend taking one with an impeller made not of plastic but of metal, look at the top photo in this article, it clearly shows the impeller and you can clearly see that it is made of metal, and by the way, if you suddenly notice that the impeller has changed its color (For example, it has started to rust), then in this case, replace the pump with a new one. When installing, keep in mind that the marking should be directed upward (see photo 1), and the camshaft pulley must be installed with the protruding part towards the car engine (see photo 2) , well, after that, align everything according to the marks, tighten the timing belt (it is tensioned with a tension roller) and pour coolant into the car engine!
Replacing the unit: procedure
Replacing a VAZ 21099 pump requires a number of special preparatory manipulations. All actions should be started only when the car engine has cooled down to the optimal temperature. Basically the progress of the work is as follows:
- the first step is to disconnect the negative cable from the battery;
- remove the cooling liquid, and if the procedure for replacing the liquid was carried out not so long ago, then after changing the pump the drained liquid can be reused;
- then all drive belts are removed;
- the next step depends on the engine specification: on a SOHC type mechanism, be sure to block the pump pulley using a special strap wrench, then unscrew the 4 mounting bolts, the timing belt flaps and the inner pulley;
- on a DOHC engine, you first need to remove the special roller bracket for the belt in the drive, then remove the timing plugs and the tensioner cover for the main chain, then turn the crankshaft counterclockwise to loosen the chains on the pump sprockets;
- remove the mounting bolts and remove the pump from the device, then inspect the blades for corrosion;
- clean the bolt holes, remove all debris, corrosion residues, and, if necessary, restore the threads;
- select a new pump strictly according to the required standard sizes;
- remove dirt and outdated dried sealant from all mating surfaces of the engine block, and wipe the entire surface with a rag soaked in gasoline or acetone;
- Apply a new, specially selected sealant or rubber O-ring.
Now the problem with removing and replacing the VAZ pump from a car has been solved.
The newly purchased device should be installed very carefully in the right place. All mounting bolts are inserted and tightened without the use of tools and are lightly treated with sealant. Be sure to pay attention to the location of the pins. If everything is in its correct place, you can begin tightening. It is worth remembering: if you overtighten the fastening, you can damage the pump. The new mechanism is quite expensive, so keep an eye on this point.
After completing the procedure for replacing the VAZ pump, you can proceed to assembling the remaining components in exactly the reverse order. Next, add coolant to the required level into the vehicle’s cooling system. When the replacement of the VAZ pump is completed, you can start the updated engine and carefully check for possible leaks.
Source
Preparatory activities
First of all:
- position the car in a place convenient for you and be sure to set the handbrake;
- make sure the gear lever is in neutral;
- If the machine has been used recently, wait until its power unit has cooled down.
Next, drain the coolant from the system. For this:
- move the heater adjustment lever to the right until it stops;
- remove the ignition mechanism with the bracket holding it;
- in the engine compartment, unscrew the coolant reservoir cap;
- find the drain hole (it is located at the bottom of the cylinder block);
- place the container;
- remove the plug;
- wait until the antifreeze has completely drained out;
- Wipe the engine dry if liquid gets on it.
An important point is that when the coolant is very dirty, it would be advisable to flush the entire system.
Quick replacement of the pump on a VAZ 2109
If your pump (water pump) is broken and you have no idea how to change it, then we will teach you. Replacing the pump on a VAZ 2109 is not difficult, but first you need to find out whether it really is out of order. It's done like this:
- start the engine and warm it up to operating temperature;
- compress the upper radiator hose.
If you feel that the water is circulating, it means the pump is intact. If not, then it’s broken.
It often happens that there is no need to change the entire pump; you can get by with changing the seal. And to find out if the oil seal is okay, you need to do the following:
- find the control and ventilation hole of the pump;
- look at it.
If liquid leaks from there, then the seal is worn out. You can verify this by removing the GPM cover and performing a more thorough inspection. If brown deposits have formed around the hole, then our assumption turned out to be correct.
Well, if while driving you hear howling sounds or the pump rattles and jams, and a visual inspection does not reveal any defects in the pump, then you will still have to remove it. It is possible that defects have appeared on the side of the rotor that is not visible.