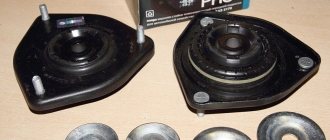
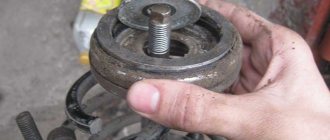
The support bearing serves to absorb and distribute shock loads coming from the wheel through the shock absorber strut to the car body. It is the main working element of the upper support of the front shock absorber, designed to connect the body and the strut.
The design of the “support” is a bearing consisting of a rubber cage with metal balls placed in it, and two thick rubber gaskets that protect it from above and below.
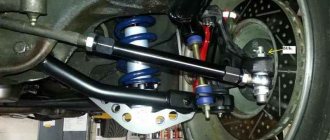
In Lada Priora cars, support bearings are installed in the “cups” of the front shock absorbers, located in the engine compartment above each of the wheels.
Do-it-yourself replacement of the front strut support bearing on a Priora
Even experienced motorists sometimes do not immediately determine the causes of knocking from the front pillars. The noise is heard under the hood while driving and when turning. There is also a knocking sound in the shock absorber springs. Car control deteriorates, and noticeable play appears at the steering wheel.
The reason for these problems is most likely that the support bearing of the Priora front strut is faulty . The part itself is installed between the support cups; inside there are also rubber gaskets - vibration and noise insulators, which also wear out. “Priorka” is an unpretentious car, but failure of the “support” still happens from time to time.
If the front support bearings of a Priora (Kalina, 2110, 2112, 2111) are knocking, it’s worth doing diagnostics and replacement.
How to check the support bearing on a Priora
Some causes of car malfunction:
- expiration of service life (mileage has exceeded 70 thousand km);
- excess axial loads on the racks (careless driving, accidents);
- moisture and dust getting under the hood.
To do this, do the following:
- Raise the hood.
- Locate and remove the protective cover of the upper support cup.
- Start rocking the car body from bottom to top, while keeping your palm on the cup.
- If you feel a knocking noise with your hand or hear grinding and rattling noises, you probably need to replace the bearing.
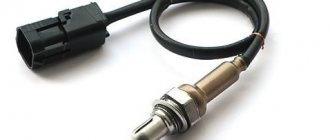
Separate support bearing VBF for Priora, Kalina
Kit with upper front support housing
How and with what to lubricate the support bearing?
Of the wide variety of lubricants for support bearings, greases are used. Due to their viscous consistency, they are easy to place in horizontal and inclined units. When choosing, give preference to waterproof lubricants. The proven and inexpensive LITOL-24 is perfect. If there are no protective covers, then after you completely fill the bearing with grease, cover it with an additional layer. Then dust and dirt will fall on the top layer of lubricant and will not enter the bearing.
Support bearing for Priora - which one is better
The support bearing is a part of the upper support that ensures the rack rotates along the axis while the car is turning. This part is an important element in the front chassis, the choice of which should be taken with care.
Reliable products are produced by SKF, as well as a number of Russian bearing factories. We list the main manufacturers, catalog numbers and prices of support bearings for Priora:
Recommended journal bearing manufacturers, numbers and prices
| No. | Manufacturer, country | Catalog number | Price, rubles |
| 1 | SKF, Sweden | VKD 35032 | 800 |
| 2 | VBF, Vologda | 1118-2902840 | 650 |
| 3 | SS20, Russia | SS10113 | 1100 |
| 4 | CS 240, trialli | 2190-2902840 | 404 |
| 5 | CJSC Lada-Image" | 390 |
How to replace the front support bearing on a Priora
Before starting the replacement, familiarize yourself with the structure of the front suspension strut, and it is also recommended to watch the video (at the bottom of the article) .
| № | Name | OEM number |
| 1 | Nut M14x1.5 | 21080-2901056-00 |
| 2 | Compression stroke limiter | 21700-2902834-00 |
| 3 | Compression Progress Buffer | 21100-2902816-01 |
| 4 | Rack protective casing | 21700-2902814-00 |
| 5 | Telescopic stand left | 21700-2905003-00 |
| 6 | Upper pillar support | 21700-2902821-04 |
| 7 | Upper pillar support | 21700-2902821-00 |
| 8 | Bolt | 21080-2902830-00 |
| 9 | Bearing | 11180-2902840-01 |
| 10 | Upper spring cup | 21700-2902760-00 |
| 11 | Upper spring insulating gasket | 21700-2902723-00 |
| 12 | Front suspension spring | 21700-2902712-00 |
Preparation for repair
Place the car on a flat surface and provide lighting, engage first gear, it is advisable to also place wheel chocks at the rear, and provide insurance when working with a jack.
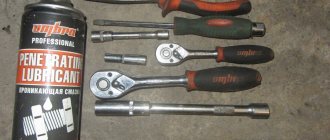
Prepare the required tool:
- new spare parts for replacement.
- a set of keys and a ratchet;
- steering wheel end puller (preferably);
- hammer;
- clamps or spring ties (required);
- jack and vice.
- penetrating lubricant WD-40.
- Torque wrench (optional).
Disassembling the front pillar assembly
- First, remove the rubber cover.
- To unscrew the fastening you will need a special elongated double head for 22, sold for 150 rubles.
- We grab the smaller inner head with a spanner.
- First, loosen the nut (do not unscrew).
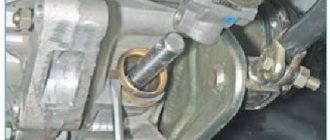
- Moving on to the bottom of the rack, the wheel has already been removed. We treat the fasteners of the secondary knuckle with penetrating lubricant (WD-40), as well as the steering tip bolt. Let's wait for a while.
- We tear off the rack mounting bolts. The process looks like this:
- You can’t unscrew them right away; you’ll have to knock them out at the end. First, unscrew the tip of the ball joint.
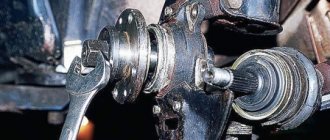
- We loosen it with a spanner, then work with a “ratchet”.
- Next, you will need a special puller, or carefully knock it out with a hammer through a wooden spacer.
- Let's go back to the lower strut bolts. We knock them out carefully with a hammer and a wooden wedge. The fastener on top regulates the wheel alignment - do not confuse it with the bottom one when assembling.
Replacing the VAZ front shock absorber strut support
Source
Types of bearings
There are two design versions of the upper part of the rack:
- The support bearing is included in the support design (can be found on a number of VAZ models);
- It is a separate element that is placed between the support and the upper spring cup.
But there are several support bearings themselves that are used in the suspension design:
- WITH BUILT-IN OUTER OR INNER RING. Its peculiarity lies in the possibility of rotation of elements that are in contact with both the outer and inner rings. Additionally, this option provides installation holes, so no pressure flanges are needed during installation;
- WITH DETACHABLE OUTER OR INNER RING. In this embodiment, one of the rings (depending on the design) can be separated, while the second is fixed to the support;
- SINGLE-SPLIT. Structurally, this option is the same bearing with a detachable ring, but has increased rigidity.
In general, there is no particular difference which type of bearing is used, the main thing is that it performs its functions.
Despite the fact that the upper part of the strut is installed inside a special niche in the wheel arch, dirt, sand and dust penetrate the support, and these contaminants are destructive to any bearing.
Additionally, the support bearing is almost constantly subjected to rapidly changing loads, including shock loads (due to the operation of the spring), which, in combination with contamination, leads to intense wear of the bearing components and its failure.
Due to rather difficult operating conditions, the service life of such a bearing is limited. Many manufacturers indicate that it must be replaced every 100 thousand km.
Replacing struts on a Priora involves using the following tools
- You will need special spring ties to remove the supports from the struts.
- Socket wrenches for 19, 17 and 13.
- Socket wrenches for 22, 19 and 17.
- Steering wheel end remover.
- Hexagon 6.
- Hammer.
- Pliers.
Step-by-step instructions:
Replacing the strut mount starts with jacking up the right side of the car and removing the wheel. The brake hoses are released from the bracket on the rack. Carefully bend the locking pin of the steering tip pin, remove it and, using a 17mm wrench, unscrew the nut. Next, you need to use the steering wheel end remover. Turn the support and begin to unscrew the soured bolts securing the strut towards the steering knuckle. In this case, you may have to use a hammer. Unscrew the nuts securing the support to the body under the hood using a size 13 wrench. Remove the stand as an assembly from the wheel well. You can begin to disassemble the structure. Install the second coils above and below the spring of the spring tie
Pay attention to the symmetrical location of the second tie. Until the load is removed from the pore, we compress the spring. Use a 22 mm spanner to unscrew the nut securing the rod towards the support. We remove the limiters. Remove the spring cup, spring and compression buffer with boot. We inspect the removed rack. Before installing new strut supports, the strut must be bled and then kept in an upright position at all times until it is installed in place. We reassemble the new shock absorber, put on a small washer and a support with a pre-installed bearing
Next comes a large washer and a rod securing nut. We remove the spring ties and orient the support so that the arrow points slightly forward into the body. We return the rack assembly to its place. The support bolts are screwed on, a stand is put on the steering knuckle, an eccentric bolt with a washer is placed in the upper hole, there should be a regular bolt at the bottom and then everything is tightened. Next, the steering tip pin is inserted into the rod on the rack, the nut is tightened, a cotter pin is inserted and the antennae are pulled apart to prevent the nut from unscrewing. Carefully thread the brake hoses into the bracket on the rack. So, the rack installation procedure is completed. Next, the wheel is placed, the car is lowered and the nut securing the rod to the support is finally tightened. To additionally pump the stand, the machine can be rocked slightly from the work side. On the opposite side, the entire procedure is repeated in a similar order. Upon completion, be sure to do a wheel alignment.
In general, the procedure under consideration, like replacing the front struts, is not complicated and can be done independently. If you are not sure about certain points, it is recommended to carry out repair work with a partner
As a result of operating the machine for several days after replacing the supports, the following improvements are observed:
- the suspension becomes more elastic;
- the former laxity is absent;
- no swaying of the car on uneven surfaces;
- turns are better;
- gravel road is much smoother;
- the steering wheel returns faster after a turn;
- more comfortable passage of speed bumps;
- at speed the car becomes more controllable;
It is worth noting that if you are carrying out such repair work for the first time, you should familiarize yourself in detail with all the nuances of the procedure and step-by-step instructions that will help you do everything as correctly as possible. Only in this case will car repair be effective.
Preparing for work
This process is best carried out in the light if we are talking about the street. A bearing is a miniature component. It will be ideal if you drive Priora into the inspection hole. We will disassemble the front hub part, since this is more difficult than carrying out the same operation with the rear hub, especially without removing the strut. And now to the tools:
- Spanners for 17, 19.
- A bearing puller is the main tool, so without it you will have to dismantle the strut and perform a wheel alignment.
- The head is 30, it is desirable that it be equipped with a reliable wrench.
- The frame is usually a homemade tool, which is a cut of a pipe of a certain size. With its help we will knock out the hub.
- WD-40 lubricant.
Lada Priora, like other passenger models of this brand, is a front-wheel drive vehicle. There are many more parts in the front, hence the more complex process of removing the bearing. The rear support component of the hub is removed in the same way; you will need less time to do it, so the instructions describe the rear support bearing.
Consequences of bearing wear and signs of damage
Since the support bearing can be partially attributed to the steering (without it, rotation of the rack would be impossible), its failure primarily affects the controllability.
But here it should be noted that this depends on the design solution used.
For example, in a VAZ-2110, the inner race of the bearing acts as a bushing through which the shock absorber rod passes.
As a result of critical wear of the bearing, it begins to play and the rod is able to deviate from the axis.
The result of this is a violation of the wheel alignment angles, and consequently a deterioration in the car’s handling, as well as accelerated tire wear.
But on a car, where the bearing only provides rotation of the strut and does not interact with the shock absorber, alignment violation practically does not occur, since the rod is kept from axial displacement by a bushing pressed into the rubber damper.
But even with this design, bearing wear will have a negative impact on handling.
If the bearing has worn out, this will naturally begin to show. In this case, the symptoms of a malfunction depend on the design.
If we take the same VAZ-2110, then bearing wear will manifest itself in the form of knocking noises when driving over potholes and unevenness on the road; in addition, they can be heard when turning
Sounds in the support are caused by play in the support element; it is important not to confuse them with a knock in the shock absorber
In the case of a bearing that does not interact with the shock absorber, its malfunction most often manifests itself in the form of squeaks and squeaks when turning.
Frequent mistakes when replacing struts and shock absorbers reduce their life. Recommendations for replacement.
The topic is quite lively. There is a lot of information on the Internet, but as usual, complete information is not available anywhere. In this same article, I would like to talk about the main mistakes when replacing struts and shock absorbers on a car. And also advice on replacement, what to pay attention to. When I sell racks in my store, I always ask clients if they know the basic rules when replacing and usually the answer is no, or the person knows, but not everything. Today I will try to cover the topic completely.
1) Proper bleeding of struts and shock absorbers before installation.
There are so many people and so many opinions. I will tell you about the method that I use myself. I learned about it at a KYB company seminar back in 2010 in Novosibirsk. The procedure for pumping gas and oil struts (shock absorbers) is slightly different, but they have some important points in common.
Shock absorbers are stored in warehouses in a horizontal position. Long-term storage leads to spontaneous flow of liquid, and the freed volume is filled with air. Bleeding the shock absorber is a necessary process; if you neglect these rules, the new strut (shock absorber) will not work correctly, a knock will appear and it will quickly fail.
The procedure for bleeding shock absorbers (struts).
1) Pull out the strut rod as much as possible; if the strut is gas, the rod will come out on its own.
2) Make sure that the rod comes out completely. Turn the stand over with the stem down. Smoothly compress the rod. And fix it in a compressed position for 4 seconds.
3) Turn the stand over with the rod up and smoothly pull it out. We repeat this 2-3 times.
4) Now we place the stand vertically and pump it in this position 2-3 times. Fully compress the rod and pull it out.
5) Check the functionality. The strut rod should compress and come out smoothly without dips or jerks. Next, with sharp, short movements of the rod, we check the smooth movement of the piston.
After pumping the rack, immediately place it on the car; if you are distracted, then leave the rack only in a vertical position as it will stand on the car. Sometimes people pump up a stand and lay it horizontally and do other things, but you can’t do that.
Another important point regarding both oil and gas shock absorbers. During the pumping process, when you compress the rod, you do not need to compress it to the extreme position and knock on the flask.
In the photo above, I indicated that when pumping, we do not compress the rod completely to the extreme position, so as not to knock on the bottom of the flask. We leave 2-3 cm to the extreme position and, when compressing the rod, bring it to this place and unclench it.
2) Replacing struts or shock absorbers only in pairs!
Many people, wanting to save money, change only the rack that has completely failed and forget that the second rack is also worn out. After installing one new rack, most of the load will be on it. Because of this, it will fail much faster and you will have to spend money again, only on buying two racks. The golden rule: “the miser pays twice.” It is also worth choosing high-quality racks from a trusted manufacturer. Cheap struts usually don’t last long, again you have to buy a new spare part, spend money on replacement (if you change it at a service station), spend money on wheel alignment.
There was a case when a practically new Solaris flew into a hole, its wheel disc burst, the strut leaked, the mileage was about 15,000 km. In this case, there is of course no need to change the racks in pairs.
3) When replacing, install a new protective kit.
When installing new racks, it is advisable to install new bumpers and anthers. There were cases when, when replacing struts, the old boots were in good condition, but after 5,000 km they cracked or tore. Therefore, when replacing, it is advisable to immediately install a new set. If you leave the old boot and it breaks after a while, you will need to remove the struts from the car again. The boot and the strut bumper are important components for the long service life of the unit. The bump stop should sit tightly on the rod and not “walk” along it.
4) The final tightening of the shock absorbers is carried out after the car has been lowered onto 4 wheels.
Do not tighten while the car is hanging on a lift. This applies to shock absorbers and struts with silent blocks or bushings. To ensure that the bushing or silent block takes the correct working position, the final tightening is only after the car is lowered from the lift. This rule should be used for all suspension components; after replacing silent blocks in the arms or replacing reaction rods, the final tightening should be done only after the car is lowered and the suspension is in the working position.
5) Along with the struts, we also change the springs.
This of course needs to be considered individually. In our climate with constant reagents on the road, the car is in an aggressive environment, and the chassis components are no exception. If pockets of rust or damage to the coating (paint) appear on the springs, then such springs will need to be replaced. It is necessary to inspect the condition of the springs. It is advisable to place the left and right springs next to each other and compare their sizes. Check to see if the coils are broken; the ends of coils especially often break and this is sometimes not noticed.
6) We use special tools.
When the strut nut is unscrewed or tightened, the rod begins to rotate along with the nut. Especially if you work with a pneumatic impact wrench. Many manufacturers claim that turning the rod in the strut body does not harm the shock absorber. At all car repair shops, I observe that the nut is tightened with a pneumatic wrench and at the same time the rod is spinning at breakneck speed. Servicemen claim that this is normal! I am a supporter of the fact that the strut rod must be fixed when unscrewing and tightening the nut. Another question is that it is not always possible to do this, so if it is possible to fix the rod, then we do it.
Support bearing Priora purpose, replacement features, PrioraPRO
The front suspension is an element that allows you to easily overcome road unevenness, eliminating jumps and vibrations. To ensure its normal functioning, many consumable parts are used.
For a Priora car, the support bearing acts as a support and ensures proper operation of the suspension. If it wears out, a number of certain inconveniences arise.
How to extend service life
Even if you do not notice any problems with the suspension while driving, it is recommended to carry out regular (every 20 thousand km) checks of these components. Once a year, the rubber part of the support assembly is coated with silicone grease. Driving carefully and avoiding bad roads will also help protect your suspension components.
To increase the service life of the OP, if possible, technicians rinse it and replace the lubricant. If this part begins to deteriorate, it will need to be replaced; repair of the support bearing is impossible.
Bearing replacement
No matter what kind of car the support bearing wears out, but if it uses a MacPherson strut, then the technology for disassembling the unit for replacement is identical, with the exception of some nuances regarding the suspension design.
Therefore, we will consider how replacement is carried out on a VAZ-2110 car, and then we will indicate the features of the operation on other models.
So, it has been revealed that the support bearing requires replacement. All work can be done in a garage, but some specialized tools will be required.
- Standard set of keys, hexagons, heads with collars and rods;
- Jack;
- Steering wheel end remover;
- Spring ties;
- Rags.
A new support will also be required, since on this car the bearing is included in its design.
Of course, you can disassemble the support itself to replace only the bearing, but most car owners prefer to replace the entire assembly.
Additionally, you can purchase a spring vibration damper that is installed between the upper cup and the spring.
Below we will consider the sequence of actions, and we will indicate small tricks that will make the work easier.
Disassembly and replacement is done as follows:
- We place the car on a level surface and immobilize it using the hand brake and wheel chocks;
- Take a 30mm socket and loosen the nut securing the drive to the hub. It is better to do this while the car is standing on all wheels (unscrewing this nut with the wheel removed is more difficult, since it will be more difficult to block the hub from turning). It is also worth noting that this nut is pinned, so it is difficult to tear it out of place and you cannot do without extending the wrench;
- We open the hood and, using a spanner wrench and a hexagon, tear off the shock absorber rod nut (the hexagon holds the rod itself, and the wrench loosens the nut. In this case, you only need to loosen it a little; it is strictly forbidden to twist the nut completely, otherwise the unheld spring will “shoot”). It is better to do this operation before removing the rack (it is much more difficult to remove the nut on a removed unit);
- After removing these two nuts from their place, you can continue disassembly. Jack up the required wheel and remove it;
- Unscrew the fastening of the ball joint of the lever to the rack;
- Using a puller, press out the tie rod end;
- Completely unscrew the nut securing the drive to the hub;
- Loosen the brake caliper mount (there is no need to disconnect the tubes from it), remove it from the disc and move it to the side;
- We take hold of the brake disc and pull it towards ourselves, pulling the hub from the splines of the drive shaft end switch;
- We go into the engine compartment and unscrew the three nuts securing the support to the car body. At the same time, we ask an assistant to hold the support so that it does not fall to the ground. After this, remove the assembly;
- We install the couplers and tighten the spring until its upper coil moves away from the thrust cup;
- We completely unscrew the nut securing the shock absorber rod and remove the support (after this you can check the performance of the shock absorber, check the condition of the boot and bump stop).
- Before installing a new support, we check the condition of the support cup, clean it of rust and dirt, install vibration dampers under it (if purchased);
- Before installing a new support, we install the spring correctly (the ends of the coils at the top and bottom should fit into special recesses in the cups);
- We install a new support and screw the rod securing nut until it stops;
- We remove the ties, constantly monitoring the position of the ends of the spring;
- We install the assembled rack on the car. After assembly work, it is necessary to additionally tighten the rod fastening nut.
Self-replacement
- Park the car on a level surface.
- Using a jack, lift it from the desired side and remove the corresponding wheel.
- Pull out the cotter pin of the steering tip nut and unscrew it (19mm wrench).
- If you have a pin remover, use it. If you don't have such a tool, use a small pry bar and a hammer to press it out. Don't damage the pin thread!
- Having pre-treated with anti-rust liquid, unscrew the 2 nuts securing the strut in the steering knuckle (19mm wrench).
- In the engine compartment, remove the “cup” cover and unscrew the 3 nuts securing the upper support to the “cup”.
- Pull out the entire shock absorber from underneath.
- Using a pair of spring clips, compress the shock spring to relieve the load on the upper mount.
- Unscrew the nut securing the support to the rack (22 wrench and 9 wrench).
- Remove the support, disassemble it and remove the support bearing.
- Replace the old “support” with a new one, and secure the support to the shock absorber.
- Carry out assembly work in reverse order.
In order not to waste your time, it is recommended to replace both support bearings, and then be sure to adjust the angle of the front wheels.
The important role of MacPherson struts
But MacPherson struts have another important function - they also serve as steering knuckles. That is, the stand with the wheel hub attached to it can rotate around an axis, which allows the drive wheels to be steered.
Naturally, where there is rotation, a bearing is used; in the case of this type of suspension, a support bearing.
To figure out where the support bearing is installed, let's briefly look at the car suspension structure.
Its main components are:
All these elements are assembled into a single whole, which provides the possibility of compressing and decompressing the spring and moving the shock absorber rod in the body (which is what the suspension is actually for, since vibrations are damped during these movements).
To ensure all this, the rack is assembled like this: a shock absorber is installed in the body and all this is installed in a spring.
To support the spring from below, a cup is used, attached to the body (welded to it).
To ensure that the spring is pressed, another cup is installed at the top, which rests against the support.
The spring extension limiter is the shock absorber rod, the end of which passes through the support and is secured with a nut.
Additionally, the support not only acts as a stop for the spring, it also provides the upper fastening of the strut to the body (it is attached to it with levers from below).
Where is the support bearing installed and what function does it serve?
It is noted above that the MacPherson strut also acts as a steering knuckle. From below, rotation around the axis is ensured by a ball joint, through which the levers are attached to the rack.
If the upper strut support were not a limiter for the spring, then there would be no problems with rotation (the shock absorber rod can rotate freely).
But the spring, being in a preloaded state, creates a fairly strong force on the cups, and as a result on the support, which is rigidly attached to the body.
Therefore, a support bearing is installed between the support and the upper spring cup.
Thanks to this design solution, under the influence of the steering mechanism, the stand (assembled) can rotate around the axis, while the support remains motionless.
It is precisely the support bearing that provides the ability to rotate the shock absorber strut.
Verification methods
Checking the condition of the support bearing is not difficult, but the technology depends on the design features of the rack itself.
It is worth noting here that such a check will not give an accurate result; you can verify that the bearing is faulty only after removing it from the car.
But, nevertheless, by performing a number of simple steps you can determine the condition of the upper support.
If we take the VAZ-2110 model, then its support bearing is installed in the support itself.
To check its condition, you should ask an assistant to rock the car in the transverse direction (not too much), while at this time we place our hand on the protruding part of the pillar in the engine compartment.
If the bearing is worn out, play will be felt by hand. Also, in a damaged element, such rocking is usually accompanied by the appearance of third-party sounds - creaks, clicks.
If all this is found during the inspection, it’s time to inspect the support.
On models such as Lada Priora, Lada Kalina, or, for example, Nissan X-Trail, the bearing is not included in the support structure, so it cannot be checked by rocking it. The only sign of wear for them is the appearance of a knocking sound when moving.
But it is still possible to further verify that the unit is faulty.
To do this, ask an assistant to turn the steering wheel in different directions. At the same time, we put our hand to the spring.
If the bearing is heavily worn, then wedging may appear in it, which will be reflected well into the spring in the form of vibration and mild “shooting”.
Why you shouldn’t delay repairs
When the OP has completely crumbled, you can continue moving. But driving with a damaged bearing dramatically accelerates the wear of other suspension parts. In addition, usually with this breakdown the geometry is disrupted - alignment and camber. This not only causes accelerated tire wear, but can significantly reduce the car's handling. This increases the risk of an accident. Therefore, it is not recommended to drive for a long time with damaged bearings.
Every car owner needs to know this.
The supports themselves do not require maintenance and last a long time. But it is necessary to change the worn-out part on time. A serviceable car is the key to safety on the road!