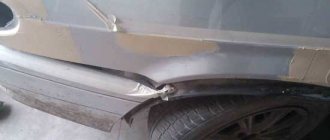
Today, for many, local painting with your own hands is not a problem; in your own garage, you can correct any damage to paintwork in literally an hour or two. And the price of do-it-yourself repairs is several times less than in a body shop.
After all, the main advantage of local painting is not even that it saves money on all materials (varnish, paint and labor), but that everything is done quickly - the process takes place literally within a few hours without removing parts. In addition, if the local painting of the bumper and other parts was done correctly, the color match will be 100%, then the boundaries of the transitions between the repair and factory coatings (spots) after final polishing will be impossible to find.
Useful! During a precision body repair, there is no need to dismantle parts, and the quality of the body assembly will not be compromised, and therefore no corrosion will occur.
That is, the factory coverage is preserved as much as possible, which allows you to “silence” the biography of a given car and sell it more successfully.
When a car needs partial local repairs with painting, choosing the right tone for dark colors is much easier than for light ones.
That is why silver, beige and bright shades are always painted “in transition” - in the process, a smooth step is made from new paint to old, during which not only the leveled or darkened part is painted, but also partly adjacent to the factory coating.
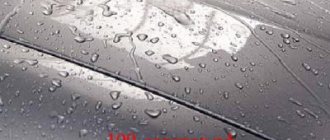
And the difference in colors when painting in this way is almost imperceptible - the transition in the form of a slight darker or lighter spot is barely visible only on silver colors and only in cloudy weather.
Partial painting of individual areas of the car: why do you need local repairs?
Partial painting of a car element is “transition”, “spot” and “local” painting. Basically, it's the same thing. Why is it so necessary if the damage is very minor? Even a currently small paintwork defect, with an area of only a fraction of a centimeter, will begin to grow in the near future, because corrosion will find a weak spot in the protection of the car body. That’s why it’s so important to promptly repair even very minor damage to your car’s paintwork.
Methods for eliminating defects in the paintwork of a body or plastic elements of a car are conventionally divided into two types. Their choice depends on the level and volume of damage.
- Retouching of car parts is used if the scratches and chips of the body are very minor. This is exactly what spot painting a car from a spray can is. What does that require? A special “pencil” consisting of a container with a brush at the end, which is built into its lid or an aerosol can with paint and varnish. You must select the color of the device according to the paintwork number of your car. The retouching method is very simple and will take you very little time.
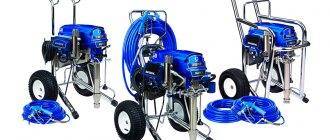
- Local repainting of the car body element is carried out when the damage is quite significant. This procedure is much more serious. It requires certain manipulations, for example, careful preparation of the damaged area for painting. It also requires reusable tools – a spray gun and a compressor. Less often, a can of spray paint is enough.
Let's sum it up
To apply a metallic transition effect, you will need to follow the exact steps of the process. Otherwise, you will have to deal with the consequences of doing things incorrectly. All this turns out to be quite a difficult task for every car owner. You can go to a service center and order a service, but here it will be quite expensive. So sometimes it’s easier to learn how to perform tasks yourself while maintaining quality.
You can only paint your car in a special chamber. The room plays a huge role in the quality of the results. You can make a camera from your own garage, but you will have to provide some special conditions. It is best to rent a place to do the work for a short time. And don't forget about the instructions for applying paint materials and preparing the body.
When is transition during coloring irreplaceable?
Car transition painting is a set of techniques with the help of which, during repairs, an almost invisible combination of the old, factory paint coating with a completely new one is created.
Moreover, on any body there are always two old coatings - paint and varnish, and therefore there are also two transition boundaries - “by paint” or “by varnish”. And they should not coincide with each other - this is important. Both transitions - paint and varnish - can be done separately or in combination.
Almost any part of the body can be painted using this method. The transition is also made with varnish, which is then polished especially carefully, and therefore is practically invisible - the transition polishing zone can be seen only when its localization is precisely indicated. The transition painting technique itself is usually used in cases where:
- the car's original paintwork is worn out in places and or severely faded;
- there is a defect on one of the large parts;
- It is difficult to choose a paint tone for painting doors or a large area of the body such as a hood or roof.
The most common transition points are the bend on the car door and fender, the edge of the hood or body. The doors themselves are traditionally painted up to the molding, and then the transition is done. In the grooves, the varnish pitch can be either with sharp boundaries or sprayed.
By the way, on light colors the paint transition is more noticeable, but on dark colors the varnish transition is more noticeable. But you can also look for non-factory paint by looking at the appearance of the new varnish - it will not have the dullness that is inevitable in used cars.
This painting method is also indispensable for using paints that tend to change their shade depending on the thickness of the layer and spray pressure. This technology also eliminates discoloration after previous unsuccessful repairs. And the costs of the material itself are significantly reduced - very little paint is needed.
But preparing the car for such painting is somewhat more difficult. Also, if the transition needs to be done on adjacent parts (for example, a door), then the material consumption will also increase. But thanks to the color transition, it became possible to avoid different colors as much as possible and significantly save energy and time on color selection.
What is the mechanical method of preparing a surface for painting?
If traces of corrosion and oxides are found on the surface of the body, specialists use various scrapers, wire or nylon brushes, grinding machines and sandpapers. Metal brushes today come in a variety of shapes: disk, cylindrical (roller), ring, cup. All brushes differ in density, width, location of the pile filling and the nature of its laying, and the shape of the wire (it can be straight, corrugated or woven into a bundle).
To remove rust from the surface, remove burrs, and remove old or defective paint using a mechanical method, today most often used are disc brushes made of corrugated or woven wire, with a radial pile arrangement. Disc-shaped brushes with non-metallic bristles are used by specialists to remove tarnish, thin layers of scale, and minor burrs. Cup (or end) brushes are used to remove surface rust, old or defective paint, as well as contaminants from large surfaces when preparing them for painting.
Even after very careful processing of body parts with tools, up to 250 g of corrosion products per 1 sq.m. can remain in the smallest pores of the metal surface. Therefore, when preparing body parts for painting, they must be additionally blown with specially purified compressed air.
The nuances of spot painting: polishing the transition and repairing without removing parts
Any job has its own nuances and secrets. Therefore, in order to learn the science of partial painting of car elements with your own hands, you need to be attentive and patient. And the first thing you need to do is learn the theory of such repairs, and then be sure to practice on old parts in order to learn to feel the process. Your actions when spot painting will depend on a combination of many factors. First of all, this is the location of the damage and the shape of the element. If normal access is not possible, repairs often have to be made by dismantling the part. When the defect is located near a molding, edging or recess, this is a strong argument for spot repairs. In this case, polishing will not be necessary. If the defect is located near the edge of the element, then only part needs to be polished. However, when the surface in the middle of a body part is damaged, it will have to be polished completely, which will affect the cost of time and material. Local painting of the car helps to avoid partial or complete removal of parts. This will make your task much easier.
Why do you need to release the trigger at the end of each pass?
Smudges can form on the edges of the panels due to the application of several layers of paint. To do this, you need to release the trigger before the border of the panel so that the paint does not get on the adjacent panel. Release the trigger when you reach the gap between the panels.
Release the gun trigger at the end of each pass. Then pull the trigger again when you start a new pass from the other edge of the panel. This technique will allow you to avoid smudges on the edges of the panels, minimize over-pollination and save materials.
The spray gun must be in motion before the trigger is pulled and must continue to move when the trigger is released.
If we look in more detail, the sequence is as follows:
- Start passing outside the panel, press the spray gun trigger halfway so that only air flows.
- When the spray gun reaches the edge of the panel, press the trigger all the way so that the paint begins to spray.
- Release the trigger halfway so that the paint stops spraying when the spray gun reaches the other edge of the panel.
- Continue the movement another 5 cm and repeat the sequence.
Pressing the trigger halfway (when only air comes out) eliminates the sharp “spitting” of paint when the trigger is fully pressed.
The main difficulties of painting a car with a transition
So, this is what painting a car with a transition using modern methods consists of: if the car is partially painted, then its closest parts will differ from the painted area, and primarily at the joints. And the difference in tones is especially depressingly visible on nitro enamels. That is why, in order to achieve an impeccable result, it is necessary to paint the car with the transition to the nearest part.
The main problem in car dealerships where professional painting is carried out using the transition method is the coordination of the work of the colorist and painter. The first one, using a special computer program, selects a tone that would ideally match the existing paint of the car, and the second one carries out the repair itself. But the problem is that the paint color, even if it was chosen according to the exact code in the documents, can vary depending on the technique used to apply the paint tone.
Important! Pressure, scope, tools - all play a decisive role in whether the transition will be visible or not.
That is why the colorist always gives instructions to the painter regarding the pressure and spray force. But the latter does not always listen or simply cannot, due to inexperience, follow all the colorist’s recommendations.
As a result, the transition is noticeable, the tones do not match, but the colorist is still blamed - if the paint was chosen correctly, then, in the painter’s opinion, the technique of applying it cannot change the color. That’s why the ideal option is to entrust transition painting to a master who will select the paint and apply it himself.
Unfortunately, there are not very many such specialists. Therefore, it is best to consider in advance, if possible, how the car transition painting is carried out by the master himself - videos of the work process are available on the websites of car repair shops.
The most difficult transition to make is acrylic, but it is doable. The main difficulty here is proper preparation of the surface for painting, because the transition will be done on the final coating itself, which will be the top layer. That's why experts recommend matting the part completely , and then carefully marking it.
In general, working on acrylic as a single-layer coating is similar to working with a transition over varnish in two-layer and three-layer ones: the new paint is applied in drops, which is difficult to make unnoticeable, and the possibilities of high-quality watering on single-layer coatings are much more limited. For example, when removing a defect, it is easy to cut off the entire layer of paint, especially if you have to work on edges and bends. And two-layer coatings dry much faster, which cannot be said about acrylic.
Also, for example, low-opaque paints, which are light and silver tones, always form a dark, noticeable halo when sprayed in several layers. In this case, an inexperienced master will cover the repair area and fight this halo, spraying paint further and further until he reaches the edge of the part. This is where his mistake will be - each individual layer needs to be applied only with a smooth transition.
Working in pairs - excellent results
In order for coloring to be effective and the result to be pleasing, a tandem is needed - a colorist and a painter who can perform the full cycle of work with their own hands. And it’s not just about getting it right, there are secrets here that will affect the quality of the work. So, the colorist always gives recommendations on what the spray pressure should be, what tools should be used, what coloring technique to use in each specific case
From this perspective, it is important to choose the right workshop, using any available means: videos on the website, advice from colleagues, recommendations from friends or classmates
There are also masters who successfully combine the skills of a colorist and a painter, and this case is the most correct. When experience and “golden hands” are combined, you can guarantee in advance an excellent result of painting any car part with a transition the first time. The use of modern achievements of progress using the example of computer selection programs is an excellent help, but the main thing, nevertheless, is the trained eye and professionalism of the master who does the work with his own hands.
Preliminary work for spot repair of paintwork: step-by-step instructions
- Car wash. This operation must be performed extremely carefully. Do not forget that dirt and dust accumulated on surfaces that will not be treated can easily enter the work area. Unnoticeable during painting, they will cause defects that will appear later. Keep in mind that the quality of the repair performed will depend 90% on the correct preparation of the surface of the part. The best option is to use special car detergents. It is advisable to clean the room in which you will work as much as possible from dust.
- Choice of color and tone. Using the color fan, you can choose the desired tone. Knowing the color number of your car, you can easily select the one you need using a special computer program. If you have no experience at all in this area, then it is best to delegate the preparation of the coloring composition to a specialist. This process is quite specific and mistakes cannot be made with it.
- Degreasing the damaged area. This operation must be performed, because particles of technical oils and compounds can lead to the formation of defects in the paint layer. This can be done using white spirit or a special automotive solvent.
- Cleaning and polishing the damaged area . Next you need to remove the old paintwork. For this purpose, use a grinding machine and P80 abrasive. There may be rust and moisture underneath the paint layer. You definitely need to get rid of them. When determining the age of the old paintwork, you may decide that you only need to polish this element.
- Puttying the surface of the defect. After sanding, degrease the damage again, and you can begin to putty it. This operation is needed to smooth out all the irregularities and remove small dents. The putty composition is selected depending on the degree of damage caused. It is better to use material modified with special additives, which significantly increase its heat resistance and strength. Small scratches can be covered well with thinly diluted putty; if the damage is deep enough, it is best to choose fiberglass material. Apply the compound with a rubber spatula across the damage, and then level it along the length. Wait until the putty is completely dry before starting any further work. Otherwise, it will settle, and instead of a leveled surface you will get a noticeable depression. After drying, sand the surface successively with abrasive P80, then P180, P220 or P240.
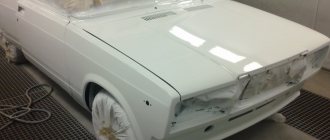
- Primer. After re-treating the damage with white spirit, cover the surfaces around it with a protective film. Next, start priming.
It should be said that the color of the primer significantly affects the tone of the dried paint. Based on this, choose the color of the material as close as possible to the tone of the substrate.
Anti-corrosion primer can be applied using a paint sprayer. The technology of this process is the same as when applying the paint itself. When the composition dries, it also needs to be sanded and degreased.
The damaged area is sequentially treated with abrasives P320 and P400, and then P500. To create risks for better adhesion, treat the work area with gray Scotch Brite. Degreasing is best done with a sticky cloth. In addition, it will remove all dust that has settled on the defect after preliminary work.
How to paint a car at home
Do-it-yourself transition painting is done in a well-lit room. Light plays a key role here - you will need to visually assess the differences between areas of the body and make the necessary adjustments. If you are working in a garage, in addition to the ceiling lamp, use LED lights aimed at the part of the body being processed. Pre-wet clean the room and, if possible, remove dust by blowing the floor and walls of the garage with compressed air.
To paint with transition you will need the following materials:
- Enamel of the same color as the body surface (use the factory paint code, it is indicated on the plate located in the engine compartment, or take the gas tank with you to the store, which will help you select the desired shade);
- Varnish;
- Solvent (for acrylic, alkyd or nitro paints - depending on the type of enamel used);
- Degreasing agent;
- Sandpaper (P1500 grit);
- Masking tape;
- Sticky wipes;
- Scotch Brite, paste and polishing cloths.
Painting car parts with a transition requires the sequential application of two compounds - paint (varnish) and solvent. For spraying, it is rational to use two separate spray guns, so you will save time by depriving yourself of the need to clean the spray tank after applying each layer.
The following instructions will help you paint your car with a transition:
- We seal the body around the treated area with newspapers and masking tape to prevent paint from getting onto adjacent areas;
- We matte the part and the transition zone on the factory paint (distance 10-15 cm) with P1500 sandpaper, removing the gloss from the old paintwork until a pronounced rough texture is obtained. Due to roughness, the adhesion (adhesion) of the metal surface and the applied paint increases;
- We remove the dust formed during grouting with a damp rag, after drying, remove the remaining dust with a sticky napkin;
- Degrease the treated surface with white spirit;
- We apply the first layer of base enamel - fill the spray gun tank with paint and set the supply pressure to 1.3 Bar. Holding the spray nozzle at a distance of 20-25 cm from the body, use diagonal movements to shade the paint area;
- We wait for the enamel to dry to touch (15-30 minutes, the exact time is indicated on the packaging of the material) and from a distance of 35-40 cm, spray a thin layer of solvent along the outer contour of the painted area;
- Immediately apply a second layer of enamel (the spray pressure increases to 1.7 bar), covering the painted area and expanding it to adjacent areas. The third layer of enamel is applied at a pressure of 2 bar - first we spray solvent along the side contours of the part, then we apply paint, shading it beyond the painted area.
To make a transition when painting a car, apply each subsequent layer of base enamel with a higher spray pressure, systematically increasing the distance between the spray gun nozzle and the body - this will smooth out the shade on adjacent surfaces.
Opening the painted part with varnish is done after the enamel has dried. If the painting of parts occupies more than 2/3 of their area, the varnish coating on the body element is completely renewed. During the transition, the factory varnishing in adjacent areas is cleaned with matting paste and Scotch-Brite.
- Mix the varnish with the activator in the proportions specified by the manufacturer;
- From a distance of 35-40 cm, we open the painted area with the first layer with a minimum of overhang beyond its borders;
- After the varnish has dried touch-free, spray the second layer, blending the stain beyond the contours of the area being repaired;
- To apply the third layer, a liquid composition is used (the varnish is diluted with a solvent 1:1). The varnish spot is carried beyond the base layer of paint to a distance of 15-20 centimeters.
Polishing the painted area allows you to remove the transition after painting the car. The surface is polished after the time required for the varnish to dry completely (according to the manufacturer’s recommendations).
Initially, the junction of the freshly applied and factory varnish is treated with Scotch Brite and matting paste, with a spacing of 3-5 cm in each direction. Next, polishing paste is applied to the matted area, which is rubbed into the body with a special napkin (or machine) until a lasting shine appears on the surface.
Features of the method - transition through the base and varnish
Today, a material called “Colorless Base” is often used for transition painting. There is no pigment in it, but in itself it resembles a base paint, although it does not need to be diluted with a solvent. This material is completely transparent and is similar in composition to metallic car paint, only without color. It is absolutely indispensable for smooth painting when you need to achieve the most correct arrangement of metal particles. For example, painting with a metallic transition without this base is generally impossible. Because the chips, which are contained in the paint itself, can no longer sink into a too thin layer of the new coating, and therefore are distributed ugly over the entire surface in “pieces”, which, in turn, invariably leads to a change in shade. But the “Colorless Base” gives that full-fledged wet layer over which metal shavings can be distributed evenly. You need to apply the material, like paint, to a clean, grease-free surface in a full layer from a spray bottle. It dries very quickly, and therefore the base coat of paint must be applied immediately.
Local body painting with metallic silver color
The local painting of the car, the color of which is metallic silver, deserves special attention. Restoring the wonderful appearance of such a car is not an easy task. So, here's what you'll need to do:
- Initially, it is necessary to cover the repair area with a covering material: film, paper and a roller;
- Using gray scotch-brite and matting paste, you need to apply a matte mark to the part of the surface of the part that will need to be repaired;
- After the entire part has been dried and degreased with alcohol-containing products, you need to apply a binder - a colorless binder for the base coat. It must be applied to the area to be repaired so that the border extends beyond the boundaries of the next application of the sprayed base. By the way, you need to use a binder only when working with a metallic coating, because without it, when you spray paint on the old one, a dark border will immediately form. And the binder layer perfectly creates the necessary transparent base in which the particles of aluminum powder “sink”, and such local painting of the body will make the reflection uniform and natural;
- Now you can apply paint. There will be three layers in total, and each subsequent one must go slightly beyond the boundaries of the previous one. But some metallic colors sometimes require five layers. In any case, the principle of operation is this: each layer needs to be stretched, as it were, by only lightly spraying it onto the old factory coating, but at the same time always remaining in the binder zone. Only in this way will the transition ultimately be completely invisible. Between layers you need to maintain a time interval of 20-30 minutes so that the previous layer has time to matte;
- After the last layer has matted, you can apply varnish. In general, this option is called “with a transition over the varnish.” Moreover, if the surface to be painted occupies more than a third of the area of the entire part, it must be varnished entirely.
To simplify the process, the varnishing itself can be divided into three stages:
- Preparing the varnish and applying the first matte layer to the area is a half-coat.
- After a few minutes, a second coat of gloss is applied, and it should cover both the paint area and the binder area. To understand exactly how such local painting is done, there are videos and photos on the website.
- All the varnish that remains in the spray gun must be diluted with solvent in a ratio of 1:1 and covered with it the area where the new varnish ended and the factory one began - in this way, the step that was formed due to the new layer of varnish is smoothed out. You need to pour clean solvent into the spray gun and cover the transition from the new varnish mixture to the factory one. After which you can cover the transition with it.
Practice - applying paint while observing transitions
When you plan to paint the bumper with a transition, completing the necessary tasks can be much easier
It is important to follow all instructions for painting plastic here. It is more difficult to process metal parts of a car, since protection against corrosion is needed, functional compliance with all rules will be required
In practice, you can paint your car using the following procedure:
- apply a base coat for color treatment of the metal surface;
- then wait a few minutes, mix the paint 1:1 with solvent;
- apply a second layer, expanding the boundaries to the washed parts of the body;
- mix the paint with solvent again 1:1 and continue this way until 5-6 layers;
- The last layer should be applied with virtually pure solvent with little color.
There are many instructions and types of tips on the topic of transition painting; videos can be found from both beginners and professionals. But it is better to be selective in assessing the quality of the material that you use as a guide to action. Otherwise, you can damage the car body and get a number of unpleasant problems that are expensive and difficult to fix.
How to correctly perform a transition with a base and varnish with your own hands
You can also paint your car with a transition at home - in your own garage, for example. The most difficult thing will be to choose a color, because even a computer program does not provide 100% color compatibility.
That’s why it’s best to paint a car using this proven method – moving on to the closest parts, because this is the only way to get an almost perfect result. But painting a car using this method is not too complicated in its technology, and even a novice car enthusiast can master it. The main thing is to strictly follow all the rules and do everything accurately and accurately.
So, for painting yourself, you will need a special “transition thinner”, which is sold at any car market or paint store, and a spray gun with a round torch and a nozzle size of 0.8.
- It is necessary to reduce the gloss from the transition piece by 70%. For this you can use sandpaper No. 1500. It would be best to make the transition in the middle, but if placing the transition border in this way does not work, then it is advisable to matte the entire part - after all, the new paint will not last long on a glossy surface.
- Now you need to degrease the prepared area and you can start painting. And, when the last layer of enamel is applied, a trace will remain clearly visible - not the spilled paint on the border.
- To remove the transition after painting the car, you need to take a transition solvent. First, it should be applied from a distance of 40 cm, wait 30 seconds and apply again until the paint on the border has completely spread. It is important not to overdo it, so that the solvent itself does not start to drip. But even if this happens, you should always have an ordinary hairdryer at hand, whose air jets dry all unnecessary drips.
- As soon as the applied paint has dried, you need to go over the entire surface with the same sandpaper and polish it well.
By the way, traditionally when painting a car with a transition, acrylic paints are used, which have excellent characteristics and heat resistance. Usually they are supplied immediately with the hardener - in one set. The transition painting technology is slightly different if nitro paints are used.
- the gloss must be removed from the entire part;
- nitro enamel is applied by smooth spraying to the middle of the part or a little further. The main thing is that there is no clear boundary;
- Now you need to let the painted surface dry and go over it with a grease-breaking cloth;
- The transition piece should be completely varnished.
If everything was done correctly, the result should be perfect.
Expert opinion
Ilya Vyacheslavovich
Consultant for body repair at krasymavto.ru
Ask a Question
To prevent the transition border from being visible, paint can only be applied diagonally, in one direction or the other, because vertical stripes always catch the eye. Moreover, each subsequent layer of paint during painting must extend slightly beyond the edges of the previous one. The most important thing is that the difference between unpainted and newly painted parts is not noticeable in the end.
Painting process
Corners and edges are always painted first, as they are the most difficult areas. It is better to paint them from a closer distance (3-5 cm less). This will reduce the width of the torch. You should also move the spray gun faster to avoid the formation of smudges.
When painting raised surfaces, hold the gun perpendicular to the surface. In this case, the gun must follow the shape of the bends to achieve uniform painting.
Painting the edges and corners is followed by painting the main surface of the body. Each spray pass overlaps the next by approximately 50%. With this approach, the paint will be distributed more evenly. A smaller percentage of overlap may result in visible streaking.
Let us separately consider how painting a vertical surface occurs. You need to start from the top. In this case, we aim the middle of the torch at the edge of the panel, that is, the nozzle is at the level of the upper edge of the panel. Some of the paint from half the torch will fall onto the masking paper.
We make the second pass in the opposite direction, the nozzle is directed towards the lower edge of the already sprayed paint. So, 50% of the second pass overlaps 50% of the first, while the second part of the torch covers the unpainted surface. Then the work continues according to the same pattern, releasing the trigger at the edges of the body and gradually lowering the gun down. The final pass is made halfway outside the surface of the part.
Do not fill the tank of the spray gun completely with paint (it is better to do it half or 1/3 full). Otherwise, it will make it more difficult to control the spray gun, as it will become heavier and less maneuverable. In the future, this will affect the quality of coloring. Plus, there is a risk of spilling paint from the barrel.