03/04/2022 6,436 Light and sound devices
Author: Ivan Baranov
Fog lamps (PTF) help the driver to control the car in conditions of limited visibility. The article discusses the types of PTFs, gives recommendations on which lamps are best to choose, and also includes instructions on how to replace a light bulb in a fog lamp.
[Hide]
Replacing the fog lamp of Lada Priora (VAZ Priora)
If you have a Chinese car with burned out fog light bulbs and you don’t know how to replace them, then this instruction is especially for you.
After all, replacing a fog light bulb is necessary for safety reasons, unless of course you want to get into a dangerous situation on the road. In principle, there is nothing complicated about this, but you still have to be patient and demonstrate your skills. I want to warn you right away that replacing the right headlight bulb will seem more difficult to you than the left one. You will ask why? Yes, because on this side the spring latches are located out of sight and you have to act by touch. Here's a list of the tools and accessories you'll need:
- short screwdrivers (phillips and flathead);
- wrench 7;
- mirror;
- flashlight;
- a new bulb that matches your car;
This is not a difficult matter at all, and it’s not worth going to a service station for such a small thing. Any car owner can do this. And, if you have never done this, you have an excellent reason to learn something new. Replacing a fog lamp (after mandatory car washing) is carried out in several stages.
To gain access to the PTF, the first step is to free up space in the work area. To do this, turn the steering wheel all the way to the right for the right fog lamp, for the left one, respectively, to the left, while the engine must be started. Also, in order to facilitate access, you can raise the front of the car using auxiliary materials - bricks, boards, a jack, or simply drive the appropriate front wheel onto the curb. In this case, you need to be especially careful and make sure that the wheel does not jump off the ledge.
Next, you need to remove the protective plastic material located on the wing. We equip ourselves with a 7 key and unscrew the screws around the wheel. It is also necessary to unscrew the plastic bolt located on the bottom of the machine. Use a flat screwdriver to pry up the tip into which the plastic bolt was screwed. We bend the freed wing plastic until the wheel allows it. Don't be afraid to break this plastic - it's very flexible and durable.
The third stage is the most difficult. It is necessary to remove the burnt out fog light bulb. For this:
we put our hand under the plastic into the cavity formed and twist the lid one quarter of a turn counterclockwise (it usually comes off easily);
We arm ourselves with a mirror, a flashlight and thoroughly study the spring fastening mechanism that holds the light bulb;
disconnect the lamp contact in the cover from the connector, the headlight cover contact from the socket;
remove the headlight socket from the housing (remember the location of the lamp in the socket and try not to drop the entire mechanism to insert the headlights);
We hold it in our right hand, and with our left hand we move the spring clamp of the lamp to the socket (this is how we release the clamp from the hooks);
we take out the burnt out lamp and install a new one (it is extremely important not to touch the lamp with your fingers, as there may be traces that are difficult to remove. And this will directly affect the life of the lamp). Sometimes water accumulates in the PTF cavity
It can be removed using a rag from a rag, carefully pushing it through the hole for the lamp into the cavity of the fog light.
Sometimes water accumulates in the PTF cavity. It can be removed using a rag from a rag, carefully pushing it through the hole for the lamp into the cavity of the fog lamp.
After this, for preventive purposes, it is necessary to wipe the surfaces of the lamp bulbs and headlights with cotton material soaked in a degreaser or alcohol. This is necessary in order to remove dirt that formed on them during lamp replacement, since the contaminated surface of the fog lamps leads to poor visibility.
At the final, fourth stage, the car must be returned to its original appearance. Showing patience and accuracy, we assemble all the parts in the reverse order.
Many car owners want to know how to install fog lights on a Priora, because... The climate of our country is predisposed to the periodic occurrence of fogs, especially in the morning and evening. In non-ideal road conditions, the presence of such an accessory will help you better navigate in poor visibility, since the wide beam of standard headlights can “illuminate” a large space, creating a kind of light curtain for both the motorist and oncoming cars.
Fog lights. Are they necessary?
From an aesthetic point of view, of course, extra light sources on a car always look more impressive, especially if they are bright. But how urgent is the need for fog lights, what lamps are best to use in them, how to connect them and where to install them? And what color should the glass be? A lot of questions, but they all break down into one single “I want.” In principle, fog lights are needed if they correspond to their name and purpose. Fog lights are more than just additional headlights. This is a light that is designed specifically for driving in poor visibility conditions, namely in fog.
That's why they install a yellow filter in fog lights.
In this case, it doesn’t matter at all what kind of lamp is in the headlight - halogen, a regular incandescent lamp or diode fog lights. The main thing is the color of the light flux
And that's why. Fog is a water suspension consisting of microscopic particles of moisture. When hitting the surface of each drop, white light is refracted and scattered, turning into an impenetrable veil. It turns out to be a solid wall of white light, a cloud through which it is difficult to see anything. The yellow spectrum is able to penetrate suspension without scattering as much, therefore visibility in general is better when using a yellow filter.
Replacing the fog light
Renault Logan
To replace the fog light on a Renault Logan, you will have to try. The process itself does not cause any great difficulties. The difficulty is how to get to it from the inside.
To replace it, you will need to remove the wheel and put the car on a stand. Next, you must follow the following procedure.
- Unscrew the clip holding the fender liner, then remove it and pull it out. This is the only way to get to the PTF.
- Remove the retaining clip from the back of the headlight and pull the headlight towards you.
- If it is necessary to replace only the lamp, the base is unscrewed from the reverse side using three turns counterclockwise.
- If the entire headlight needs to be replaced, install a new one in place of the old one and install the fender liner.
Nissan X Trail
Changing the fog light on this car model is somewhat simpler. You can get into the PTF from the inside through the hood.
- The fasteners holding the inner trim in the headlight area are unscrewed.
- Next, feel for the fog light with your hand and snap off the clip.
- Carefully disconnect the wire. The inconvenience is that everything has to be done by touch.
- Pull out the headlight and install a new one in its place.
Hyundai Solaris
To change the fog light on a Solaris, you also need to remove the fender liner from the front wheel. The process occurs in the same way as when replacing the PTF with a Renault Logan or Duster.
- Carefully pull out the fender liner.
- If you only need to replace the lamp itself, turn the base counterclockwise and remove it. Then put a new one in its place.
- If the entire headlight needs to be replaced, then in order to get it out, you must first unscrew the casing that attaches it to the bumper.
- Next, you can remove the headlight and install a new one in its place.
Ford Focus 1, 2, 3
Here, the process of replacing a fog light is absolutely no different from Renault Logan and Duster. First, remove the wheel and level the car on a horizontal surface.
- Unscrew the clip holding the fender liner, remove it and pull it out. This is the only way to get to the PTF.
- Remove the retaining clip from the back of the headlight and pull the headlight towards you.
- If it is necessary to replace only the lamp, the base is unscrewed from the reverse side using three turns counterclockwise.
- If the entire headlight needs to be replaced, install a new one in place of the old one and install the fender liner.
Lada Largus
Replacing a fog light on Largus is also not an original process. A positive thing is that the fender liner on this model is quite flexible, and there is no need to pull it out; you just need to bend it slightly behind the brake disc, having first unscrewed all the fasteners.
- Carefully disconnect the wires from the lamp body.
- Unscrew the lamp itself by turning the base counterclockwise or completely pull out the headlight housing by squeezing the fastening clips.
- Install a new PTF and mount the structure back.
Volkswagen
The most popular way to replace PTF on a Volkswagen is similar to almost all previous ones: through the fender liner. But you can get to the fog lamp on this model from the outside.
- After the fender liner is pulled back, it is necessary to disconnect the pads securing the wires. Since the action occurs almost blindly, this must be done very carefully.
- From the front side, insert a special hook, usually included in the kit, into the hole for adjusting the headlight. Having carefully hooked and pulled the fasteners towards you, we push the decorative trim forward, and then pull it out completely.
- Then unscrew the screws securing the PTF.
- Gently pull the lamp towards you.
- By pressing the latch, disconnect the wire block.
- Depending on the situation, either unscrew the lamp and replace it with a new one, or install a completely new device.
Mitsubishi Lancer X replacement bi-xenon lenses with Devil Eyes backlight
- Replacing lenses in non-original headlights with original Hella Classic D2S
- Installation of Denso ignition units
- Setting the lens backlight to red
To remove the headlights, there is no need to remove the entire bumper, just unscrew one bolt under each wing, then remove the plastic clips holding the plastic trim under the hood, then unscrew the bolts holding the bumper on top
You can disconnect the glass after heating the headlight to about 80 degrees
The old lens's mounts are almost identical to the new one, so it can be installed without modifications
Before installing the lens, red LEDs were placed inside, with a forced shutdown when the low beam was turned on
The ignition unit does not fit this headlight; the housing had to be modified.
Mandatory check of the functionality and correct settings of the lenses on the machine before assembly.
After the work is completed, nothing indicates that these headlights have been tampered with.
But the difference in light is significant. Old Chinese ignition units did not light the lamps. In addition, the light distribution was not correct, but now everything is as it should be.
How to replace lamps, basic precautions
Replacing a burnt out light bulb is quite simple. If desired, this procedure can be carried out completely independently.
To protect yourself and your vehicle's electronics, you must take the following precautions:
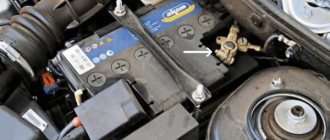
before starting work, disconnect the negative terminal of the battery, this will protect the on-board electrical network from accidental short circuits;
First you need to remove the protective cover from the Kia headlight by turning it counterclockwise
- a burnt-out lighting element should not be handled with bare hands, as it may still be hot;
- when replacing a halogen, it is impossible to grab its bulb with your bare hands so as not to leave traces of greasy discharge on it; a burnt-out lighting fixture can simply explode in your hands, and a new one will quickly fail (if you touch the bulb, you need to wipe it with alcohol, then with a dry cloth );
- Replacing the fog light on a Kia Rio should only be done on an overpass or inspection ditch.
The easiest way is to replace a burnt-out Kia Rio headlight bulb, where there is:
- head lamps (low/high) type H4;
- automatic lamp for indicating vehicle dimensions;
- turn indicator.
To replace a H4 halogen lamp you must:
- Open the hood and disconnect the terminal from the negative battery connector.
- Unscrew the protective plastic casing from the inside of the headlight. If the fuse box is in the way on the left, you'll have to disassemble that too, but you can do without it.
Next, you need to disconnect the lock cable directly from the projector
- Disconnect the power connector from the halogen lamp. It is located in the center of the box and is larger than the second side light.
- Press down on the retaining spring to release it, lift it up, and then remove the burnt out halogen bulb.
- After installing the new halogen, reassemble in reverse order.
To replace another headlight bulb, there is no need to remove the cover or unplug the extension cord. The turn signal light (PY21W) is located next to the box on which the other two lights are mounted. To replace it you need:
- Open the hood and disconnect the battery terminal.
- Unscrew the turn signal lamp socket located next to the headlight unit on the fender side of the vehicle.
- you can remove the lamp from the socket by pressing it and turning it counterclockwise.
- Insert a new lamp.
- Screw the socket into the hole in the headlight.
Replacing the Kia side light bulb is done by removing the entire socket from which the lamp is pulled out.
The procedure for installing fog lights on a Kia Rio has two stages. At the first stage, the lamps are installed in their standard places. At the second stage - the most important and complex - they are connected to the car's electrical power supply.
There are two ways to install fog lights (FTL) in the standard places provided by the manufacturer: by removing the bumper (practice at gas stations) or by removing the wheels (a handy and inconvenient method).
Wheel removal method
Let's consider the installation of PTF Kia Rio 3, which involves removing the wheels. The sequence of actions looks like this:
Place the Kia Rio on a flat, hard surface. The wheels are installed strictly in the direction of movement of the car. Engage first gear or put the reverse lever. It is recommended to place safety shoes under the rear wheel on the side opposite the gear engaged. Loosen the wheel nuts with a standard wrench. Place the jack on the side member reinforcement (approximately 40 mm from the threshold) and lift the car. Unscrew the wheel nuts completely, remove them and place them under the bottom of the car for safety reasons. Disassemble the wheel arch trim by unscrewing the bolts and removing the clamps. Note the dirt accumulated in the wing cavity. It must be removed and allowed to dry on clean surfaces. Remove the fog lamp cover by unscrewing the 4 mounting screws (you will need a short screwdriver, no more than 6-8 centimeters)
Three main screws can be removed with a standard screwdriver, but the fourth is difficult to reach with tools. Remove the fog lamp cover. Set the PTF to its normal position.
Assembly is carried out in reverse order.
https://youtube.com/watch?v=b3bUuRVWjC8
Second way
Another option involves removing the bumper. This makes it easier to route cables through the engine compartment and connect to the vehicle's power source and controls.
Complete instructions for replacing the fog light on a Mazda 3
Safe driving is influenced by many factors, one of which is the condition of the Mazda3's fog lights. Because the reflectors are not very high, the glass is damaged quite often, which significantly reduces the quality of light. This is when it needs to be replaced, which you can mostly do yourself.
All work requires minimal equipment and careful execution of all stages
It is important to follow the sequence of work so that disassembly and assembly of both the entire fog lamp structure and its individual parts is carried out correctly. You can do all the work yourself, but it's best to have a second person on hand to help with disassembly and assembly.
We install Mazda 3 fog lights correctly
If the fog lamp PTF BC hatchback Mazda 3 2008 has low efficiency, it is necessary to replace the glass or incandescent lamp. All work related to replacement is carried out in accordance with a certain procedural algorithm.
Fog lights are installed in the following sequence:
- Remove the clamp from the battery to avoid short circuit.
- Raise the car and remove the wheel to gain access to the headlight.
- Unlock the fender latch pins to release the front fender trim.
- Unscrew the three screws on the headlight and disconnect the connector block to remove the assembly.
- Replace the assembly with a new one.
- Reassemble in reverse order.
Replacing glass on fog lights
The Mazda 3 fog lamp glass is often damaged during vehicle operation. This problem has unpleasant consequences, including affecting driving safety. Headlight decals can temporarily solve your window maintenance problem. However, if cracks have already appeared and the quality of the light beam has decreased significantly, you should think about replacing the damaged element.
You can buy a new windshield at auto stores that sell auto parts for the Mazda 3 or take advantage of offers from the dismantling market. Here you can buy all glass at an affordable price with a minimum service life.
Glass replacement is carried out according to the following scheme:
- Pick up a new glass.
- Disconnect the battery cable to avoid short circuit.
- Raise the car and remove the wheel to gain access to the headlight.
- Release the sash latch pins to unlock the sash front trim.
- We unscrew the three screws on the headlight and disconnect the connector block to remove the structure.
- Remove debris and lift the glass to remove it.
- Degrease the unit with gasoline or thinner.
- Clean the structure from old sealant and sand the surface.
- Apply sealant around the perimeter of the glass without disturbing the sealant lines.
- Install the glass, pressing it directly against the fog lamp.
- Remove any remaining sealant.
- Allow the composition to dry completely.
- Reassemble in reverse order.
After attaching the headlight, you need to adjust the fog light. This will require a wall with a straight line at the height of the fog lamp. The car is placed at a distance of 3 meters from the wall, and the height of the light beam and the distance between the points are adjusted by two screws.
Changing light bulbs
To replace the fog light bulb, perform the following steps in the following order:
- Remove the clamp from the battery to avoid short circuit.
- Raise the car and remove the wheel to gain access to the headlight.
- Unhook the fender latch pins to release the front fender trim.
- We unscrew the three screws on the reflector and disconnect the connecting block to remove the structure.
- Remove the cover by releasing the latches.
- Disconnect the clamps and lamp latch.
- We remove the light bulb.
- Insert the new bulb and secure it.
- Reassemble in reverse order.
When you go to buy a new light bulb, it is better to take the old one with you so that you can find the same one and thus avoid making the wrong choice and wasting your money.
Results
All work related to replacing glass or a light bulb does not require specialized tools and equipment, as well as knowledge and skills. Do it yourself for everyone, which means you don’t need to go to a service center. However, if in doubt, it is better to entrust all work to professional craftsmen.
Types of lamps for PTF
Before purchasing, the format of the base and the type of part are determined. The following types of lamps are installed in fog lights:
The design of the fog lamp reflector differs from the type of light source. Changes concern the shape, wiring system, and cooling.
Car enthusiasts often install LED lamps or xenon in headlights that were designed for halogen. In this case, the formation of the correct light beam is impossible, as is the provision of proper lighting. Independent intervention in the structure causes unwanted light to appear, which blinds oncoming drivers.
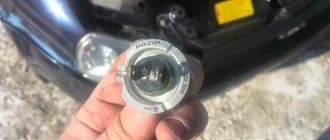
To select the appropriate base and type of light element, you should use electronic catalogs that require a VIN number. A proven option, so as not to make a mistake, is to dismantle the part from the fog lamp and go to the store with a sample in hand.
Classic halogen
Fog lights use a regular halogen lamp. The type of base depends on the make of the car, most often it is H7 or H1.
When choosing a new part, preference should be given only to well-known companies that have proven themselves well in the market. These include:
Products from dubious manufacturers can not only damage the glass of the headlight, but also melt the plastic housing. It is also necessary to observe the voltage and power of the part. The parameters are indicated on the flask or body of the original consumable.
Halogen-type lamps have a yellowish glow, consume from 35 to 75 watts and last about 2-4 years.
LED lamps
LEDs are characterized by reduced energy consumption and a bright glow with a white tint. Durability can exceed 10,000 hours, which equates to 5-8 years of use.
LED light sources become very hot during operation. To protect against melting, manufacturers often use radiators with forced cooling by fans.
To connect, you do not need to cut into the car wiring and provide additional power. Installation into the headlight is carried out using standard sockets and fasteners.
When choosing, you should pay attention to the following manufacturers:
The use of low-quality parts can lead not only to melting of the headlight, but also to short-circuiting the wiring. The main disadvantages of diodes include frequent fan breakdowns, as a result of which the control unit or LED tracks burn out.
The installation of such lamps in a headlight designed for halogen is monitored by traffic police officers. If a malfunction is detected, the inspector has the right to impose an administrative fine and confiscate the equipment.
Gas discharge
Xenon is not officially installed in foglights, as it requires an expensive lens to form a light beam.
To fully use xenon in fog lights, you will need not only the installation of lenses, but also the installation of additional ignition units. With the usual replacement of light bulbs with gas-discharge ones, the reflector will not be able to form a beam of light and will blind oncoming drivers.
Car owners often install xenon fog lights and lower them down. However, this does not completely remove the glare, and all road users are blinded.
Installation of such equipment is prohibited by vehicle safety requirements and is punishable by an administrative fine.
Gas discharge
Xenon allows you to make fog lights very colorful and effective. The service life of high-quality xenon is about 3 years, but xenon can only be used for fog lights in accordance with serious rules, violation of which will not result in a fine, but in deprivation of rights for up to 1 year. So, for xenon you can only use special headlights marked “D”, and the presence of an automatic corrector is a must. Self-installation of xenon in fog lights is more difficult than other types of lamps, but if installed correctly, the result will last for a couple of years. The disadvantages of gas-discharge lamps, in addition to the high price, include the need to replace both lamps if only one burns out.
Buy LED lamps
CL6 H8,H9,H11.
Buy a high-quality fog light bulb
To buy a good light bulb, just contact the store with a professional consultant. Here they will tell you which manufacturers are the most reliable, which lamp models have sufficient brightness for your car model. The design of the fog lights also determines the type of light element required. Some good, reliable bulbs simply won't fit into your headlight because they're too long. There are also options for types of bulbs - you can buy halogen, LED or xenon bulbs for fog lights. The choice is influenced by the following factors:
if the replacement occurs in one headlight, you should pay attention to the type and brightness of the lamp in the second fog lamp; it is necessary to comply with the power, which is a limitation of the manufacturer of a particular headlight; It is also worth purchasing a lighting element of exactly the shape that is necessary for normal installation; it is necessary to make sure that the thermal activity of the lamp does not destroy the headlight and its surrounding elements; when purchasing a lamp for an original factory headlight, it is best to buy an official lighting element from the manufacturer; overpaying for the purchase of light elements usually pays off handsomely, the lamp will last longer, and the quality of its work will not disappoint you.
Everything suggests that it is better to buy expensive equipment that will work functionally and for a long time. Many believe that an excellent opportunity would be to change the factory settings and install a more functional LED lamp or xenon lighting element. This solution is not suitable for all fog lights. Therefore, before performing this task, it is best to consult with a specialist who can evaluate the design and requirements of your fog lights.
Comments and reviews
Ivan Ivanovich Baranov
Experience working at a service station:
View all answers
Avtozam.com - your assistant in car repair and maintenance
Your use of this website constitutes your agreement that your use is at your own risk.
Not all maintenance processes require contacting specialists. If you don't want to pay extra money for simple procedures, you should learn how to perform them yourself. But in the design of modern cars there are not many tasks that can be done with your own hands. Previously, with a little preparation and good instructions, it was possible to perform virtually any process of car repair and maintenance with your own hands. Today, manufacturers have done everything to protect drivers from performing their own repairs. Therefore, you have to turn to professionals and pay money even for trivial work.
However, there are a number of options for servicing the machine yourself. For example, everything related to replacing lighting elements can be done with your own hands without difficulty and without extra costs. To change the light bulb in the fog light, all you need to do is acquire a high-quality lighting element, look at the replacement instructions and follow this procedure. The main features of this simple procedure are the careful execution of all tasks. Let's look at several important aspects of doing this job.
Replacing the lamp - step-by-step instructions
First you need to decide how to gain access to the failed light bulb. As a rule, access to the PTF lamp can be obtained in two ways:
- from the wheel side;
- by removing the entire headlight.
The first option is suitable for those who decide to replace the light bulb in the fog light on a VAZ or other Russian cars. The ideal option is to drive into a garage with an inspection hole or lift the car on a lift. Otherwise, you will have to lift the corresponding part of the car using a jack.
- We fix the position of the car and remove the corresponding wheel.
- Unscrew the fastening elements of the fender liner and remove it. Sometimes you can get by by partially unscrewing the screws.
- We move the protective boot and disconnect the connector with the wires.
- Turn the faulty bulb counterclockwise and pull it out of the headlight.
- We install a new light bulb and turn it clockwise.
- Put the connector and boot back on.
In some cars, it is impossible to access the fog lights in this way. In this case, you will have to remove the entire headlight from the bumper. Here you can’t do without a lift or inspection hole.
First, unscrew the headlight mounting elements and pull it out, disconnecting the connector. It is necessary to understand that PTF locks are different in all cars, so there cannot be a single instruction. As a rule, everything is intuitive and no difficulties arise even for a beginner.
Let's sum it up
High-quality lighting in a car is an important point for every vehicle owner. The optics must be in order, perform all its functions and provide a maximum useful field of view. Fog lights are designed to help the driver in difficult visibility conditions. They are quite powerful and produce a point light, which allows you to show oncoming drivers the presence of vehicles on the road. This makes the trip safer and involves the use of effective and high-quality lighting technology. Otherwise, fog lights turn out to be a useless addition.
Therefore, you always need to monitor the performance of these elements. It is quite important that all optics in the car work efficiently. If the fog light doesn't work, you have three options. You can completely replace the entire headlight and achieve high efficiency. There is also the option of replacing just one light bulb to save money on repairs and get the same performance characteristics. The third option is to go to a service center and have it professionally repaired. Which way would you choose to solve this problem?
Replacement instructions
Before you change the bad bulb in the fog light, you need to understand how to get to it. The design of light devices built into the bumper varies and depends on the make of the car. There are 2 ways to access lighting devices:
- from the wheel arch side;
- by removing the optical block.
The first method is used when disassembling headlights of VAZ cars and other foreign brands with a similar design. For ease of disassembly, it is worth placing the car on an inspection ditch, although you can do without it. The work algorithm is as follows:
- Secure the car and remove the front wheel from the side of the faulty device.
- Unscrew the screws holding the plastic fender liner and remove it from the car. In some car models, you do not need to remove the entire mudguard, just bend it to the side.
- Remove the rubber boot protecting the connector.
- By pressing the corresponding protrusion, disconnect the block with wires.
- Turn the burnt out lamp counterclockwise and pull it out of the block.
- Insert a new element, secure it and assemble.
During the replacement process, try not to touch the bulb bulb, as sweat marks will reduce the service life of the part.
If this happens, wipe the glass flask with a dry, clean cloth. Before assembling the unit, check the functionality of the lighting by turning on the fog lights. Not all foreign cars allow access to the fog lamps on the wheel side. The question of how to replace burnt out light bulbs in this situation can be solved by removing the entire fog lights. You will need an inspection hole from where it is more convenient to unscrew the optical unit. If necessary, you will have to remove interfering parts - the lower apron or front body kit.
Remove the unscrewed headlight from the outside of the bumper and disconnect the connector. By turning counterclockwise, pull out the block from the block (this is done on Nissan cars), there are spring clips under it. They should be unlocked and the lamp pulled out. Having installed the new element and checked its operation by turning on the headlights, put the block and other parts in their places.
Preparing for recovery
To repair the reflector yourself? you need to remove the headlight from the car. On some models, you will need to remove the radiator grille and bumper.
To remove the grille:
- Open the hood.
- Remove all clamps and clips.
- Unscrew the retaining screws, if any.
- Gently pull the part towards you and up.
To avoid losing fasteners? they can be screwed into the grill or placed in a ziplock bag and tied to the piece.
- Unscrew the screws around the perimeter of the part.
- Unclip the plastic clips.
- Loosen the fender liner fasteners adjacent to the bumper.
- Disconnect the fog light plugs.
- Remove the bumper without scratching the fenders with sharp corners.
- Unscrew the upper and lower fasteners.
- Carefully disconnect electrical plugs.
- Disconnect the corrector rods (for models with a hydraulic system).
- Remove the headlight.
Many vehicles do not require removal of the grille and bumper to remove the headlights. In this case, the wiring is disconnected, the holding mechanism rods are pressed, and the optics are moved forward until they are completely removed.
To disassemble, the headlight is placed in a cardboard box with a hole and heated with a hairdryer for about 15-20 minutes. Then the glass is carefully pryed up with a screwdriver and pulled out.
why the fog lights don't work and how to remove the PTF according to the diagram
Traffic safety in poor visibility during rain or fog is ensured by fog lights
Therefore, it is important that they are in working order. The article discusses the PTF, features of operation, and provides instructions on how to replace a fog light.
Features of PTF operation
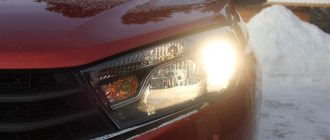
These lighting fixtures differ in the light they emit. They can glow with yellow or white light, their main feature is that they do not illuminate the fog ahead, resting the beam on it, but create a flat, wide beam that spreads along the road.
To ensure good visibility in bad weather conditions, the following two rules must be observed:
- Adjust precisely the boundary of the light beam emitted by the optics. The beam should not shine above the specified horizontal plane.
- The lamp must be at a minimum distance from the road surface. Under such conditions, it is easier to precisely adjust the boundary of the light beam.
It becomes clear that these lighting sources are necessary to ensure good visibility on the road under difficult weather conditions.
To ensure high-quality light from the beam, it is necessary to monitor the condition of the surface of the lampshade: polish, remove scratches that reduce the transmission capacity of the glass.
Common foglight malfunctions and how to fix them
The main cause of foglight malfunctions is oxidation and corrosion processes.
The reasons why the fog lights do not light up may be the following:
- fuse is blown;
- light bulbs burned out;
- there is no contact in the relay;
- the shutdown button is faulty;
- poor contact to the ground of the body or the PTF itself;
- incorrect connection;
- oxidation of contacts.
To diagnose and troubleshoot problems, you will need a tester and a set of tools. The most common electrical fault is blown fuses. If they are burnt out, they need to be replaced.
If the fuses are OK, then you need to check the light bulbs in the headlights. They can burn out as a result of a short circuit, or due to natural wear and tear. You can check the serviceability of the lamp using a known working light source
It is important that the base of a working lamp is the same as the base of the non-working element. You can replace the light bulb without removing the PTF (video author – MegaMeyhem). If, after eliminating the above reasons, the fog lights do not work, then the power button may be faulty, which can be easily replaced
The contacts may oxidize, then they should be cleaned. If the fog lights do not light up after connecting them yourself, the wires may be connected incorrectly
If, after eliminating the above reasons, the fog lights do not work, then the power button may be faulty, which can be easily replaced. The contacts may oxidize, then they should be cleaned. If the fog lights do not light up after connecting them yourself, the wires may be connected incorrectly.
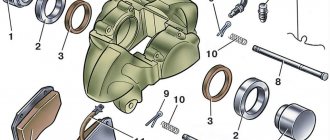
If fog lamp repair is necessary, it may include replacing the fog lamp glass or its lamp. It is possible that the fog lamp lining is damaged, then it will be necessary to remove the fog lamp and replace the fog lamp frame, which is secured with a bracket. In any case, before disassembling the fog lamp to repair or replace the glass shade, it is necessary to dismantle the fog lamp by unscrewing the screws securing it to the bracket.
What is this service
Most drivers have basic skills in replacing some parts of their car, but replacing a fog light bulb is often not on that list. Indeed, it would seem to be the simplest operation, because at home we usually change a burnt-out light bulb ourselves. But the problem is that in some car models you have to do a little fiddling to change the fog light bulb. And since this procedure is not performed so often, especially with high-quality optics, the skills are forgotten. And when it requires replacing a reverse lamp and replacing brake light lamps, it is not recommended to drive onto the roadway.
A small educational program
Many drivers underestimate the benefits of fog lights. Although this optics has proven itself well not only in foggy conditions. In rainy weather and snowfall, when conventional headlights are of no use, and sometimes visibility becomes even worse, fog lights can save the situation. Many drivers know how blinding the bright white headlights of oncoming cars are, practically invisible through the veil of rain, snow or fog. The yellow light of the fog lights, directed downwards, under the veil of fog, on the contrary, makes the road surface and part of the shoulder more noticeable.
How to replace a light bulb in a fog light?
Most often, fog lights (FTL) are built into the “body” of the bumper and form one whole unit with it. Therefore, in order to replace a regular light bulb, you sometimes have to unscrew and remove the entire front bumper. This procedure begins by unscrewing the screws on which the bumper is mounted. Then, opening the hood, disconnect the power wires leading from the lamps. Then the fog lights are removed and replaced.
This operation is usually performed if there is physical damage to the entire headlight or if it is impossible to open the headlight housing with a regular screwdriver (in the case of a solidly soldered housing). It is best to heat such a housing from the back to slightly melt it and be able to remove the cover and replace the light bulb. Of course, the tightness will be slightly lost, but there is no other way out if the operation needs to be performed urgently. If the housing is ordinary, then replacing the fog light bulb is easier, using a regular screwdriver. Having opened the case, the light bulb is unscrewed, and a new one is screwed in its place, after which the case is closed.
If replacing a light bulb in a fog light is still not one of your favorite activities, then by ordering an on-site service from our technician, you will receive excellent service in a short period of time and at the most affordable price.
https://youtube.com/watch?v=0ibs5ou_XmI
Video “Replacing PTF”
This video demonstrates how to remove fog lights and how to replace them (the author of the video is Sergey Glazyrev).
To change the light bulb in the fog light on a Nissan Note yourself, you need to arm yourself with a screwdriver (Phillips+flat head), the light bulb itself, and a pair of free hands.
Those who love the non-standard, or who want to decorate their car a little, can find taillight covers at https://www.russ-artel.ru/, they are also called cilia. And they are available for both rear and front headlights. This is a fairly inexpensive way to slightly tune your car, thereby making it stand out from the crowd of production cars.
LEDs in foglights are now very popular, there are even yellow LEDs. In my opinion they look very good and shine brightly with a white glow. So which diodes to choose in PTF?
LEDs for front fog lights
H8 35W lamps
. All the light bulbs are in Raccoon.
In the photo on the left you see the best-selling LEDs in PTF. The diodes are very successful: they shine very brightly, with pure white light.
They have their own cooling and have been working for many car enthusiasts for a long time.
When ordering, specify the base correctly - H8 and be sure to read the reviews to decide for yourself whether to buy or not!
Which ones are better?
Typically, standard optics have halogen elements; replacing them with the same ones, but more powerful, makes no sense. It is better to install LED lamps in fog lights; a good option is to replace the fog lamp with xenon (author of the video - Learning to drive a car. All the secrets for beginners.).
LEDs can be installed in PTF without restrictions, unlike xenon. Replacing a light bulb in a fog lamp does not require special equipment or specific knowledge, so you can replace it yourself. It is better to buy products from trusted brands, since cheap Chinese samples are often of poor quality and quickly fail.
When purchasing LEDs, you need to select a lamp with a base similar to the halogen counterpart. An important parameter for fog lights is brightness, measured in Lumens (Lm). Fog lights with xenon must have a brightness of at least 1000 lm.