AvtoVAZ, as a domestic manufacturer of passenger vehicles, has a controversial reputation among car enthusiasts. On the one hand, their cars are loved for a relatively low price, and this applies to both the cars themselves and subsequent operation.
On the other hand, this is, in fact, the only thing you can love them for, because in all other characteristics the Lada is hopelessly behind its foreign competitors. At the same time, two decades ago it set the pace of development in some areas and gave a head start to some overseas colleagues. However, the concern itself admits that their creations are not intended to set speed or roadability records. These are cars for every day, which, as they say, are not a pity - they do not lose their visual appeal even after external damage, because they do not have it, and repairing them, as a rule, is not difficult even for a novice car user.
VAZ-2110 is a very common model, especially on the secondary market. It cannot be said that it stands out as something special even against the background of its fellows, but it looks much more fun than the same “seven” or “nine”, which for more than 30 years have not undergone any changes either in the interior or in the technical component. In addition, the “ten” is distinguished by relatively good reliability of its components, and this applies not only to small consumables, but also to spare parts for the gearbox and internal combustion engine. However, of course, it cannot be done without problems: both due to natural wear and tear and as a result of other reasons, various types of breakdowns occur. A common problem on such cars is the need to replace bearings.
Of course, you can go to the nearest service station and ask its technicians to service your “ten,” but replacing generator bearings is not a procedure that requires enormous effort.
If you bring a VAZ-2110 to a service station, it won’t require any effort at all, but it will require a certain amount of money, albeit not that much. However, you can replace these parts yourself, thus not only saving money, but also gaining experience in independently servicing your car, which will undoubtedly be useful in the future.
When replacement is required
If you hear creaking and howling while the generator is running, then you have discovered the main sign of bearing failure. The only correct solution is replacement.
Creaking and howling occur due to the fact that the bearing separators lose lubrication, they wear out, and are destroyed as a result of prolonged use under heavy loads.
Sometimes a thin creaking sound can be heard from the generator, which is often confused with bearing failure. In fact, it could be the timing belt pulley or the water pump. Because to make sure, just remove the belt. If the sound remains, then the culprit is the bearing.
What to use
Before you start replacing the bearings on the generator, you need to determine what elements are on your car, as well as what they can be replaced with.
| Bearing | Number | |
| Old generators | New generators | |
| Front | 6302 | 6303 |
| Rear | 6202 | 6203 |
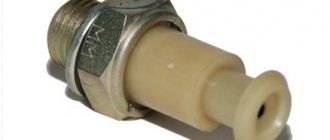
When choosing bearings, pay attention to the hub manufacturers. For VAZ 2110, bearing hubs are produced in the city of Samara and are marked SPZ-4. But there are also Vologda and Saratov hubs marked 23 GPZ and 3 GPZ, respectively. It is not recommended to purchase bearings with unmarked hubs, much less use Chinese generator elements.
Dimensions
It will not be superfluous to know what dimensions the standard front and rear generator bearings for your “ten” should have in order to make sure that the spare parts are selected correctly.
The rear bearings of the new type, marked 6203, have the following dimensions:
- Inner diameter - 17 millimeters
- External diameter - 40 millimeters
- Width - 12 millimeters.
We recommend: Repair of power windows on VAZ 2110
The front bearings marked 6303 have the following dimensions:
- Inner diameter - 17 millimeters
- External diameter - 47 millimeters
- Width - 14 millimeters.
Based on the dimensions, you can understand why rear and front bearings are often called small and large, respectively. It’s easy to visually distinguish them from each other, so you definitely won’t confuse the elements when replacing them.
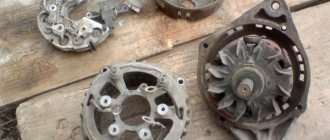
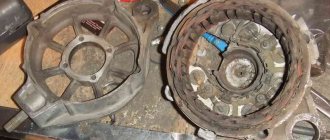
Disassembled device
Video “Do-it-yourself rotor repair instructions”
Visual instructions on the topic of self-repair of the rotor from an electrical specialist are given in the video below (the author of the video is the Auto Electrician HF channel).
The purpose of a car generator is to convert mechanical energy into electrical current and supply electrical energy to the systems and components of the car while driving. The generator is responsible for charging the battery and transmitting power to the vehicle's engine systems.
Alternator malfunctions can take a serious toll on your wallet, but it's better to do a DIY generator repair than to resort to alternator replacement. After all, replacing a generator is not a cheap pleasure.
If you are unlucky enough to encounter a generator failure, let's try to find out what kind of generator failure we are facing.
Generator bearing replacement process
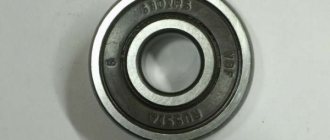
General view of the front and rear bearing of the generator
Existing play indicates that the bearing has indeed failed.
So, let's consider the step-by-step process of replacing a product with a VAZ-2112.
- We place the car on a pit or overpass. The main thing is that there is access from below.
- We dismantle the “minus terminal”.
- Remove the generator belt.
Pull the alternator belt through the slot
- To further carry out the work, you will need to dismantle the generator itself.
- Disconnect the appropriate wires to the generator.
Disconnect all wires that go to the generator
- Loosen the nut that holds the tension bolt.
- Remove the adjusting bolt.
Unscrew and remove the generator adjusting bolt
- Remove the lower engine protection.
We dismantle the engine protection
- Unscrew the 2 lower mounting bolts.
- We are dismantling the generator. It comes out through the bottom.
We unscrew the fastenings and dismantle the generator
- When the generator is in your hands, you can put it on the table. Now, you can proceed directly to the repair.
- Having blocked the rotor from turning, remove the pulley.
- We dismantle the casing. To do this, you need to pull back the latches.
Block the rotor and unscrew the pulley
- Remove the front and back covers.
Generator disassembly diagram
- Now feel free to move on directly to replacing the bearing.
Using a hammer, knock out the rotor from the cover along with the bearing
- The product can be dismantled using a special puller, or simply by knocking it out of its seat.
- Installation is carried out in reverse order.
Replacing bearings
- We clean the load-bearing elements well.
Disassembled generator
- Apply sealant to the seat.
Applying sealant
- We press in new bearings.
One bearing is pressed in
- The most difficult part is to press in the inner bearing. First we remove it. There is a puller, but if it is not available, then we use a regular key.
Removing a bearing without using a puller
- We put on a new one.
New bearing ready for use
Next, we assemble the generator and install it back!
What bearings are on the VAZ-2112 generator?
The choice of bearing should be taken seriously, since the stable voltage in the on-board network, as well as the wear of the generator itself, depends on this part.
Since there are 2 bearings in the unit - front and rear, each of them has its own markings and dimensions.
So, the front ones are marked - 6302 or 6303, but the rear ones - 6202 or 6203.
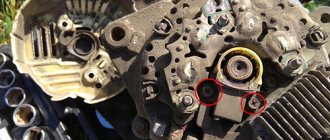
Generator front and rear bearings
Since there are many fakes on the automotive spare parts market , especially with regard to bearings, when choosing, you should pay special attention to the production of this product. The wear of many other parts of the generator will depend on the quality. Therefore, it is recommended to check the availability of a quality certificate, as well as the presence of markings and holograms.
Original
6303-10B is the original catalog number of the generator bearing for the 10 series of Lada cars produced by AvtoVAZ. The average cost of a product is up to 150 rubles .
Analogs
Not original bearings, strip, and plug. Vologda bearings VBF
In addition to the original, you can buy a substitute product. Of course, now bearings can be selected depending on the size or number, but manufacturers of analogues still decided to produce high-quality products for cars.
| Manufacturer's name | Catalog number | Price |
| F.A.G. | 6303 | 450 |
| Nachi | 6203ZZ | 150 |
| NTN | 6203ZZ | 180 |
| Koyo | 6303C3 | 200 |
| SNR | 6203.ZZ | 400 |
Reasons for failure
There are several reasons for generator bearing failure:
- Wear . Like any part, the generator bearing fails during operation.
- Violation of the rules of operation and maintenance will lead to the product failure.
- External factors such as dirt, salt and road chemicals lead to the part being subject to increased wear.
- Poor quality can cause premature failure.
- Lack of lubrication. The grease may have dried out over time.
The lubricant is almost invisible
Diagnostics
If noises and hums appear in the operation of the engine, it is necessary to check and find the culprit of the noise. Most often it is the generator, but in order to exclude other culprits it is necessary to diagnose it.
It is not difficult to independently check the condition of the bearings; this only requires compliance with the points described below.
- Remove the generator belt from the crankshaft and generator pulleys
- We start the engine and listen
- If the noises, whistles, vibrations have disappeared and the internal combustion engine is working properly and smoothly, then the culprit is definitely the generator bearings.
- You can also grab the generator pulley and shake it up and down; there should be no play. Turn the rotor manually, there should be no whistles or squeaks, the rotor should rotate smoothly and softly.
Why is the 2110 generator needed and how does it work?
The tens generator is an ordinary, most banal three-phase dynamo. Like an electric motor, but in reverse. The generator is driven by the crankshaft pulley and produces a nominal voltage of 13-14 volts at its output. at least it should give. Stop. Therefore, then it is three-phase, if we need constant +12, and not alternating current? very simple.
To answer this question, you need to find a grandfather who has a Moskvich 403 in his garage. Watch him when he goes fishing at five in the morning and ask him to open the hood. The atomic warhead, which takes up half of the engine compartment, is the DC generator. If grandpa doesn't come out for a long time, here's a photo of this generator.
Naturally, a modern car, even a dozen, cannot afford the luxury of devoting half of the engine compartment to a generator, so it has to convert alternating current to direct current. Alternating current generators are always several times more compact. And to convert it to a constant voltage, there is a rectifier unit in the generator housing itself. It is he who converts the change into the +12 volts we need. A more detailed picture of the generator structure for the curious is here:
For now, we’ll talk about malfunctions, mechanical malfunctions that can take a car enthusiast by surprise.
Why does noise occur?
Although the generator is one of the most stable mechanisms, no car is immune from its breakdown. Often the malfunction is accompanied by noise coming from the bearings. If the driver hears a squeak, this indicates poor belt tension. In this case, the situation will be corrected by stretching it. separately about how to check the functionality of other elements of the generator .
Bearing wear is always indicated by a hum. If the driver begins to hear a similar noise from under the hood, do not delay repairs. The reason is that without a generator the car will not go far, because the battery in the vehicle's electrical system acts as a starting element. Its charge is not enough to drive.
A worn bearing begins to make noise because it has a strong connection with the engine crankshaft. The forces are transmitted to it through the pulley. For this reason, the noise will increase with increasing speed.
What do you need to know when choosing new parts?
Initially, in the design of the 2110 generator, as mentioned above, two bearing devices are usually installed. In older versions of the car, parts marked 6302 or 6303 (these are front units), or 6202 (rear units) are used; in more modern versions, 6203 bearings are installed at the rear.
As for the sizes, they are as follows:
- for 6303 (or the domestic analogue under number 180302) the dimensions are 17*47*14;
- for marking 6302 (or domestic analogue 180303) - 15*42*13;
- for marking 6202 (Russian parts are marked as 180202) the dimensions are 15*35*11;
- for 6203 (domestic equivalent - 180203) dimensions - 17*40*12.
Video herunterladen, kostenlos anschauen
3:40Aufrufe 1 074 345 96%13:35Ich teste den Amazon 49€ Beauty Adventskalender!Aufrufe 275 942 96%3:34Aufrufe 1 145 615 97%9:05Meine neue Wohnung | inscopelifestyleAufrufe 181 228 98%1:09Gülperi | 7.Bölüm - Fragman 1Aufrufe 399 780 99%3:09Zara Larsson - Ruin My LifeAufrufe 1 364 343 98%14:02JP Performance - Lexus LC 500 | Das Bodykit!Aufrufe 194 788 98%10:03Gamescom 2018 VERBOT | Ich entschuldige mich !Aufrufe 318 697 96%6:44Wie gut ist Bibis Bilou AppAufrufe 66 960 98%9:34Trump Paints A False Portrait Of The Migrant CaravanAufrufe 560 057 93%2:9:51Aufrufe 261 086 96%20:27Big Little Allies | The Daily ShowAufrufe 498 648 96%0:31Aşk ve Mavi - 75.Bölüm FragmanıAufrufe 642 882 81%5:53Fındık Ailesi. Mikail ve Elis'in anneleri tanışıyorAufrufe 402 202 32%7:29ぶAufrufe 2 655 468 65%3:58WizKid — Fever (Official Video)Aufrufe 503 696 96%3:04Cardi B - Money (Official Audio)Aufrufe 5 353 168 92%7:07Die große Schuldemo #41 | Krass SchuleAufrufe 583 642 96%2:14:01Müge Anlı ile Tatlı Sert 23 Ekim 2022 - Tek ParçaAufrufe 172 723 80%6:39Sarp çocuklarına kavuşuyor.. - Kadın 36. BölümAuf rufe 756 329 96%15:04INTIME CHALLENGES
What types of bearings are in the top ten: part numbers and sizes
Bearings in generators of VAZ 2110 cars are closed type, ball, single row, have a double-sided seal.
- The front marking is 6202 2RS (in domestic catalogs under number 180202).
- Rear bearing - 6103 2RS (aka - 24940220).
An important point: when choosing bearings, you should pay special attention to the manufacturers of their hubs. Typically, VAZ 2110 bearing hubs are produced in Samara, their marking is SP3-4.
You can also find hubs on the market from 23 GPP (this is Vologda) and 3 GPP (this is Saratov). It is strictly not recommended to buy bearings on which the hubs are not marked. You also cannot buy Chinese generator bearings, which are now found everywhere, since the quality of these bearings does not stand up to criticism.
Dismantling and disassembling the generator (in detail)
Work order:
- Disconnect the negative terminal of the battery.
- Next, unscrew the terminals of the device itself, having previously unscrewed the fastenings of these terminals.
- We study the diagram of the generator fasteners in order to begin removing the unit.
- Then remove the crankcase guard and get under the car.
- Next, unscrew the fasteners securing the generator to the frame (positions 5 and 2 in the diagram).
- While unscrewing the last fastener, hold the mechanism with your hand.
- Remove the unit, remove dirt and wipe with a rag. Lubricate the threaded connections with WD-40.
- Use a screwdriver to remove the rear plastic cover on the generator.
- Using a Phillips screwdriver, unscrew the voltage regulator and brush holder fastenings.
- Remove the pulley from the axle and clamp the product in a vice.
- Using an adjustable wrench or other wrench, unscrew the nut on the pulley. To prevent the shaft from spinning, insert the hexagon into a special recess at the end.
- Remove the washer and, having unscrewed the corresponding bolts, disassemble the unit body.
- Remove the plastic cover and then the front ball bearing to access the armature.
Replacement
The procedure cannot be called complicated, but it is very important to strictly follow the instructions. Based on our recommendations, as well as video tutorials, you can carry out the replacement yourself without any problems.
You have already found out what bearings are on VAZ 2110 generators, purchased a set of new spare parts, so you can start repairing.
Dismantling works
Front bearing
- Slightly unscrew the mounting nut on the generator, and also loosen the adjusting bolt.
- Reset the alternator belt and start the engine. This will allow you to verify that the problem is with the generator.
- If the noise disappears, then we move on. There is still a lot of work ahead of you.
- Let's move on to the battery, from which the negative terminal should be removed. This is important from a safety point of view and protection against accidental short circuits during repairs.
- Once the terminal is removed, unscrew all the wires going to your generator.
- If you have a crankcase guard, unscrew the mounting bolts and remove it. This will allow you to reach the lower mount of the generator and remove the device. Remove the generator by pushing it through the engine compartment.
- Using a regular screwdriver or other handy tool, you need to block the generator rotor and then unscrew the pulley.
- The next step is to look for special latches. By pulling them to the side, you will be able to dismantle the device body.
- Next, the generator brushes are unscrewed, as well as the mounting bolts holding the halves of the generator assembly. There should be 4 of these bolts in total.
- We recommend marking both halves of the generator housing to avoid problems during reassembly.
- Use a flathead screwdriver to pry up the cover and remove it.
- Practice shows that it is more convenient to remove the rotor from the front cover bearing in the following way. Take a nut and screw it onto the rotor threads. Then hit it with a hammer, first placing a wooden block under it.
- Find a part whose diameter will coincide with the diameter of the bearing being removed. For example, a 27 millimeter head may be perfect.
- Gently start tapping the element so that the bearing comes out of its seat.
- Take the new bearing and prepare to reinstall it.
- The first step is to treat the new bearing with lubricant so that it lasts as long and reliably as possible.
- To install a new component, you will need the old bearing. Place it on top of the new device and lightly tap with a hammer to install.
That's it, the front bearing has been removed and replaced. Let's move on to the back.
Press-fitting
Rear bearing
- To remove the rear element, you will need a special puller;
- If you don't have a puller, you will have to knock out the component with a chisel. An alternative option is a metal rod and a powerful, strong screwdriver;
- The selected tool is used to strike the bearing with a hammer. Here you definitely need to move along the surface, moving in the opposite direction;
- Some people can easily cope with dismantling; they use a regular strong open-end wrench;
- Now take the socket that you used to remove the front bearing and the old generator element that was removed. With their help, a new bearing is driven into its seat;
- If you don't like this method, use a tubular wrench or a metal pipe whose diameter matches the diameter of the rear bearing.
Having finished the work, all you have to do is assemble the assembly, following the steps in reverse order. You should start with the front cover of the generator, followed by all other components of the assembly.
If you carefully study the instructions, watch training videos, understand the structure and operating principle of the generator, replacing its bearings will become a fairly simple repair job for you, which will take no more than an hour of your time.
After completing the replacement, be sure to check the machine for noise. If everything was done correctly, the next operation to change the bearings will not be required soon.
Replacing the generator bearing on a VAZ-2112 is quite simple with your own hands. However, to complete the process you will need some knowledge of car design and auto electrics. Particular attention should be paid to the quality of the part, since low-quality components fail much faster than more expensive high-quality ones.
Communities › Kulibin Club › Blog › How to remove a blind bearing without a puller
Hi all! During quarantine, we got around to sorting out a long-broken hammer drill, and during disassembly and troubleshooting, a collapsed bearing was found (only the inner race remained, the rest had spilled out) pressed into a dead tide in the area. In general, all the bearings were easy to get, but not this one, I don’t have a collet puller, and its price did not justify the repair economically. I found a solution in the form of a homemade reverse hammer from an old screwdriver, which I sharpened with sandpaper, and a holder for dies, which acted as a striker, and heated it up. with a hairdryer and in several approaches we managed to pick up and knock out the remnants of the bearing. I hope it helps someone)
Comments 48
In this case, was it possible to drill a couple of holes “from the outside” to the holder?
The alloy did not look particularly strong, I was afraid that the fit would crack later
Only this is not the inner ring...
Soap, bread crumb
Plasticine, bread, etc.
It would be so easy to pull out of the flywheels! In principle lifekah is not bad