Lada K alina 2 . REMOVAL AND INSTALLATION OF GENERATOR - PART 2
For removing the generator of cars with VAZ-21126 and VAZ-21127 engines
do the following. On cars with and without air conditioning, generators are secured in different ways, since to install the air conditioning compressor, a bracket common with the generator is used, of a new design, significantly different from the bracket of the previous design. The operation is shown using the example of a car without air conditioning. Techniques for removing a generator on a car with air conditioning are specifically discussed. You will need: keys “10” and “13”.
1. Disconnect the wire from the negative terminal of the battery.
4. Place the car on a lift or jack and remove the right front wheel (see “Replacing a wheel”, p. 50).
5. Remove the right front wheel arch liner
This is where contact bolt A and terminal block B of terminal D+ of the generator of a car with air conditioning are located.
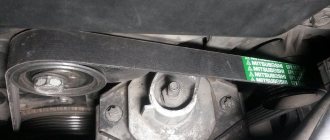
This is how the adjusting bolt is located on a car with air conditioning. Do not forget to tighten the locknut of the adjusting bolt after completing the adjustment!
20. Tighten the nut securing the generator to the tension bar to a torque of 21 Nm.
Lada Kalina cars are equipped with generators of two brands - 5132.3771 or 9402.3701-06. The standard Kalina generator is a three-phase alternating current device, which has a built-in rectifier unit and an electronic voltage regulator.
There are very different reviews regarding the quality and reliability of the devices with which these cars are equipped during factory assembly. If the unit fails, you can replace or repair it yourself.
Removing and disassembling the generator
Disconnect the wire terminal from the negative terminal of the battery.
Remove the generator belt (see “Checking the condition and replacing the generator drive belt”). By pressing the lock of the generator pre-excitation wire block. . disconnect the block from the voltage regulator connector.
Using the “13” socket, unscrew the nut securing the wire lugs to terminal “B+”. . and remove them from output.
Using a 17mm socket, unscrew the bolt of the lower mounting of the generator and remove it. Remove the nut from the generator bracket.
Using a 13mm socket, unscrew the nut of the bolt for the upper mounting of the generator.
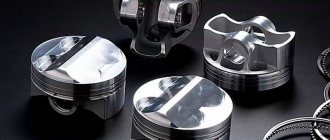
. and remove the generator. We disassemble generator 5132. 3771 to replace the voltage regulator, rectifier unit, rotor, stator and bearings.
Using the “8” socket, unscrew the three nuts securing the casing.
. and remove the casing.
Remove three metal washers from the casing mounting studs.
Using a slotted screwdriver, unscrew the two screws securing the voltage regulator terminals.
Using the “8” socket, unscrew the two nuts securing the voltage regulator.
. and remove the regulator.
We use a marker to mark the relative positions of the generator covers.
Using a 7-point socket, unscrew the four bolts holding the covers together.
Remove the back cover with the stator assembly. If the stator does not come out of the front cover, pry it off with a screwdriver from different sides relative to the front cover.
We put a high “24” head on the pulley fastening nut and through its hole insert a “8” hexagon into the hole of the rotor shaft. We unscrew the pulley fastening nut, holding the tool head with a pipe wrench or in a vice. Remove the spring washer
. and a spacer washer.
Push the rotor shaft out of the front cover.
. and remove the cover to replace the front bearing.
. Using a slotted screwdriver, unscrew the four screws securing the bearing pressure plate.
Remove the pressure plate.
Use your hands to push the bearing out of its seat.
. and remove it. If it is not possible to push out the bearing, we knock it out using a mandrel or tool head of a suitable diameter. To replace the rear bearing...
. Using a two-jaw puller, press the bearing from the rotor shaft. When performing this operation, the puller screw should be pressed exactly into the center of the shaft so as not to damage the plastic insulator of the rotor slip rings. To install the puller grips, two flats are made on the plastic rotor bushing. If it is necessary to remove the rectifier unit or stator.
. We unsolder the six terminals of the stator winding from the terminals of the rectifier block. . and, having unscrewed the three fastening nuts with a “8” wrench, remove the rectifier unit and the stator. Using a tester, we check the stator and rotor windings for open circuits and short circuits to the housing (see “Checking the generator”). We assemble the generator in the reverse order. To install the rear bearing, rest the front end of the rotor shaft on a wooden block.
. and press the bearing onto the rear end of the shaft using a mandrel or a piece of pipe of a suitable diameter, applying force only to the inner ring of the bearing. If the front bearing cannot be inserted into the generator cover...
. We press it in with a suitable tool head, applying force to the outer ring of the bearing.
Tell me how to remove and replace the Lada Kalina generator? Otherwise there is not enough voltage, last time I changed the regulator. But it didn’t help for long, I want to install a new one that’s more powerful.
- The reason for the whistling of the generator on the VAZ Kalina - 7 answers
- VAZ Kalina generator fire – 3 answers
- Generator failure on Kalina, station wagon – 3 answers
- Why doesn't the new generator charge? – 3 answers
- Kalina has trouble starting - 2 answers
There seems to be nothing complicated about removing and replacing the generator on a Lada Kalina...
Changing bearings in Lada Kalina
The rectifier units present in the designs of generator sets of the AvtoVAZ model range have received a considerable number of negative reviews during operation. This statement is also true for the Lada Kalina we are considering. These modules can break down even after a mileage of 10 thousand km, which requires repair or replacement of the device.
It has also been revealed in practice that the cause of most malfunctions is the generator set bracket. However, bearings can also fail prematurely. It is gratifying that the owners are able to cope with such a problem on their own.
To repair the generator module, it will require preliminary disassembly. For this purpose, we “grab” the tips of the stator cables with a screwdriver and slightly pull them out of the springs present in the diode bridge. Next, you need to unscrew the bolts holding the bridge itself. In addition, unscrew the connecting bolt.
Having disassembled the body of the LADA Kalina generator set, we resorted to checking the integrity of the rear bearing. Here you will need to twist its outer ring. If it rotates without noticeable difficulties or sounds, and is not inclined to emit play, then we ascertain the serviceability of the bearing. When the slightest signs of wear are evident, we change it without hesitation.
The next step is to dismantle the generator unit bracket. Using the same screwdriver, we pry up the stator and remove it from the casing. The bracket design contains a bearing, which is also subject to inspection and replacement (if necessary).
The bearing of the front part of the LADA Kalina generator is rolled inside the casing. The manufacturer does not recommend replacing it. However, experts still advise performing this procedure, since if it breaks down, you will have to replace the entire generator, which is very expensive.
Replacing rear pads Kalina
Idle air control Kalina
Kalina torpedo
This bearing can be removed, but you will first have to remove the pulley and the plug present here. Next, using a hammer with a rubber striker, we excavate the rotor. Note that the front lining of the product will have to be clamped with a vice. We remove the bearing with special care.
Replacing a generator on Kalina
There seems to be nothing complicated about removing and replacing the generator on a Lada Kalina...
To replace the generator with a 16-cl. Kalina you will need a warm garage with a pit and a set of keys: 13, 19; heads: 8, 10 and 13.
Be sure to remove the terminal from the battery.
Remove: the plastic engine protection and the washer reservoir (after all, it would be better to unscrew a few extra nuts than to suffer later). So remove the connectors from the washer motor and use keys “8” and “10” to unscrew the nuts securing the barrel. The barrel is screwed in two places.
Then remove the alternator belt and remove the “gene” chip.
If there is engine protection at the bottom, then remove it too. Then disconnect the generator wires.
The wires are fastened with two bolts (it’s not difficult to reach the top one, and the second one from the bottom from the hole with a head and a key set to “13”, just for this it was necessary to remove the tank).
Remove the generator from the Kalina from the bottom, and if it is an 8-valve, then pull it out from the top.
By the way, be careful not to lose the nut when unscrewing the lower bolt, which is installed on the other side.
Of course, you can remove the generator on Kalina without a hole, using the keys to climb up from above, but this will be much more difficult to do.
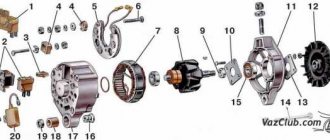
Main Generator Components
In general, a generator is a converter that creates electrical energy from mechanical energy. On all cars, the design and operating principle of these devices are similar. The design consists of the following components:
- The stator winding, a thick copper wire is used for it, since it is with its help that voltage is generated.
- The rotor winding is excitation. Without it, it is impossible for current to appear in the stator winding. In order for any potential difference to appear in the frame, the presence of two components is necessary - rotation and a magnetic field. Thanks to the generator belt on the Kalina, the rotor rotates. It is its winding that fulfills these two conditions - a magnetic field is created around it, and it rotates around its axis.
- The rotor is equipped with slip rings, to which voltage is supplied using a brush assembly.
- A pulley mounted on the rotor allows rotation to be transmitted from the crankshaft via the generator belt on the Kalina.
- A mechanical or electronic voltage regulator changes the voltage on the rotor winding. Due to this, the generator produces a stable voltage.
- The block of semiconductors (valves) mentioned earlier is necessary to convert three-phase alternating voltage into unipolar direct voltage.
- Covers with bearings are designed for rotor alignment and normal operation of the unit.
- The capacitor allows you to get rid of residual alternating current after rectification.
Removing the Kalina generator
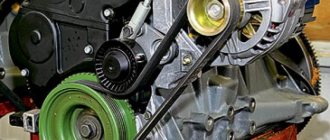
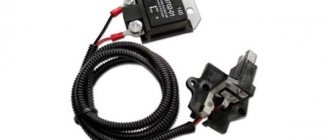
| A car generator is a very reliable device without which the operation of a car is not possible. In this article we will talk about the belt tensioner, as well as how to remove the generator yourself and adjust the tension of the generator belt. |
In April 2011, a pilot batch of 1000 elastic belts 1118-1041020-07 manufactured (Germany) was installed. These Kalinas do not have an alternator belt tensioner, all problems caused by its absence are solved, like the Lada Granta. On other Lada Kalina cars, the alternator belt tensioner is present.
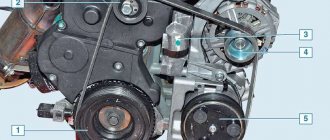
Required tools: socket wrench “8”, wrench “19”, socket “13”, socket “17”. Disconnect the negative terminal of the battery. Then:
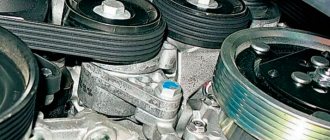
- We hold the belt tensioner pin with a 19mm wrench, put a 8mm wrench on the hexagon of the adjusting pin, and turn it clockwise. The tension will weaken.
- Remove the Kalina generator belt from under the tension roller, and then from the generator pulleys and crankshaft.
- Press the lock of the generator pre-excitation wire block. Disconnect the connector from the voltage regulator connector.
- Unscrew the nut securing the wire lugs to terminal “B+” using a “13” socket. Remove them from output.
- Unscrew the lower mounting bolt of the generator using a 17mm socket and remove it. Remove the nut from the generator bracket.
- Unscrew the nut of the bolt of the upper mounting of the generator, using a 13mm head.
- Remove Kalina generator
We press the lower branch of the belt upward with our hand; with a pressing force of 100 N (10 kgf), the belt deflection should be about 10 mm. In the absence of a special tool, household scales can be used.
- Excessive belt tension causes increased loads on the belt, generator bearings and tension roller, which leads to premature failure.
- Insufficient belt tension will cause it to slip on the pulleys, causing wear and preventing the battery from charging.
About the principle of operation of a car generator
The operation of the Lada Kalina generator unit is based on the following principle: an alternating current is induced in the stator winding, which is subsequently transformed into direct current through a rectifier module located on the body of the unit.
The basic characteristics of the generator set include the following parameters:
- maximum generated current – 85-90 Amperes;
- operating range of on-board voltage – 14.4-15.1 Volts;
- rotation ratio of the motor and rotor – 1:2.4;
- right-hand direction of rotation.
The housing of the unit is held together by pins that tighten the stator with the covers. The mounting sockets of the indicated covers contain bearings, which ensure the ability of the rotor to rotate. The rear bearing is installed inside the cover with a minimum gap.
Let's move on to the switching diagram of the generator with the on-board network. The connection diagram is very simple. After turning on the ignition, power begins to flow to the voltage regulator through the battery discharge lamp circuit. When the motor starts, the excitation winding is supplied with supply voltage from three diodes mounted in the rectifier unit.
Using the indicated signal lamp, the generator unit can be checked. If the device is working properly, the lamp lights up when the ignition is on. It goes out when the engine starts. When this phenomenon is not observed and the lamp continues to shine, the generator set should be diagnosed for the presence of malfunctions. In some cases, replacement is required, and many are interested in how to remove the generator?
How to remove the generator on the LADA Granta
The “Grants” generator has to be removed for various reasons: for repair, maintenance, modification of the unit. You can do this yourself if you know how to remove the generator on the Grant. Depending on the modification of the car (8 or 16 valve engine, presence of air conditioning), the procedure for dismantling the generator has its own characteristics, so it is worth considering each option separately.
How to remove a generator on an 8-valve Grant without air conditioning
To work you will need:
- socket wrenches for 8, 10 and 13;
- mounting blade.
Before removing the generator on a Grant without air conditioning, you should disconnect the ground from the battery by removing the negative terminal. The procedure is as follows:
- unscrew the 2 rear engine protection mounting bolts;
- unscrew the 4 front engine protection bolts;
- remove the engine protection (mudguard) from the car;
- disconnect the wiring block from the generator;
- remove the protective cap of the nut holding the power wire;
- unscrew the nut and disconnect the generator power cable;
- unscrew the top nut securing the “Grant” generator;
- press out the generator with a mounting spatula and remove the upper mounting bolt;
- unscrew the lower bolt securing the generator;
- move the generator away from the engine with a mounting blade and remove the lower mounting bolt;
- move the generator towards the right mudguard;
- remove the generator belt from the unit pulley;
- pull out the generator;
- Remove the alternator belt from the crankshaft pulley.
To put the LADA “Grant” generator in place, you need to perform the steps in reverse order.
Important: when installing the generator belt, make sure that the pulley grooves and the groove tracks on the belt match.
How to change the generator on a 16-valve Grant
The generator mount on the 16-valve Granta variation is distinguished by the presence of a belt tensioning mechanism. Therefore, the procedure for replacing the generator on this model is slightly different. To work, you will need socket wrenches 8, 10 and 13. As when dismantling the generator from the 8-valve Granta, before starting work you need to remove the ground terminal from the battery to eliminate the possibility of a short circuit.
After this, you need to remove the engine protection by unscrewing the 4 front and two rear bolts securing it to the body parts. The 16-valve “Granta” generator is removed as follows:
- disconnect the block from terminal “D” on the generator;
- remove the rubber cap covering the “B+” terminal of the generator;
- Using a 10mm wrench, unscrew the nut holding the wire tip;
- loosen the tension bar nut using a 13mm wrench;
- by rotating the tensioner adjusting bolt counterclockwise, loosen the tension on the Grant generator belt (a 10mm socket wrench is required);
- move the generator towards the engine and remove the belt from the pulleys;
- Unscrew and remove the adjusting bolt of the belt tension mechanism from the generator mounting bracket;
- remove the tension bar;
- unscrew the lower nut securing the “Grant” generator;
- remove the spacer bushing and remove the lower mounting bolt;
- remove the tension bar;
- pull out the LADA Granta generator.
To install the generator, you need to do the above in reverse order.
Important: after installing the 16-valve LADA “Grant” generator, it is necessary to adjust the belt tension.
How to remove a generator on a Grant with air conditioning
The LADA Granta air conditioner is driven by a generator belt, which complicates the operation. You must first move the air conditioner to the side, and then proceed to remove the generator. To work you will need:
- socket wrenches for 8, 10, 13 and 18;
- wheel wrench;
- jack;
- WD-40 product.
Rotor and stator repair
First of all, you will need to examine the stator and rotor windings for breaks. To do this, you do not need to remove the generator from the car. It will be necessary to dismantle only its diode bridge. This will require a two- or three-jaw puller, as well as an artificial frame borrowed from a cup puller.
Carefully straighten the wires in the winding and remove the diode bridge. To avoid getting confused during reassembly, you need to mark with a marker the placement points of the front and rear casing of the generator. Using a size 8 socket wrench, unscrew the 4 bolts that hold both trims in place. Carefully remove the front trim using a flathead screwdriver. After this, slide the rear casing and remove the connecting bolt along with the insulating washer, as well as the plastic plug from the bearing.
To check you will need an ohmmeter tester. Having connected its plugs to the rotor rings, check the winding for breaks. In this case, the winding resistance should be 5-10 Ohms. After this, connect the tester plugs to any of the slip rings and to the rotor. Now you need to check the winding for short breaks to ground. If the winding has no breaks and is working correctly, the tester will show the highest resistance value.
In the same way, it is necessary to connect the plugs to the stator and check the winding for breaks. If they are absent and the part is working properly, the tester will show extremely low electrical resistance. When checking for short-term ground breaks, the tester should also show the highest electrical resistance value.
To ensure proper operation of the rectifier unit, its diodes must transmit electric current in only one direction. If they conduct electricity in 2 directions or do not conduct it at all, then the diodes have become unusable and need to be replaced.
Attach the tester plug with a negative value to the diode itself, and the plug with a positive value to the part body or plate in which it is located. A functioning diode will not conduct electric current, and the tester will show the highest resistance value. After this, you will need to swap the plugs and perform the test again. If the diode is working correctly, the tester will show electrical resistance. In the same way, it is necessary to test the remaining diodes in the diode bridge circuit.
DIY generator replacement
Usually, even factory generators on Kalina serve for quite a long time and do not require replacement, of course, unless you come across a car with a factory defect of this device. If this electrical equipment unit fails, it will have to be replaced. Although this is not difficult to do, it will take at least an hour, especially if this is your first time doing this procedure. So, we will need the following tools:
- Open-end or ring wrenches for 8, 13 and 19
- Small and large ratchets and heads for 8, 13 and 19 for more convenient and faster work
- Wrench with extension
Guide to replacing the Kalina generator yourself
So, let's proceed to a very detailed description of all the types of work that need to be performed. First of all, we need to loosen and release the belt tensioner and then remove it. So be sure to check out this Alternator Belt Replacement Guide first. After this, you can proceed directly to removing the device from the car.
Before carrying out any repairs related to electrical equipment, be sure to disconnect the battery by removing the negative terminal from it.
First, we disconnect the plug, which is secured with a plastic latch, just lightly press it and pull it to the side, it will come out without any problems:
And the wire terminals that are under the rubber protective cap, pry it off and unscrew the nut:
Then we unscrew the nut securing the upper part of the Kalina generator, this is clearly shown in the photo below. You can first move it with a knob, and then work with a ratchet handle:
And tapping the protruding bolt a little so that it moves, remove it from the back side, as shown in the photo below:
Next, we proceed to the lower fastening bolt, and proceed by analogy, only if necessary, hold the nut on the reverse side, since it can scroll:
Be careful when removing this rod as there are bushings there. Hold them immediately so that they do not fall and get lost. And holding the generator body with one hand so that it does not fall, we remove this bolt with the other hand:
Now almost everything is ready and you can safely remove this device from the engine compartment, turning it slightly from side to side, finding the most convenient position for its removal.
To replace the generator on the Lada Kalina, we purchase a new one and install it in the reverse order of removal, putting all the bushings in place in the same places as they were. The price of a new generator ranges from 4000-5000 rubles, so you will have to fork out a little.
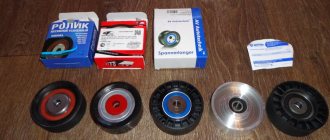
Replacing bearings
AvtoVAZ cars are very often subject to fair criticism from the owners of cars produced by this company. The Lada Kalina model was no exception to the general rule. Almost all current converters installed on cars of this brand break down after 10 thousand kilometers, after which the generator requires repair or replacement.
As practice has shown, the cause of many breakdowns is not only the bearings, but also the Kalina generator bracket. Car owners often fix this problem on their own. Doing this with certain skills is not so difficult.
To repair the generator, it is necessary to disassemble it. To do this, use a screwdriver to hook the tips of the stator wires and pull them out a little from the springs of the diode bridge. Then unscrew the bolts that attach the diode bridge. After this, the connecting bolt is unscrewed.
After disassembling the generator, check whether the rear bearing is in good condition. To do this, you need to twist its outer ring. If it rotates easily, without noise or rattle, and there is no play, then the bearing is in good condition. At the slightest suspicion of a malfunction, it is better to replace the bearing.
Next, you need to dismantle the Kalina generator bracket. Using a screwdriver, the stator is picked up and removed from the device casing. The bracket includes a bearing, which should also be checked. If a malfunction is detected, the part must be replaced.
The front bearing of the unit is rolled into its casing. Although AvtoVAZ does not recommend changing it, it would still be more advisable to do so, because otherwise you may then need to buy an expensive new generator for Kalina.
The bearing is removed by removing the pulley and spacer plug. After this, the rotor is removed from the rubber using a hammer, and the front casing of the unit is clamped in a vice. The bearing is carefully removed.
Signs of generator failure
To diagnose the generator set, it is not necessary to remove it. Here are some typical symptoms of breakdowns:
- The presence of a hum and whistle from the generator indicates that the bearings are damaged. If you start it, the rotor may jam and the belt may break.
- Whistling, short-term ignition of the charging control lamp - the alternator belt on the Lada Kalina is worn out, or it has low tension. If the lamp is constantly on, there may be a break.
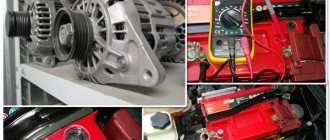
- If the charging lamp is on, this means that there is no voltage at the generator output. The reason may lie in the windings, voltage regulator, slip rings, diodes, wiring.
Troubleshooting should begin from the simplest to the more complex. It is possible that the cause of the generator failure is a break in one wire. But it is quite possible that there is a break in the rotor or stator winding. When making repairs, the generator connection diagram should be at hand.
Disassembling the device
To disassemble the generator, you need to perform several simple manipulations:
- Remove the drive pulley. Try not to lose the key.
- Unscrew the nuts from the back cover that secure all parts of the structure.
- Remove the voltage regulator. At the same time, evaluate the condition of the brush assembly.
- Disconnect all parts of the generator.
After this, you can begin to carry out repairs.
Bearings often fail, especially the one located in the front cover. The reason for this is excessive belt tension. To make a replacement, you need to unscrew four screws and press the bearing out of its seat. Instead, install a new bearing. To increase reliability, change both rollers at once.