The fuel pump on the VAZ 2110 (VAZ 2111, VAZ 2112), as on any other car with an injector, is an important element of the fuel supply system. Simply put, the fuel pump pumps gasoline from the tank, while the fuel in the system is under pressure.
Pressure is necessary to ensure that fuel is supplied through the injectors as efficiently as possible, and that the engine has enough fuel in all operating modes. Moreover, if the VAZ fuel pump fails, the engine simply will not work until the part is replaced.
If the performance of the fuel pump is reduced, in this case it is necessary to determine and eliminate the cause or replace the element. Next, we will look at how to service the fuel pump on a VAZ 2110, as well as how to inspect or replace the fuel pump.
Fuel coarse mesh in the fuel pump - why is it needed?
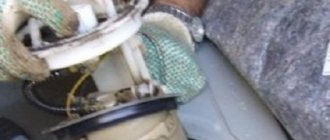
The initial cleaning of the fuel is ensured by a mesh mounted on the fuel pump body, and when the car begins to move jerkily and the fuel supply is difficult, first of all you should check the condition of this mesh, because it can be contaminated to such an extent that its initially snow-white color is very difficult to recognize.
Note! The main reason for grid contamination is poor fuel quality!
When to change the screen in the fuel pump?
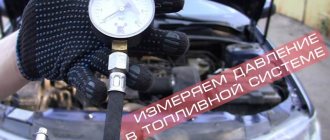
In order to understand when it is necessary to replace a particular component in the fuel system, and specifically the grid, you need to know about the presence of pressure in the fuel rail. You can learn how to take measurements correctly from this article.
You can also find out about its insignificant condition by the following signs:
- When the ignition is turned on, a very prolonged and loud hum occurs, since gasoline is hardly sucked into the system through a clogged mesh. This can significantly reduce the working life of the fuel pump itself and the contamination of the entire fuel system as a whole.
- While driving, when switching to third or fourth gear and then pressing the gas pedal, there is no increase in power.
- Also, a clogged mesh can cause a loss of speed while the car is moving, since the required amount of fuel simply does not enter the combustion chambers.
The principle of operation of the mechanism
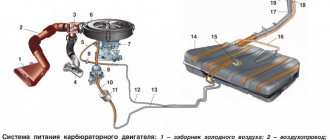
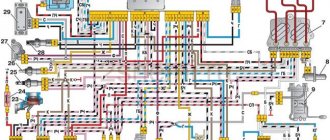
Product diagram for injection engines:
Mechanical products are used in cars with a carburetor fuel system, where fuel is supplied under low pressure, and electric fuel pumps in vehicles with fuel injection equipment, where gasoline is supplied under high pressure.
1. Fuel pump on vehicles equipped with a carburetor as a dispenser. The drive lever (pusher) is in constant friction, but the diaphragm shifts to the lower plane only when it is necessary to fill the product chamber with fuel. The return spring moves the diaphragm to the upper position, thereby supplying fuel to the dispenser. Composition of a mechanical fuel pump:
- Fuel filling chamber;
- Inlet and outlet type valves;
- Diaphragm seal;
- Return spring;
- Pusher (drive type lever);
- Cam;
- Camshaft.
2. Electric fuel pump on injection cars. Such a device is similar in operating principle to a mechanical prototype: the core is pulled into an electromagnetic valve until the contact group opens, blocking the flow of electric current. Composition of this product:
- Fuel filling chamber;
- Inlet and outlet type valves;
- Diaphragm seal;
- Return spring;
- Electromagnetic valve;
- Fuel pump mesh;
- Core;
- Contact Group.
For beginners, we inform you where the VAZ 2110 fuel pump is located: it should be looked for under the rear seat cushion of the car.
Prevention and useful tips
For trouble-free operation and increasing the life of the fuel pump, professionals recommend:
- refuel only with high-quality fuel;
- maintain the maximum fuel level in the tank;
- do not use a car with a discharged battery;
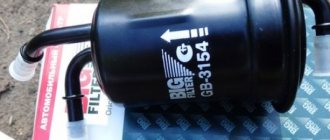
- promptly replace the fuel filter;
- use sport driving mode less often.
Self-diagnosis and replacement of the fuel pump is quite simple. To do this, you just need to carefully follow the recommendations of professionals. The same applies to preventive measures. Refuel with high-quality gasoline and do not forget to replace the fuel filter on time. Then you will have problems with the fuel pump much less often.
Fuel pump VAZ 2110 injector, fault diagnosis
The fuel pump for Lada-110 is the heart of your car; when the pressure supplied to the fuel injector drops, the car’s power is inevitably lost, the car periodically stalls at idle or has difficulty starting. In this case, most likely, the fuel pump mesh is clogged and repairs should begin with replacing it.
By measuring the pressure in the fuel rail with a pressure gauge, you can also speak with a high degree of probability about the causes of the malfunction. So, a clogged filter will cause a low pressure reading at the output of the regulator, and high values hint at problems directly in the regulator itself.
Normal pressure on the injector from the Lada-110 fuel pump depending on the engine type, ranges:
* from 2.8 to 3.3 kgf per cm2 (284-325 kPa) for engines type 2111 and 2112; * from 3.6 to 4.0 kgf per cm2 (364-400 kPa) for engines type 21114 and 21124.
If you have insufficient skills in measuring pressure, you can very tentatively conclude that the VAZ 2110 fuel pump is working properly, having pumped gasoline into the container through the main fuel supply hose. A working fuel pump will pump at least 1.5 liters in a minute. gasoline.
If on a VAZ 2110 the fuel pump does not turn on at all, then you should first pay attention to the electrical power supply circuit according to which the VAZ 2110 fuel pump operates, namely:
- serviceability of the fuse in the fuel pump circuit;
- sticking of the fuel pump relay contacts;
- presence of voltage on the terminal block by turning off the “tens” fuel pump and connecting an ordinary 12 V test light to the corresponding power connectors;
- burnout of the electric pump motor windings.
What kind of fuel pumps are installed on VAZ 2110/2112 cars
The fuel pump is considered the most important element of the fuel system of any car. So, depending on what type of engine the VAZ 2110/2112 model is equipped with, the choice of fuel pump will also depend. An electric pump is installed on injection cars, and a mechanical one on carburetor cars.
The family is equipped with fuel pumps produced by AvtoVAZ. However, these units do not have a high service life and reliability, so often car owners do not wait until the fuel pump fails and replace it.
Installed at the factory on each VAZ 2110/2112 model. Most often, fuel pumps (Russia) and “Bosch” (Germany) are chosen for replacement. Their quality and durability have been known for a long time, although their cost is several times higher than the price of AvtoVAZ gasoline pumps.
The German manufacturer ensures the quality and durability of the products. The location of the fuel pump in the VAZ 2110/2112 is worth mentioning separately: the device is not located under the hood. To achieve maximum optimization of the fuel pump, manufacturers install it directly into the fuel tank. That is, to get to the pump, you will need to fold back the cushion in the back seat of the car and open the hatch hidden under the carpet.
The fuel tank and fuel pump are located under the seat cushion.
Replacing the fuel pump (fuel module) - step-by-step instructions
In this article we will look at how to remove and replace the fuel module (fuel pump) on VAZ 2110 and 2112 cars.
The main signs of a malfunction: if you hear periodic howls or increased noise when the fuel pump is operating, or the fuel pump does not pump or operate at all, and engine power drops, then most likely the fuel pump has failed.
First, you need to check the pressure in the fuel supply system by connecting a pressure gauge to the fitting on the fuel rail in the engine compartment.
If the fuel pump pressure in the system is higher than 325 kPa (3.3 kgf/cm2) for engines 2111 and 2112 or 400 kPa (4.0 kgf/cm2) for engines 21114 and 21124, then the pressure regulator is faulty and must be replaced.
If the system pressure is below 284 kPa (2.8 kgf/cm2) for engines 2111 and 2112 or 364 kPa (3.6 kgf/cm2) for engines 21114 and 21124, replace the fuel filter.
If this does not help, try removing the fuel module and washing the fuel intake screen. If in this case the pressure does not increase, the fuel pump must be replaced.
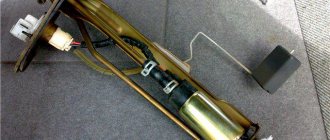
The fuel module includes a fuel level sensor, a fuel intake grid, an electric pump and a pressure regulator (on vehicles with engines 21114 and 21124). Main fuel pump malfunctions:
- failure or incorrect operation of the fuel level indicator sensor;
- clogging or damage to the fuel intake grid;
- failure of the electric pump;
- failure of the pressure regulator (for engines 21114 and 21124).
To carry out the work you will need:
- screwdriver,
- high socket head “10”,
- wrench, for cars with engines 2111 and 2112 there is also a “13” key.
This will take about half an hour.
When to replace
During this procedure, you can replace the air and oil filters, as well as the fuel pump mesh. If you make it a habit to change this mesh only after it is completely clogged, the pump will constantly work with increased load, as a result of which repair or even replacement of the VAZ 2110 fuel pump will quickly be required.
If after this the car engine does not start or even the sound of the VAZ 2110 pump cannot be heard, then you need to check the presence of gasoline pressure in the line. This is done using the bleed valve on the ramp. The verification procedure will be discussed below. If there is no fuel, it becomes clear that the fuel pump is not working or its screen is clogged.
Replacing a mechanical fuel pump
Unscheduled replacement of a mechanical type device takes place in the following order:
- We dismantle the air purification filter.
- Remove the fuel supply line to the fuel pump.
- First loosen the tightening of the clamp.
- Remove the fuel supply line to the carburetor.
- Unscrew the fasteners of the product.
Installation is in the reverse order. At the same time, do not forget to look at the arrows on the products showing the direction of movement of fuel to the carburetor.
The question is often asked, how to check the VAZ 2110 unit in operation? To do this, it is necessary to tighten the screws on the cover with the pump lever depressed and test the carburetor accelerator pump.
- Volkswagen Tiguan 2022 photos, price, equipment, video Tiguan 2017. Volkswagen Tiguan 2022 has been awaited in our country for a long time. Luby.
- New Hyundai Solaris 2022 photo, price, equipment Hyundai Solaris 2022 model year. New Hyundai Solaris 2022 photo, price and configuration ass.
- New Ssangyong Tivoli price, photo, video, characteristics. The new Ssangyong Tivoli has arrived in Ro.
New Lada 2022
- Lada X Ray Sport photo, technical specifications, price Lada XRay Sport. Lada X Ray Sport was officially presented at the capital's av.
- Lada Vesta Sport photo, technical specifications, price of Lada Vesta Sport. Lada Vesta Sport is officially shown on the Moscow auto show.
- Lada X Ray Cross photo, technical specifications, price Lada XRay Cross. Lada X Ray Cross 4x4 will not appear yet, it has become known.
- Lada Vesta Cross photo, video, technical specifications, price Lada Vesta Cross SW. The Lada Vesta Cross station wagon was shown last year.
- Lada Vesta Cross sedan photo, technical characteristics, price of Lada Vesta Cross. The Lada Vesta Cross sedan came as a surprise to many. X.
- Lada Vesta Signature photo, video, characteristics, price Lada Vesta Signature. The long-wheelbase Lada Vesta Signature was shown to the general public.
Replacing the fuel pump on a VAZ-2112 16 valves
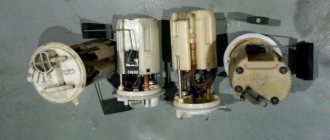
I ran into a problem that on the Internet all the articles on replacing the fuel pump were made with a fuel pump completely different from mine. And since I climbed there for the first time, it was a little boring... I had to do everything using the method of scientific knowledge. I took a photo for myself so as not to forget what where and how later.. But I thought maybe it would be useful for someone..) First, you need to relieve the pressure in the fuel pump. To do this, just pull out the fuel pump fuse, which is located behind the plastic partition on the passenger side, near the “brains”. In theory, the fuse will be the first on the right (closer to the engine compartment, mine was 15 A). We pull it out and start the car until it stalls. We recline the rear seats. We see a black hatch. Unscrew its two screws and remove it. Judging by the abundance of dirt, I am the first to climb here. We disconnect two pipes, I had to tinker with the second one, because it did not want to come off, resting against the back wall. When disconnecting the pipes, prepare a cloth; a little gasoline may leak out of them. Disconnect the power plug. Using a 10mm wrench, unscrew the 8 nuts. After that, I vacuumed and washed there so that when pulling out the pump, dirt would not get into the gas tank. We remove the piece of iron, which was held by 8 nuts, and remove the seal under the piece of iron. After this, we pull out the fuel pump module, carefully tilting it so as not to tear off the fuel level measurement float. We let the gasoline flow back into the tank) And then we carry the patient to the operating table. Let's start to sort it out. First I unscrewed the spring from the first metal rod. Then, from the second rod, carefully prying it with a screwdriver, remove the metal ring. Then we disconnect the pipe by simply pulling it to the side. Then I disconnected the electrical plug. To remove the fuel pump from the housing, you need to bend the latches and carefully pull it up along the plastic “rails”
We gained access to the filter mesh. Having looked at the state of my mesh, I doubted whether it was even capable of letting anything through itself... We simply remove it by pulling it towards us. Next, we bend the latches and take out the electric motor of the fuel pump, which I was going to replace. The next stage was the most difficult for me. It was necessary to remove the old corrugated tube and then put on a new one. These tubes are crammed in so hard that you can't even take a horseradish away. I had to use an industrial hair dryer. First heat it up and then pull it out. I took a new BOSH motor bought for 1300 rubles and a corrugated tube for 50 rubles. Putting the tube on was a pain in the ass... First I warmed it up, then put it on. To be sure, I tightened one end with a zip tie.
It turned out to be a little easier to put it on the motor. After that, we begin to assemble. We insert the motor into the housing. Then we put on the filter mesh. There is a pin on the motor body on which you need to place it, just pressing it down well. Upon completion of the assembly, I noticed that I had made a mistake in the location of the new plastic corrugation. It rested and did not allow the body to close completely. In general, I was too lazy to take everything back apart, so I just cut a couple of turns from the spring, which is attached to the metal rod. We put the fuel pump in place. We turn on and turn off the ignition a couple of times so that it sucks in gasoline)) And that’s it. let's start. The result: firstly, the terrible squeaking noise when I turned on the ignition disappeared, secondly, the car began to behave much more cheerfully, and the jerking when switching to second gear also disappeared. And of course it’s nice that you made it yourself
(votes: 63) Category: 211021112112
Good afternoon. Today a VAZ 2110 came to our service center. The car stopped starting.
Checked the spark plugs, excellent spark. The owner said that he had dried it out several times before. In this situation, we need to check the functionality of the fuel pump.
We removed the fuel filter to see if fuel flows. But it didn't work. In this article we will show you how to remove and replace the fuel pump on a VAZ 2110, 2111, 2112.
Installation
So, carefully remove the structure from the tank. To dismantle the old element, you will need to remove the anti-drip glass. The pump itself lies tightly in the grooves with latches. To remove it, you do not need to use keys or other equipment. It's easy enough to pull it with your hand and remove it from its seat. Also replace the mesh (coarse filter). Then install the new element into the same grooves and do not forget to put on the plastic cup. Carefully place everything in the tank and tighten it with bolts, sealing everything with a rubber band. This completes the entire replacement.
Description of the work
The location of the VAZ 2110 injector fuel pump is in the gas tank located under the bottom of the car, in the area of the rear seat. It is accessible from the cabin, so no inspection holes or other additional devices are required. Only tools needed:
- open-end wrench 13 and 17 mm;
- Phillips screwdriver;
- 7 mm tubular socket wrench.
Instead of a long 7 mm tubular wrench, you can use a small open-end wrench, but this will be inconvenient and take more time. Before starting repairs, you should completely remove and pull out the rear seat to gain access to the gas tank. Two more preliminary operations that are done in the engine compartment.
- Loosen the nut securing it to the negative terminal of the battery, remove the clamp along with the wire.
- Relieve pressure from the fuel line. At the end of the ramp, near the outer nozzles, there is a bleed valve with a rubber cap on it. Having removed it and substituted a plastic cup, you need to press the valve stem. Fuel will leak out from there and the pressure in the system will drop.
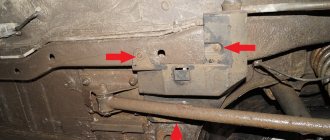
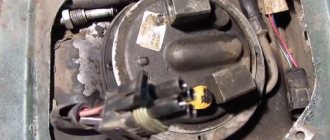
Under the bottom of the rear seat there is a square hatch that provides access to the gas tank; it will need to be removed. The subsequent disassembly diagram looks like this.
- Using a Phillips screwdriver, unscrew the 2 screws securing the hatch cover, remove it and put it aside.
- Disconnect the fuel pump electric drive connector and move it out of the way.
- Using an open-end wrench, loosen and unscrew the 2 nuts that secure the fuel line pipes to the fuel pump fittings.
- Pull the tubes out of their sockets. The round rubber rings attached to their ends must be removed and replaced with new ones, since they are designed for one-time use.
- Using a long tubular wrench, unscrew the 8 nuts that hold the flat flange that presses the VAZ 2110 fuel pump to the bottom surface. Remove the flange from the studs.
- There is a rubber gasket on the mounting studs under the clamping part of the body. The latter must be removed from the studs, otherwise it will not make it possible to pull out the fuel supply device. Then carefully remove the fuel pump from the tank cavity along with the float. If the rubber gasket is worn out, then it is better to replace it too.
When removing the unit, gasoline will flow out of it, so you should place a rag underneath and quickly move the fuel pump out, placing it above a wide pan. The mesh is located at the end of the suction tube and is secured with a plastic ring. You can remove it manually.
If the ring is strongly stuck to the tube, it is recommended to pry it off, for example, with a flat screwdriver. Next, a new mesh is placed and fixed by pressing the hand all the way. Now you can reassemble, which is done in reverse order. There is an arrow stamped on the top of the unit; it should point to the rear of the car.
We recommend tightening all connections with little force. To avoid distortion when tightening the 8 nuts of the clamping flange, a star tightening pattern is used.
If it is necessary to replace the fuel pump on a VAZ tenth model or repair it, then the system is disassembled as described. When replacing, you need to remove the float and level sensor from the unit and move them to the new pump. The entire procedure, if performed in conjunction with replacing other consumables, will take you no more than half an hour.
How to replace the fuel pump on a VAZ-2110
Replacing a fuel pump, like other car parts, should begin with purchasing exactly the same unit. The fuel pump in the VAZ-2110 car is located in the tank and is constantly washed with gasoline for cooling, so before replacing it, you need to completely drain the gasoline. You also need to disconnect the negative terminal on the battery. All work related to repairing the fuel system must be carried out with the vehicle de-energized. To work you will need some tools:
- wrench 17:
- head at 7;
- flat and figured screwdrivers.
It is also advisable to have a rag and a box on hand for storing the nuts.
- First of all, you need to remove the rear seat and gain access to the location of the fuel pump.
- Next, we find a square hatch, remove the carpet and unscrew the two bolts located diagonally with a Phillips screwdriver. Put them in a box and remove the lid.
- There is a fuel pump under the cover. Before proceeding with the replacement, it is advisable to reduce the pressure in the fuel system. If the car has been parked for several hours, this may not be necessary. But if you decide that you still need to reduce the pressure, then you need to remove the fuse from the fuel pump and start the car, after a few seconds the pressure will drop to the minimum level. Next, you can begin the procedure for replacing the fuel pump.
- Disconnect the plug with wires. You need to bend the latch slightly upward and disconnect the connector. So that part of it does not interfere, we move it to the right to its maximum length.
- Next you need to move on to unscrewing the fuel pipes. There are two of them on the fuel pump. We take the key for 17 and unscrew both tubes in turn. We take the tubes to the side. It is advisable to move the left tube, which is closer to the passenger compartment, further away to make it more convenient to remove the fuel pump.
- The next step is to twist the eight nuts of the pressure plate in a circle and put them in a box. To tighten the nuts, it is advisable to have a socket wrench with a ratchet and a 7-mm socket. If the nuts are rusty and do not want to be unscrewed, you need to treat them with WD-40 and wait a little.
- Carefully remove the pressure plate and set it aside. Use a screwdriver or hand to pry up the rubber seal so that it comes off the studs, and proceed to removing the fuel pump.
- We pull the pump halfway out of the gas tank and tilt it a little so that the float does not get caught, and we take out the entire structure.
When the fuel pump is completely removed from the gas tank, it can be examined in detail. If necessary, it is worth changing the filter, mesh, motor, but it is better to replace the entire assembly with a new fuel pump, so that in the future you don’t have to worry about what breaks and when. You need to install the fuel pump in the same way, but in reverse order. The only thing that needs to be taken into account during installation is that the arrow, which is located on the top cover of the fuel pump, should point towards the rear of the car.
conclusions
Replacing a gasoline pump on a VAZ-2112 with your own hands is not difficult. The total time of the operation is about 1.5 hours, unless force majeure occurs in the form of a break in the power contact group or a breakdown of the pipeline connector.
It's good that I found this article with photos. I changed the fuel pump myself and didn’t have to go to the service station.
It took me a long time to get used to the fact that the fuel pump was in the tank. On the classic it was more convenient to remove and repair it. But, in principle, there is nothing complicated here, it just takes longer.
I also had no problems replacing the fuel pump. There are no rusty nuts here. Everything is easy to unscrew and replace.
I couldn’t remove the last eighth nut, it turns (I tried it with pliers and didn’t use any current, but nothing worked. Please advise something useful
Source
Replacing the fuel pump on a VAZ 2110/2112 with your own hands
If the car owner has accurately diagnosed the failure of the pump mechanism in the fuel system, it will need to be replaced. It is worth noting that replacing the fuel pump on VAZ 2110/2112 cars is quite simple; even an inexperienced driver can cope with this task.
The fuel pump is usually replaced not only because it has lost its functionality, but also in other cases:
incorrect pressure readings when the pump is working;
insufficient fuel capacity;
after purchasing a new VAZ in order to get rid of the “weak points” of the model.
To work you will need a small set of tools:
10mm socket wrench.
The work procedure can be divided into two stages: dismantling the old device and installing a new one.
Instructions for dismantling the fuel pump
Disconnect the “+” terminal from the battery.
Fold back the seat in the back row and remove it.
Find a small hatch under the carpet.
Unscrew its fastenings and remove the cover.
Remove the connector with wires from the fuel pump.
To make it more convenient to work, the plastic clamps on the fuel pipes are cut, the tubes themselves are separated and removed from the fuel pump.
The pump itself is attached to the tank with 8 bolts. Using a 10mm wrench, you need to unscrew all the bolts and pull the device out of the socket.
The pump is pulled out along with the float and seal.
The procedure for removing a faulty fuel pump will take no more than 10 minutes - everything will depend on how rusty the fastening bolts are.
Installation instructions for fuel pump
A new pump is inserted into the vacated socket. In this case, the arrow on the body should point towards the rear of the car - this is the only way to ensure the correct position of the device.
After which the pump is screwed back to the tank with the same eight bolts.
Next you will need to connect the two fuel pipes to each other.
A connector is connected to the pump contact.
The final stage is installing the hatch cover and returning the rear seat cushion to its original place.
The procedure will take no more than 7–8 minutes.
How to check the performance of the fuel pump
Checking the condition of the fuel pump is carried out only in cases where certain signs of its malfunction are observed:
- increased noise during pump operation;
- the engine power has sharply decreased - the car cannot accelerate quickly;
- The car does not start because no fuel is supplied to the engine unit.
This is interesting: Features of ensuring safety at railway crossings
You can determine that the cause of the malfunction lies in the fuel pump yourself. In addition, this does not require complex diagnostic equipment or special knowledge.
Initially, you need to check whether the pump itself is working. After the ignition is turned on, a slight buzzing noise should be heard under the rear seat cushion for a few seconds. If there is sound, it means the pump is working.
Pressure check
To check the pressure of the fuel pump, you will need a pressure gauge . It will need to be connected to the fuel system, which is located under the hood of the VAZ 2110/2112. A pressure gauge is connected to the fitting of the fuel pipe that goes to the engine. If at idle the device shows a pressure of more than 3.3 kg/cm3, then the fuel pump is clearly faulty.
When connecting, be careful not to damage nearby hoses and wires.
If the pressure gauge reading is less than 2.3 kgcm, then the problem in the fuel system lies not in the pump, but in another element - the filter.
Based on these indicators, you can immediately identify the nature of the problems in the fuel system
What to do if the pump does not pump fuel
In some cases, the problem lies in the fact that the fuel pump does not turn on. Accordingly, it will not provide gasoline to the power unit, and the car simply will not start.
Checking the functionality of the pump is as follows:
- recline the rear seat in the cabin;
- remove the hatch cover;
- turn the starter on to crank, but do not start the car;
- Connect a tester to the contacts of the fuel pump - if power is supplied, but the fuel pump does not pump, therefore, the device itself has failed;
- if there is no power supply, the problem lies in the relay, fuse or wiring.
The easiest way to check the health of the relay and fuse is to replace them with new ones. If the fuel pump still does not work, there is a short circuit in the wiring.
Based on the diagram, you can identify the location of the malfunction