Typical faults
It is better to start diagnosing the starter even before you remove it.
After dismantling, some signs of failure, by which the source of the problems can be determined, can no longer be determined.
Signs of a faulty element include:
- An unusual noise occurs when the engine starts;
- Complete absence or slow rotation of the starter;
- Rotation occurs, but there is no gear engagement with the Bendix ring;
- The unit rotates with the bendix, but then the clutch breaks;
- Turning the key in the ignition, there is silence.
Checking the dismantled unit
Before blaming the starter for everything, take the time to look under the hood and check the condition of the terminal contacts and connectors
Also pay attention to whether everything is ok with the battery. Only after this can you start working on the starter
Malfunctions and repair of starter traction relay
The traction relay is located on the front cover of the starter and is designed for short-term engagement of the starter shaft with the flywheel ring. It is this, and not the starter itself, that most often fails. In addition to the wiring and contact problems discussed above, the most common traction relay malfunctions are:
- burning of contact bolts (nickels);
- short circuit or break in the winding;
- mechanical damage.
The main sign of relay failure is the absence of a click when turning the key in the ignition switch. It means that:
- the electromagnet did not work;
- the relay contacts did not close;
- no voltage is supplied to the starter.
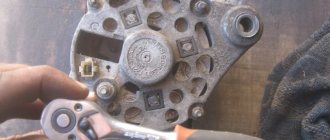
In such a situation, after checking the wiring and contacts, the relay should be removed from the starter and diagnosed. This is done as follows:
- Using a 13mm wrench, unscrew the nuts securing the power wires to the relay contact bolts.
- Disconnect the control wire connector.
- Using a slotted screwdriver, unscrew the three screws securing the traction relay to the front cover.
- Disconnect the relay from the cover.
- We inspect the relay and if we detect mechanical damage or burning of the contact bolts, we replace it with a new one.
- If there is no visible damage, we continue checking and connect the relay directly to the battery. To do this, we find two pieces of wire with a cross-section of at least 5 mm2 and with their help we connect the terminal of the control wire to the negative of the battery, and the relay body to the positive. At the moment of connection, the relay core should retract. If this does not happen, the relay needs to be changed.
Video: checking the VAZ 2106 traction relay using a battery
https://youtube.com/watch?v=jYrORsLBDE0
Replacing the traction relay is quite simple. To do this, simply install the new device in place of the old one and tighten the three screws securing the relay to the front cover.
Thus, diagnosing, dismantling, disassembling and repairing the VAZ 2106 starter is not very difficult even for an inexperienced car owner. Carefully following the instructions of professionals will allow you to do this quickly and efficiently.
Step-by-step guide to repairing a starter on a VAZ 2110 with your own hands
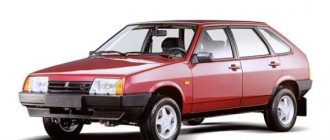
Normal operation of a car engine is possible only if all its constituent elements, as well as the main components of the car, are in working condition. One of the main components of the ignition system in domestic “tens” is the starter device. You can learn more about how to repair a VAZ 2110 starter with your own hands and in what cases it needs to be carried out from this material.
Why does starter 2108 often break?
The starter is a short-term motor. When it is in good condition and the battery produces high-quality current, starting the device lasts a few seconds. It cannot function for a long time, so drivers who like to “drive” the starter need to give up this habit and use it only as the manufacturers advise.
As practice shows, repair and replacement of the starter on a VAZ 2108 is often required in cases where the car owner heavily overloads it or starts it with a weak battery. In addition, failure of the starter may be associated with one or other problems that are caused by malfunctions of the vehicle’s power unit.
In what cases is it necessary to replace bushings?
In the life of any motorist, there may be situations when, for various reasons, it is impossible to start the engine. One of the reasons may be worn bushings. Let's imagine this situation. During starting, the starter with noticeable difficulty tries to turn the crankshaft, every now and then sticking and stopping. At the same time, the uninitiated motorist is perplexed as to why this could be happening, because the battery is in good condition and fully charged. The reason in this case is the armature touching the stator. The gap between the first and second is only tenths of a millimeter, due to this, even the slightest misalignment of the armature shaft relative to the stator will certainly lead to the above problems. This misalignment appears due to the failure of the plain bearings in which the armature rotates. As a rule, the front bearing is more worn out, since the main load falls on it. The bearings in this case are bushings made of brass. The front one is built into a special hole, which is located in the clutch housing. The rear bearing is located on the starter cover.
Bushing replacement
Part failure: reasons
Bendix is relatively reliable and often does not cause much trouble for car enthusiasts, but a breakdown cannot be ruled out. The gears and rollers can wear out - these parts experience serious loads when starting the engine and when moving off the car.
The main signs that the part is faulty:
- the engine does not start - the starter does not spin, but there are clicks;
- when the power unit is running, the bendix does not disconnect from the flywheel, that is, the starter continues to spin;
- smoke with a burning smell appears from the engine compartment;
- When you try to start the engine, you can hear the starter whirring. The engine can be started only after several attempts.
These symptoms may indicate that the Bendix needs to be replaced with a new one.
If the battery is dead
But you can consider the option of a seated battery, no contact at the terminals, no contact on the ground wire, which is attached to the car body. It’s easy to check the battery - remove the negative terminal, measure the voltage and, if it is less than nine volts, put the battery on charge and go to work on public transport.
Video about the causes of starter malfunction If the battery is charged, then we check the terminal contacts, but the most insidious contact is the negative wires from the battery to the car body. It has one nasty property.
The contact may appear and disappear, so you need to completely unscrew it, clean it, reassemble it, and try again. If the attempt is unsuccessful, we move on. It happens that the solenoid relay clicks, but the engine refuses to crank, and this is also the fault of the battery, but at the same time the indicator lamps on the instrument panel dim or go out completely.
In this case, and in the case when the starter does not click and does not scroll, we place all the blame on the battery, charge it, but now we need to think about what led to the complete discharge of the battery. Even if we charge the battery today, there is no guarantee that it will not run out tomorrow.
Checking the starter using the battery
Before contacting a car service center, buying a new unit or spare parts for it, you should try to check its performance yourself. With the right approach, it is possible to independently identify problems.
First of all, if you suspect a malfunction of the starting device, you need to check the contacts on the battery and starter terminals, their tightness and the presence of oxidation, the battery charge, since in many cases the problem in starting the internal combustion engine is the above factors.
A simple way to check that the electrical network is working is to close the terminal bolts of the electric motor with a screwdriver; before this procedure, you need to put the car in neutral speed (or move the selector lever to park or neutral mode).
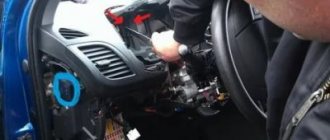
If the starter starts the engine, you should look for a fault in the electrical circuit. Otherwise, remove the unit by disconnecting all fasteners from the engine and removing terminals and other wires.
How to check Bendix
After removing the electric motor, it is necessary to inspect the bendix (the gear at the very end); if there is increased wear of the teeth or cracks in it, it should be replaced.
The Bendix should only turn in one direction, otherwise it will have to be replaced. By connecting the unit to the battery, it is unlikely to be able to diagnose the serviceability of the Bendix, since it can spin, but with insufficient force to start the internal combustion engine.
How to check Solenoid relay
When you turn the ignition key, you should hear a click, indicating that the armature is retracted and the bendix is engaged.
Before checking the serviceability of the starter, it is necessary to firmly secure it (either in a vice, having previously wrapped it with a thick layer of fabric, or with the help of a strong assistant who will hold the unit), since a very strong jerk may occur when starting it.
It is necessary to connect the positive from the battery to the positive on the starter, and the negative from the battery to the body of the unit. If the unit is working properly, then there should be a quick and sharp click and the bendix will extend and begin to spin.
If there is no click or movement of the overrunning clutch, it is necessary to replace the solenoid relay. When the power from the battery is disconnected, the bendix should retract.
How to check the Anchor and Brushes
To check the brushes and armature, you will need a multimeter or a 12-volt light bulb. Checking with a light bulb involves connecting its contacts to ground and the brush holder with the starter connected to the battery. When the light comes on, it indicates high brush wear.
When checking with a multimeter, the contacts are connected identically, only the results of measuring the resistance should tend to infinity, otherwise there is a short to ground.
The armature can only be checked by disassembling the electric motor. In addition to carrying out a visual inspection for the presence of oxidation, traces of short circuits, and increased wear, to check the armature you will need a special device PPYA (armature testing device) to check the interturn closure.
The difficulty of diagnosing armature malfunctions, as well as its repair, will require contacting specialized specialists, but in order to avoid unnecessary costs, it is necessary to check all other parts of the unit.
How to check the starter winding
To check the motor winding you will need a multimeter or a light bulb. The wires of the control lamp are connected to the winding terminal and the starter housing. If the light comes on, then there is a breakdown in the winding.
Using the same connection, the winding resistance is checked, for which the multimeter must be switched to the appropriate mode. The average reading of a serviceable winding will be 10 kOhm.
The starter is the most important element of the car, and its malfunction will immediately make itself felt either by the inability to start the car or by difficulties with it.
This unit is very reliable, but problems do occur with it. Some of them are easy to determine on your own, but to identify others you will need special equipment, which is available only to highly specialized specialists.
VAZ 2110 trigger mechanism
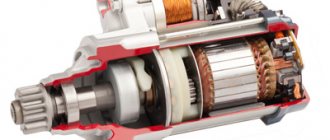
The device for starting the VAZ 2110 engine has an electric motor with a planetary gearbox, as well as a starting solenoid relay. The gears of the planetary gearbox rotate on needle bearings, transmitting torque to the drive shaft. The traction relay switches a large amount of current and transfers it to the electric motor when the ignition key is turned.
The traction relay is returned to its original position using a powerful return spring. The interior of the assembly is a standard electric motor powered by DC battery power. An electric motor consists of a rotor, a magnetic stator and a brush assembly.
This is how the VAZ 2110 starter works. The photo (see below) shows in detail the structure of the unit.
Various external factors, including driver actions, can contribute to malfunctions. To troubleshoot the problem, it is important to understand how to disassemble the VAZ 2110 starter.
Replacing VAZ starter brushes
The process of replacing brushes will not take more than 20 minutes. All you need to do is unscrew the contact wires of each of the elements on the brush holder, and connect new ones in the same way.
Next, each starter brush 2110 or 2109 is placed in its seat on top of the pressure spring. When this is done, the brush assembly must be mounted on the commutator. To do this, the brushes are alternately recessed inside the cell, and the armature is rotated in one direction. After this, we assemble the starter using the reverse algorithm. Before installing the starting device, we check it as described above. If the starter works, it means you did everything right.
Assembly
You can install the brush assembly on the starter armature commutator using a special mandrel or tool head of a suitable size and shape. If they are missing, brushes can be installed without these devices. For this:
1. Using two screws, secure the brush assembly to the rear cover of the starter.
2. Lubricate the end of the starter armature shaft with two drops of engine oil.
3. Insert four brushes into the corresponding brush holders. Without inserting the brush springs into the brush holders, we put the brush assembly on the armature commutator.
Determining the cause of the malfunction
Do not rush to completely disassemble the VAZ 2109 starter; as always, it is first important to correctly identify the fault. Therefore, you should start by checking:
We disconnect the wiring from the terminal and connect it to the “plus” directly. If the engine is running, this means that the power relay is faulty. If the motor is silent, then the likely reason is wear of the brushes. A simple method will help you identify misalignment or wear of the brushes. Remove the unit from the machine, and we check it, start it, removed from the car. When we check the starter separately from the car, you should pay attention to the functioning of its engine. It often happens that the engine works perfectly in only one position. You just need to turn it to one side, and the contact will immediately disappear. Such a strange phenomenon is easy understandable: When the brushes of the starter have a normal length, they are pressed tightly, by means of the springs of the brush holder. When the brushes wear out heavily, the force of the springs may not be enough, then the brush is pressed only by its own weight. Therefore, when the position of the unit changes, the contact disappears. A similar phenomenon is observed when the brushes “hang”, having a normal length, or when the brushes are skewed
Replacing brushes
Replacing starter brushes on a VAZ 2109 is a simple procedure. Any novice auto mechanic or car enthusiast can replace brushes on their own
All you need to do is follow simple steps to complete this task:
- We take the unit removed from the car
- From the starter terminal, disconnect the cable, remove the screws connecting the shaft and commutator covers
- Remove the sealing ring, cover, gasket, then the ring clamp and the second sealing ring located behind it
After unscrewing the screws, remove the cover, gasket, clamp and all o-rings
After this, we proceed to removing the rear cover of the starter by unscrewing the nuts from the tie rods
Remove the nuts from the tie rods
Removing the brush holder assembly
We take out the brush holder assembly
- After this, the brushes will fall out under the action of springs, but will be held in place by wires
- After disassembly, we proceed to inspection and, if necessary, replacement of brushes
- When disassembling the starter, do not forget to carefully arrange the parts in the sequence of their removal, so as not to get confused during assembly.
- The appearance of “extra” parts means that you forgot to screw something on
- We inspect and, if necessary, replace the VAZ 2109 starter brushes or the entire assembly
- Before assembling, we carry out its maintenance - we clean all its elements
- We place the brush plates on the commutator, center them, and then put on the springs and brush holders
- We install the brush holder assembly on the commutator armature, and insert the sealing sleeve into the cutout on the body
- We put the manifold cover on the armature, then the o-ring with gaskets
- After this, install the gaskets, o-ring, ring clamp, put the shaft cover on the manifold cover, tighten the bolts
- Connect the power cable to the electromagnetic starter and tighten the nut
- All that remains is to screw the unit to the engine and connect the wires to it
Now replacing the VAZ 2109 starter brush is a breeze for you, you are convinced that the operation is simple and accessible to everyone, in addition you can always watch a training video.
Summary
It is worth noting that a starter without a gearbox has a larger gap between the armature and the stator than a geared counterpart. For this reason, its permissible shaft misalignment is also greater.
And one more piece of advice. If the starter is still disassembled, then it would be a good idea to replace the brushes. The parts are cheap, so waiting for them to fail and then dealing with them separately is not worth it. Of course, for all the operations described above, at least a little experience is required. And, as you know, he is a profitable business. In the end, to get it you have to try. Go for it!
Tuning VAZ cars
In VAZ models that do not have oil nozzles and the engine is hot, it is advisable to install such elements from the VAZ 2112 engine. In this case, the most heavily loaded parts of the engine will receive additional cooling. The VAZ 2112 oil nozzle is installed using a drill in the cylinder block. Initially, a hole of small diameter is drilled, then with a large diameter to a depth of 5 millimeters. There is not much space to install the injectors, so the top of the injector is cut off, as shown in the figure below.
It is better to install the injectors as shown in the figure with red dots.
In this case, the devices will “sit” more in the block, and if the oil spray hole is directed correctly, the crankshaft will not touch the crankshaft. Using a hammer and file, if necessary, you can adjust the installation of the nozzle. You need to act carefully so as not to damage the body of the part; it cracks and breaks very easily.
Glory to the buckets! Cars 2Atmotaz - Born to run, you won’t get 3.14 years! Turbotaz - Born 3.14 to die, one horseradish will catch up, and from 3.14 will die =) by sharky
STK Yaroslavka - sports training and repair of domestic and foreign cars
https://sc.yaroslavka.ru/
blog.yaroslavka.ru/
www.yaroslavka.ru
https://youtube.com/watch?v=2lX9fJXOk_s
Sources
- https://vaz-russia.ru/remont-vaz-2108/proverka-forsunok-na-rabotosposobnost-na-vaz-2108-vaz-2109-vaz-21099.html
- https://masteravaza.ru/dvigatel/obsluzhivanie-dvigatelya/vaz-2112-maslyanye-forsunki-ohlazhdeniya-424
- https://www.lada.cc/board/index.php?showtopic=63384
Replacing the VAZ 2109 starter (2108, 2115, Kalina)
This article will discuss replacing the starter on a Kalina car. But due to the similar design of the engines, it is perfect for other cars of the VAZ family (2109, 2108, 2115, etc.).
Initially, on my car produced in 2007 (1118 1.6 8kl), a starter manufactured by BATE 2109-3708010-01 was installed. After 80,000 kilometers, it began to show itself and periodically refused to work - I turn the key, and in response there is silence, nothing clicks, nothing spins. But after applying physical force - tapping it a little with a key - it came to life and started working again.
An autopsy showed that the brushes were almost completely worn out, 90 percent. In this case, you could simply replace them with new ones, but I did not like the design of the starter itself. The permanent magnets are not glued to the body, installing them in place is sheer fun, there is no gearbox. And it was precisely because of the last reason that I decided to replace the starter with a new one - with a gearbox. In my opinion, a starter with a gearbox should turn the engine better in winter, because it was very difficult for the old one to do this.
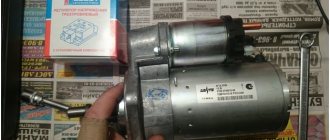
I bought a starter from ATEK 2108-000.
In order to remove the old starter you will have to remove the air filter.
Now you have excellent access to the starter itself. You need to disconnect two wires from the solenoid relay - one thin and one thick (constant + from the battery).
The starter is attached to the engine with three nuts, one of which is located at the bottom. It will be the most difficult to unscrew.
A bushing is pressed into the engine housing, which it is advisable to replace with a new one. I didn't do this because I thought it was still in pretty good condition. But getting it out is very problematic.
It is also advisable to clean everything from dirt. Lubricate the tip of the axle and the bendex gear a little. Now you can begin installing the new starter. And don't forget to connect all the wires in their places.
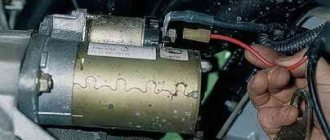
Before proceeding with the actual dismantling of the starter, it is imperative to disconnect the wire from the “-” terminal of the battery. At the same time, the procedure for removing the starter is not at all complicated, but rather inconvenient. It is best to carry out this work in a pit.
Work order:
1. The block with the wire is disconnected from the traction starter relay terminal.
2. Unscrew the fastening nut and remove the drive from the contact bolt of the traction relay.
3. The fastening bolts are unscrewed and the crankcase protection is removed.
4. At the bottom of the engine compartment there are two nuts that secure the starter - they need to be unscrewed.
5. At the top of the engine compartment, you need to unscrew another nut, with which the starter is attached.
6. The starter is removed from the VAZ car.
Perhaps that's all. The starter is installed based on this sequence of work only in reverse order.
Replacing the starter on a VAZ 2109 video bonus
The starter on a VAZ 2109 car is removed to replace or repair it. To carry out the work, prepare a standard set of tools, turn off the power to the car, and then drive it onto an inspection hole or overpass so that it is convenient to remove the lower engine protection. Perform the following sequence of actions:
First of all, it is necessary to disconnect all wires from the traction relay. Remove the block with wires from the relay connector, then unscrew the nuts and remove the high-voltage supply wire from the battery.
- Now you need to remove the engine crankcase protection; to do this, unscrew all the screws securing it around the perimeter and remove it.
- After that, immediately unscrew the two nuts securing the starter to the block from below.
Next, unscrew another nut from the top in the engine compartment and remove the starter.
At this point, the repair work to remove the starter on the VAZ 2109 car has been completed. Disassemble it and then repair it or completely replace it. Perform installation in reverse order. You must first lubricate the Bendix, namely its gear. Also carefully clean the traction relay terminals with sandpaper, since if they are heavily oxidized, a significant voltage drop in the circuit may occur and, as a result, the starter will not start well.
https://youtube.com/watch?v=DRhN3pF9UOE
Sources
- https://car-hobby.ru/zamena-startera-vaz-2109-2108-2115-kalina.html
- https://avtogury.ru/tyuning-dvigatelya/zamena-startera-na-vaz-21099-2109-2108-svoimi-rukami.html
- https://zubilovaz.ru/vaz-2109-kak-snyat-starter
Replacement technology
First of all, you need to disconnect at least one of the wires from the battery, as well as all the wires from the starter. Then you need to unscrew the bottom bolt that secures the starter and screw it in on the reverse side to secure the engine to its front mount. Otherwise, the motor may move forward. After this, you need to unscrew the remaining two bolts that secure the starter and remove it from the car. As mentioned earlier, the bushing is built into the clutch housing. To remove it, you need an M12 tap, as well as a drill chuck. The tap will have to be inserted into the chuck, then clamped, after which it must be carefully screwed into the sleeve, thereby cutting the thread. Great care is required due to the fact that the steel of the tap is very fragile and even a slight misalignment with the applied force can lead to its breakage. In this case, the shank will remain in your hands, and the cutting part will remain inside the sleeve. It would seem that the situation is hopeless. However, it is not. The length of the sleeve is approximately 14 millimeters, which means that there is approximately 10 or 20 mm of the cutting part of the tap on the hands. You need to take a regular nut with exactly the same M12 thread and screw it onto the broken tap. In a situation where the tap is broken off so that it is impossible to screw a nut onto it, you can take a bolt with a corresponding thread about 10 centimeters long and grind grooves on it similar to the grooves of the tap. Or you can do it more radically, but at the same time simpler. Go to the store for a new tap. The tap is equipped with three grooves into which you need to insert nails of the appropriate size. This must be done in such a way that their ends protrude beyond the end of the tap by about 10 mm. Try to insert the resulting structure into the sleeve with the broken end of the tap. It may not work out right away, but with the right amount of persistence the operation can be easily accomplished. After this, you can try to unscrew the piece and try to unscrew the bushing again. As a rule, after a few turns the bushing will begin to rotate and can be carefully unscrewed. If the bushing is very stuck, you will have to cut the thread in it approximately 6 or 8 turns. After this, remove the tap, and in its place screw in a bolt of a suitable size and use it to remove the sleeve. When a new one is inserted in its place, it is slightly pressed in.
If the replacement is not happening for the first time, then the bushing can be inserted quite easily by hand. But during long-term operation, this can lead to it turning in the mounting hole. Over time, the mounting hole will break up, forming the so-called eccentricity, and the starter shaft may become misaligned. This means that the starter will stick and the engine will not be able to start. However, this is quite easy to fix. To do this, it is necessary to determine the size of the so-called eccentricity. Then you need to machine or order from a specialist a bushing with a larger outer diameter just to fit the eccentricity. You should solder some solder on the side of this bushing. After this, the bushing will fit in with a slight interference fit.
How to ring the starter, which indicates the need to replace the starter
The scheme for carrying out this activity is very simple, you need to place the starter with the windings up, i.e. on the end, after which we perform the following actions: we connect one end of the wire to the bolts of the mechanism, the other to the positive terminal, then we start the device.
If the mechanism does not turn at all or turns poorly after starting, feel free to start repairing it. But, if the device is working normally, then there is no need to disassemble it; most likely, the reason for the poor start lies in another component of the vehicle.
In addition, it would be useful to check the mechanism relay. In this situation, the verification scheme is elementary:
- We apply the “minus” to the relay body.
- We apply 12-volt voltage to the output.
- We connect an ohmmeter to the contact bolts.
If sparks appear on the contact bolts and the coupling moves into the hole, then the relay is working properly. The absence of these phenomena and voltage surges on the device will indicate that it is necessary to replace the relay, since the starter does not turn because of it.
Starter problems and their elimination
If the starter does not turn, the car does not start, and the traction relay clicks characteristically, then the culprit is often a discharged battery. Due to insufficient battery charge, when voltage is applied to the starter, its level in the circuit drops, which causes the traction relay to turn off. To resolve this situation, you need to recharge the battery.
The culprit for the relay clicking may also be an oxidized terminal. Because of this, the voltage in the circuit is unstable and varies significantly depending on the load. To eliminate problems, you should grind the terminal connection, clearing the oxides. If the damage is significant, the defective element must be replaced.
The main problems with the starter are divided into mechanical and electrical. Among the first, the most popular is a Bendix malfunction. During operation, it wears out, which leads to backlash. Mechanical damage to the gear and clutch is also possible. If problems arise with the bendix, it must be replaced, since it is difficult to repair.
The planetary gearbox has improved the performance characteristics of the starter. At the same time, he introduced an additional malfunction, characteristic of VAZ 2112 units. The lubricant thickens over time, this manifests itself in sluggish rotation of the crankshaft, which can ultimately lead to the fact that the car will no longer start. To solve the problem, you should disassemble the assembly, wash the gears of the gearbox and fill the planetary gear with fresh lubricant.
In the electrical part, brushes are most susceptible to wear. They wear out at the point of contact with the collector. Insufficient brush length leads to unstable power supply to the armature windings, which affects the inability to rotate the crankshaft normally. To eliminate problems associated with brush wear, you should measure their length and if it does not reach 4 mm, replace the worn-out elements.
A large current flows through the brushes and commutator. It causes heat, which under unfavorable conditions leads to thermal and mechanical damage. Small defects can be eliminated by sanding. If the damage is significant, then the failed elements must be replaced.
Also, when diagnosing the starter armature, you should check the windings for an interturn short circuit, open circuit or breakdown to the housing. This will reveal damage to conductors or insulation.
Starter brushes VAZ 2109
There may be several reasons why the engine does not start. However, you can always quite accurately determine the source of the malfunction by the sound emanating when you try to start the car.
If there is a clear click, but the starter does not start or turns weakly, then the cause may be worn brushes. This is especially likely if the starter does not make any creaking sounds when starting, but simply spins slowly. Replacing the VAZ 2109 starter brushes is generally not difficult, but it will require at least a general understanding of the process of removing and disassembling the device. On the “nine”, and on other domestic models of this series, the starter is located in the engine compartment on the left. It is attached with three bolts to the clutch housing. Having removed the negative terminal from the battery, we also remove the wires from the starter solenoid relay. After that, unscrew the three bolts with a 13 mm wrench. And then the starter is at our disposal.
If you suspect a problem with the brushes, this is not a clear reason to run for new ones to replace them. You need to additionally test the starter by connecting it directly to the battery. So, we connect the ground and the positive terminal to the starter.
| Photo of a set of brushes for the starter of a VAZ 2109 car. |
If it starts, but when turning from side to side (on its side) it stops or reduces its speed, then it will still have to be disassembled. This is because if the formal length brushes are placed at a short distance from the commutator, then the worn brushes can no longer contact it. As the starter housing rotates, the brush simply falls out and moves a little closer to the commutator, and then the starter rotates. If you turn the body just a little, the brush falls back. It is clear that this is not normal and replacement is required.
Replacing the VAZ 2109 starter brushes will require removing the starter rear cover. You need to unscrew the two mounting bolts, after which the protective cover can be removed. Remove the protective ring of the anchor. To remove the manifold compartment cover itself, you need to unscrew the nuts of the two tightening bolts. After removing the cover, pull out the brush holder assembly. It is convenient to pull out the brushes with some kind of hook. They will pop out, but will be held on by the wires.
VAZ 2109 starter brushes in normal condition have a length of at least 12 mm. They must be clean, free of carbon deposits.
| The photo shows the minimum allowable size of starter brushes. If the size decreases to less than 12 mm, the brushes must be replaced. |
If the length of the brushes is normal, you just need to clean them and align them evenly - the engine may not spin even from a simple misalignment. We install the brush plates (new or the same) back into the commutator, align them, and put on the springs and brush holder. The brushes should move freely in the brush holder and should not become stuck. We install the brush holder back on the commutator and put the cover in place. After assembling the starter, we check whether the nature of the device’s operation has changed without installing it back into the engine compartment. The price for VAZ 2109 starter brushes is not high, and replacing them will not break your pocket. For domestic cars, purchasing them is not difficult; they are freely available. However, if the car enthusiast already has some brushes from another starter model, then, as a rule, they can be used. Conventional copper-graphite brushes are quite easy to process by chipping them with a tool
It is only important to choose the right length. If the brushes are too long, the starter will make a characteristic cracking sound during operation, and it will be clear that they need to be shortened
When installing third-party brushes, it is important to position them so that they do not short to ground. The brushes must all be the same length, and this length is selected experimentally
The manufacturer does not state a specific value, but the minimum brush length in almost any starter is 8 mm. However, if you don’t want to experiment, you can simply purchase original VAZ 2109 starter brushes, the price of which is only 50-100 rubles per set.
Also read other reviews
- VAZ 2109 starter retractor relay A very important part of the starter of any car is the retractor relay, the role and function of which will be discussed in this article. ...
- How to check the VAZ 2109 starter The article provides an overview of the main starter faults and the main methods for diagnosing them for the VAZ 2109 car. ...
- Design of a gear starter This review describes the basic principles of operation of a car starter equipped with a gear. ...