December 10, 2015 Lada.Online 109 865 0
During the operation of the car, drivers may encounter minor troubles. For example, at night they notice that the headlights do not light up. If the check does not reveal faulty fuses, then the cause may be a burnt out light bulb.
Before replacing lamps, make sure the optics are turned off. To replace the lamps in the left headlight of the Priora, there may not be enough free space; to do this, remove the battery. Do not touch the lamp bulb with bare hands; use cotton gloves. If there is dirt on the bulb, it is recommended to wipe the lamp with a swab moistened with a 70% ethyl alcohol solution.
Lada Priora headlights can be of two types:
- High beam and DRL (daytime running lights) are combined. Option A - with two protective plugs.
- high beam without DRL. Option B - with one large plug.
We buy replacement light bulbs
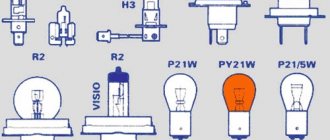
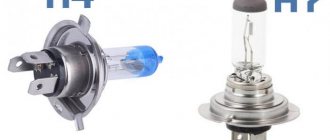
The headlight unit contains four lamps: dimensions, turn signal, low beam and high beam. We are interested in the last two components:
- Low beam is equipped with H7.
- For “high beam” the lamp AKG12-55-2 (H1) is used.
The VAZ 2170 (as well as more modern models) uses halogen optics for high and low beam. Some motorists prefer to modernize the Priora by installing alternative headlights. We recommend following factory recommendations. A halogen lamp for low beam will cost you 250-500 rubles, for high beam - 100-400 rubles.
If you decide to change the standard “light” of the Priora to alternative optics, then you should pay attention to the products of Philips, Koito and Osram. On automobile forums, owners recommend using products from these manufacturers, as they have a long service life
When choosing light bulbs, you need to start from their types. For example, you want to buy a Koito component for low beam - find the H7 bulb in the list.
Now you know which light bulbs are suitable for the Lada Priora car. Prepare clean gloves, a brush for cleaning optics, and a standard set of tools, which includes wrenches and screwdrivers. If you will be working with the left headlight, it is recommended to remove the battery in advance. Replacement can be done without this step, but it will be difficult for you to reach some of the light bulb mounts. Before you change the lights, you need to determine what type of headlights are installed in your car.
- Option A shows headlights with high beams and DRLs. In this version they are combined and equipped with plugs.
- On option B, the main beam does not have daytime running lights; there is one large plug.
Novice motorists may confuse the lamps with each other. To prevent this from happening, compare the light bulbs of your car with this image, H1 - high beam, near H7 - low beam:
The Priora uses halogen lamps. When installing new components, try not to touch the bulbs with your fingers. Upon contact, grease stains may remain, which will lead to darkening of the lamp glasses. Work must be carried out with clean cotton gloves. If you do touch the flask, immediately wipe the area with a clean rag. It is advisable that the cloth be soaked in alcohol.
Preventive measures
Let's return to the issue of longer service life of light bulbs. Do not forget that in Priora the light is provided by halogens, whose bulbs have an extremely negative attitude towards dust and especially grease. Recommendations to take them only by the base are fair, but this makes installation very difficult. The best way to change light bulbs is to wear a clean cotton glove. Rubber ones are no good, they leave sticky fingerprints on the glass, which is no better than your bare hand.
If you touched the flask
, wipe it with a soft cloth soaked in alcohol. If you ignore the procedure, you will at least get darkening in the places where the lamp comes into contact with the skin. In the worst case, it will burn out in a week.
How to install angel eyes
Angel eyes Lada Priora with DRL controller. Angel eyes on the Priora are LEDs that are installed inside the front unit, along the perimeter of the lenses and in the rear light. To do this you need to purchase:
- Electric wire of moon-white color. Type SH; diameter 2.6 mm;
- Receiver (Operating voltage – 12 Volts).
After everything is ready, you can begin active actions:
- Raise the hood, remove the battery (this will make it easier to work).
- Dismantle the block, remove the substrates.
- First secure the wires in place with tape (lightly) or clothespins - this is done to fix their position. Then fix them with epoxy resin.
- Wait for the resin to dry, secure the substrates and seal all the gaps with sealant so that the glass does not fog up. We carry out the installation.
How to change the low beam light bulb on a Priora
Priora is an extremely interesting car. The car, with its appearance, shows interest in all living things, and the same happens inside. Not as clearly expressed as in her gaze, but you will also have to feel all the delights of the design. We won’t go far, we’ll just change the light bulb. What's easier?
Replacing a low beam lamp on a Lada Priora
Light bulb is different. Several changes were made to the electrical circuit of the Priora compared to its predecessor. But we’ll talk about them later, but for now we’ll just change the regular lamp. How to change the low beam light bulb on a Priora is very clearly described in the operating instructions. It’s simple: open the lid, take out one lamp, and put a new one in. All things. But it's in the manual. In practice, things are somewhat different.
The reference conditions for replacing a low beam lamp are a table, a removed headlight unit and ideal lighting. Then it will turn out as in the instructions. In fact, the situation is somewhat different. But first, let's take a look at the manufacturer's recommendations.
- To replace the left low beam lamp, it is necessary to remove the battery, otherwise there will be no access to the base. Some recommend moving the battery towards the windshield, but if you are not a philharmonic pianist, then it is better not to be lazy and remove the battery. Nerves are more expensive.
- The left low beam lamp is closer to the fender, so you need to remove the rubber cover on the far left.
- Power is supplied to the lamp through a block with contacts that need to be disconnected and the harness taken to the side.
- The lamp itself is attached to the reflector using a spring clamp, which must be pressed from top to bottom, after which it will disengage with the hooks of the reflector.
- Now you can remove the halogen and carefully insert the new H7 lamp into the headlight housing.
- Having fastened the lamp to the reflector, you can put the block on the contacts and close the cover.
Replacing the right low beam lamp is similar, but you do not need to remove the battery
One more important note. All halogen lamps have a bulb that is very sensitive to dust and grease, so it is highly undesirable to touch the bulb with your hands
If you do touch it with your fingers, be sure to wipe the flask with a soft, clean rag soaked in alcohol.
Selecting a low beam lamp
If everything is more or less clear with replacing the lamp, you just need to have composure and flexibility of a boa constrictor, then with the low beam lamp itself on the Priora things are not as rosy as we would like. Firstly, a huge number of fakes littered the market, and with the same impudence as Priora looks at humanity, they replaced human lamps. It's simple - they are much cheaper.
In appearance, such a lamp is almost impossible to distinguish from a real one, and sellers in car dealerships show professional solidarity, striking in their incompetence. It is in their interests to sell us a cheap fake, and not to provide us with a good spare part, so all questions regarding the choice of lamps fell on the fragile shoulders of the car enthusiast.
There is a series of tests that is conducted from time to time by a reputable organization. During the tests, it turned out that those lamps that sell for 50 rubles apiece can have any inscription - Philips, Osram, Bosch, whatever. But these are not real H7 lamps, and their use is not only useless, but even harmful.
Low beam lamp models
Each halogen lamp has its own characteristics and necessary parameters in order to be used as a source of low beam, and this must be indicated on the packaging. In particular, according to GOST, the luminous flux of the lamp is standardized and should be within the range of 1350 - 1650 lumens. If this parameter is not indicated on the packaging, or is indicated but does not comply with the standards, then such a lamp should not be installed. The lamp power should not exceed 58 W, otherwise the wiring will be overloaded and may melt, which will lead to obvious consequences. Also, the light spot must comply with the standards in area and shape.
The best lamps for these parameters turned out to be
Philips Vision Plus +30% - if the headlight is correctly adjusted, then this lamp is quite suitable for use, provided that it is not a fake. The most ordinary good halogen.
OSRAM H7 - the most common counterfeits of this model are found. This lamp meets all standards and parameters.
H7 MEGAPOWER+30% - there is no European certification on the packaging, there is only a Russian certificate. The light spot does not comply with GOST, the base is of poor quality, and the luminous flux is 1050 lm, which is slightly below the norm. Not recommended for long-term use.
In short, this is all that can be said about the low beam headlight lamps in Priora and their replacement. Do not bring the lamp to a critical state, so as not to change it later in the cold. Choose good lamps, and good luck on your journey!
Adjustment
You managed to install the PTFs, but in order for them to perform their task, they must be configured. Place the Lada Priora on a flat surface. There should be a wall opposite the front bumper; motorists usually use a garage for this. Check the tire pressure - it should be the same.
Now you need to measure the distance from the ground to the middle of the headlight. On the wall, draw an even strip corresponding to the distance from the coating to the middle of the PTF. Draw another strip 5 cm below, the top one can be erased. The fog lights need to be adjusted so that the upper limit of the light is located on the horizontal line that we drew on the surface. As you can see, the headlight adjustment scheme is quite simple.
PTFs are installed on the Priora to improve the standard light when driving through dark sections of the road or in fog, they are simply necessary. Fog lights on the Priora are a privilege of luxury trim levels. Lada Priora was produced in 2 bumper design options: restyling SE, pre-restyling, so the part number is different - more about it below. In all other, empty configurations of the Priora car, plugs are installed in place of the PTF, which over time you want to replace with fog lights. Usually this moment comes when the driver drives his car for the first time through dense fog - so that visibility is minimal, it’s scary to drive, but it’s necessary. In such cases, the emergency lights turn on, movement should be slow and careful - and if there were fog lights, the driver would feel more confident.
Connecting the PTF is done in 7-8 steps; if you wish, you can do it yourself in the garage - read about it in this article.
The turning point leads to the choice between lens PTFs in the Priora and LED PTFs. One way or another, when driving in conditions of insufficient visibility, the light will become much larger. The driver will do everything possible to fulfill his duty to ensure traffic safety. But the fulfillment of this duty will have to be supported.
What kind of lamps are in the headlights of the Lada Priora?
| Lampatip | Lamp type |
| low beam lamp | H7 |
| high beam lamp | AKG12–55–2 (H1) |
| high beam lamp and DRL | H15 |
| turn signal lamp | А12–21–4 (PY21W) |
| side light lamp | А12–5–2 (W5W) |
Also, the process of replacing low and high beam lamps is shown in the video:
Have you ever had to change the bulbs in the headlights of a Priora yourself? What were the challenges during this process? Let us remind you that it is possible to install DRLs yourself.
Found an error? Select it and press Ctrl+Enter..
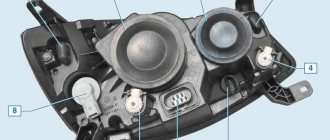
Replacing lamps in a Lada-Priora headlight
Depending on the manufacturer, two types of headlights are used on the Lada Priora. In order to change the lamp in the left headlight, you must first remove the battery.
Procedure for replacing low or high beam lamps:
- remove cover 2;
- disconnect the wire block 7 from the failed lamp;
- remove the antennae 6 of the spring clamp from the grooves;
- remove the lamp;
- Replace the lamp and install it in reverse order. In this case, you should hold a working lamp only by the base and under no circumstances touch its glass part.
The procedure for replacing the side light lamp in the headlight:
- remove cover 1;
- remove the side light lamp socket from the seat in the reflector 5 by the wires;
- remove the lamp from the socket;
- replace the lamp and install it in the reverse order, fix the lamp socket in the reflector socket, applying force to the socket body.
The procedure for replacing the turn signal lamp in the headlight:
- remove the headlight housing by unscrewing the three fastening screws;
- turn the socket with lamp 3 counterclockwise and remove it from the seat of the headlamp housing;
- remove the lamp from the socket by turning it counterclockwise;
- Replace the lamp and install it in reverse order.
Replacing lamps in the rear light of a Lada Priora
The procedure for replacing the lamp in the rear light:
- bend back the trunk trim, providing access to wing nuts 1 for securing the rear light;
- unscrew the 3 wing nuts and slide the rear light out of its seat;
- turn the lamp socket to be replaced counterclockwise and remove it from the seat;
- remove the lamp from the socket by turning it counterclockwise;
- Replace the lamp and install it in reverse order.
Replacing the lamp in the side turn signal of Lada Priora
In order to replace a failed side turn signal lamp, it must first be removed. The side turn signal lamp 1 is held in its socket by a spring latch and a latch. It is necessary to move the lamp in the direction of vehicle movement and disengage the latch. Turning socket 3 counterclockwise, remove it together with the lamp from the flashlight body and pull lamp 2 towards you. Replace the lamp and reinstall the lamp in the reverse order.
Replacing the license plate lamp of Lada-Priora
To gain access to the license plate light lamp socket, you need to open the trunk lid and turn the socket with lamp 3 clockwise through the holes in the inner panel of the trunk lid, without disconnecting the wiring harness block, and remove the socket from the lamp housing and pull out lamp 2 to myself.
To replace the lamp in light 1 in a Lada Priora in a hatchback body, you need to remove the tailgate trim, which is attached with buttons. After this, you should do the same steps as described above.
Replacing a lamp in the interior lighting of a Lada-Priora
To replace the lamp in the dome light, it must be removed from the roof trim container body. The lampshade is held by a metal spring latch 4 in the socket of the container body. To remove the lampshade, you need to insert a flat-tip screwdriver into the groove on the right side of the lampshade (passenger's side) and carefully turn the lampshade towards you, after which you should press contact 3 and remove lamp 2, replace the lamp and install the hooks 1 of the lampshade into the socket on the left, after Then press the right side of the lampshade until it locks.
Replacing the lamp in the trunk and glove compartment lighting of a Lada Priora
To replace lamp 2 in trunk light 1, remove the light from the bracket. To do this, install a flat-head screwdriver in groove 3 on the right side of the lampshade and carefully press the lampshade down. The lampshade is held in the bracket by a spring latch. Replace the lamp, install the lampshade hook on the left in the bracket, then press the right side of the lampshade until it locks.
To replace lamp 3 in the glove box lamp 1, remove the lamp from the socket by inserting a flat screwdriver into groove 2 on the right side of the lamp and gently press the lamp down. The lamp is held by a spring latch 7 in the socket of the glove compartment housing. Replace the lamp, install the lampshade hook on the left into the socket, and then press the right side of the lampshade until it locks.
Top of page
What is the difference between PTF for Priora 1 and Priora 2
In fact, the Lada Priora does not have any generations or numbers. In 2013, this car was restyled, which significantly changed the appearance of the Priora, but this did not make it the second generation. As for PTFs, after restyling they did not change, just as the types of lamps used in them did not change. The only exception is the Lada Priora Restyling SE, which received new PTFs, but with the same H11 lamps.
Third-party developers also produce LED versions of such headlights, and some of them can additionally serve as daytime running lights.
PTF with LED daytime running lights for Priora SE
That's probably all. If you carefully read the article, you will be able to equip your Priora with PTF yourself, and, if necessary, change the light bulb in the headlight.
H4 car lamp tests
1. Which lamps are the brightest were determined by the Test Lab channel (June 2020). The rating is as follows:
- OSRAM Night Breaker
- Philips X-Treme Vision
- Philips Vision
- Philips Vision Plus
- Philips Longlife Ecovision
- OSRAM U37R
- Narva
- OSRAM Cool Blue
- GE 50440U
Out of the standings:
- MTF Argentum
- OSRAM Super Bright
2. Test of H4 automobile lamps “Behind the Wheel” in the laboratory and on the roads (March 2022):
| Zone III (measurement direction: 0°-0°), lx | Counter. point B50L (measurement direction: 34′ up, 3°26′ left), lx | Counter. point 75R (measurement direction: 34′ down, 1°09' to the right), lux | Counter. point 50R (measurement direction: 52′ down, 1043′ to the right), lux | Notes | |
| Standardized values, lux | 1,00 | <0,60 | >9,60 | >9,60 | |
| Standard Philips H4 lamps | 1,00 | 0,60 | 9,60 | 9,60 | the light is visually white |
| ClearLight X-Treme Vision H4 | 1,00 | 0,34 | 15,30 | 26,50 | the light is visually white |
| Narva Xenon White H4 | 0,64 | 0,22 | 8,00 | 12,40 | light visually blue |
| MTF Light Aurum H4 | 2,04 | 1,00 | 12,88 | 28,40 | the light is visually yellow |
| LED MAS H4 | 1,20 | 1,20 | 1,40 | 1,40 | no cut-off line |
| DLED H4, 270 lm | 0,40 | 0,40 | 0,40 | 0,40 | no cut-off line |
| DLED H4, 900 lm | 7,60 | 4,24 | 7,20 | 5,70 | no cut-off line |
Manufacturers of lamps for VAZ 2114
Since lamps with an H4 socket are used in headlights of many models from different manufacturers, all manufacturers of car lamps produce such lamps. Among them are the following companies:
- A world-famous Dutch company, known for its low prices and good quality products;
- A German company with a long history and rich technological experience;
- Narva. This is another manufacturer from Germany, known for the quality and durability of its products;
- Bosh. Another German company that does not need any special introduction;
- Company based in Hong Kong and Germany. Produces a wide range of reliable lighting equipment.
The above list can be continued for a long time. Today, a big name of a manufacturer is not a guarantee of high quality and reliability. There are a lot of fakes on the market, which are not only cheap, but also completely inconsistent with the original. Therefore, it is better to make a choice based not on the name, but on the characteristics of the light bulbs.
Criterias of choice
The low beam of VAZ-2107 (Lada Priora) cars is implemented using halogen lamps. They have an H7 base and a power of 55 W. Similar lighting devices are produced by all car lamp manufacturers, both European and those from Southeast Asia. The most reliable companies producing H7 light bulbs include:
- A Dutch company whose history goes back 120 years. The range includes a large number of different technical devices. Lighting devices make up only a small part of the total production volume. Famous for quality and reliability. Today the company has factories in many countries around the world;
- Large manufacturer of automobile lamps from Germany. Initially, the company was a division of the Siemens concern. The production of lighting devices is the main specialization of the company, which has achieved great success in this direction. The company's subsidiary, Neolux, which also produces lamps and lighting equipment, is actively operating;
- Another German company whose age exceeded 100 years. It produces a wide range of products; in addition to light bulbs, power tools and automobile accessories are widely known;
- The company was founded in Germany in 1948. The production of electric lamps is the main direction of the company. All products undergo multi-stage quality control and have appropriate certificates;
- Sho-Me. A large Chinese manufacturer of car lamps, accessories and other goods. Most xenon lamps are produced by this company;
- MTF-Light. A Russian company that produces automobile lamps for the domestic market. Production facilities are located in South Korea. The products meet all international standards and are highly valued by users.
The above list is not exhaustive. It is difficult to list all the companies, and there is no point in doing so. New companies are constantly appearing on the market, offering their products to customers.
What kind of lamps are in the headlights of the Lada Priora?
| Lampatip | Lamp type |
| low beam lamp | H7 |
| high beam lamp | AKG12–55–2 (H1) |
| high beam lamp and DRL | H15 |
| turn signal lamp | А12–21–4 (PY21W) |
| side light lamp | А12–5–2 (W5W) |
Also, the process of replacing low and high beam lamps is shown in the video:
Have you ever had to change the bulbs in the headlights of a Priora yourself? What were the challenges during this process? Let us remind you that it is possible to install DRLs yourself.
Found an error? Select it and press Ctrl+Enter..
Replacing lamps in a Lada-Priora headlight
Depending on the manufacturer, two types of headlights are used on the Lada Priora. In order to change the lamp in the left headlight, you must first remove the battery.
Procedure for replacing low or high beam lamps:
- remove cover 2;
- disconnect the wire block 7 from the failed lamp;
- remove the antennae 6 of the spring clamp from the grooves;
- remove the lamp;
- Replace the lamp and install it in reverse order. In this case, you should hold a working lamp only by the base and under no circumstances touch its glass part.
The procedure for replacing the side light lamp in the headlight:
- remove cover 1;
- remove the side light lamp socket from the seat in the reflector 5 by the wires;
- remove the lamp from the socket;
- replace the lamp and install it in the reverse order, fix the lamp socket in the reflector socket, applying force to the socket body.
The procedure for replacing the turn signal lamp in the headlight:
- remove the headlight housing by unscrewing the three fastening screws;
- turn the socket with lamp 3 counterclockwise and remove it from the seat of the headlamp housing;
- remove the lamp from the socket by turning it counterclockwise;
- Replace the lamp and install it in reverse order.
Replacing lamps in the rear light of a Lada Priora
The procedure for replacing the lamp in the rear light:
- bend back the trunk trim, providing access to wing nuts 1 for securing the rear light;
- unscrew the 3 wing nuts and slide the rear light out of its seat;
- turn the lamp socket to be replaced counterclockwise and remove it from the seat;
- remove the lamp from the socket by turning it counterclockwise;
- Replace the lamp and install it in reverse order.
Replacing the lamp in the side turn signal of Lada Priora
In order to replace a failed side turn signal lamp, it must first be removed. The side turn signal lamp 1 is held in its socket by a spring latch and a latch. It is necessary to move the lamp in the direction of vehicle movement and disengage the latch. Turning socket 3 counterclockwise, remove it together with the lamp from the flashlight body and pull lamp 2 towards you. Replace the lamp and reinstall the lamp in the reverse order.
Replacing the license plate lamp of Lada-Priora
To gain access to the license plate light lamp socket, you need to open the trunk lid and turn the socket with lamp 3 clockwise through the holes in the inner panel of the trunk lid, without disconnecting the wiring harness block, and remove the socket from the lamp housing and pull out lamp 2 to myself.
To replace the lamp in light 1 in a Lada Priora in a hatchback body, you need to remove the tailgate trim, which is attached with buttons. After this, you should do the same steps as described above.
Replacing a lamp in the interior lighting of a Lada-Priora
To replace the lamp in the dome light, it must be removed from the roof trim container body. The lampshade is held by a metal spring latch 4 in the socket of the container body. To remove the lampshade, you need to insert a flat-tip screwdriver into the groove on the right side of the lampshade (passenger's side) and carefully turn the lampshade towards you, after which you should press contact 3 and remove lamp 2, replace the lamp and install the hooks 1 of the lampshade into the socket on the left, after Then press the right side of the lampshade until it locks.
Replacing the lamp in the trunk and glove compartment lighting of a Lada Priora
To replace lamp 2 in trunk light 1, remove the light from the bracket. To do this, install a flat-head screwdriver in groove 3 on the right side of the lampshade and carefully press the lampshade down. The lampshade is held in the bracket by a spring latch. Replace the lamp, install the lampshade hook on the left in the bracket, then press the right side of the lampshade until it locks.
To replace lamp 3 in the glove box lamp 1, remove the lamp from the socket by inserting a flat screwdriver into groove 2 on the right side of the lamp and gently press the lamp down. The lamp is held by a spring latch 7 in the socket of the glove compartment housing. Replace the lamp, install the lampshade hook on the left into the socket, and then press the right side of the lampshade until it locks.
How to change the low beam light bulb on a Priora
Priora is an extremely interesting car. The car, with its appearance, shows interest in all living things, and the same happens inside. Not as clearly expressed as in her gaze, but you will also have to feel all the delights of the design. We won’t go far, we’ll just change the light bulb. What's easier?
Replacing a low beam lamp on a Lada Priora
Light bulb is different. Several changes were made to the electrical circuit of the Priora compared to its predecessor. But we’ll talk about them later, but for now we’ll just change the regular lamp. How to change the low beam light bulb on a Priora is very clearly described in the operating instructions. It’s simple: open the lid, take out one lamp, and put a new one in. All things. But it's in the manual. In practice, things are somewhat different.
The reference conditions for replacing a low beam lamp are a table, a removed headlight unit and ideal lighting. Then it will turn out as in the instructions. In fact, the situation is somewhat different. But first, let's take a look at the manufacturer's recommendations.
- To replace the left low beam lamp, it is necessary to remove the battery, otherwise there will be no access to the base. Some recommend moving the battery towards the windshield, but if you are not a philharmonic pianist, then it is better not to be lazy and remove the battery. Nerves are more expensive.
- The left low beam lamp is closer to the fender, so you need to remove the rubber cover on the far left.
- Power is supplied to the lamp through a block with contacts that need to be disconnected and the harness taken to the side.
- The lamp itself is attached to the reflector using a spring clamp, which must be pressed from top to bottom, after which it will disengage with the hooks of the reflector.
- Now you can remove the halogen and carefully insert the new H7 lamp into the headlight housing.
- Having fastened the lamp to the reflector, you can put the block on the contacts and close the cover.
Replacing the right low beam lamp is similar, but you do not need to remove the battery
One more important note. All halogen lamps have a bulb that is very sensitive to dust and grease, so it is highly undesirable to touch the bulb with your hands
If you do touch it with your fingers, be sure to wipe the flask with a soft, clean rag soaked in alcohol.
Selecting a low beam lamp
If everything is more or less clear with replacing the lamp, you just need to have composure and flexibility of a boa constrictor, then with the low beam lamp itself on the Priora things are not as rosy as we would like. Firstly, a huge number of fakes littered the market, and with the same impudence as Priora looks at humanity, they replaced human lamps. It's simple - they are much cheaper.
In appearance, such a lamp is almost impossible to distinguish from a real one, and sellers in car dealerships show professional solidarity, striking in their incompetence. It is in their interests to sell us a cheap fake, and not to provide us with a good spare part, so all questions regarding the choice of lamps fell on the fragile shoulders of the car enthusiast.
There is a series of tests that is conducted from time to time by a reputable organization. During the tests, it turned out that those lamps that sell for 50 rubles apiece can have any inscription - Philips, Osram, Bosch, whatever. But these are not real H7 lamps, and their use is not only useless, but even harmful.