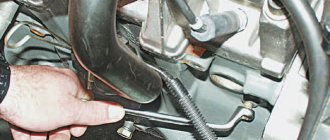
The weak link of the VAZ 2107 brake system is the rubber hoses connecting the metal liquid tubes to the working cylinders of the front and rear wheels. The pipes are bent many times during the operation of the car, which is why the rubber begins to crack and leak liquid. The problem cannot be ignored - over time, the level in the expansion tank will drop to a critical level and the brakes will simply fail. Replacing defective hoses on the “seven” is not difficult and is often performed by car enthusiasts in garage conditions.
- When to change hoses
Video: diagnostics of flexible brake pipes
- Video: how to distinguish counterfeit parts
- Installing the front hoses
Video: Tips for replacing front hoses
- Video: replacing the rear axle brake hose
Purpose of flexible pipes
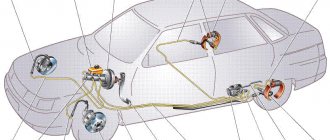
The contours of the VAZ 2107 liquid brakes are made of metal tubes leading from the master cylinder (abbreviated as GTZ) to all wheels. It is impossible to connect these lines directly to the working cylinders, since the wheel brake mechanisms are constantly moving relative to the body - the chassis absorbs unevenness, and the front wheels also turn left and right.
The brake circuits of the "seven" use 3 flexible lines - two on the front wheels, one on the rear axle
To connect rigid tubes to the calipers, flexible connections are used - brake hoses made of moisture-resistant reinforced rubber. The “seven” has 3 pipes - two on the front wheels, the third supplies fluid to the brake pressure regulator of the rear axle. Short thin hoses between the expansion tank and the gas turbine engine do not count - they do not have high pressure, spare parts rarely become unusable.
Flexible eyeliner consists of 3 elements:
- Textile fiber reinforced flexible hose.
- A steel fitting with an internal thread is pressed onto one end of the pipe, into which a mating sleeve of the metal tube is screwed. There is a groove on the outside of the tip for fixing the element to the car body with a special washer.
- The shape of the second fitting depends on the purpose of the hose. To connect to the front mechanisms, an eye with a hole for a bolt (the so-called banjo fitting) is used; on the rear contour there is a conical tip with a thread.
The front brake circuit pipe is equipped with a banjo fitting for an M10 bolt
The first end of the hose, connecting to the circuit tube, is always attached with a fixing bracket to a special bracket on the body. On the rear axle the second tip remains free, on the front wheels it is additionally fixed to the calipers with overhead brackets. To prevent liquid from seeping through the threaded connection, 2 copper sealing washers are put on the bolt.
A cone with an external thread is screwed into the tee, the second end of the rear hose is connected to a metal tube
Please note: the hose eyelet for the front wheels is made at an angle relative to the longitudinal axis of the pipe, as shown in the drawing.
The eye of the outer tip must be adjacent to the plane of the brake caliper at an angle
Main elements of the brake system
The brake system of the VAZ 2109 car includes many auxiliary parts, but the main design elements are:
- GTZ. Master brake cylinder. The most important part of the system, which creates pressure in the pipes. This element is made of a piston moving along an ideal, flat surface. Rubber rings are used to seal connections between components.
Please note that these rings must be replaced during repairs, regardless of whether they are intact or not.
- The brake fluid that is poured into the GTZ is quite aggressive. It contains many additives. But they are the ones who guarantee high-quality engine operation. The disadvantage of such a system is that the components of this liquid quickly evaporate. Therefore, it is better to change the brake fluid at least once a year;
- Vacuum booster. It is located between the passenger compartment and the compartment where the engine is located. It is a large container, cylindrical in shape. The booster is connected to the master cylinder and the booster runs a hose to the fuel injection system (carburetor).
- The function of this element is to make driving easier. And this simplification lies in reducing the effort required to press the brake pedal.
On a note. If you think that this element of the brake system is not particularly important, then drive an old-style Zhiguli, which does not have a vacuum booster. The difference is simply huge, both in ease of control and in braking efficiency;
- Brake calipers. The function of these calipers is to press the brake pad against the top of the disc. When repairing a VAZ 2109 model car, calipers are replaced in very rare cases for the reason that their service life is very long. The design consists of a housing made of aluminum, in which there are two holes. A tube is connected to one of the holes using a hose. A fitting is inserted into the other. Inside the device itself there is a piston made of steel that activates the pads;
- Pressure regulator. An element whose purpose is to increase the efficiency of the braking system. The entire braking process is 70-80 percent done by the wheels of the front axle. The remaining percentage of braking is performed by the rear brake system of the VAZ 2109. Of course, this parameter is conditional and depends on many factors such as the load on the car, etc. Therefore, the developers made sure that the brake system of the VAZ 2109 model could, independently of anyone, regulate the forces on the wheel calipers of the front and rear axles.
When to change hoses
The service life of brake rubber pipes is about 3 years if the car is used regularly. A poor-quality hose may leak after six months or 2-3 thousand kilometers, or even earlier.
In order not to lose the brakes while driving and not become the culprit of an accident, the owner of the “seven” must constantly monitor the technical condition of the flexible hoses and immediately change them if the following signs are detected:
- when many small cracks appear, indicating critical wear of the rubber shell;
- in case of detection of wet liquid stains, which most often appear near the very tips;
Most often, the pipe breaks near the tip, and fluid literally floods the steering rod - in case of mechanical damage and rupture of the pipe;
All the liquid can leak out through a through hole in the pipe, which is noticeable by a decrease in the level in the expansion tank - a decrease in the level in the expansion tank is another reason to check the integrity of all connections;
- It is also recommended to replace the hoses after purchasing a used car.
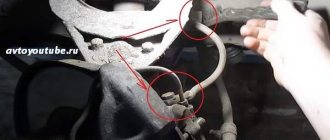
To identify cracks, the pipe must be bent by hand, otherwise defects may go unnoticed. A friend of mine discovered a fistula in the hose in this way, and quite by accident - he was about to change the upper ball joint, while disassembling it, he touched a rubber tube with his hand, and brake fluid flowed from there. Until then, the hose and surrounding undercarriage components remained dry.
To identify cracks in the rubber part, the hose must be bent by hand
If you ignore the above signs and drive further, the flexible line will break completely. Consequences: the fluid will quickly leak out of the circuit, the pressure in the system will drop sharply, and the brake pedal will fall to the floor when pressed. To minimize the risk of a collision in the event of a brake system failure, take the following steps promptly:
- The main thing is don’t get lost and don’t panic. Remember what you were taught in driving school.
- Pull the handbrake lever to the maximum - the cable mechanism operates independently of the main fluid system.
- Stop the engine without pressing the clutch pedal or changing the current gear.
- At the same time, monitor the road situation and use the steering wheel, trying to avoid collisions with other road users or pedestrians.
The advice regarding turning off the engine is only suitable for Zhiguli cars of the VAZ 2101-07 series, which are not equipped with hydraulic or electric power steering. In modern cars, you should not turn off the engine - the steering wheel will instantly become heavy.
Video: diagnostics of flexible brake pipes
Work procedure
Rear brake pipes VAZ 2109
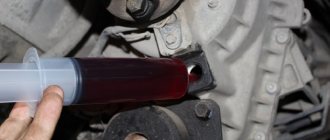
Before you take action, you need to prepare first. During the preparatory work, it is necessary to clean the surface of the fitting tubes from contamination. You also need to apply a special compound to all threaded connections, this will make it much easier to unscrew the nuts. In addition, you need to prepare a wrench, spare brake fluid for topping up, a small container to drain the remaining fluid from the system and a suitable vinyl tube. For convenient repairs, it is recommended to install the machine either on an overpass or on a pit for inspection:
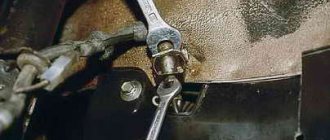
- First, use a Phillips screwdriver to unscrew two self-tapping screws that secure the tube to the body of the vase.
- Using a suitable wrench, unscrew the 2 fittings through which the tubes are attached to the hose with the regulator.
- The tube is removed.
- After all necessary work has been carried out, the tubes are installed in the opposite order to dismantling.
- Add brake fluid.
- The quality of repaired brakes is checked.
On newer VAZ models, the tubes are first unscrewed from the main cylinder and brake hose, only after that the holes are plugged. In this case, you will have to unscrew the 3 fastening nuts and remove the plastic covering. Next, dismantle the metal plates and disconnect the necessary tubes from the clamps; if they are damaged, they will need to be replaced.
Note! New elements must be secured in the opposite order. To check the quality of work, it is necessary to bleed the system. It must be done to eliminate excess air.
Replace the rear brake pipe of a VAZ 2109
Signs of air penetration into the system are considered to be increased travel and softened sagging of the brake pedal when pressed. It is necessary to follow a certain sequence of bleeding the brakes:
- rear right;
- front left;
- rear left;
- front right.
In addition to changing the brake line, the brake hose may also need to be replaced.
Which spare parts are better
The main problem when choosing brake hoses is the saturation of the market with counterfeit parts of low quality. Such eyeliners do not last long, quickly become covered with cracks or begin to leak near the pressed tips literally a week after installation. How to choose the right rubber pipes:
- Do not buy cheap hoses without packaging, sold individually. Usually the front tubes come in pairs.
- Carefully examine the metal surfaces of the fastening fittings - there should be no traces of rough machining on them - nicks, grooves from a cutter and similar defects.
- Examine the markings on the rubber tube. As a rule, the manufacturer puts its logo and indicates the product catalog number, which matches the inscription on the packaging. Some hieroglyphs clearly indicate the origin of the spare part - China.
- Try stretching the pipe. If the rubber stretches like a hand expander, refrain from purchasing it. Factory hoses are quite stiff and difficult to stretch.
The inscriptions on the paper insert must correspond to the markings of the nozzles
An additional sign of a quality product is 2 pressing contours instead of one. Counterfeit pipes are not made with such care.
Trusted brands that produce brake pipes of decent quality:
- BRT - Balakovo Rubber Products Plant;
- DAAZ - Dimitrovgrad aggregate;
- KRAFTTECH;
- Fenox.
The embossed logo and inscription on BRT products are molded along with the rubber shell
Hoses from the Balakovo plant are considered original. The parts are sold in transparent packaging with a hologram, the marking is in relief (molded along with the rubber product), and not a colored inscription with paint.
Copper washers serve to seal the bolted connection; overhead brackets additionally secure the ends of the pipes
Along with a set of front pipes, it is worth buying 4 new O-rings made of copper 1.5 mm thick, since the old ones are probably flattened from strong tightening. It also doesn’t hurt to make sure there are fixing brackets screwed to the calipers - many drivers don’t bother installing them.
Video: how to distinguish counterfeit parts
About bleeding the brakes
To carry out the operation in the traditional way, you will need the services of an assistant. Its job is to press and hold the brake pedal repeatedly while you bleed air through the fittings on each wheel. The procedure is repeated until there are no air bubbles left in the transparent tube connected to the fitting.
To bleed the brakes, a transparent tube directed into a bottle is connected to the caliper fitting.
Before pumping, do not forget to add fluid to the reservoir. Waste material with air bubbles that you have drained from the brake mechanisms cannot be reused.
To bleed the brakes without an assistant, you need to have a mini-compressor for inflating tires and make a fitting - an adapter in the form of an expansion tank plug. The supercharger is connected to the spool and pumps up a pressure of 1 bar, simulating pressing the brake pedal. Your task is to loosen the fittings, release air and add new fluid.
The integrity of the brake hoses must be constantly monitored, especially when the elements are well worn. If you notice a network of small cracks or a tear with protruding textiles, purchase and install a new pipe. Spare parts do not have to be replaced in pairs; hoses can be installed individually.
Replacement and installation
We put the car on a jack or lift, remove the wheel, for ease of access we unscrew the wheel in the opposite direction from the side of the hose being replaced. Use a 15mm wrench to hold the edge of the inner part of the hoses and use a 10mm wrench to unscrew the fitting. We put a rubber cap on the tip of the tube, removed from the bleeder fitting on the working brake cylinder on the wheel, no matter how much brake fluid flows. We take out the hose from the bracket on the shock absorber and use a 15 wrench to unscrew the fitting from the working brake cylinder. If the copper ring remains on the cylinder, remove it and thoroughly clean the area of dust and dirt before installation. If you don’t have a new copper ring, you can put in an old one, pre-treat it with sandpaper and level the surface. Installation is carried out in reverse order. It is important that after installation the new hose should not be twisted and when turning the wheel in any direction it should not touch the vehicle’s suspension elements.