Sensor check
Verification procedure:
- Remove the chip with wires from the sensor.
- Check for voltage on the block when the engine is running. It should be equal to 5 V.
If the voltage is normal, then you need to remove the sensor and check it. Tools for work:
- Deep socket head on "19".
- Ratchet or crank.
- Multimeter.
Any multimeter, which every motorist should have in the garage, is suitable for testing.
Diagnostics
The sensor is checked by measuring its internal resistance when immersed in water of a certain temperature.
Diagnostic procedure:
- Partially drain the coolant from the system so that when unscrewing the sensor it does not spill onto the ground. The engine must be cool.
- Disconnect the chip with wires, if you have not done so before.
- Using a wrench, carefully unscrew the sensor.
- The multimeter must be set to resistance measurement mode.
The easiest way to check the sensor is to immerse it in boiling water (the temperature will obviously be 95-100 degrees, you don’t even need a thermometer). The sensor resistance at this temperature should be about 177 Ohms. If it differs greatly from this value, the element must be replaced.
| Temperature, ° C | Resistance, Ohm |
| 100 | 177 |
| 90 | 241 |
| 80 | 332 |
| 70 | 467 |
| 60 | 667 |
| 50 | 973 |
| 45 | 1188 |
| 40 | 1459 |
| 35 | 1802 |
| 30 | 2238 |
| 25 | 2796 |
| 20 | 3520 |
| 15 | 4450 |
| 10 | 5670 |
| 5 | 7280 |
| 9420 |
Table. Temperature values and the corresponding sensor resistance.
If you don’t want to boil water, but have an accurate thermometer, you can immerse the sensor in cold or warm water. For example, at a temperature of +15 degrees, the resistance should be about 4.45 kOhm. At a temperature of +40 degrees - about 1.459 kOhm.
Source
Checking operation and replacing the sensor
Checking the sensor for serviceability when diagnosing problems with a car comes down to measuring its voltage when it is at rest. Measurements are taken with the engine not yet running. You can take readings using a regular multimeter. You need to pierce the wires near the connectors of the sensor being tested as carefully as possible and record the voltage between pins 3 and 5.
For a working sensor, the readings will be 0.996 V, and if it is faulty or its readings are incorrect, then the voltage value will be more than 1.7 V. With such readings, it is better to replace the mass air flow sensor as soon as possible. To replace it on a VAZ 2110 car, you do not need special knowledge or skills.
The replacement procedure is a set of simple steps that even novice car enthusiasts can easily handle. You need to remove the negative cable from the battery, then drain the radiator. Next, you can proceed to dismantling the air filter.
It must be removed to make it more comfortable to replace the sensor. Then you need to squeeze out the plastic clip that holds the wire block from the sensor. Now all that remains is to dismantle the sensor itself, and then install a new one in its place and carry out all the steps in the reverse order.
It is advisable to purchase a coolant and mass air flow sensor of those models that are recommended by the manufacturer for the VAZ 2110. Their price is low, and a lot depends on the quality of these devices. It is necessary to carefully monitor the serviceability of the sensors and the veracity of their readings. Then it will be possible to avoid engine overheating and other problems with the “ten”.
1200 rub. for the photo report
We pay for photo reports on car repairs. Earnings from 10,000 rubles/month.
Write:
Checking the temperature sensor is a simple procedure that even a novice car enthusiast can handle. The coolant temperature sensor (abbreviated as DTOZH) is a thermistor, that is, a resistor that changes the value of its internal resistance in accordance with the temperature where its actuator is placed. Most often, a multimeter is used for this (another name is a tester, “tseshka”), which is able to measure the value of electrical resistance in a circuit.
Design and principle of operation of DTOZH
When the sensor contacts close, the system receives information that the temperature of the liquid has risen.
Due to the similarity of functions, a temperature sensor is similar to a resistor. The sensor is designed in such a way that the resistance of the electric current changes as the temperature around it changes. Changes in resistance are transmitted to the electronic engine control unit.
Before DTOZH, so-called thermal relays were used. They were installed in injection systems. When the contacts were in the open position, the internal combustion engine heated up. If the contact closes, then the motor has reached operating temperature (usually 90 degrees).
The thermistor is the main design element of a temperature sensor. It is the thermistor that determines how the current resistance will depend on the ambient temperature.
In turn, the thermistor consists of cobalt, or rather oxides of cobalt (Co) and nickel (Ni). When heated, these substances increase in number of free electrons. Due to the increase in free electrons, the resistance decreases.
There are thermistors with negative temperature coefficient. In this case, the thermistor shows maximum values when the engine is cold. A voltage of 5 Volts (V) is supplied to the temperature sensor. Further, when the engine heats up, the sensor will reduce resistance.
If the sensor is faulty, the ECU may give a command to enrich the fuel mixture when it should have been made lean. When working with a rich mixture, the spark plugs will quickly become dirty.
The engine may not start if the engine speed at startup is not sufficient. The ECU can give a command to increase the speed. In order to maintain controllability while starting the internal combustion engine, the recirculation valve must be in the closed position until the engine reaches operating temperature.
If the speed fluctuates, then this is one of the signs that the temperature sensor is not working correctly. In this case, the engine may stall. The ignition angle depends on the correct operation of the sensor, because this parameter is also regulated through the ECU. The emission of harmful substances from spent fuel mixtures with such regulation is reduced.
What is DTOZH
DTOZH is a resistor, namely a thermistor, which is capable of changing the value of its own magnetoresistance due to a certain temperature where its active component is located. For such purposes a multimeter , which can easily measure the exact value of magnetoresistance in a circuit.
If we talk about the importance and significance of this meter, then we cannot fail to mention its participation in the operation of a car engine. He:
- Notifies the vehicle driver about the current antifreeze temperature.
- While the machine is moving, the ECU generates information about the functioning of all systems and mechanisms based on data from thermistors. Based on this information, the controller forms a normal fuel-air mixture. The described DTOZH also always participates in this important process.
- When the car engine reaches a certain degree of heat, the controller, having received data from the resistor, activates a special fan for cooling.
- It is directly involved in increasing the idle speed due to the enrichment of the fuel-air mixture on a cold drive.
Temperature sensors for Lada Kalina
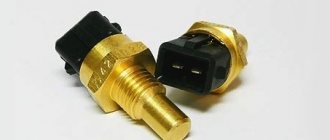
Both sensors are located under the air filter housing, which must be removed to replace or check the sensors.
One is responsible for the readings on the instrument panel, the second provides data to the car's ECU. It is in the ECU that it is written at what temperature the cooling fan must be turned on.
Sensor design and operating features
Both sensors operate on the same principle, but differ in size, thread diameter and connectors.
The main element of the temperature sensor used on Kalinas is a thermistor. This is a resistor that changes its resistance depending on temperature. The element is located in a sealed metal case. It has a thread for installation. On the outside of the sensor there is a plastic plug with contacts. One is connected to ground, the second to the electronic control unit.
Engine temperature sensor device.
For normal operation of the element, constant power is required. Voltage - 5 V comes from the ECU through a constant resistor. The thermistor temperature coefficient is negative. This means that as the temperature increases, its resistance will decrease. The voltage supplied to the sensor also decreases. The electronic control unit has a built-in algorithm that allows you to calculate the temperature value from the voltage drop.
The temperature sensor is located on Kalina:
Source
Operating principle of the sensor
When raising the question of checking a meter, it is important to first understand exactly how it works. This will provide an excellent opportunity to choose subsequent diagnostics. This temperature sensor is capable of changing magnetoresistance based on a certain degree of heat, in particular the antifreeze used in the vehicle engine. The resistance value and all its adjustments are immediately recorded by the vehicle drive controller. Based on them, the controller issues various commands.
During startup, the main controller, according to information from the DTOZH, sets a certain number of steps of the so-called idle speed controller. This is how the controller regulates the fuel supply. The resistance of the meter immediately increases in cold weather, and decreases when heated.
Important! To control the meter, a special signal with a voltage of five volts is supplied to it from the ECU through a resistor with resistance in the controller.
The controller can easily recognize the OX (coolant) temperature by reducing the voltage on the DTOZH, which has variable magnetoresistance.
- The voltage drop on a cold car drive will certainly be greater, and on a well-warmed one - less.
- On a cool engine, the voltage on the meter will definitely be higher, and on a warm engine, less.
How to dismantle
Many drivers are confused where the temperature sensor is located in the system, which provides information to the ECU, and where the instrument cluster is. In Kalina, the first controller is embedded in the thermostat, which is located on the coolant outlet pipe from the engine. The transmitting sensor is located nearby; you can find it using a thin wire.
All work on removing and installing parts is carried out with the engine turned off and the negative terminal of the battery disconnected. Dismantling order step by step:
- Loosen the screw securing the air hose coupling to the air filter housing. This will allow you to get to the instrument sensor. If necessary, remove the air filter housing for good access to the sensors.
- Remove the screen or engine cover, using force, remove the cover from the latches.
- Drain the coolant from the radiator. On Kalina, antifreeze or antifreeze is used. To do this, the fluid needs to be cooled, but experienced drivers replace it without draining the antifreeze. In this case, all replacement work will need to be carried out quickly and accurately. Therefore, if the sensor is changed for the first time, it is better to drain the coolant so that an air lock does not form in the system.
- Disconnect the wire block.
- Using a socket head or a 19 mm wrench, unscrew the sensor from its seat. If the coolant is not drained, antifreeze will flow out of the hole. Therefore, experienced drivers who are too lazy to drain it immediately clamp the hole with their finger and insert a new one.
Installation of the elements is carried out in the reverse order - the sensor is inserted into the hole, screwed in, connected to the wire block, and antifreeze is poured. The functionality of the system is checked after connecting the battery.
Sensor location on the engine
In order to check the coolant temperature sensor, you need to know where it is located. Naturally, this information will vary for cars of different brands and models. However, there are several typical signs by which you can find the place where the sensor is directly attached. So, in most cases it is located on the exhaust pipe of the cylinder head. Structurally, it has a metal thread, with which it is screwed into the corresponding hole. The main requirement in this case is to ensure direct contact between its sensitive element and the coolant. It is this contact that ensures the accuracy of the sensor readings.
Please note that some vehicles may be designed to have two temperature sensors installed. In this case, the first of them records the temperature of the coolant at the outlet of the engine (cylinders), and the second - at the outlet of the radiator. This approach makes it possible to more accurately monitor the condition of both the engine as a whole and its cooling system in particular. However, two sensors are usually installed on powerful and/or expensive cars, where this parameter is critically important, and the ECU contains special programs for engine operation. You can find additional information about the design of a particular car in the corresponding manual or technical documentation.
The design of the cooling system on the VAZ-2114
Coolant temperature sensor location
Before proceeding directly to the replacement process, it is necessary to understand the design of the cooling system and the location of the sensor in the main power unit:
Everything here is trivial
1 – element in the form of a plug for the expansion tank; 2 – expansion tank; 3 – hose for draining liquid from the pipe; 4 – hose passing between the radiator and the expansion tank; 5 – hose leading from the radiator; 6 – tank to the left of the radiator; 7 – aluminum tube; 8 – plug systems; 9 – tank to the right of the radiator; 10 – drain plug; 11 – middle of the radiator; 12 – casing for electric fan; 13 – plastic wings of the electric fan; 14 – electric motor; 15 – toothed pump pulley; 16 – pump impeller; 17 – camshaft drive belt; 18 – engine block; 19 – pump pipe; 20 – radiator hose with supply function; 21 – heater radiator hose with drain function; 22 – hose supplying coolant to the throttle pipe; 23 – exhaust pipe; 24 – hose for refilling; 25 – heater radiator hose with supply function; 26 – thermostat; 27 – coolant temperature sensor; 28 – coolant level indicator sensor.
The process of replacing the sensor (DTOZH)
Therefore, as practice shows, motorists carry out the operation with their own hands. So, let's look at the sequence of actions aimed at replacing the coolant sensor:
- Remove the terminal from the battery.
We dismantle the battery terminal
- Unscrew and remove the air filter. This is necessary in order to ensure maximum access to the sensor.
In order to get to the sensor you need to remove the air filter
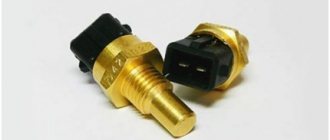
- Disconnect the wires that power the element.
Disconnect the sensor power supply connector
Coolant temperature sensor with removed chip
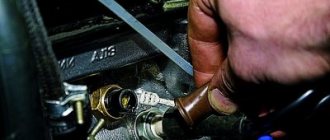
- Using a 19 key, we dismantle the product.
Dismantling of DTOZH
Using a 19mm wrench, unscrew the sensor.
- Assembly proceeds in reverse order.
Product selection
The choice of product should be approached carefully, since its quality will directly depend on its service life, as well as engine operating modes. So, let's consider all the options for purchasing a coolant temperature sensor for the VAZ-2114.
Original
Original view of the coolant sensor produced by AvtoVAZ
2101-3808600 is the original catalog number of the part that is installed on almost all cars of the Lada family. This product is produced at the AvtoVAZ plant. The cost is 300 rubles. Installed in a standard mounting location and does not require modifications.
Analogs
In addition to the original part, there are a number of analogues that can be installed on a car. Some of them are much better quality than the original.
It was not the original sensor
So, let's consider all the analogue options for the coolant temperature sensor:
| Manufacturer's name | Catalog number | Cost, in rubles |
| Fenox | TSN22101 | 210 |
| LUZAR | LS 0101 | 240 |
| Fenox | TSN22101O7 | 240 |
| Vernet | 2509 | 250 |
| Patron | PE13059 | 300 |
| Intermotor | 52400 | 300 |
| Era | 330082 | 350 |
| Facet | 7.3000 | 350 |
| Eps | 1.830.000 | 400 |
| KW | 530.000 | 550 |
| H+B Elparts | 70511515 | 600 |
| Cargo | 180804 | 700 |
| Hella | 6PT 009 107-151 | 750 |
Coolant sensor made by Hella
Consequences of untimely sensor replacement
Not many car enthusiasts know that a malfunction of the coolant temperature sensor affects the operation of the engine as a whole. Let's consider the main consequences of a malfunction of this unit for a car:
- Incorrect operation of the electronic engine control unit. Thus, the sensor does not provide reliable data to the ECU, which in hot weather may not turn on the cooling fan in time. So, in turn, the consequence will be that the car will boil. This can lead to the fact that in the worst case, it can cause deformation and sagging of the head.
- Due to incorrect operation of the sensor, the following functions may be impaired: engine performance, driving dynamics, thermostat operation.
- Other consequences to which the sensor is indirectly linked.
Video “Procedure for replacing the MPV sensor on a VAZ car”
How to replace the regulator on the “ten” yourself at home - find out from the video (the author of the video is In Sandro’s garage).
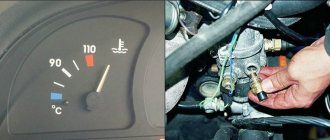
The VAZ 2110 temperature sensor is an important element of the system; it informs the computer about the engine temperature. A lot depends on the engine temperature. For example, the lower it is, the richer the fuel mixture is supplied to the injector or carburetor.
Sometimes on the road you can see cars standing on the side of the road with steam pouring out of their open hoods. This is a fairly common situation when the engine temperature exceeds the permissible limits and the engine overheats.
The coolant sensor in the car failed or the car owner was distracted and did not notice that the temperature of the VAZ 2110 engine was going through the roof. Due to engine overheating, the liquid in the cooling system exceeded its boiling point and turned into steam. To somehow help the car cool down, the driver opens the cap on the radiator and releases steam, which comes out under pressure.
You shouldn't do that. This carries certain risks: you can get serious burns. To avoid such problems, the motorist needs to be extremely careful during the trip and promptly respond to information from sensors and instruments on the console. It is also important to ensure that the VAZ 2110 coolant sensor is in working order and its readings are accurate.
Overview of types of DTOZH: design and principle of operation
Let's take a closer look at the operating principle and types of controllers.
Magnetic
Such controllers consist of coils located on the sides of a steel armature. The arrow of the controller located on the instrument panel in the cabin is connected to the latter. The first coil is connected to the vehicle's on-board network, and the second to a cable with varying resistance. This parameter changes according to the temperature values in the engine. The voltage passing through the coils creates a magnetic field that controls the armature. The element displacement parameter is determined by the field difference depending on the current value.
User Irimiya Evgeniy showed in his video how unstable the DTOZh is.
Bimetallic
The operating principle of bimetallic controllers is based on the expansion of elements during heating. The device is equipped with a rod that changes size as the temperature of the internal combustion engine increases. The stripes in the coil rotate the arrow on the control panel in the car's interior in accordance with the current value.
Modern antifreeze temperature sensors can use two types of sensors:
- semiconductor;
- bimetallic.
The latter are practically not used today. The strip in such controllers moves to the coil and opens the contacts, helping to change the amount of current flowing to the dashboard. And semiconductors are used everywhere. The control unit supplies a signal to the device thermistor with a negative coefficient through a resistive element with constant resistance. As the temperature increases, the resistance in this circuit drops. Accordingly, the voltage level decreases. The control module detects a decrease in this parameter and determines the temperature of the consumable material, displaying it on the control panel with an indicator.
Capillary
It is considered the oldest and irrelevant type of sensor for use today. The arrow on the device is directly connected to the device. The controller is made in a housing in the form of a container with consumables, which has a low boiling point. The reservoir is connected to a pointer as well as a steel tube. When the power unit warms up, the refrigerant in the container begins to boil and evaporate, resulting in an increase in pressure in the flask. This parameter is sent to the pointer where the Bourdon tube is located. This element begins to straighten as a result of pressure and moves the arrow on the control panel.
This type of controller is almost never used for several reasons:
- the measuring element itself runs through the entire engine compartment, connecting to the tube on one side and to the control panel on the other;
- The capillary tube is quite thin and is quickly damaged during operation.
Photo gallery “Varieties of DTOZH”
Diagrams of different types of sensors are shown in the photo.
Magnetic type DTOZH Bimetallic sensor Capillary sensor circuit
Device Description
If you need to know where the coolant temperature sensor is located and how it works on 16- or 8-valve VAZ 2110 engines, first read the basic information on the device. The operating principle of the regulator and typical problems with this element are described below.
DTOZH for VAZ 2110
Principle of operation
The coolant temperature regulator on a 16- or 8-valve VAZ 2110 car is a simple thermistor device. A thermistor is a resistor that has the ability to change resistance values depending on the temperature conditions in which it operates. On an injector with 8 or 16 valves, the device is installed directly in the cylinder head. Antifreeze circulates through the hose in which the regulator is installed.
The purpose of the coolant temperature sensor on the carburetor or injector of 16 valves of the VAZ 2110 is to monitor this temperature. If the indicator exceeds the normalized one, the device reports this to the control unit, as a result of which the fan is turned on. It should be noted that the fan is turned on forcibly. Without turning on the fan, the motor may overheat.
There is an opinion that in the entire design of the VAZ 2110 16-valve injector, this element is the most reliable. However, breakdowns still occur. On the dashboard there is a regulator with a pointer, which receives a signal from the device. If the element is working correctly, the signal indicator will always show the exact temperature.
Two knobs for "ten"
Typical problems
There are quite a lot of problems associated with the failure of the sensor on the engine injector 16 valves of the VAZ 2110. As a rule, the essence of the malfunction lies in the lack of contact on the internal components of the device. The malfunction may also be due to problems with the insulation of the cables around the regulator itself, in particular if the gas pedal cable is hanging loose. If the regulator does not work correctly, it will not be able to provide the correct information to the control unit, and accordingly, over time, problems with starting the internal combustion engine may appear. In addition, if the device on the 16-valve injector of the VAZ 2110 does not work correctly, fuel consumption may increase.
If the device sends incorrect signals, turning on the fan will be impossible, and without turning on the fan, as mentioned above, it will not be possible to cool the motor. Sometimes it happens that the fan is turned on constantly - if the regulator registers an increased temperature, but in fact it is normal. Then the fan is turned on constantly, in principle, this does not threaten the car enthusiast in any way, but this can cause high energy consumption of the battery (the author of the video is Vasily Kalugin).
The thermistor, which is installed inside the coolant temperature control device on the 16-valve injector of the VAZ 2110, is an electronic system. This system is characterized by negative temperature indicators. If the element heats up, the resistance level begins to decrease, and vice versa, if the device cools, the resistance increases. By the way, the resistance indicator is considered quite important. The optimal operating temperature of the VAZ 2110 injector is up to 130 degrees, in this case the resistance level drops to 70 Ohms.
The lowest temperature limit, which is 40 degrees below zero, will increase the resistance to the highest value - 107 Ohms. When the controller is operating, it passes a voltage of about five volts to the regulator according to the circuit. The coolant temperature in this case is determined by the ECU. The control unit calculates this parameter based on the voltage difference across the device. Always take into account the fact that temperature levels affect the functioning of many vehicle mechanisms.
Signs of breakdown
Like any other part of the mechanism, the DTOZH in Priora periodically becomes unusable. It happens that the cause may be a broken indicator on the device, problems with the wiring, or a malfunction of the sensor itself. The following symptoms may indicate a malfunction:
- continuous operation of the fan, which is designed to cool the engine - in this case, the machine will operate in emergency mode, and a constantly running mechanism will lead to burnout of the winding in the motor, which in the future will require a complete replacement of the unit;
- the cooling fan does not turn on - in this case, increasing overheating of the engine will lead to boiling.
There are also indirect signs that may suggest a problem with the detector:
- reduction in vehicle power;
- presence of hum from constant operation of fans;
- increase in consumption;
- The engine often stalls and is difficult to start.
Main signs and characteristics of DTOZh malfunctions
The failure of the coolant temperature sensor can be judged by several signs. However, it is worth understanding that the typical manifestations listed below may also be the cause of other car engine defects. Therefore, to be sure, you need to conduct an additional check.
The main signs indicating a sensor malfunction:
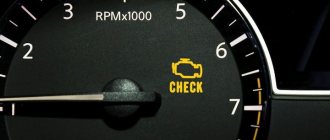
- The Check Engine light came on on the dashboard. If you see this icon, scan the error code; it may indicate other problems.
- Fuel consumption has increased. Due to the fact that the electronic unit receives incorrect data from the sensor, it cannot correctly read it and determine the required command. Namely, how much fuel is needed to form a fuel mixture and maintain the optimal engine temperature.
- Unstable engine operation. This includes failures at idle, difficulties when starting the engine (more often in winter) or a complete stop at low speeds.
- The car stalls when the engine is warm. As soon as the antifreeze temperature reaches a certain point, the engine stops spontaneously. Regardless of what liquid was used in the system (good antifreeze or plain water).
- Unstable fan operation. There are several manifestations - sometimes it does not work at all, and in other cases it does not switch to emergency mode. Here it is important to additionally check the thermistor for serviceability.
- The car does not start easily when the engine is cold.
More often, such sensors are made with a non-separable housing, so if they are defective, they are replaced with new ones. This applies to cars of any manufacturer, both domestic and foreign.
Replacing and checking the coolant temperature sensor on LADA
The coolant temperature sensor (CTS) is one of the elements of the engine management system. Its purpose is to control the temperature of the fluid in the cooling system. Based on these data, the engine control unit adjusts the composition of the fuel-air mixture, crankshaft speed, and ignition timing.
On all modern LADA cars (XRAY, Vesta, Largus, Granta, Kalina, Priora or Niva 4x4), replacing and checking the coolant temperature sensor is carried out in the same way.
SIGNS OF DTOZH MALFUNCTION
The coolant temperature sensor affects engine starting and operation. Here are some symptoms that indicate that the sensor may be faulty:
Lada Xray: air conditioning device
Maintenance and repair of Lada Xray chassis
New VAZ 21179 engine for Lada Xray
Replacing the coolant temperature sensor
The coolant temperature sensor is located in the thermostat housing; it is number 14 in the diagram.
To change the DTOZH with your own hands you should:
- Drain the coolant (car mechanics do not drain it);
- Disconnect the connector with wires;
- Unscrew the sensor (key “19”).
Installation is carried out in reverse order. To eliminate the leak, replace the copper washer or apply a heat-resistant sealant to the threaded part of the sensor.
How to check the coolant temperature sensor
After removing the sensor, it should be visually inspected for damage or corrosion. The easiest way to check the DTOZH is to replace it with a known good one.
- multimeter (in voltmeter mode, ohmmeter with a measurement limit from 100 Ohm to 10 kOhm);
- thermometer (with a measurement limit of at least 100 °C);
- heat-resistant container with a volume of 0.5 l.
The procedure for checking the power supply circuit of the DTOZH:
- Switch the multimeter to voltmeter mode;
- Remove the block with wires from the sensor and turn on the ignition;
- Connect the negative probe of the multimeter to the engine ground, and the other to terminal No. 1 of the block;
- The voltage at the terminal must be at least 12 V. If there is no voltage or less than 12 V, it means the battery is discharged, the power circuit or the computer is faulty.
We also recommend that you read
Procedure for checking DTOZH:
- Switch the multimeter to ohmmeter mode;
- Prepare a container with hot water (about 100 oC);
- Connect the multimeter probes to the sensor terminals and lower its working part into water;
- We measure the resistance of the DTOZH as the water cools.
The sensor resistance should be close to the data shown in the table:
If the DTOZH turns out to be in good order, the cause of the malfunction may be poor connector contact, broken wiring, or a faulty ECU.
Checking the removed DTOZH
In some cases, it is necessary to remove the resistor for correct and error-free diagnosis. In such situations, alternative methods of testing a given device come to the rescue.
Sensor readings depending on temperature changes
After removing the resistor, this component can be checked with a thermometer. This method can provide very accurate data. Many experts recommend this particular device.
How to check the vehicle's DTO in this way? Everything is simple here. Necessary:
- Prepare a container and pour some water into it.
- Heat the liquid with a regular boiler.
- Prepare your multimeter.
- Immerse the sensor component of the part in water.
- Provide connection to the device contacts.
- Dip the thermometer into water to monitor the degree of heat. For this purpose, it is better to buy an electronic thermometer, as it has greater accuracy.
- Heat the water and take measurements for various heat degrees.
- Fill out a special table containing the magnetoresistance parameters relative to the set temperature.
- Check with the information contained in the vehicle manual.
Without thermometer
This test option differs in that a thermometer is not used here, and readings are taken only once.
It is necessary to immerse the resistor in any container of water and then bring it to a boil. You should connect the multimeter probes to the output terminals and see what this device shows.
If the part is fully operational, the resistance will show 177 Ohms. It is important to understand that small errors are possible. In addition, the multimeter probes have their own resistance, and the heat degree of the water may be below hundreds of degrees, which will definitely increase the resistance.
This method is somewhat inferior to that where an electronic or conventional thermometer is used. However, it is also actively used.
With thermometer
Diagnostics can be done using a thermometer. To test, do the following:
- Remove the spare part from the car engine in advance. A wrench is perfect for this task. Here you can clean and thoroughly lubricate the threads in the pipe. Like the resistor itself, but only if it is working and will not be replaced with a new one.
- Pour water into any container, find a boiler. They will be used further to heat the water in the vessel. You will also need to switch the multimeter to a special mode, namely to accurately determine the resistance.
- It is necessary to place the sensor component of the sensor in heated water, and also provide access to the terminals using the probes of an electronic multimeter.
- Dip the thermometer directly into the water. For such purposes, it is better to use the electronic version, because it shows more accurate measurements. In addition, this way you can conveniently obtain information about the degree of heat of the liquid.
- Measure the thermistor resistance step by step as the degree of heat increases. It is recommended to do this at small increments of five degrees. As a result, you can get a lot of useful information, which can then be easily converted into a detailed table.
- Compare all obtained indicators with information from the technical documentation of the machine.
With the definition described above, minor errors may well be allowed. What does this depend on? First of all, it depends on the experimental conditions. Secondly, on the specifics of a particular spare part. After all, the electrical resistance of the mechanism will often differ very little even under identical measurement conditions.
Performance test
The most effective way to check is diagnostics using diagnostic equipment, in common parlance – a “car scanner”. This is the most accurate way to identify any car malfunctions, and there are 2 options - go to a service center or purchase a scanner for personal needs. At the moment, the second option will be the most preferable, because... will save you a lot of money in a short period of time. There are a very large number of diagnostic devices on the market for every taste and color.
If your budget is limited or you simply do not want to spend large sums on purchasing a device, then we can recommend you an adapter from the Korean manufacturer Scan Tool Pro Black Edition.
The adapter is compatible with 99% of cars manufactured in 1993 and connects via Bluetooth or Wi-Fi to any device on Android, iOS and Windows. It is noteworthy that, despite its low cost in the region of 2 - 2.5 thousand rubles. the device sees not only the engine, like most budget adapters, but also other components and assemblies of the car. It also shows the operation of all available sensors in your car in real time.
If you do not have such devices, and the nearest service is very far away, then there is another way to check, at home.
To check the thermal sensor, it will have to be removed from the car. To do this, follow these steps:
- Allow the engine to cool to 40-50 °C to avoid burning your hands during operation. Partially or completely drain the antifreeze from the cooling system.
- Disconnect the battery from the on-board power supply by removing the negative cable.
- Disconnect the block with wires from the thermoelement.
- Unscrew the part using a wrench of the appropriate size.
If the device is installed at the top point of the system, then it is not necessary to empty it entirely; it is enough to drain a third of the liquid into the container. All antifreeze must be drained when the thermocouple is located at the bottom of the radiator.
To carry out the tests you will need:
- a multimeter or other device capable of measuring circuit resistance;
- a small container for water (you can use a regular glass);
- thermometer with a scale up to 100 °C.
A thermometer is essential if you want to make accurate resistance measurements by referring to the reference chart for your vehicle. When there is no table, the serviceability of the part is checked without a thermometer according to its operating principle: the hotter the water in the glass, the lower the resistance at the contacts should be.
If the multimeter shows a certain resistance, then immerse the thermocouple in a glass of cold water and record the readings. Then add hot water and watch the resistance change, it should decrease. If there are no changes, purchase and install a new temperature sensor.
If the tests were successful and the device changes resistance when heating the water, then it is worth checking the connecting wires and cleaning the contacts. Little things like this often cause major problems.
Checking work
How to check the device at home? To check an element, it is necessary to measure its voltage level only if it does not work. The voltage check is carried out with the engine turned off; the indicators for checking can be measured using a multimeter. It is necessary to pierce the circuit as carefully as possible next to the regulator connectors and measure the voltage level between the third and fifth contacts.
If the component is working and does not require replacement, the voltage reading will be about 0.996 volts. Of course, if the element is not working, it will show incorrect readings, which will be more than 1.7 volts. If this is indeed the case and during diagnostics you identified such a parameter, the part needs to be replaced. To replace a component you do not need any knowledge or experience, everything is quite simple.
Causes of failure of the coolant temperature sensor
Structurally, the coolant sensor is quite simple, and accordingly, it rarely fails. Usually this happens simply due to its old age or mechanical damage. For example, corrosion of contacts and metal parts of the case may occur due to the fact that instead of antifreeze or antifreeze, ordinary water was poured into the cooling system (and even more so if this water is “hard”, that is, with a high content of metal salts). Also, the reasons for the failure of this device may be:
- Damage to the body. This can be expressed in various aspects. Often, leaks of coolant are visible, which flows from the threads of the sensor or its housing. Also, the electrical contacts and/or the thermistor itself may be damaged, which will produce an incorrect signal.
- Oxidation of contacts. Sometimes situations arise when, under the influence of fumes or simply from old age, the contacts on the sensor oxidize, so the electrical signal does not pass through them.
- Damage to the chip. In some cases, due to mechanical damage, the so-called “chip” may fail, that is, a group of contacts that is connected to the coolant temperature sensor. Simply put, the wires at the base of the connector fray. According to statistics from reviews found on the Internet, this is one of the most common malfunctions that occurs with the sensor and the corresponding system.
- Lost electrical contact inside the sensor. In this case, unfortunately, repair is hardly possible, since usually its body is sealed and does not allow access to the insides of the DTOZH. Accordingly, in this case the sensor only needs to be replaced with a new one.
- Violation of wire insulation. In particular, we are talking about the power and signal wires that go to the sensor from the electronic control unit and back. The insulation can be damaged due to mechanical stress, abrasion, or even simply from old age, when it “peeles” in pieces. This is especially true for those machines that are operated in conditions of high humidity and sudden changes in ambient temperature.
If it is possible to simply clean the body/threads/contacts of the sensor, then to restore its normal operation it is enough to carry out the appropriate measures. However, if the housing is damaged and/or the internal thermistor is damaged, then repair is hardly possible. In this case, you just need to replace the sensor with a new one. Its price is low, and the replacement process is simple and will not take much time and effort even for novice car owners.
Signs of failure of the coolant sensor
A number of signs will indicate the need to check the coolant temperature sensor. However, it is worth noting that the situations listed below may be signs of other breakdowns in the car’s engine, therefore, to obtain an accurate result, it is necessary to perform additional diagnostics. So, signs of a faulty coolant temperature sensor include:
- Activation of the warning lamp on the Check Engine panel. However, it can also be activated during other failures, so it is necessary to perform an additional scan of the error code.
- Increased fuel consumption . This is due to the fact that incorrect information is supplied to the electronic control unit, and accordingly, it is also unable to determine exactly how much fuel is needed not only to create an optimal air-fuel mixture, but also to maintain the engine temperature in the normal (non-emergency) range.
- Unstable motor operation . In particular, its unstable operation at idle, difficulty starting (especially in the cold season), spontaneous stopping at low speeds and freezing at high speeds on a warm engine.
- The engine stalls when hot . That is, it may suddenly stall when the critical coolant temperature is reached. Moreover, this does not depend on what kind of coolant was poured into the system (in particular, factory-made antifreeze or ordinary water).
- Problems with the cooling fan on the radiator . This can manifest itself in different ways. In some cases, the fan does not turn on at all, in others it does not turn on in emergency modes, in others it does not turn off even when the engine cools down. When the coolant temperature sensor is disconnected, the electronic control unit perceives this as an open circuit in the sensor and forcibly turns on the fan. In any case, to obtain an accurate picture, it is necessary to perform additional diagnostics of the sensor and/or thermostat.
Due to the fact that this sensor has a fairly simple device and most often a non-separable housing, if it fails it must be replaced. This applies to almost all machines on which this device is installed.
How to check the sensor
DTOZH for Kalina has catalog article 23.3828; checking the element is mandatory if gasoline consumption increases and difficulties are observed when heating the engine. An enriched mixture will always flow into the cylinders, the radiator cooling fan will constantly work, which will lead to rapid wear.
If the element transmitting signals to the instrument panel fails, the indicator needle will stop moving and remain at zero.
Check the dismantled assembly with a multimeter by placing the element in a container (kettle, pan) with boiling water. As the liquid cools, the instrument readings will increase. How to check step by step:
- Remove the unit from the car.
- Set the multimeter to the ohmmeter position in the range of 100 Ohm–10 kOhm.
- Connect the DTOZH outputs to the multimeter, lower it into boiling water, with the terminals located outside, only the head of the element is lowered into the boiling water, which in working condition comes into contact with the antifreeze or antifreeze in the system.
- Check the table for the relationship between winding resistance and ambient temperature.
| Temperature, °C | Resistance, Ohm |
| −40 | 100700 |
| −20 | 28680 |
| −10 | 16180 |
| 9420 | |
| +5 | 7280 |
| +10 | 5670 |
| +15 | 4450 |
| +20 | 3520 |
| +25 | 2796 |
| +35 | 1802 |
| +45 | 1188 |
| +60 | 667 |
| +80 | 332 |
| +100 | 177 |
Checking the sensor that transmits temperature to the dashboard is carried out in the same way. The ohmmeter readings may differ from those indicated by 15–29 units.
What symptoms indicate problems with the sensor?
During long-term operation of the car, obvious and indirect signs may be observed indicating problems with the temperature sensor or its electrical circuit. The first ones directly indicate the need to check the functionality of the device:
- The engine heating indicator on the dashboard stopped working;
- the cooling fan stopped turning on, although the engine water jacket had already warmed up to 100 °C;
- antifreeze leakage from under the part body;
- The fan starts at random, including when the engine is cold.
If your car exhibits the listed signs of a malfunction of the coolant temperature sensor, then feel free to proceed to diagnosing it and fixing the problem, which will be discussed below. Indirect symptoms may indicate a breakdown of the meter or other elements of the cooling system or power unit. Here are the most common ones:
- Cold starting of the engine is difficult. The car starts, but immediately stalls, you need to make several repeated attempts. The cause may be a thermocouple, throttle position sensor, insufficient compression or ignition problems.
- Unstable operation at idle. In addition to the temperature meter, it is affected by the serviceability of the spark plugs, mass flow sensor, injectors and many other factors.
- The temperature is within normal limits, but the coolant begins to boil. If the thermostat fails or the level of antifreeze in the jacket decreases, then the readings of the device may differ from the real state of affairs.
How to dismantle
Many drivers are confused where the temperature sensor is located in the system, which provides information to the ECU, and where the instrument cluster is. In Kalina, the first controller is embedded in the thermostat, which is located on the coolant outlet pipe from the engine. The transmitting sensor is located nearby; you can find it using a thin wire.
All work on removing and installing parts is carried out with the engine turned off and the negative terminal of the battery disconnected. Dismantling order step by step:
- Loosen the screw securing the air hose coupling to the air filter housing. This will allow you to get to the instrument sensor. If necessary, remove the air filter housing for good access to the sensors.
- Remove the screen or engine cover, using force, remove the cover from the latches.
- Drain the coolant from the radiator. On Kalina, antifreeze or antifreeze is used. To do this, the fluid needs to be cooled, but experienced drivers replace it without draining the antifreeze. In this case, all replacement work will need to be carried out quickly and accurately. Therefore, if the sensor is changed for the first time, it is better to drain the coolant so that an air lock does not form in the system.
- Disconnect the wire block.
- Using a socket head or a 19 mm wrench, unscrew the sensor from its seat. If the coolant is not drained, antifreeze will flow out of the hole. Therefore, experienced drivers who are too lazy to drain it immediately clamp the hole with their finger and insert a new one.
Installation of the elements is carried out in the reverse order - the sensor is inserted into the hole, screwed in, connected to the wire block, and antifreeze is poured. The functionality of the system is checked after connecting the battery.
Checking the electrical circuit
Malfunctions in the cooling circuit system are not always associated with faulty sensors; in 70% of cases, the problem is a violation of the integrity of the wires. On Kalina, the block often suffers; the thin plastic at the entrance to the block rots and cracks. After disconnecting the pads from the sensors, the throughput of the circuits is always checked before dismantling the latter.
- The ignition is turned off and the block is removed from the sensor.
- The tester probe (multimeter) is connected to output “B” of the block, the second tester probe is located at ground.
- The ignition turns on.
- The monitor should display a voltage in the range of 4.8–5.2 V. These are indicators of the complete circuit.
- Similarly, the performance of the circuit is checked by resistance. The tester probe is connected to terminal “A” on the block, the second one is connected to the ground of the car. The operating circuit will show a resistance of less than 1 ohm.
If the voltage does not correspond to the operating voltage, then the circuit is checked for an open circuit. The tester probe is connected to terminal “B” on the block and terminal “39” on the controller; if the voltage is normal, then there is a malfunction in the control unit.
The cooling circuit of the Lada Kalina engine is equipped with two temperature sensors, the correct operation of which determines the performance of the engine and its service life. You can diagnose and replace the control elements yourself; it will take about an hour of time and a little skill.
Where to find the sensor on the car
To check the sensor you need to know where it is located. Naturally, its location will differ in different brands and models of cars. However, there are several signs by which you can determine where it is installed.
Most often, the coolant temperature sensor is located on the outlet pipe of the cylinder head. Its design includes a thread with which it is mounted in the appropriate place. An important requirement is direct contact of the sensor head directly with the coolant. This provides the most accurate sensor readings.
It should also be taken into account that some car models have two coolant temperature sensors at once. In such cases, the first one takes and transmits readings of the antifreeze temperature at the engine outlet, and the second one at the radiator outlet. This provides more accurate information about the condition of the engines and cooling systems.
All information about the number and location of sensors can be found in the car’s registration certificate.