The coolant temperature sensor (CTS) is essentially a thermistor or thermal resistance. Depending on the temperature of the environment in which it is immersed, the resistance in the circuit changes up or down. The process of checking the coolant temperature sensor is quite simple; this can be done in several ways. However, you should understand the main aspects of its operation, and to identify a defect, know the common causes and signs of breakdowns. Most often, a multimeter is used for checking. Below we present the most popular options for diagnosing the sensor.
What is DTOZH
DTOZH is a resistor, namely a thermistor, which is capable of changing the value of its own magnetoresistance due to a certain temperature where its active component is located. For such purposes a multimeter , which can easily measure the exact value of magnetoresistance in a circuit.
If we talk about the importance and significance of this meter, then we cannot fail to mention its participation in the operation of a car engine. He:
- Notifies the vehicle driver about the current antifreeze temperature.
- While the machine is moving, the ECU generates information about the functioning of all systems and mechanisms based on data from thermistors. Based on this information, the controller forms a normal fuel-air mixture. The described DTOZH also always participates in this important process.
- When the car engine reaches a certain degree of heat, the controller, having received data from the resistor, activates a special fan for cooling.
- It is directly involved in increasing the idle speed due to the enrichment of the fuel-air mixture on a cold drive.
Purpose
For older cars with carburetor fuel injection, the DTOZh has a simple function in the radiator-engine-dashboard temperature indicator circuit. In other words, this sensor simply provides a temperature reading in the engine. It does not affect the operation of injection systems.
Modern cars with fuel injection are equipped with a DTOZH element, which monitors the temperature indicators of the antifreeze itself. Taking these parameters as a basis, the device transmits a signal to the ECU, which in turn:
- turns on the additional cooling fan;
- regulates fuel injection into the system during warm-up at idle speed;
- Forcefully stops the motor if it receives data about its overheating.
Many motorists consider DTOZH a sensor for measuring temperature from the engine block. The DTOZH is installed on the thermostat housing or at the bottom of the radiator, it all depends on the make and model of the car. These devices have one main difference.
DTOZH has a 2-pin electrical connector, while DTBD has only 1 contact. The DTBD is installed directly on the engine block to record its temperature. Two similar units, but with different functionality in relation to the ECU.
More complex cars are equipped with 2 temperature sensors at once. One is located before the engine, on top of the thermostat housing, on the thermostat hose or on the radiator. The second sensor is installed at the fluid outlet from the engine. This is often the top of the radiator or the hose.
Operating principle of the sensor
When raising the question of checking a meter, it is important to first understand exactly how it works. This will provide an excellent opportunity to choose subsequent diagnostics. This temperature sensor is capable of changing magnetoresistance based on a certain degree of heat, in particular the antifreeze used in the vehicle engine. The resistance value and all its adjustments are immediately recorded by the vehicle drive controller. Based on them, the controller issues various commands.
During startup, the main controller, according to information from the DTOZH, sets a certain number of steps of the so-called idle speed controller. This is how the controller regulates the fuel supply. The resistance of the meter immediately increases in cold weather, and decreases when heated.
Important! To control the meter, a special signal with a voltage of five volts is supplied to it from the ECU through a resistor with resistance in the controller.
The controller can easily recognize the OX (coolant) temperature by reducing the voltage on the DTOZH, which has variable magnetoresistance.
- The voltage drop on a cold car drive will certainly be greater, and on a well-warmed one - less.
- On a cool engine, the voltage on the meter will definitely be higher, and on a warm engine, less.
Basic moments
A multimeter is used as a thermometer if it is necessary to measure temperature in difficult conditions - an open flame, toxic substances, difficult access to an object, an object that is too hot.
Many multimeters have a built-in temperature measurement function. In this case, using the device is not difficult, since you do not have to make any changes to its design, you just need to figure out which mode to choose.
Usually this mode is marked with the letters “temp”, and the multimeter comes with a thermocouple, which is a wire with a sensor. There are two sockets on the housing to connect a thermocouple.
Most testers are capable of working with temperatures ranging from -40 to 1000 degrees Celsius. If you have purchased an inexpensive multimeter, you should pay attention to which thermocouple is included.
The fact is that most multimeters have fairly thin wires that can melt when exposed to temperatures above 250 °C. It is also necessary to pay attention to whether it is possible to measure the temperature of liquids or only gases.
If you are going to work with high temperatures, then it is better to replace the standard thermocouple with a special one, the design of which is designed for measurements in more difficult conditions.
For some devices, you will need to use a special adapter, since multimeters have single inputs, and a professional thermocouple has a miniature plug. After connecting the thermocouple, you must select the temperature measurement mode: it can be in degrees Celsius or Fahrenheit.
In order to find out what the temperature is, you need to touch the tip of the thermocouple to the object of interest. The data will immediately appear on the electronic display.
The duration of contact with the object is only 2-3 seconds; for accurate measurements, the contact must be tight. You can check if your multimeter is working correctly by comparing its readings with those of a thermometer. It is also important to monitor the polarity of the thermocouple connection.
Where is the coolant temperature sensor located?
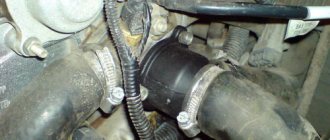
To diagnose a thermistor, you need to know where exactly it is located. This information will differ for different vehicles, which is quite logical. But we can name a number of special signs by which it is quite easy to detect the place where the part is fixed. This mechanism today can mainly be found on the cylinder head exhaust pipe.
It has a steel thread, through which it can be screwed into a small hole without any problems. In this case, the main thing is to ensure direct contact of the OX and its sensory component. Thanks to such a simple contact, it is possible to determine the exact readings of the part.
Many people wonder how many thermistors are there in a car? The design of some machines may also provide for the installation of two such meters.
- The first one records the OX temperature at the outlet from the drive.
- The second is at the radiator outlet.
Thanks to this, you can accurately control the condition of the engine.
Two DTOZH can mainly be found only on powerful or expensive cars. That is, where this parameter is most important, and the ECU has special applications for the operation of the drive. To find important information about the design of a vehicle, just read the technical documentation or instructions for this car.
Checking the idle speed sensor
If the listed malfunctions appear, you need to consider how to check the idle speed sensor. It is located on the throttle valve. Her cable is attached next to it. Above the idle speed sensor is a throttle position control device. You need to turn off the ignition and dismantle the presented device. The sensor can be attached using adhesive or bolts. In the first case, you will need to dismantle the entire throttle assembly. The bolted connection will allow you to disconnect only the sensor.
Next, you need to connect the on-board network wires to the sensor. You need to place your finger on the conical needle. Next, the ignition is turned on. If after this you feel slight jolts of the needle, then the sensor is working. Otherwise, this structural element will be motionless. The sensor will need to be replaced.
Signs of a malfunctioning coolant sensor
What or who can tell a driver that the thermistor on his car is broken? This is not an invisible process. There are many important signs of failure. Signs of partial or complete malfunction of the temperature sensor:
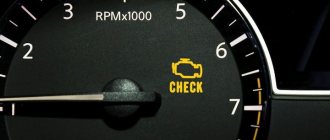
- The light on the dashboard that says Check Engine comes on. To find out what happened, you will need to scan the controller and read the errors. To do this, you can use, for example, the popular ELM327 car scanner connected to a mobile phone.
- A significant increase in the heating time of the machine motor.
- Faulty fan inside the radiator. This problem manifests itself as a complete failure of activation when heating or operating after the vehicle engine has completely cooled down. When the resistor is disconnected, the vehicle computer perceives the failure as a break and activates the fan.
- Excessive dark or black smoke coming out of the vehicle's exhaust pipe.
- Malfunctions in the general functioning of the car engine. This breakdown can manifest itself as stopping at low speeds, as well as significant difficulties with starting in winter.
- OX is boiling , but the display shows normal temperature.
- Increasing the overall gluttony of the vehicle. This is due to the fact that incorrect or distorted information is supplied to the controller. Because of this, the computer is not able to know the required volume of OX to maintain a stable degree of heat.
- Leakage of antifreeze used in the vehicle. This problem is easily identified through a simple inspection.
- A heated car drive immediately stalls. This malfunction often occurs after reaching the highest degree of heat. The type of antifreeze used does not matter.
- heating indicator of the power unit on the panel does not work
The breakdowns described above can occur singly or together. In the vast majority of cases, this indicates a problem in the power unit. DTOZH in such situations is not always the main cause of failure.
If you can clean the case or internal elements of the meter, then to fully restore its functionality you will need to perform the necessary operations. But repair will no longer help if the internal thermistor is broken or the housing is damaged. In such situations, you will need to replace the temperature sensor with a new one. It is not that expensive, and the complete replacement procedure is quick and uncomplicated. In addition, it is not very expensive, so it is available to all car enthusiasts.
Recommendations for care and maintenance of sensors
- Strictly follow the manufacturer's recommendations regarding vehicle maintenance schedules;
- Buy parts with original catalog numbers. The exact data is indicated in the instruction manual for your technical device;
- When the first signs of engine malfunction appear, contact a service station;
- Do not buy a temperature sensor from other technical means, since the full functionality of the equipment is not guaranteed;
- Carefully compare the catalog numbers on parts and spare parts with the actual markings indicated in the instruction manual.
Reasons for sensor failure
The design of the thermistor is simple, so failure of this mechanism is rare. Basically, this happens simply due to old age or physical damage. For example, corrosion of contacts and steel components can occur when ordinary water is poured into the cooling system. In addition, there are a number of other reasons for the breakdown of the temperature sensor:
- Damage to the chip. Sometimes, after certain damage, the so-called “chip” breaks, that is, the contact block that connects to the DTOZH. According to extensive statistics, this is one of the most common thermistor faults. It is because of this that most breakdowns of spare parts occur, which in themselves are quite reliable.
- Damage to the body. This problem is expressed in different aspects. You can often see streaks of antifreeze leaking from the threads or resistor housing. The terminals and the thermistor itself can easily be damaged, which will begin to produce its own signal with errors.
- Problems with withdrawal to DTOZH. If this happens, then repairs will not help. After all, the meter body is often sealed and does not provide free access to its internal elements. In this regard, the temperature sensor will have to be replaced with a new one in any case. There is no point in trying to repair it. It will just be wasted time.
- Violation of normal cable insulation. We are talking here about various cables that go to the spare part from the controller and back. Cable insulation can become damaged due to abrasion, some kind of impact, or simply from old age. This is especially true for those vehicles that are used in high humidity and sudden changes in heat.
- Oxidation of terminals. It happens that after many years of regular use or under the influence of fumes, the leads on the meter oxidize. Because of this, a signal cannot pass through them.
How to find the temperature sensor in an air conditioner
Indoor unit:
- Room air temperature sensor
This is the same sensor that sets the operating mode of the compressor.
- Evaporator temperature sensor (installed at the midpoint of the evaporator)
It serves to turn off the compressor when the evaporator temperature is below zero, or to indicate an error, in order to avoid icing of the evaporator.
- Temperature sensor at the evaporator outlet
- Fan motor temperature sensor
Shuts off the engine when overheated, preventing fire.
Overheating usually occurs in the event of an interturn short circuit.
- Thermal fuse in terminal block
- When the operating temperature is exceeded (most often about 90 0 C), it burns out, opening the air conditioner power circuit.
External unit:
- Outdoor temperature sensor
This sensor serves to limit the operation of the air conditioner when the outside temperature is below its operating range.
The air conditioner simply won't turn on if the outside temperature is below its limit.
- Condenser temperature sensor (several can be installed at different points)
The function of this sensor is to maintain the condensation pressure within a given limit when the outside temperature changes.
- Compressor discharge temperature sensor
The pressure can be indirectly determined by the discharge temperature, and if it is higher than normal, the air conditioner generates an error.
- Gas line temperature sensor
The gas line sensor duplicates the low pressure sensor, and generates an error when it decreases excessively.
- Temperature sensor on fan motor
- Thermal fuse on the connection block
There are also systems that determine the level of condensate using temperature sensors, instead of a mechanical float.
How to check the coolant temperature sensor
Testing the serviceability and performance of a spare part is possible using two methods. The first one involves removing the thermistor, the second one directly in the car engine.
To quickly and easily remove the part, a simple wrench is required.
- Before such a procedure, it is important to disconnect the special contact terminals from the thermistor.
- In this case, before installation, you must make sure that power is still supplied to the coolant sensor. Basically, this is five volts of voltage. To find out, just disconnect its chip from the resistor, and using a multimeter configured to measure DC voltage, use probes to accurately check the exact voltage value.
- If the voltage is present and has the described value, you can further check the temperature sensor.
No special mode
Is it possible to measure temperature with a multimeter that does not have a special mode for this? It turns out that this can really be done, but the device will need to be slightly upgraded.
You need to purchase an LM-35 microcircuit, with its help the temperature readings will be converted into voltage, and the device will be able to recognize the data, but will indicate them in Volts. For example, 0.30 Volts will need to be understood as 30 degrees Celsius.
The use of a microcircuit does not require complex intervention in the design of the device and allows you to use any multimeter to measure temperature.
In order for the chip to work, you will need:
- three wires that can be connected to the 10-ohm output of the device;
- a separate power source of at least 4 Volts, that is, 2 flat batteries.
If you need to measure not only positive, but also negative temperatures, you will also need to connect a reference voltage source.
The microcircuit itself is easy to connect. It has three connectors for positive and negative wires and an output sensor. This approach will allow you to transform any multimeter, making it more functional, while the design will be inexpensive.
Check without removing from the car
If the temperature sensor has stopped showing the temperature of a car engine or is doing it incorrectly, there is no need to remove this component from the vehicle at all. All necessary operations can be performed without dismantling using a diagnostic device or a special tester.
To do testing directly on the car, you need to disconnect the chip from the thermistor. After this, you will have access to all outputs.
- If the vehicle drive is hot, you should work carefully.
- Otherwise, the risk of getting burned and melting a modern multimeter is very high!
Then, using a tuned multimeter set to the magnetoresistance detection mode, you need to measure this value between the metal terminals.
Note! Such meters do not break down often, which is good news. But cases when the temperature sensor lies are not so rare. Therefore, you can completely compare the temperature readings on the panel with the obtained resistance value. If a spare part produces erroneous data, it is better to remove this component and perform testing using a water heating device and a thermometer.
Previously
To check this component of the car, you will first need to start the car and let the car engine warm up a little to about ninety-five degrees.
After this, you need to disconnect the connector from the temperature sensor and observe the behavior of the arrow on the panel:
- If it goes down, then the fuse needs to be checked. If it is in perfect order, and when the steel terminal is shorted to ground, the arrow jumps, then the problem is in the resistor.
- If the arrow has not moved from its place, then a check of the meter or the electrical circuit that goes to the device is required.
Multimeter
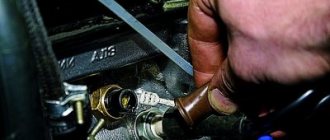
If the part does not indicate the degree of heat of the car engine, it is important to know how to properly check the temperature sensor with a multimeter. This is the simplest testing method. To use it you need:
- Check the voltage and turn on the multifunction device mode for measuring voltage.
- Disconnect the connector from the temperature sensor.
- Activate the ignition.
- Connect the positive wire of the device to the connector with a plus sign, and short the second terminal of the device to the drive.
The tester should show from 4.8 to 5.2 V.
To test a part you need to:
- Disconnect the leads from the DTOZH.
- Enable a special mode for determining magnetoresistance on the electronic device.
- Measure all parameters between different terminals.
- Compare them with indicators from a special table.
If the temperature sensor constantly gives erroneous information, it will need to be removed for a more thorough check and then replaced with a new one.
The use of this multifunctional device greatly simplifies diagnostics, which is why this method is very popular and popular today. Buying an electronic multimeter nowadays will not be difficult. You can find this device in almost any car store. And this cannot but rejoice.
Diagnostic device
If the Check Engine sign suddenly starts to glow constantly on the dashboard, then it’s time for a new full scan of the error code. In this situation, the most effective and efficient way is testing with an ODB2 scanner. For example, a scanner model Scan Tool Pro.
- If there are no signs of damage to the resistor during visual inspection, but testing shows the presence of one of its errors, then the meter is still faulty. To diagnose a thermistor, you do not need to test it with a device. The scanner will easily show in real time the functioning of the vehicle’s thermistors.
- If the thermistor's performance is quite normal, the scanner will show what degree of heat the resistor produces.
The device operates on a 32-bit chip, so it can test both the car’s engine and its various other components. In addition, it allows you to measure the operation of all vehicle systems over specific time periods and store valuable information. The scanner is currently compatible with virtually all known diagnostic programs. At the same time, it supports different formats of communication and Internet access.
We use an electric kettle
The temperature sensor will be tested in boiling water, which will allow the resistance to be determined more accurately. This process can be broken down into several sequential steps:
- First of all, you should stock up on an electronic thermometer to measure high temperatures. After this, it is placed inside a kettle with cold water.
- At this stage, a multimeter is connected to the sensor according to a special diagram. The device is then placed in water. To prevent damage to the wires, long cables must be used to connect to the multimeter.
- After placing the system in cold water, a control resistance measurement is performed. The results obtained should be saved.
- Then the kettle is turned on. When heating water, the temperature of which is controlled using a thermometer, you need to measure the resistance every 10 degrees (+20, +30, +40, etc.).
- The results obtained are ultimately compared with a special table. Here are the optimal resistance values. If they do not match, this may indicate a breakdown.
Tips in the article “How to sell real estate?” Here.
The technology for testing other types of temperature sensors depends on their technical features and should be carried out in accordance with the manufacturer’s recommendations.
Modern air conditioners have a developed self-diagnosis system, which receives information from various sensors and, based on this, changes system parameters or issues error codes.
One type of such sensors is thermal sensors, usually semiconductor thermistors.
Checking the removed DTOZH
In some cases, it is necessary to remove the resistor for correct and error-free diagnosis. In such situations, alternative methods of testing a given device come to the rescue.
Sensor readings depending on temperature changes
After removing the resistor, this component can be checked with a thermometer. This method can provide very accurate data. Many experts recommend this particular device.
How to check the vehicle's DTO in this way? Everything is simple here. Necessary:
- Prepare a container and pour some water into it.
- Heat the liquid with a regular boiler.
- Prepare your multimeter.
- Immerse the sensor component of the part in water.
- Provide connection to the device contacts.
- Dip the thermometer into water to monitor the degree of heat. For this purpose, it is better to buy an electronic thermometer, as it has greater accuracy.
- Heat the water and take measurements for various heat degrees.
- Fill out a special table containing the magnetoresistance parameters relative to the set temperature.
- Check with the information contained in the vehicle manual.
Without thermometer
This test option differs in that a thermometer is not used here, and readings are taken only once.
It is necessary to immerse the resistor in any container of water and then bring it to a boil. You should connect the multimeter probes to the output terminals and see what this device shows.
If the part is fully operational, the resistance will show 177 Ohms. It is important to understand that small errors are possible. In addition, the multimeter probes have their own resistance, and the heat degree of the water may be below hundreds of degrees, which will definitely increase the resistance.
This method is somewhat inferior to that where an electronic or conventional thermometer is used. However, it is also actively used.
With thermometer
Diagnostics can be done using a thermometer. To test, do the following:
- Remove the spare part from the car engine in advance. A wrench is perfect for this task. Here you can clean and thoroughly lubricate the threads in the pipe. Like the resistor itself, but only if it is working and will not be replaced with a new one.
- Pour water into any container, find a boiler. They will be used further to heat the water in the vessel. You will also need to switch the multimeter to a special mode, namely to accurately determine the resistance.
- It is necessary to place the sensor component of the sensor in heated water, and also provide access to the terminals using the probes of an electronic multimeter.
- Dip the thermometer directly into the water. For such purposes, it is better to use the electronic version, because it shows more accurate measurements. In addition, this way you can conveniently obtain information about the degree of heat of the liquid.
- Measure the thermistor resistance step by step as the degree of heat increases. It is recommended to do this at small increments of five degrees. As a result, you can get a lot of useful information, which can then be easily converted into a detailed table.
- Compare all obtained indicators with information from the technical documentation of the machine.
With the definition described above, minor errors may well be allowed. What does this depend on? First of all, it depends on the experimental conditions. Secondly, on the specifics of a particular spare part. After all, the electrical resistance of the mechanism will often differ very little even under identical measurement conditions.
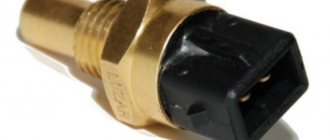
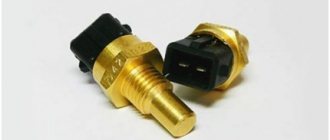
Device
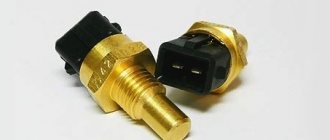
A modern DTOZH consists of a connector, a metal case, a thermistor (a sensitive electronic component) and a gasket. A small device determines its own ohmic resistance and transmits the readings to the ECU - an electronic control unit. Depending on the degree of heating or cooling of the antifreeze, the device readings change.
TOZh sensor device
Resistive elements are used in DTOZH. As they heat up, the resistance drops. For example, if the sensor is placed in an environment heated to +20°C, the thermistor will have a resistance of 3.5 kOhm. If the antifreeze heats up to + 90°C, the sensor will have a resistance of 0.24 kOhm. In rare cases, on some models the antifreeze temperature sensor has a positive coefficient, i.e. When heated, the resistance in the circuit increases.
Replacing the coolant sensor - brief instructions
If it is obvious that the coolant temperature sensor has really failed completely and there is no hope for repair, only one thing will help. The best option is to replace the old part with a new one. What needs to be done to correctly change the part?
- Remove the protection on a cooled car engine using a key. They can also unscrew special clamps that securely hold the built-in radiator.
- Set the stove to the highest setting, and then unscrew the heating valve.
- Place the prepared coolant container under the radiator and begin to unscrew the plug that covers the drain. It is important not to accidentally hit the generator directly.
- Drain the antifreeze. It won't take more than ten minutes.
- Move the container under the engine, unscrew the special plug under the ignition module and wait a little longer until the liquid is completely drained.
- Next, you need to remove the special rubber for protection and determine the location of the DTOZH marking on the body. Thanks to this, it will be possible to install the new part in the correct position without any problems.
- Unscrew the broken one with a key and install the current part.
- Pour antifreeze into the engine cylinder block and radiator.
If the new part does not work for some unknown reason, it will need to be fully tested again. Maybe it's just a marriage.
Other reasons for a new part to malfunction could be a dirty generator, an antifreeze leak, or a device that is too loosely tightened.
Obviously, completely replacing this part is not the most difficult operation in the world. Therefore, even people far from auto mechanics can easily do it. The main thing is to adhere to the recommendations and instructions described above.
Let's start checking
Temperature sensors are the general name for mechanisms that can respond to changes in temperature in the external environment. There are many similar products, but we will consider the verification algorithm on the principle of automotive devices that read coolant readings.
You can check the condition of the sensor using boiling water. This approach will only give approximate results, but will allow you to know whether the system is working. Checking the device consists of the following sequential actions:
- Initially, you should bring the water to a boil and lower the sensor into the liquid.
- To find out if a device is working correctly, you should find out its resistance. The optimal indicator at a temperature of 100 degrees is 177 Ohms. But the water may cool down a little during measurements. Therefore, this indicator should be in the range of 190-210 Ohms. If this is not the case, you should look for the cause of the malfunction or completely replace the product.
How to check the temperature sensor on specific cars
On different cars, diagnostics of DTOZh can be performed in different ways. It all depends on the location of the mechanism and the design features of the vehicle. The following describes testing options for the most popular domestic brands.
On VAZ 2110
Testing a part on a VAZ 2110 car is actually similar to the processes that were described earlier. To diagnose the sensor, it is advisable to know the resistance at very different degrees of heat:
- The resistor voltage output at 15 degrees ranges from 92.1 to 93.3%.
- The voltage output of the resistor at 128 degrees is between 18.1 and 19.7%.
- Resistance at 15 degrees ranges from 4033 to 4838 ohms.
- Resistance at 128 degrees ranges from 76.7 to 85.1 ohms.
Regarding the removal of a spare part for its full testing or replacement, this should begin with draining the antifreeze. This should be done when the car engine is cold. Otherwise, you can easily get burned or damage the engine components of the machine. For dismantling you need a regular nineteen millimeter wrench. They can easily unscrew the meter and remove it together with the seal ring.
Then you should test the resistance of the mechanism in steps of ten degrees, starting from the complete boiling of the liquid in a special container with a thermistor until it cools completely. After this, the results should be checked with data from a special table.
On VAZ 2114 and 2115
One cannot help but recall another model of the legendary domestic car. The part in this vehicle can be found directly between the thermostat and the cylinder head. For quick and correct testing, the component must be dismantled. This can be done with a nineteen millimeter open-end wrench. It is important to first wait until the engine cools down, remove the negative voltage on the battery and drain all the antifreeze. The sensor can then be removed to be checked later using various methods.
There is a special liquid method of cooling the engine. This process is carried out by circulating a special liquid inside the cooling system.
The system consists of a pump and thermostat, a cooling and heating radiator, an expansion tank, various pipes, a radiator fan and the DTOZH itself.
For more convenient dismantling, the body of the latter has special edges. The connection is made by connecting a block with two cables.
For diagnosis you need:
- Start the car in advance and let it idle until the arrow points to the maximum operating temperature.
- Disconnect the leads and observe what exactly the arrow on the panel shows.
Then there are two possible scenarios:
- If the arrow drops down, the fuse needs to be checked. When it is completely normal, and the arrow jumps when the output is shorted to ground, then the problem is in the resistor.
- If it remains in the same place, then you need to check the temperature sensor or the electrical circuit that goes to the device.
On Gazelle (engines ZMZ 406, 405 and 409)
405
The heat meter here is located on the motor near the thermostat or directly on the housing. To remove it, you will need to drain some antifreeze from the car engine, disconnect the harness block fastening, and then remove the block from the mechanism. After this, you can loosen the broach with a wrench by nineteen millimeters and unscrew the part without any problems. An important indicator in this situation is the determination of resistance.
406
To test a part on this car engine, you will need a modern multimeter, as well as a regular boiler, water and a variable temperature. You will definitely need to choose some kind of circuit and apply approximately 1.5 mA to it. It is the voltage that needs to be measured.
Why is a cooling system needed?
When fuel burns, a lot of heat is released, and only 30-35% of this heat is used to perform work. About half of the remaining amount flies out along with the exhaust, and a cooling system is needed to remove the rest, otherwise the engine will overheat. The vast majority of modern cars have a liquid cooling system. Operating principle: a special liquid (antifreeze) takes heat from hot parts and releases it into the environment. This ensures the constancy of the thermal regime necessary for normal operation of the motor, as well as uniform heating if the motor was cold. But in order for antifreeze to perform its task correctly and effectively, a number of special devices are needed. In order to maintain the operating temperature of the coolant (that is, the one at which engine operation is optimal), you need to know how many degrees it is at the moment.
Coolant temperature sensor
This task is performed by the coolant temperature sensor.