The front suspension of a passenger car is one of the most loaded devices. It is she who takes all the blows, she “eats up” small unevenness in the road surface, and she also keeps the car from tipping over on sharp turns. One of the most critical elements of the suspension is the front beam, which, despite the massive structure, can also fail. Can I repair it myself? Yes. Let's figure out how this is done.
- Description and fastening of the beam
Main faults of the beam
- Sequence of work
Preparatory work
Before removing the beam, it is necessary to remove the shock absorbers and suspension springs. For this operation, in addition to standard keys and heads, you will need a pry bar, a jack and spring ties.
The order of operation is as follows:
- Drive the car into the pit, put the handbrake on, and install wheel chocks under the rear wheels.
- Loosen the upper nuts of the front shock absorbers located in the engine compartment (to prevent the shock absorber rod from turning, it should be held with an open-end wrench).
- Unscrew the top nuts and remove them along with the washers and springs (the location of the elements must be remembered, this will be useful during assembly).
- Unscrew the nuts securing the shock absorbers to the lower arms.
- Pull out the shock absorbers.
- Loosen the front wheel mounting bolts.
- Raise the car on a jack, place the front part of the car on supports, remove the front wheels (special supports or ordinary bricks are located under the side members at the point where they connect to the body).
Further actions are performed sequentially for the right and left levers:
- Unscrew the nuts securing the lever two turns (otherwise it will be difficult to lift it with a jack).
- Raise the end of the lever with a jack and remove the stabilizer rubber bracket by unscrewing the fastening nuts.
- Partially unscrew the nuts securing the lower ball joint and knock it out of the knuckle with a hammer (it is better to use a special puller instead of a hammer).
- Move the stabilizer through the top pin using a pry bar.
- Lower the lever and remove the jack.
- Lift the upper arm and pull out the suspension spring, prying it up with a pry bar from below.
Reinstalling the parts is done in the reverse order. Before installing the springs, they should be compressed with ties.
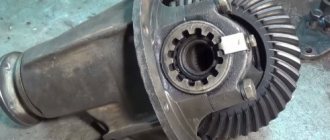
Beam dismantling
The VAZ 2107 beam serves as the basis for attaching the lower suspension arms, so before removing it, the arms must be unscrewed. To dismantle the lever, simply unscrew the two nuts securing the lever axis to the beam.
The car engine is also attached to the beam. Before removing the beam, it is necessary to secure it to the hoist using the eye on the cylinder head located between the carburetor and the tee. Before hooking the engine onto the hoist, it is necessary to remove the air filter so as not to damage it. Once the engine is suspended, you can begin to remove the beam.
Unscrew the nuts securing the engine mounts to the beam.
Support the beam so that it remains in place after unscrewing from the side members. To do this, you can use a stack of boards, placing them under the part.
Unscrew the beam fastening bolts running in the horizontal plane, then the nuts of the bolts running vertically.
Raise the front of the car, controlling the beam so that it does not fall from the supports.
Suspension repair
For suspension repairs in Krasnodar, come to the UNICAR workshop. We will inspect and diagnose your car in the shortest possible time, find the cause of the problem and quickly fix it. Regardless of whether your car is domestic or imported, our technicians will repair the front suspension promptly and with a quality guarantee.
But the technician will be able to accurately answer the question of how much it will cost to repair the suspension in your particular case only after inspecting the car. In addition, the cost will also depend on the brand of the car.
Purpose of the beam
The main task of the transverse beam is to prevent the “seven” from tipping into a ditch when passing the next turn at high speed. When a car goes through a turn, a centrifugal force begins to act on it, tending to throw the car off the road.
The beam has an elastic torsion element, which, when a “seven” wheel occurs, thereby counteracts the centrifugal force. In addition, the transverse beam provides additional support for the VAZ 2107 engine. That is why, when dismantling it, the engine is always hung on a special block.
Why do cracks appear in the front beam housing, what is the danger?
Since the cross beam is an all-metal part, it serves for many years. Does not require special maintenance. But when carrying out TO-2, a visual inspection of the part is required in order to identify deformations and cracks. The same check is required for parts that have direct contact with the beam.
Frequently encountered malfunctions that are detected during such inspections are deformations; they arise as a result of:
- increased static or shock loads
- metal fatigue stresses causing cracks
- wear of fasteners
What is the danger:
- the alignment accuracy of the front wheels is impaired
- the car's sensitivity to control decreases
- the safety of moving a car on the road decreases
- there is a threat of complete destruction of the part
Naturally, troubleshooting such a problem should be done as soon as possible. If minor deformations are detected, you can attempt to correct the bent beam using a special machine.
Description and fastening of the beam
Structurally, the beam is a massive C-shaped structure made of two stamped steel sheets welded together. At the ends of the beam there are four studs to which the suspension arms are attached. The pins are pressed into the recesses. Above the studs are lugs with several holes. Bolts are screwed into these holes, with which the beam is screwed directly to the body of the VAZ 2107.
Basic beam faults
At first glance, the beam seems to be a very reliable element that is difficult to damage. In practice, the situation is different, and owners of “sevens” have to change beams more often than they would like. Here are the main reasons:
- beam deformation. Since the beam is located under the bottom of the car, stones can get into it. The driver can also hit the road with the beam if the front wheels suddenly fall into a particularly deep hole that the driver did not notice in time. Finally, the car may have incorrectly adjusted camber and toe. The result of all this will be the same: deformation of the beam. Moreover, it does not have to be big. Even if the beam bends just a few millimeters, this will inevitably affect the car’s handling, and therefore the driver’s safety;
- beam cracking. Since the beam is a device subject to alternating loads, it is susceptible to fatigue failure. This type of failure begins with the appearance of a crack on the surface of the beam. This defect cannot be seen with the naked eye. With a crack, a beam can work for years, and the driver will not even suspect that there is anything wrong with the beam. But at some point, a fatigue crack begins to propagate deep into the structure, and propagation occurs at the speed of sound. And after such a breakdown, the beam can no longer be used;
Replacing the cross beam on a VAZ 2107
Before moving on to the description of the process, a couple of clarifications should be made:
- firstly, replacing the cross beam on the “seven” is a very labor-intensive task, so the help of a partner will be very helpful;
- secondly, to remove the beam you will need to hang the engine. Consequently, the driver needs to have either a hoist or a simple manual unit in the garage. Without these devices, the beam cannot be removed;
- thirdly, the only acceptable option for repairing a beam in a garage is to replace it. Below we explain in detail why this is so.
Now to the tools. Here's what you need to get it working:
- new cross beam for VAZ 2107;
- set of socket heads and wrenches;
- 2 jacks;
- flashlight;
- set of spanners;
- flat screwdriver.
Sequence of work
To work, you will have to use the inspection hole, and only that. Working on a street overpass is not possible, since there is nowhere to attach a block to hang the motor.
- The car is installed on the inspection hole. The front wheels are jacked up and removed. Supports are installed under the body (several wooden blocks stacked on top of each other are usually used as supports).
- Using open-end wrenches, the bolts holding the lower engine protective casing are unscrewed, after which the casing is removed (at the same stage, you can also unscrew the front mudguards, since they may interfere with further work).
- Now the hood is removed from the car. After this, a lifting device with a cable is installed above the engine. The cable is inserted into special eyes on the engine and tensioned so as to prevent the engine from falling after removing the beam.
Video: removing the front transverse beam on a “classic”
Tools, accessories, consumables
It is advisable to stock up on tools and spare parts:
- wrenches, complete with extension and wrench
- jack of required lifting capacity
- hoist with fastening structure
- pry bar
- carrying - to provide high-quality lighting for the workplace
- spring ties
- new front beam
- new fasteners
About welding and straightening a damaged beam
A beginner who decides to weld fatigue cracks in a garage does not have the proper equipment or skills to do this. The same applies to the process of straightening a deformed beam: by trying to straighten this part in the garage, as they say, “on the knee,” a novice car enthusiast can only deform the beam even more. And the service center has a special device for straightening beams, which allows you to restore the original shape of the beam literally down to the millimeter. We should not forget one more important point: after repairing the transverse beam, the driver will again have to adjust the camber and toe of the wheels. That is, you will have to go to the service center to the stand in any case.
Taking into account all of the above, the only rational repair option for a novice driver is to replace the cross beam. And the restoration of a damaged beam should only be carried out by specialists with the appropriate skills and equipment.
So, it is possible to replace the cross beam in a garage. The main thing is to carry out all the preparatory operations correctly and under no circumstances remove the beam without first hanging the engine. It is this mistake that novice drivers who are new to the design of the “seven” often make. Well, regarding the restoration and finishing of the beam, the driver will have to contact specialists.
Hello! The next post on my blog will be about replacing the front side member on a classic VAZ, since this problem can befall both an old, tired car and a fairly fresh one. Corrosion, the spar rots, and accordingly the front part of the body in the suspension area loses its rigidity, perhaps a beam or anti-roll bar falls off. The second option is when the spar does not seem to have holes, but the studs that attach the beam to the spar have broken out. The third problem is the fatigue of the spar in the place where the steering column is attached; when the steering wheel wobbles, the column body moves. There are two options, but the only solution is to replace the VAZ front spar with your own hands. Practice has proven that it is not necessary to replace the entire spar; it is enough to replace most of it; if, for example, a beam has broken out of the spar, then it is enough to replace the front part of the spar, 10–20 cm long, by the beam mounting studs. This replacement option is less problematic and suitable for the average user; it gives fewer problems, since when replacing an entire spar, you will need to remove the carpet and weld the spar from below, at the junction with the whip.