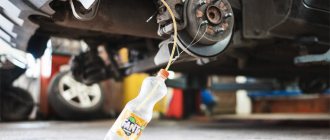
Lada 4×4 3D Kvakazyubra › Logbook › Replacing the chain and tensioner “Isai”
The work of the quacazubra's heart led to slight irritation of my hearing.
While the car is warming up, the engine whispers like a happy cat. After warming up, diesel sounds are heard. Perhaps I’ll start with the chain and tensioner and then go down the list... Everything was purchased in the same online store, supposedly original spare parts:
Chain tensioner shoe VAZ-21213 (BRT) 21213-1006090-R Engine gaskets (full set) VAZ-21213 Riginal RG21213-1002064-86 Chain stabilizer VAZ-21213 (JSC AVTOVAZ) 21213-1006100-00 Chain VAZ -2103-06 116 stars (company packaging LADA) 21030-1006040-82
Everything arrived in 5 days.
We open the parcel very carefully.
The parcel also contained valve stem seals, but seeing how difficult it is to replace them, it was decided to leave them out for now... The parcel also contains an FLS, but this is a topic for a separate post...
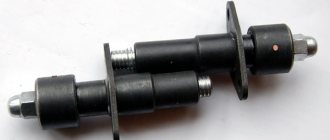
We also purchased an “Isai” tensioner for Lada 2101-2107 models.
It also arrived in five days. Inside the package is a neatly wrapped package.
Inside there is a package with a tensioner. The package contains brief instructions on “where to push and what to pull.”
Next, as Nivazbuka teaches, remove the valve cover and timing cover. align the marks and remove the gears.
It’s probably worth noting here that you need to remove the nuts on all gears and pulleys at once. While the chain is tight. It seems logical, but apparently I’m not good with logic... I had to take a homemade tool to fix the gearbox shank.
The gears and pulley can be easily removed by hand; there is no need to call for a soton or hammer with a sledgehammer. True, when unscrewing the limiter bolt, I dropped it into the pan. There was a lot of swearing at that moment, I just remembered how I changed the oil pump, I didn’t want to repeat it at all. Fortunately, I have the hands of a pianist and took out the bolt without removing the pan. I believe that this is the main luck of February, and perhaps even of 2020! There will be no more photos of the process after this procedure, so those who like to “gawk” will have to be disappointed.
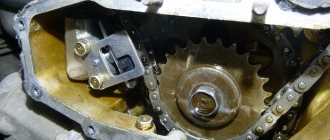
So we'll have a look at everything that's been filmed.
The gears are quite good. I didn’t find any signs of wear, although with my experience it’s not clear what I wanted to find there.
The chain length is the same. By the way, during disassembly I did not find any looseness in the chain; everything was well tensioned.
The old chain has a 26mm bend.
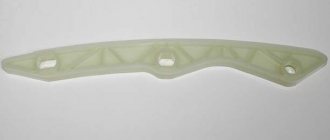
The damper did not fit, it looks like it is from 214 Niva, although the order number is from 213. The removed tensioner shoe has no wear. There are no more marks. Both are 15 mm.
I put everything back together without any problems. We take gaskets from the kit. The Isai tensioner installs easily. In fact, the chain and tension were quite normal. This operation did not add or remove any noise. Next we’ll dig into the valves, but for now it’s just a new skill...
Chain tensioner shoe VAZ-21213 (BRT) 21213-1006090-R — 170 Engine gaskets (full set) VAZ-21213 Riginal RG21213-1002064-86 — 350 Chain stabilizer VAZ-21213 (JSC AVTOVAZ) 21213-100610 0-00 — 75 Chain VAZ-2103-06 116 sp. (company packaging LADA) 21030-1006040-82 — 800 Tensioner ISAI — 1625 Oil scraper caps kit. (8 pcs.) (company packaging LADA) 21080-1007026-86 — 230 Delivery — 420
Source
Niva chain tension – Adjusting the camshaft chain tension VAZ 2121 Niva 2131
Loosen nut 1 (Fig. 2-56) of the tensioner. In this case, rod 3 is released and the chain is tensioned by shoe 7 (Fig. 2-55), which is acted upon by spring 7 (Fig. 2-56).
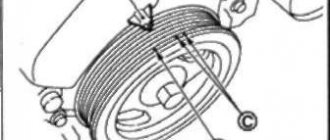
Rice. 2-56. Chain tensioner section:
1 – cap nut; 2 – tensioner body; 3 – rod; 4 – plunger spring; 5 – washer; 6 – plunger; 7 – spring; 8 – cracker; 9 – spring ring; A – plunger surface; B – places of punching at the end of the body.
Turn the crankshaft 1-1.5 turns in the direction of rotation. In this case, the tensioner spring acting on the shoe will automatically adjust the chain tension.
Tighten the nut 1 of the tensioner, due to which the rod 3 is clamped by the collets of the block 8, and when the engine is running, only the spring 4 acts on the plunger 6. This spring presses the plunger away from the head of the rod 3, and oil flows into the gap between them when the engine is running, playing the role of a shock absorber when shocks of the chain.
The timing chain plays an important role in the operation of the gas distribution mechanism. Over time, it stretches and requires tension, since the quality of the engine depends on it. Therefore, you need to know when to check the tension and how to tension the chain on a VAZ 2101. This topic is covered in an article and a video that demonstrates the process of checking and tensioning the chain drive.
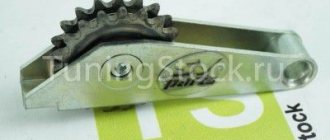
Tranquilizer
Another important element in this system is the Niva Chevrolet chain damper, which prevents the resonance effect from occurring. This system consists of the following elements:
The damper is located inside the cylinder head on the front side and is attached to it with two bolts. If it is damaged or worn out, vibrations appear, which can lead to the chain jumping and thereby damaging the motor.
Replacement
To replace, you will need a ten-size socket wrench and a screwdriver. When the tool is ready, we go through the following steps:
- Remove the cover from the cylinder head
- Remove the camshaft drive chain tensioner
- Without disconnecting from the chain, remove the sprocket from the camshaft flange
- Starting from the bottom bolt, unscrew the two fastening bolts
- We fix the chain together with the sprocket and remove the damper. During removal, it is advisable to hold it so that it does not fall into the oil pan.
- We inspect it and if there is damage, we replace it with a new damper.
- We take a new part and install it in reverse order.
It is necessary to purchase a new element exactly the same as the one that was installed previously, since models that were produced earlier may have a damper of a different shape.
Summarizing everything written above, we can conclude that to carry out this work you do not need to have special knowledge or have a special tool, therefore, if necessary, following all the above instructions, you can do all the work yourself.
Replacing the Niva damper
Just.
Everything is in the video
IMHO the creator! The Creator is not responsible for your actions!
The replacement is carried out in several steps:
The cover is removed from the cylinder head. Replacing the Niva damper is simple. Everything is in the video IMHO of the author! The author is not responsible for your actions. Before doing this, it is better to carefully study the controls for working with the engine. no charging Niva Chevrolet. Generator repair, replacement of Chevrolet Niva. Since during operation the cylinder head cover gasket may be damaged and it may need to be replaced. The next step is to remove the tensioner from the camshaft drive chain. then the sprocket is disconnected from the camshaft flange. 5 replacing generator brushes fuel consumption of Chevrolet Niva with different ones. However, you should not completely disconnect it from the circuit.
The damper mounting bolts are unscrewed. Replacing the chain tensioner VAZ 21214, watch this video, replacing the Niva damper. You need to start working from the bottom.
To make further work more convenient, you need to connect the gear together with the chain, as shown in the figure below. After this, you can unscrew the upper mounting bolt and completely remove the damper. Attention! When removing the damper, you must hold it firmly with your hand so that it does not fall into the oil pan. Replacing a timing chain on a Chevrolet Niva. Replacing a chain guide on a VAZ 2101-VAZ 2107. Video of replacing a timing chain guide. Replacing a chain guide on a classic Chevrolet Niva repair. Otherwise, its removal will become a big problem, since additional disassembly of the engine will be required. After the damper has been completely removed, it is necessary to inspect it. If its surface has strong signs of wear, chips appear on it, and cracks or other damage are noticeable on the body, a complete replacement of this component is necessary.
It is important to remember that the damper on the Chevrolet Niva engine has a slightly different shape compared to the one previously used on VAZ engines. Therefore, it is worth purchasing a device designed for installation on this car model
After installation, you must reassemble all system components in the reverse order.
When is stretching necessary?
Chain tensioning is required in the following cases:
Timing belt VAZ 2101
In the first two cases, it is clear that a tension check is necessary because the chain was removed or replaced. In addition, you should also check that the alignment marks match. These marks are located on the crankshaft and camshaft. You can determine the need for tension by the sounds of the engine running. If the tension is weak, then during its operation extraneous noises are heard in the place where the chain drive is located. At the same time, timing parts wear out faster. Therefore, when checking the tension, it is necessary to pay attention to the condition of the damper and the shoe.
Step-by-step self-replacement of a Chevrolet Niva timing chain
Recently, an old friend of mine came to see me in his old Chevrolet Niva with the characteristic sound of an extended chain.
In addition to the timing kit, I had the foresight to purchase even a front cover gasket, a crankshaft oil seal and a kilo of marinated meat. I could not refuse such an offer. So, Niva Chevrolet replaced the timing chain and front crankshaft oil seal.
First, let the engine cool to an acceptable temperature. Remove the pipe by unscrewing the bolt by 10 and loosening the clamps.
Air pipes
Next, we unscrew the eight nuts by 10 and move aside the throttle cable and all the pipes that will interfere with us, remove the valve cover.
Valve cover fastening.
Engine without valve cover.
Remove the air conditioner belt by unscrewing the bolt 13 of the tension roller.
Air conditioner tension roller.
Then loosen three 13mm nuts and one bolt of the generator belt tension roller and remove it.
Service belt tension roller
Now comes the fun part. To unscrew the pulley nut, we need a 38mm socket. Since the elongated head does not fit under a regular wrench (the radiator is in the way, but we don’t want to remove it), we use a pry bar, carefully sawed off from the hub key of some large car.
Homemade key.
Everything fits perfectly. Unscrew the nut and remove the crankshaft pulley.
Crankshaft pulley.
Unscrew the deflection roller.
Bypass roller.
We dismantle the reinforcing plate.
Plate.
Front timing chain cover.
Set the top dead center. The key on the crankshaft should align against the mark on the block.
Crankshaft mark.
The mark for the camshaft sprockets is against the ebb of the camshaft housing.
Camshaft mark.
Next, unscrew the oil supply pipe and two nuts 10 of the chain tensioner.
The tube is secured with a hollow bolt and copper washers on both sides. Don't lose them.
Tensioner fastening.
Next, unscrew the tensioner shoe, damper and remove the timing chain.
Tensioner shoe.
Compare the new and old timing chain. It could be worse.
Old timing chain.
New timing kit.
New timing kit.
Reinstall the chain, guide and tensioner shoe. We tighten the chain by hand and check that the marks match.
To make it convenient for us to check the marks after installing the front timing cover, we find the factory mark on the crankshaft pulley and mark it with a white marker. This mark at TDC should be opposite the center of the crankshaft sensor.
Mark on the pulley.
We install the front cover, crankshaft pulley and tensioner. Let's check the marks again. We install all the removed parts in the reverse order of removal. Fill with fluids, start the engine and enjoy.
Good luck on the roads. No nail, no rod.
There are no clear recommendations regarding at what mileage you should think about replacing the timing chain, however, if the mileage is more than 100 thousand kilometers, then most likely the chain is already worn out. To replace the timing chain of a Chevrolet Niva, it is necessary to disassemble the engine; only in this case it is possible to determine its condition and draw a conclusion about the need for such actions.
We recommend: How to properly change the oil in a manual transmission on a Lada Priora with your own hands?
However, there are also signs by which it can be determined that the timing chain has stretched. For example, this may be indicated by a sound reminiscent of a ringing rustle when a diesel engine is running, coming from under the hood. It is this characteristic noise that should alert the car owner and let him know that a replacement is coming.
Replacing the chain tensioner on VAZ 21213, VAZ 21214, VAZ 2131
Welcome! Chain tensioner - as is already clear from its name, it is needed only to tension the chain so that it does not loosen while the engine is running, and so over time this part breaks for various reasons, this happens, sometimes the tensioner simply cannot withstand very heavy loads breaks, for example, if you keep the engine speed in the red zone for a long time, the tensioner cannot withstand and breaks, but it can also break because it is not very durable, for example, there are a lot of very bad tensioners on the market at the moment qualities that really fail very quickly and after that they will need to be replaced with a new one, and you will learn how to do this from this article.
Note! In order to replace the chain tensioner, you will need to stock up on: A basic set of wrenches, which will contain the most basic keys that you use almost everywhere in the car!
Summary:
Where is the chain tensioner located? It is located on the side of the engine, it can be easily found by the way if you approach the car from the right side of the engine compartment (The countdown starts from the rear of the car to the front), there is also a battery installed nearby and there is a standard injection receiver in the form of curved pipes ( It is white), so when you stand on this very right side, look for the place indicated in the photo, this is the same tensioner.
When to change the chain tensioner
It changes only if it has become unusable, but how can you understand this, you ask? In general, when the tensioner becomes unusable, the car’s engine begins to run significantly louder, because the chain is weakened and thus there is such a roar as if you started the car with a diesel injection system, and not with a gasoline one, so if you hear something rattling in the engine, vibration may also appear, and by the way, this knocking should become less as the speed increases, that is, if the engine is noisy at idle and the chain rattles, then just give a little gas and if this knock goes away (the higher the speed, the weaker it should be knocking) then it is most likely really the tensioner, although many other parts could be to blame for this, but first you need to check it, since it is removed very quickly and is also checked accordingly.
An interesting article about biofuel produced from ordinary sawdust, read more here.
Step-by-step instruction
Before starting troubleshooting, check that all timing components are free of mechanical defects. To do this, you need to remove the protective cover of the drive and perform a visual inspection of the parts: sprockets, damper, tensioner and shoe. If defects are found, these components should be replaced.
Tools
Before you start work, you need to prepare the necessary tools:
To carry out work, the car should be placed on a convenient platform and supports should be placed under the wheels so that it does not roll. The gear shift lever must be set to neutral.
Engine compartment of VAZ 2101
Stages
Mechanical chain tensioner. Main manufacturers.
Pilot. The operating principle is a toothed rack. Good quality tensioner. The big brother of "autopilot". Stable quality. It is also possible to work without removing it from the cylinder head. The main disadvantage is the huge percentage of fakes on the market. This tensioner was the first successful design, and the Chinese grabbed it. If Autopilot is completely impossible to find, then Pilot is very difficult to find “original”. Based on the St. Petersburg market, I estimate the prevalence of counterfeits for this tensioner at 70%. I work with Rusmash directly, so this as a “minus” is insignificant.
Isaiah. The operating principle is a clock spring. To avoid questions and insinuations, I contacted the designer directly and in 2022, we installed several dozen of them. The main disadvantage of the product, which the designer passes off as its advantage, is that there are no precision parts. When the rod doesn't move out too much, everything is fine. When the chain is worn out and the rod goes beyond half, it “walks” quite a lot. If we are talking about a production engine without “pretensions” for tuning, this may be acceptable. If the engine is “more serious” this is unacceptable. The tolerance for axial “walking” of the chain and sprockets in the timing tract is only 0.3 mm.
chain tensioner Pilot for 21213
VAZ 21213 | Adjusting the timing chain tension | Niva
Service and operation
Manuals → VAZ → 21213 (Niva)
Engine timing mechanism mod. 2106
| 1 – camshaft sprocket; 2 – chain; Z – sedative; 4 – oil pump drive shaft sprocket; 5 – crankshaft sprocket; 6 – tension shoe; 7 – tensioner plunger; 8 – tensioner rod fixing nut . Performed on a cold engine when the new car has driven 1.5 thousand km (after tightening the cylinder head fastening) and subsequently every 15 thousand km, as well as in case of increased noise in the drive. |
| 1. Loosen the fixing nut 8 (see Fig. Engine timing mechanism drive mod. 2106) of the tensioner rod, lightly tapping it with a hammer to eliminate possible “biting” of the rod and use a special wrench to turn the crankshaft 1–1/2 turns in the direction of its rotation. . |
| 2. In this case, the plunger spring acts on the tensioner shoe 6 through the plunger 7 and automatically sets the required chain tension. |
| 3. Upon completion of the adjustment, the fixing nut 8 must be tightened. |
| Engines mod. 331, 3317 and 3313 |
| 4. Loosen the tensioner plunger pressure plate by unscrewing the locking bolt (1) 1/2–2/3 turn. You should not unscrew the locking bolt by an amount greater than the specified amount, as this may cause it to become disconnected from the locking plate and the tensioner plunger will not be fixed in the selected position. This will cause the chain to jump on the sprocket teeth and ultimately cause severe engine failure. Using a special wrench, turn the engine crankshaft 2-3 turns along the direction of rotation and tighten the locking bolt as far as it will go, fixing the new position of the tensioner sprocket. |
Replacing the chain damper VAZ 21214 injector
Remove the cylinder head cover (see here).
On an injection engine, remove the sprocket and chain from the camshaft toe (see here).
Using a 10mm spanner, unscrew the two bolts (of the same length) securing the chain guide to the cylinder head.
The bolt has a cylindrical shank for alignment in the damper hole.
We take out the sedative.
To remove the camshaft drive chain guide on a carburetor engine, loosen the chain tension (see here). Removing the damper mount is similar to the operation shown in Photo 1.
The upper bolt securing the chain guide to the cylinder head is longer than the lower one.
Install the damper in the reverse order.
Video
Greetings, fans of the Niva all-terrain vehicle.
With the onset of cold weather, I began to notice a tinkling or even squealing sound in the engine when starting it, I decided not to pay attention at first, since it only lasted 3-4 seconds. But over time, in good frosts, this sound became more and more prolonged and disappeared as the engine warmed up.
I began to understand that this was a chain tension problem.
The chain is no joke, since it is the engine’s gas distribution mechanism drive and a failure in its settings can lead to serious damage or simply will not increase its service life. Strange noises from the engine compartment, caused by a failed hydraulic chain tensioner, are a common problem for the VAZ 21214.
It would seem like a finely tuned automatic hydraulic system. No periodic adjustments for you, but in winter, when the oil viscosity increases, this tensioner stops working, and at this moment ominous processes occur in the timing system.
Replacing the hydraulic chain tensioner on Nivki New model “Nivki” cutting through domestic roads, better known to us under the names Urban, Bronto, etc. inherited this chain tensioning mechanism from its older brother VAZ 21214, which, in turn, is now proudly called Lada 4x4. But the problem is not as scary as its description. In order to keep the power unit in good condition, it is enough to always keep your finger on its pulse: listen to extraneous sounds, regularly carry out maintenance after 60-100 thousand kilometers and not let the problem take its course. I decided not to tempt fate and bought only the most necessary things at the auto parts store, namely: a mechanical tensioner of the “Pilot” series
Dear readers, I would like to draw your attention to the fact that replacing a used VAZ 21214 hydraulic tensioner with a new one is not the right way out of the current situation. At a minimum, it is necessary to change the timing chain, which is clearly in critical condition, disposable rubber sealing gaskets in the form of rings and oil seals
And, if replacing such a simple device as a hydraulic tensioner does not present any special problems on a VAZ 21214, then as for the timing chain, this is already a reason to contact a car service center, or a good specialist who is ready to replace spare parts and adjust the gas distribution mechanism. I also draw your attention to the front crankshaft oil seal; when carrying out work to replace the timing chain, change the front crankshaft oil seal, since replacing it is not cheap and there is no need to disassemble it all a second time.
I decided to share this knowledge with you, I wish you all the best.
More precisely, there were harbingers. A strange rattling sound after starting the engine began to bother me around the end of winter, but I blamed the starter shield. Then the sound appeared a couple of times while driving around the city at the end of spring, but quickly disappeared. What can happen to an engine that has 68 thousand miles, a hydraulic timing chain tensioner and hydraulic valve compensators? Out of habit, after the 213rd Niva, after 10 thousand miles, I was going to tighten the chain and check the valve clearances, but to my great surprise I did not see the chain tensioner in the engine housing in its normal place. Only the tubes are kind of strange. It turned out that these operations are not required on engine 21214. Those. In general, there is no need to remove the cylinder head cover every 10 thousand kilometers and turn the nuts, setting the required valve clearances to a micrometer, and after one tightening the chain with visual inspection. Here, a cunning hydraulic system invented by smart engineers does everything for us.