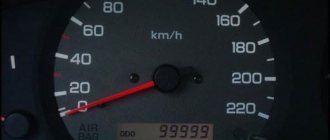
When the speedometer does not work on a VAZ-2112 hatchback, the reasons may be different. Usually they try to repair the tidy, but the speed sensor turns out to be faulty. The ECU detects a malfunction of this sensor with difficulty, and the CHECK lamp does not turn on. The fact that the speed sensor is broken has to be identified by the following signs: idle speed always remains low, and the engine stalls when changing gears. These nuances will be discussed in more detail below, but we will only talk about 16-valve valves.
If all devices do not work, then one fuse is at fault. The video shows which one.
The VAZ 2110 speedometer does not work, what should I do?
The vast majority of VAZ 2110 cars are equipped with electronic odometers. They can disturb their owners with various malfunctions, which, as a rule, manifest themselves in different ways.
A speedometer is one of the main instruments of a car, which is used to measure the speed of a vehicle. Its breakdown, of course, does not lead to serious malfunctions in the operation of the car, but when the speedometer needle jumps from one indicator to another or even hangs at some value, it deprives the driver of the ability to control the speed of the car.
This can lead to both fines and more serious consequences. Therefore, if the VAZ 2110 speedometer does not work, it is necessary to carry out repairs, especially since this process can be quite easy and fast if the cause of the malfunction is correctly identified.
Malfunctions
On VAZ 2110 cars, the speed sensor can fail for several reasons:
- Oxidation of contacts. This is the most minor damage. However, it can cause the needle to drop to zero or jump. To eliminate it, you must thoroughly clean all contacts from dirt;
- Wire chafing. The main sign of this breakdown is that the needle falls or jumps after starting the engine. Such a malfunction is not always detected visually, since in some cases the wire may outwardly appear intact, but in fact has a break. To determine the location of the damage, you need to ring it using a special tester. A broken wire is often the cause of failure of the instrument panel, and in particular the speedometer;
- The sensor has stopped working. In order to make sure that the breakdown is correctly identified, you can take a new speed sensor and connect it. If the speedometer starts working after this, then the conclusion is obvious. Failure of the speed sensor may occur due to the housing not being sealed, as a result of which dirt, dust, and moisture can enter;
- Checking the connectors. In VAZ cars they are located in such a place that they are constantly in contact with dirt and quite often this is the main reason that the speedometer needle jumps or refuses to work at all, showing incorrect vehicle speed values;
- Drive unit. Also, the reason why the needle jumps on the speedometer may be wear of the shaft. With such a malfunction, the VAZ 2110 speedometer drive does not effectively transmit torque. It is worth noting that this is one of the most common reasons why the sensor needle jumps.
If the vehicle speed indicator does not work correctly, before purchasing a new device, you need to check all possible breakdowns and only then think about replacing it.
Replacement features
The speedometer is located on the main instrument panel. And if, after checking all possible reasons why the device does not work, it turns out that all the faults lie in the device itself, then the entire panel will have to be replaced, and not just this individual element.
Today, unfortunately, spare parts for dashboards are not sold and this complicates the entire replacement process. It is worth noting that when installing a new device, you can rewind the mileage indicators.
Replacement
If during diagnostics it was determined that the needle is falling or jumping as a result of a breakdown of the speed sensor itself, it needs to be replaced. This manipulation is quite simple, but still requires certain knowledge and skills from the car owner.
To replace the speed sensor you will need special keys. It is better to carry out manipulation from above the engine. First, you need to disconnect the battery ground and contact chips, then remove the device using a key. If the rod is broken, then you cannot do without removing the drive. Here you need to be especially careful.
If the arrow jumps, lies or freezes, then repairs must be made as soon as possible. It is better to entrust such work to professionals, since without the necessary experience and certain knowledge, replacing a device can be done poorly.
Only professionals at service stations can quickly remove and install new equipment. As a rule, such a procedure does not take much time and its cost is low.
Other deviations
We have discussed the possibility of replacing a device if it is not functioning, but it often happens that the data is displayed on the dashboard incorrectly. For example, a driver drives at the maximum permissible speed limit, but at the same time he constantly receives fines for violations. Of course, you can drive with such a device, roughly focusing on the deviation indicators, but it is best to adjust it.
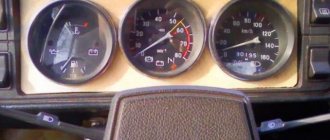
To do this, let's look at the types of speedometers. Mechanical speedometers are installed on 8-valve engines. They are equipped with a carburetor system. Sometimes options for installing additional electronic devices are possible. In these variants, pointer instruments are used; their malfunction can be identified due to deviations. There are three types of deviations:
- The arrow is in position 0;
- The arrow is in one position;
- The arrow constantly changes readings.
If the arrow is at zero, then the previous options can be used for repairs. If the needle readings are unstable, or if it hangs in a chaotic position, there is a possibility that the speed sensor is faulty. In such cases, in addition, the odometer does not work and because of this the driver cannot determine the number of kilometers traveled. In order to understand that the engine is in a faulty state, it is worth monitoring the operation of the engine. If the motor may stall on its own at some points, or its operation is unstable and the engine begins to trip, then this may be the result of a breakdown. Also one of the reasons may be increased gasoline consumption. For more accurate readings, you can run car diagnostics when errors p0501-p0503 are displayed - the reason will lie precisely in the failure of the DS. If the failure of the DS is electrical-related, then a check light will light up on the dashboard.
In this case, you can dismantle the device and use a screwdriver to recreate the rotation of the core. It is necessary to rotate counterclockwise. At the same time, we constantly monitor the readings of the multimeter. The lower voltage should be 1 V, and the upper voltage more than 5. Rotate the wheel, with each rotation the device should display 6 pulses. If the signal appears, but the speedometer of the VAZ-2110 does not work, then the problem may be in the sensor drive. In this case, it would be best to replace it.
On carburetor engines with 8 valves, everything is much simpler. A cable is connected to the gearbox, which controls the position of the arrow. Therefore, to diagnose it, it is enough to disconnect it from the gearbox and look at its integrity. We inspect the end of the cable, and more specifically the tetrahedron. If there is no mechanical damage on it, then everything is intact. After this, we turn the tip and monitor the readings on the dashboard. If this starts to pick up speed, then everything is in order, but if it rotates freely, incorrect readings may occur.
Instrument panel test on video (speedometer self-diagnosis)
There are some things we don't specifically consider.
Power to the circuit shown in the previous chapter comes from main relay 6. It is also called the “ignition relay”. There is also fuse 1 in the circuit.
Additional relay and fuse box
When the ignition circuit is broken, both the speedometer and the ECU module do not work on the VAZ-2112, and the engine does not start at all. So advice about checking the relay would seem stupid.
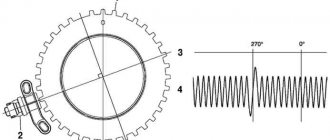
Advice for those who have an oscilloscope
If you still decide to dismantle the sensor, connect a 1 kOhm resistor to its output (to the middle terminal). The resistor tap is connected to the “plus” of the power supply. By turning the shaft by hand, pulses can be observed at terminal 2. There are six pulses per revolution.
Fuses and relays 2112
Fuse number Current strength, A Protected circuits
- F1 5 License plate lamps. Instrument lighting lamps. Side light indicator lamp. Trunk light. Left side marker lamps
- F2 7.5 Left headlight (low beam)
- F3 10 Left headlight (high beam)
- F4 10 Right fog lamp
- F5 30 Electric door window motors
- F6 15 Portable lamp
- F7 20 Electric motor of the engine cooling system fan. Sound signal
- F8 20 Rear window heating element. Relay (contacts) for turning on the heated rear window
- F9 20 Recirculation valve. Windshield and headlight cleaners and washers. Relay (coil) for turning on the rear window heating
- F10 20 Reserve
- F11 5 Right side marker lamps
- F12 7.5 Right headlight (low beam)
- F13 10 Right headlight (high beam). High beam warning lamp
- F14 10 Left fog lamp
- F15 20 Electric seat heating. Trunk lock lock
- F16 10 Relay-breaker for direction indicators and hazard warning lights (in emergency mode). Hazard warning lamp
- F17 7.5 Interior lighting lamp. Individual backlight lamp. Ignition switch illumination lamp. Brake light bulbs. Clock (or trip computer)
- F18 25 Glove box lighting lamp. Heater controller. Cigarette lighter
- F19 10 Door locking. Relay for monitoring the health of brake light lamps and side lights. Direction indicators with warning lamps. Reversing lamps. Generator excitation winding. On-board control system display unit. Instrument cluster. Clock (or trip computer)
- F20 7.5 Rear fog lamps VAZ-2112.
- K1 – lamp health monitoring relay;
- K2 – windshield wiper relay;
- K3 – relay-interrupter for direction indicators and hazard warning lights;
- K4 – headlight low beam relay; K5 – headlight high beam relay;
- K6 – additional relay;
- K7 – relay for turning on the heated rear window;
- K8 – backup car relay.
Speed sensor malfunctions
Signs of a sensor malfunction may include:
- unstable operation and incorrect speedometer and odometer readings;
- cessation of stable engine operation at idle;
- errors generated by the computer (P0500 – no sensor signal, P0503 – intermittent sensor signal).
The problems listed above may result from:
- poor contact in the sensor connector due to contamination;
- violation of the integrity of the wiring from the sensor to the ECU;
- mechanical failure of the DS drive (in older VAZ 2110 models).
Do I need to change
Not only the speedometer and odometer readings, but also the quality of the fuel mixture supplied to the cylinders, the idle speed of the vehicle, engine stability and fuel consumption depend on the information received by the ECU from the sensor.
A failed DS will “confuse” the electronic unit, which simply will not understand whether the car is moving or standing still. As a result, the speed will begin to fluctuate, the engine will stall at idle, and fuel consumption will increase.
Checking a mechanically driven speed sensor is not difficult. On the removed sensor, we find the pin and turn it with pliers, having attached the connector to it in advance. If the speed sensor is working, the arrow on the instrument cluster will jump, if there is no reaction, then there is a problem with the drive or electrical wiring.
Checking the wiring to the instrument cluster is also not difficult, take a paperclip (you can use any other metal object) and insert it into the middle pin on the connector, then touch it to the engine housing, the arrow on the combination should twitch, otherwise you need to look for the cause in a wiring fault or sensor connector (oxidation, breakage, etc.).
Principle of operation
Domestic VAZ-2112 cars with a 16-valve power unit are equipped with an electromechanical speed calculation system. It consists of the following elements.
- The speed sensor is the main element of the circuit. It is an electronic modernized pulse Hall sensor with a rod equipped with a gear.
- Electrical wiring that provides connection between the electric control unit and the on-board computer, fuse box, and instrument panel.
- Electrical fuse and contact relay. Provide protection against voltage surges in the network.
- Electronic drive of the speedometer itself.
The operation of the entire system is ensured as follows:
- An electromechanical speed sensor is installed on the vehicle's gearbox. It is driven by the drive gear of the gearbox. Rotation is transmitted through the EMF driven gear.
- Rotation is converted into electrical impulses. For 1000 revolutions, 6004 pulses are generated.
- Electrical impulses through the wires, or more precisely through the “2” wire of the electrical connector, enter the on-board computer.
- The ECU calculates the received signals, transferring them further along the circuit to the speedometer receiver drive.
- Electrical voltage with a certain current strength acts on the speedometer electric motor, causing it to turn at a certain angle.
This system is as reliable as possible. But, due to some factors, it also fails. The following will describe the symptoms that precede a speedometer malfunction.
Instrument panel test on video (speedometer self-diagnosis)
There are some things we don't specifically consider.
Power to the circuit shown in the previous chapter comes from main relay 6. It is also called the “ignition relay”. There is also fuse 1 in the circuit.
Additional relay and fuse box
When the ignition circuit is broken, both the speedometer and the ECU module do not work on the VAZ-2112, and the engine does not start at all. So advice about checking the relay would seem stupid.
Advice for those who have an oscilloscope
If you still decide to dismantle the sensor, connect a 1 kOhm resistor to its output (to the middle terminal). The resistor tap is connected to the “plus” of the power supply. By turning the shaft by hand, pulses can be observed at terminal 2. There are six pulses per revolution.
labavto.com
The purpose of the speedometer on any car is to demonstrate the speed of the vehicle. Like any other component on domestic cars, this mechanism can fail over time. For what reasons does the speedometer on a VAZ 2110 car not work, how does this manifest itself and how can you diagnose the device - read in this article.
Why the speedometer does not work on a VAZ-2112: the main reasons for a 16 valve engine
When the speedometer does not work on a VAZ-2112 hatchback, the reasons may be different. Usually they try to repair the tidy, but the speed sensor turns out to be faulty. The ECU detects a malfunction of this sensor with difficulty, and the CHECK lamp does not turn on. The fact that the speed sensor is broken has to be identified by the following signs: idle speed always remains low, and the engine stalls when changing gears. These nuances will be discussed in more detail below, but we will only talk about 16-valve valves.
If all devices do not work, then one fuse is at fault. The video shows which one.
Electrical diagram
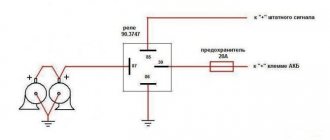
The sensor itself is powered by a voltage of 12 Volts (pink-black cord), and another pin is connected to ground. The gray wire is the sensor output. It is connected to the voltage source through a resistor (see figure).
Typical connection diagram for DS on a VAZ-2112
The diagram shows that the output is connected to the ECU terminal. Terminal number:
- 9 – block January 5.1, also BOSCH M1.5.4N (engine 21120, 1.5 l);
- 59 – BOSCH M7.9.7 module (ICE 21124, 1.6 l).
Another gray cord goes to the “red” block on the dashboard, where it connects to terminal 9.
As you can see, everything is elementary.
Instrument panel test on video (speedometer self-diagnosis)
There are some things we don't specifically consider.
Power to the circuit shown in the previous chapter comes from main relay 6. It is also called the “ignition relay”. There is also fuse 1 in the circuit.
Additional relay and fuse box
When the ignition circuit is broken, both the speedometer and the ECU module do not work on the VAZ-2112, and the engine does not start at all. So advice about checking the relay would seem stupid.
Advice for those who have an oscilloscope
If you still decide to dismantle the sensor, connect a 1 kOhm resistor to its output (to the middle terminal). The resistor tap is connected to the “plus” of the power supply. By turning the shaft by hand, pulses can be observed at terminal 2. There are six pulses per revolution.
Mechanics
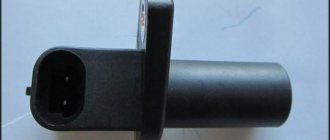
The following diagram shows exactly how the speed sensor is designed.
Speed sensor for VAZ-2112
- 2110-3843010-13 – sensor;
- 2110-3843010-18 – sensor;
- 2108-3802820-10 – speedometer drive;
- 2101-3802718 – gasket;
- 2108-3802822 – drive housing;
- 2108-3802830 – sealing ring;
- 2108-3802834-20 – driven gear;
- 2108-3802833-20 – drive gear;
- 2101-3802717 – washer;
- 15896211 – M6 nut;
- 12601271 – wavy washer;
- 11500121 – pin M6x14.
Elements 1 and 2 are interchangeable.
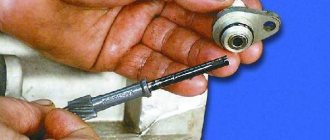
Dismantling
To remove the sensor from the car, you need to disconnect its connector. The sensor housing is fixed near the CV joint - the desired point is shown by an arrow.
First step in dismantling
When the connector is disconnected, take a flat key “22” and unscrew the plastic nut. Then you can change the sensor or repair it.
What you need here is a flat key
To replace the sensor drive, use a “10” key to unscrew the M6 nut and remove it together with the washer. The drive housing is rocked from side to side - you need a 14mm spanner.
Dashboard connectors and speedometer contacts
The dashboard, as well as the speedometer on the VAZ-2112, may not work when they are disconnected from ground or power. Be aware that the speedometer receives power separately from the instrument panel. This also applies to the “mass”. Wiring:
- X2-2: +12V for speedometer;
- X2-3: speedometer “ground”;
- X1-9, X1-10: power supply for tidy;
- X1-1: “mass” of the tidy.
Connector X2 is painted red, X1 – white. Terminals 8 and 9 in connector X2 are the speedometer output and input. The output is connected to the on-board computer.
Both terminals (X1-9 and X2-2) are connected to one wire - orange. This line is protected by a fuse installed in the main mounting block (F19).
How to remove the tidy
First, disconnect the negative terminal of the battery. Then use a screwdriver to unscrew the 4 screws (photos 1 and 2) to remove the frame with glass.
Removing the dashboard
In the second step, unscrew the two screws holding the dashboard in place (photo 3). Next, compress the petal brackets to remove the tidy completely.
- If you connect the battery and turn on the ignition, the orange cord (connectors X1 and X2) should receive voltage “+12”;
- The presence of “ground” at terminal X2-2 is also a very important indicator;
- The gray cord (terminal X2-9) is usually called “+12”, and in rare cases - “ground”. When moving, pulses should appear at this terminal.
Sometimes they do this: they make a tap from terminal 9, and, without engaging the gear, move (push) the car. The engine remains switched off. Pulses will appear on the tap, detectable even with a voltmeter. The voltmeter itself must be a pointer type.
It will not be possible to fix a faulty speedometer - it will be easier to replace it. But first you need to find out exactly what the problem was.
Electrical diagram
The sensor itself is powered by a voltage of 12 Volts (pink-black cord), and another pin is connected to ground. The gray wire is the sensor output. It is connected to the voltage source through a resistor (see figure).
Typical connection diagram for DS on a VAZ-2112.
None The diagram shows that the output is connected to the ECU terminal. Terminal number:
Another gray cord goes to the “red” block on the dashboard, where it connects to terminal 9. As you can see, everything is simple.
Causes of malfunction on a VAZ 2110 with a carburetor
In the “ten” with a carburetor, torque is transmitted from the gear in the gearbox (gearbox) through a flexible shaft to the speedometer mechanism. In most cases, it is the shaft that may be causing the problem.
Flexible drive in the shell is the main cause of speedometer malfunction
If the speedometer stops working, first check the mounting locations of the flexible drive. Tighten the nuts. If even after tightening the speedometer does not work, then the shaft has probably broken or there has been a breakdown in the mechanism on the instrument panel. In this case, the flexible shaft must be replaced. You can do this type of repair yourself. When installing a new drive, avoid extreme bending. Incorrect installation of the shaft will lead to unpleasant knocking.
If everything is in order with the flexible shaft and the instrument panel mechanism, then the problem is in the gear. It is located inside the checkpoint. We recommend that such repairs be carried out at a service station.
Replacement
Now to the question of how to make replacements. To do this, we dismantle the old device and connect a new one in its place. Your steps look like this step by step:
Remove the negative cable from the battery, which will allow you to turn off the power to the car; Now disconnect the wires from the sensor and be sure to remember what form the pinout was in; The device can be dismantled by simply twisting it by hand. There is usually no need to use any tools. But if the device fits tightly, then use 22 or 21 millimeter keys. Depending on the modification of your “ten”, the design of the sensor may differ slightly; At the same time, we recommend checking the wiring; After removing the meter, unscrew the fixing nut that holds the wire going to the gearbox; Remove carefully so as not to drop the rod into the box. If this happens, you will have to completely disassemble the gearbox.
This is clearly not in your best interest; A new device with a rubber ring must be lubricated with transmission fluid so that the fixation in the new place is as reliable as possible; Assembly is performed in reverse order; Pay special attention to the pinout. Connect the multimeter with the ignition on
If the device showed “minus”, then you connected the wire to positive, which is absolutely not allowed. This is why we initially advised using a sensor that is not labeled 1, 2, or 3.
If you couldn’t avoid using a new device with inconvenient markings 1, 2 and 3, then remember an important pinout detail:
- 1 corresponds to “+”;
- 2 denotes signal output;
- 3 is “-“.
>
Speedometer Troubleshooting Options
Failure of the speed sensor is not the only reason for the lack of speedometer readings. The performance of the latter can be affected by a break in the connecting wires or a lack of contact in the terminal block, as well as a breakdown of the indicating device. If, when checking the DS, it turns out to be serviceable, then the search for the defect continues from the block to the speedometer. To ensure the integrity of the line and check the device for functionality, you need to use a test lamp.
To do this, one control wire is connected to the negative terminal of the battery and the ignition is turned on, and the other wire is often touched to contact “A” of the block, creating a kind of impulse. In this case, the speedometer needle should deviate from its original position. If the effect is achieved, then this section of the kit is serviceable, otherwise they begin checking the integrity of the circuit from the block to the fuse and then to the device. If the result is negative, we can talk about a device malfunction.
Replacing the speedometer is carried out with the instrument panel, since the industry does not produce spare parts for its repair. According to statistics, only in 7% of such malfunctions the inoperative element is the indicating device. If the speedometer kit is operational, but signs of malfunction remain, then most likely the drive gear located in the gearbox has broken down. It is recommended that such repairs be carried out at a service station, since it is necessary to dismantle the gearbox and disassemble it.
On the “dozens” of the first releases, speedometer problems can arise as a result of a broken drive cable or if the edges of the tip are “licked”. In this case, the cable is dismantled and replaced with a working one. If the speedometer drive socket is damaged, it must also be replaced.
Preparing for replacement
In order for the procedure for replacing the controller on the tenth VAZ model to proceed correctly and to obtain the expected result, namely the normal functioning of the speedometer, you should be properly prepared for this process.
Firstly, on a VAZ 2110, replacing the DS means purchasing a new controller
When purchasing a new regulator, you need to pay attention to the fact that each connector located in the block design has certain symbols. It should contain the symbols “-”, “A” and “+”, not numbers
In principle, in this case there is not much difference between these options; when connecting the connector you will have fewer problems with pinout. If you have never encountered a process like this, this pinout will allow you to complete it correctly.
Controller connector pinout
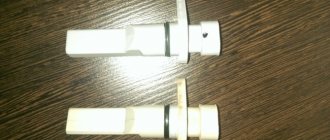
One more, no less important nuance. You need to buy a device that is equipped with a metal rod. This rod will last at least six months, which cannot be said about regulators with plastic rods. In addition, when purchasing, you must check whether the rod rotates or not. It should not rotate, there should be no play on this element, and it should also be equipped with a washer.
Wiring pinout, what to pay special attention to when using a multimeter
Pay attention to the pinout inside the block. With the ignition on, use a multimeter to determine which connector is connected to which wire.
If you connect the wire to the “plus” connector, and the multimeter shows “minus”, then you should urgently change the polarity. Therefore, it is advisable to take a block with the appropriate designations. But if this doesn’t happen, you can take the regular one. In this case, the pinout is as follows - 1 is “+”, 2 is “signal output”, and 3 is “-“.
Speed sensor pinout
If you understand how to connect a speed sensor, you should know that these devices differ in the degree of connection. There is the following pinout of the VAZ 2110 speed sensor, which should be followed
In this case, it is very important to study the circuit diagram of the speed sensor, which is attached to this article
The factory speed sensor of VAZ 2110 cars is manufactured with some differences in connections to the shoe connector. The square-shaped connector is used in Bosh electronics systems. The circle-shaped connector is used in electronic systems such as January 4 and GM.
When connecting a speed sensor, you should choose devices with contact group digitization such as “-”, “A”, “+” (internal designation on the block contacts) instead of digital designations such as “1”, “2”, “3”. In addition, preference should be given to devices with a metal-type rod, since plastic rods are very short-lived.
Having decided to buy a speed sensor for a VAZ 2110, you should check the rod of the device with rotational movements and its backlash, which should be kept to a minimum, as well as the presence of such a part as a spacer washer on the rod of the product.
Pinout DS 2109, 2110, 2112, 2114, 2115
If you understand how to connect the speed sensor, then there is the following pinout that you should follow
At the same time, it is important to understand the essence of the operation of the DS to study the circuit diagram of the sensor, which is attached to this article
The factory speed sensor of VAZ cars is manufactured with some differences in connections to the block connector. The square-shaped connector is used in Bosh electronics systems. The circle-shaped connector is used in electronic systems such as January 4 and GM.
When connecting a sensor, you should choose devices with contact group digitization such as “-”, “A”, “+” (internal designation on the block contacts) instead of digital designations such as “1”, “2”, “3”. In addition, preference should be given to devices with a metal-type rod, since plastic rods are very short-lived.
Causes of speedometer malfunction on VAZ 2110, 2111, 2112
A car's speedometer is an important component of a safe and comfortable trip. Every car owner knows what this device is intended for, but not everyone can immediately figure out the reason why the speedometer stopped working. And this is an unpleasant thing when the speed indicator shows incorrect numbers or has stopped functioning altogether.
There is a high probability of speeding and getting a fine from a traffic police officer. Or not fit into the turn at all. To avoid these unpleasant situations, you should know the principle of operation of the device and the most likely causes leading to its failure.
Reasons why the VAZ 2110, 2111, 2112 speedometer stopped working
The operation of any speedometer is based on the Hall effect. The controller receives data from the speed sensor, which produces a signal proportional to the tire rotation speed. On cars of the “tenth” VAZ family, one of the most common reasons for speedometer failure is contact oxidation. Cleaning them will take about 10-15 minutes; this is the simplest and most effective solution to the problem.
This video describes the reasons why the speedometer on a car does not work:
https://youtube.com/watch?v=qiDmZLUuTMI
But, if this did not help and the speed meter still refuses to work in the VAZ 2110, VAZ 2111, VAZ 2112, then the owners of these cars will have to prepare for more painstaking work. The following possible malfunctions include:
- Deformation of wires in domestic cars is also a common problem. It is necessary to visually check all wires for defects. If nothing was found, to be completely sure, “ring” the wire; the internal conductors may be damaged;
- The fuse should be checked. It may simply simply burn out;
- The problem may be hidden in the speed sensor itself. In VAZ 2110, 2111, 2112 cars, in this case, it is necessary to urgently replace the faulty mechanism. But, first, it’s still worth checking the mechanism for functionality: remove the device from the box and connect a drill to the device. If it is working properly, then torque will be transmitted to the device;
- It is advisable to check the instrument panel for faults. If the instrument panel was removed, then incorrect reinstallation could result in the arrow touching the trim.
These are the most likely reasons that answer the question: why does the speedometer not work? This principle should be observed for both owners of an “injector” engine and owners of a “carburetor”. If, after going through all the procedures, the problem was not detected and solved, then in this case it is necessary to carry out a comprehensive diagnosis of the vehicle.
We are replacing the speed sensor
If the reason turns out to be the sensor, then you can replace it yourself. This can be done with a little experience with the operation of electrical appliances. Procedure:
- Be sure to wear rubber gloves, since de-energizing the on-board system of the machine can cause unpleasant sensations.
- Then you need to detect the sensor. As a rule, on a “tenth” generation car, the mechanism is located between the drive and the tip of the flexible shaft.
- Having found the device, it is necessary to disconnect the block with the wire by removing all spring clips.
- Next, use a 22 key to unscrew the mechanism from the drive.
- At this point the work is almost finished, but only a little remains. Next, the new device is installed. This is done simply, but the main thing is to get the sensor rod into the center of the drive. Then you need to tighten all the components in the reverse order, secure them and begin checking the new mechanism.
Symptoms
When the VAZ-2112 speedometer does not work, the car owner is faced with a number of symptoms that manifest themselves in the performance of the engine. The operation of the injection system requires the simultaneous combination of almost all electronic sensors in the circuit. The ECU calculates the mixture and fuel supply based on many data coming from the electronic components of the machine. Symptoms of a non-working speedometer are as follows:
- Notification of on-board computer errors P0501 - P0503. These errors indicate an increase or decrease in the power of the pulses emanating from the EMF.
- A "Check Engine" alert often comes with these codes. The reason is an incorrect calculation based on incoming signals from the EMF.
- Partial or complete stoppage of the speed meter needle.
- Problems when starting a cold power unit.
- Noticeable loss of power.
- The power unit is unstable, especially when accelerating or shifting into gear.
- There is a noticeable increase in fuel consumption.
If clear signals from the speedometer sensor are lost, the on-board computer incorrectly calculates the required amount of fuel and the proportion of air in it. For this reason, speed stability decreases, consumption increases, and a significant part of the power and dynamics is lost. If the described symptoms appear, the owner can independently diagnose all components of the speed calculation using the instructions below.
What else is the reason for the speedometer not working?
However, often the reason for the speedometer malfunction lies elsewhere:
- Oil and dust get into the speed sensor, which is located in the engine compartment under the hood of the car.
The malfunction is eliminated after removing dirt and oil by washing the sensor. If the DS fails and needs to be replaced, any car owner can perform this simple operation independently.
The replacement sequence is as follows:
- place the machine on a flat horizontal surface;
- open the hood and find the speed sensor on the gearbox;
- by pressing the latch bracket, the plug is disconnected from the DS:
- to remove the sensor, use a 22 mm wrench, turning it counterclockwise;
- The new part is installed by screwing it in by hand. The use of a wrench is not recommended, as you may miscalculate the rotation and break the thread;
- install the connector, as evidenced by the click of the fixed part.
Troubleshooting
To begin troubleshooting the problem, you first need to find the device. From the photo you can determine how the speed sensor on the VAZ 2110 looks externally.
Ears for fastening
As for its location, look in the engine compartment in close proximity to the exhaust manifold. They say frankly that the place where it is installed cannot be called ideal. It's all about the collector. While the car is running, the manifold heats up. The sensor wires rub against it, which over time leads to malfunctions and short circuits.
Therefore, experts recommend that the first step is to properly insulate the wiring, and also use some kind of clamps so that the wires do not come into contact with the collector. This significantly extends its service life.
Having checked the device visually and not determining the presence of breakdowns, this tells us that the element itself is faulty. This problem can be solved by replacing it.
Replacing the speed sensor on cars manufactured before and after 2006
Checking the sensor is described in detail in the article about. First of all, you need to disconnect the negative terminal from the battery. Then disconnect the wiring plug from the electronic speed sensor. To do this, press the wire retainer with your fingers (on some sensor models the retainer is plastic) and pull the plug up.
On 16-valve engines, you need to squeeze two clamps on top of the plug. After this, you need to unscrew the speed sensor. To do this on most cars, finger pressure is sufficient. If it doesn’t work with your fingers, you will have to unscrew it with a 21 key. After that, if necessary, with a 10 key, unscrew one bolt securing the sensor drive and pull it out of the gearbox. Install a new sensor or actuator in the reverse order.
For those released after 2006
On cars manufactured after 2006, there is no mechanical drive from the gearbox, which is why they use a different method of mounting the sensor. The sensor itself is installed there. First of all, disconnect the negative terminal from the battery. After this, unscrew the clamps of the air pipe, which goes from the filter to the throttle valve. If you do not remove the pipe, it is very difficult to get to the sensor. Then disconnect the plug from the sensor by squeezing the wire or plastic retainer. The wires are put aside and using a 10mm wrench (it’s easier to do this operation using a ratchet with a small extension) unscrew the sensor mounting bolt. After this, the sensor is pulled out of the gearbox. Installation is carried out in reverse order.
The main reason why the speedometer on a VAZ 2110-2112 may fail is a breakdown of the speed sensor. Moreover, the speedometer needle may not only simply refuse to work, but also jump within unacceptable limits, regardless of speed.
Dismantling
To remove the sensor from the car, you need to disconnect its connector. The sensor housing is fixed near the CV joint - the desired point is shown by an arrow. When the connector is disconnected, take a flat key “22” and unscrew the plastic nut. Then you can change the sensor or repair it.
What you need here is a flat wrench. To replace the sensor drive, use a “10” wrench to unscrew the M6 nut and remove it together with the washer. The drive housing is rocked from side to side - you need a 14mm spanner.
Installation requirements: on the one hand, it is necessary to obtain a tight seal, on the other hand, the plastic must not be broken.
Expert recommendations
Driving with a faulty speedometer poses a danger both to others and to the car owner himself. When a problem is discovered, it should be corrected immediately. If the driver himself is unable to do this, he will have to take the car for repair to a specialized service center or service station.
But most problems are fairly easy to repair with your own hands. If suddenly the speedometer no longer displays the correct data, then you should not panic.
It usually happens that the breakdown consists of faulty wiring, oxidation of contacts and other easily correctable disturbances in the transmission of electrical signals. It is not difficult to detect such a breakdown; it is enough to carry out a visual inspection, during which the cause of the malfunction will immediately become obvious. Then you can fix the breakdown on the VAZ 2110 with your own hands - it won’t be difficult.
Contamination of the controller can also cause a malfunction. You need to remove it and clean it, and then install it back. Often this procedure is enough to make repairs when the speedometer on a VAZ 2110 car stops working.
The proper operation of the speedometer is important while driving, and many repair methods are simple and accessible to most drivers
Therefore, you should not delay the diagnosis and repair of this important device.
Useful video:
Wiring
First of all, they check the pads - dirt, grease and soot get on them, and this is enough for the device in question to stop functioning.
Review all contacts carefully. If necessary, clean them with a regular stationery eraser until they shine. Gently tug the wires - one of them may have come off.
Make sure all fuses in your 2110 are intact.
When this does not help, test the wires with a tester. After detecting a break, replace the unusable wire with a whole one - do not try to repair it, as twists increase the resistance, which puts a greater load on the electrical system of the machine.
You should also not particularly trust insulating tape - it can come off due to vibration or cold and cease to perform its insulating function. Accordingly, the exposed wire will probably close at the first opportunity.
What else is the reason for the speedometer not working?
However, often the reason for the speedometer malfunction lies elsewhere:
- Oil and dust get into the speed sensor, which is located in the engine compartment under the hood of the car.
The malfunction is eliminated after removing dirt and oil by washing the sensor. If the DS fails and needs to be replaced, any car owner can perform this simple operation independently. The replacement sequence is as follows:
- place the machine on a flat horizontal surface;
- open the hood and find the speed sensor on the gearbox;
- by pressing the latch bracket, the plug is disconnected from the DS:
- to remove the sensor, use a 22 mm wrench, turning it counterclockwise;
- The new part is installed by screwing it in by hand. The use of a wrench is not recommended, as you may miscalculate the rotation and break the thread;
- install the connector, as evidenced by the click of the fixed part.
The driver should buy a new DS with similar markings. Otherwise, the speedometer needle will display incorrect readings.
- For some unknown reason, the VAZ 2110 speedometer stopped working. First of all, you need to check the most accessible elements associated with the speedometer. Since the car compartments are not ideally clean, dirt and moisture can damage any part, including wires and contacts.
Under the influence of moisture and dirt, wires and contacts can oxidize. Eliminating this cause is simple: the contacts must be removed, cleaned of oxidized deposits, wiped dry and reinstalled. It is also necessary to check the integrity of the wires.
Externally good wires may have broken sections of cores inside. Checking the serviceability of the wires involves ringing their surface with a tester.
During operation, the splines and elements that rotate the speedometer cable may be damaged. Such a defect may impair the operation of the instrument panel. You can verify its serviceability by testing it.
- The third, very important defect is the malfunction of the speed sensor. This device is located on the gearbox, adjacent to the exhaust manifold. This factor leads to heating and chafing of the DC wires.
The reasons for the sensor being out of working condition, the fault can be determined at the service center. The technician will perform this procedure in the presence of the car owner. To troubleshoot the problem yourself, you should do the following:
- The speed sensor must be removed by unscrewing it from the gearbox;
- connect the DC wire to a screwdriver or drill, set the rotation counterclockwise;
- turn on the ignition.
The movement of the arrow indicates that the sensor is working properly. The weak link is most likely located in the vehicle's transmission. It is difficult for a driver without experience to cope with this task.
In this case, the problem must be solved by car service specialists. If the speedometer needle on a VAZ 2110 does not work, the speed sensor must be replaced.
The speedometer on a VAZ 2110 with an injector is an important element of any car, not excluding the “top ten”. VAZ 2110 drivers even with little experience can check and find the source of the malfunction of this device.
However, if you cannot determine the source of the speedometer problems, you need to draw the attention of technical service specialists to this problem.
As you know, devices installed in a car allow you to monitor the situation while driving on the streets and monitor the operation of the engine and all other systems. Among others, the speedometer occupies a special place. It is located on the dashboard directly above the steering wheel. With its help, the driver finds out at what speed the car is moving.
In a situation when the speedometer and the injector installed on the VAZ-2110 do not work properly, the person behind the wheel puts both his own health and the lives of passengers at risk. At the same time, he can easily “earn” a fine from a traffic police officer for speeding too high. Thus, a working speedometer allows you to avoid a considerable amount of trouble.
Examination
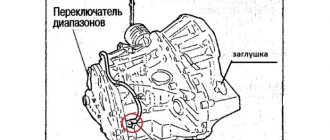
The speedometer on a VAZ-2112 car does not work for reasons related to the mechanical and electronic parts of the speed calculation system. All elements must be checked one by one.
Safety relay
This electronic element is located in the safety block under number “6”. Responsible for the secondary power supply of the ignition system, or rather passive electrical devices (panel, interior lamps, radio, speedometer, tachometer).
To check this relay, you must:
- Switch the tester to constant voltage test mode.
- Turn on the ignition.
- Find fuse "F19".
- Connect the red test lead to the top contact of the fuse.
- Connect the black test probe to ground.
The tester should show a voltage equal to the battery charge. At least 11 volts. Often, when this relay fails, the on-board electrical power is turned off. This test only helps to test the integrity of the contact between the relay and the fuse.
Fuse
This fusible element is located in the safety block marked “F19”. To check, you need to remove the part and inspect it visually. It is also worth inspecting its landing site. Both contacts must be cleaned of dirt and oxidation. It is worth paying special attention to the presence of burnt contacts and melted body of the unit. Voltage drop is not the only reason for fuses to fail. Heating as a result of poor contact leads to melting of the housing, contacts, and fuse mounting location. If a visual inspection of the fuse does not produce results, it must be tested with a multimeter. To do this, connect the measuring probes to the contacts of the element, and switch the device to the continuity mode. The absence of an audible warning will indicate a malfunction. The protective fuse will have to be replaced with a 10 A analogue.
It is not recommended to insert analogs of a lower or higher value instead of a protective element. It is also prohibited to use wire, coins, or any foreign metal objects. They will not protect against overload.
Speed sensor
This node is checked in several stages. Initially, you need to disconnect the power plug of this unit in order to check the integrity of the contacts. Any oxidation, dirt or moisture found must be cleaned with a solvent.
The following is a performance test:
- The car is raised on a jack.
- A wire is drawn from the battery, which is connected at one end to the “+” terminal on the battery, and at the other to the “1” terminal of the sensor.
- The second wire is connected at one end to the “ground” or “-” of the battery, and the other to terminal “3” of the EMF.
- The tester switches to DC voltage measurement mode.
- The red test lead is connected to terminal “2” of the sensor.
- Black test lead with ground.
- Next you need to turn the drive wheel of the car.
The tester should output pulsed voltage data up to 12 volts. The number of pulses should increase as the number of revolutions of the drive wheel increases. If there are pulses, then the sensor can be recognized as working. If they are not there, then the mechanism requires dismantling.
In order to dismantle the part you will need a key “22”. With its help, being careful, you need to unscrew the EMF from the installation site. The part has a plastic case and can be easily damaged with a key. The dismantled mechanism must be inspected.
- There should be no cracks or chips on the body. The presence of defects can cause a short circuit to the housing. If such damage occurs, the part requires replacement. Solving the problem with sealant, insulating tape, or glue is prohibited. High revs will destroy these compounds.
- The rod should not have any backlash, distortion, or bending. Such malfunctions cannot be eliminated, since it will not be possible to achieve ideal direction. The EDS will have to be replaced.
- The most important mechanical part is the driven gear. The presence of broken, worn, or bent teeth will indicate a malfunction with subsequent replacement of the rod and gear as a set.
- If the sensor is fully operational, you need to check the integrity of the drive gear. To do this, you will have to spin the drive wheel of the car. You need to turn the wheel slowly in order to examine in detail all the teeth of this part. The presence of chips or wear will indicate a violation of integrity. Repairing the gearbox will help solve the problem. Perhaps the condition of the gear was affected by foreign solid objects in the manual transmission housing, broken teeth or parts of other mechanisms.