Hello, in this article you will learn how to replace the fuel pump on a VAZ 2101, 2102, 2103, 2104, 2105, 2106, 2107. Carburetor cars have a mechanical gasoline pump, so if something breaks in it, it’s most likely from wear of parts. There are repair kits for sale for the fuel pump; you can, of course, use them, but it is better to buy a new fuel pump, because... it is not that expensive, about 600 rubles. To replace the fuel pump you will need: a Phillips screwdriver or a 8-mm wrench, a 13-mm socket or wrench.
First of all, prepare a bottle to catch the gasoline that will flow out of the fuel hoses, or M8 bolts with which you can tightly plug the hoses. Next, unscrew the hose clamps with a Phillips screwdriver (or a wrench and pull off the hoses
The next step is to use a 13 mm socket to unscrew the 2 bolts that secure the fuel pump.
Then remove the gasket and heat-insulating spacer
If the gasket is in a very worn condition, it should be replaced. Installing a new fuel pump is done in the reverse order. The main thing is that after assembly, start the car and inspect the fuel pump for gasoline leaks; if there are any, then the cause of the leaks must be immediately eliminated.
During the operation of the VAZ 2107, owners are faced with a situation where the fuel pump is not functioning properly. This is a device through which gasoline is pumped from the gas tank to the carburetor. One of the important parts of the VAZ 2107 fuel pump that fails is the rod. Let's look at the design features of this product, and also find out why the fuel pump rod fails.
A little about the design of the fuel pump
The VAZ 2101 fuel pump housing consists of two halves. On the bottom there is a diaphragm drive lever. There are two small valves in the top cover - inlet and outlet. By the way, they are included in the repair kit. But it is better not to use it, since the effectiveness of replacing several components and gaskets is extremely low. As practice shows, even highly professional repairs will not give good results.
The fuel pump will still not work as it should. And if you think that the electric fuel pump on the VAZ 2101 can save the situation, then you are mistaken. These are unnecessary problems that you simply don't need. Such a fuel pump must be installed if an engine with a two- or seven-wheel drive (injection) is being installed. In all other cases, it is useless to do this - there are a lot of costs, there is no effect.
Therefore, the only right solution is to completely replace the VAZ 2101 fuel pump. Its price in stores is 450-500 rubles, no more. The repair kit is cheaper, but the guarantee that it will pump the pump is small. But if you install a new one, the problem will disappear for several years. According to reviews from car owners, the most reliable fuel pumps for the VAZ 2101 are those produced by DAAZ. But it is worth noting that Pekar and Weber are also praised by drivers. True, it doesn’t happen every once in a while, sometimes a true G (marriage, in the sense) comes across. With repair kits the situation is even worse.
And if there is a chance to purchase a low-quality fuel pump, but it is small, then you can buy a repair kit of a very low grade. From my own experience, I will say that I personally purchased kits in which the valves either did not fit into their grooves at all, or fell into them like a spoon in a mug. I don’t know, it’s quite possible that fate doesn’t like me very much, but this happened not only to me. Therefore, I decided that the best way to repair the VAZ 2101 fuel pump is to purchase a new one. And install a new rod. And gaskets.
Purpose of the timing belt
An internal combustion engine is a complex system that consists of hundreds of parts and several more or less independent mechanisms. And the engine will only function normally if its mechanisms, assemblies and systems work in harmony. This quality - consistency of operation - is of decisive importance for the engine. For example, a certain position of the pistons corresponds to a strictly defined position of the valves, and if this condition is not met, the engine simply will not work.
Therefore, in internal combustion engines there is an urgent task of synchronizing and coordinating the operation of several systems. In modern engines, this problem is solved using several drives - a gas distribution mechanism drive, a generator, a water pump, an ignition distributor, a fuel pump, etc. But the most important thing is the timing drive, which is necessarily present in all types of engines.
- 1,050 rub.
- 350 rub.
- RUB 3,785
- RUB 1,190
- 415 rub.
- 300 rub.
- RUB 2,070
- RUB 3,350
- RUB 1,135
The engines of VAZ passenger cars initially used a timing drive, implemented using a metal chain that connected the crankshaft gear to the timing shaft gear and some other units. However, later VAZ designers abandoned the use of a chain, preferring a simpler, more reliable and modern solution - a rubber timing belt.
The timing belt in VAZ engines solves several problems at once:
- Transmission of torque from the engine crankshaft to the shaft (or shafts, if there are two) of the gas distribution mechanism;
- Transmission of torque to auxiliary units, primarily to the water pump of the engine cooling system;
- Ensuring synchronous operation of the crankshaft and timing gear;
- Preventing mismatch between the operation of the crankshaft and timing gear in all engine operating modes.
It should be noted that in VAZ cars the timing belt serves to drive the camshafts and water pump. This belt could, in principle, rotate the generator and other mechanisms, but VAZ designers abandoned this idea. Why? Because in this case, a broken belt or jamming of any of the units would immediately disable the entire engine, so it is more reliable and safer to make a separate drive for some units. And a breakdown of the water pump will not stop the engine immediately, so combining the drive of this unit with the timing drive does not pose a potential danger.
VAZ cars use several types of timing belts, which differ in characteristics and design.
Symptoms that clearly indicate a faulty pump and rod
The main sign of a faulty fuel pump is that the engine begins to stall at high temperatures, and after stopping it does not start. It sits for a while, cools down, and only then is it possible to start the engine. Of course, another breakdown has a similar symptom - a violation of valve adjustment. Only in this case does it feel as if the engine is trying with all its might to pull the car, but cannot, it is beyond its capabilities. And when the fuel pump starts to malfunction, the engine simply stalls.
The reason for this is excessive heating. As we said, the VAZ 2101 fuel pump consists of two valves. Well, one or both became warped due to heating and stopped opening. Cool them slightly and you can continue moving. Remember how often you saw a wet rag thrown over a gas pump? Now you know what purpose this is for.
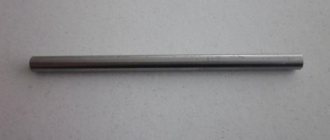
But there is also a VAZ 2101 fuel pump rod, a truly wonderful contraption. It is made of steel. And if in the Soviet years it was hardened, now no one needs it. The price of the stock is at least 25 rubles. Well, who will spend kilowatts of energy on a part whose final cost is 25 rubles? Nobody! What happens then? But an unpleasant picture emerges - the fuel pump lever simply erases the rod, reducing its length.
And if you have gaskets under the fuel pump housing, then you are just lucky! When you pull one out, the rod will protrude from the insert more. And that’s it, the pump will continue to pump gasoline normally. But what if there are no gaskets? Who knows what could happen, for example, they forgot to put them on? And that’s why the rod was worn out. What to do then? Try taking it out and inserting it the other way. You know, this action helped several times.
A sign that the fuel pump rod has worn out is that the car accelerates to a certain speed. I had such a thing that I drove around the city normally, but as soon as I got on the highway, my maximum speed was 90 km/h, and that’s all. You step on the gas, but the engine stalls, it doesn’t have enough gasoline. I released the pedal a little - it drives calmly and shows no signs of breakdown. Moreover, a pump rod malfunction cannot always be detected when driving around the city or at idle speed. A short-term increase in engine speed will not give the same effect as long-term driving at high speed.
Replacing the fuel pump rod
So, you need two gaskets to replace - thin and thick. To be honest, I don’t remember the exact thickness, but if you say so in a store, the seller will understand you. The fact is that there are usually no other gaskets available J. The main thing is to ensure that the new rod protrudes beyond the spacer by no more than 1.3 mm. But it is unacceptable for the protrusion of the rod to be less than 0.8 mm. Take the average value - one millimeter. This will be quite enough for the normal operation of the fuel system.
The fact is that with a larger rod overhang, the likelihood that the diaphragm in the VAZ 2101 fuel pump will break increases. Well, if the protrusion is smaller than 0.8 millimeters, then all the symptoms described above will appear. Please note that the gaskets are placed between the spacer and the engine block. There is no need to install them under the fuel pump housing. You can easily confuse them; they will easily fit there too.
That’s probably all that can be said about the VAZ 2101 fuel pump rod. All that remains is to mention a few words about increasing reliability. Before installation, heat it red-hot over a fire, this will slightly increase the strength of the metal and make it not so sensitive to the influence of the diaphragm drive lever.
How to check the performance of the fuel pump without removing it?
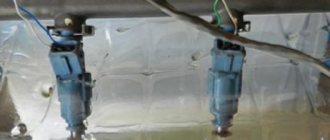
First of all, you need to carefully inspect the fuel pump. Particular attention should be paid to the fit of the cover 4 to the body 3. The skew of the cover, its weak tightening, and an incorrectly installed nylon mesh filter 2, which also serves as a sealing gasket, contribute to the leakage of gasoline in the connector of the cover and the body or in the mating of the cover and the bolt 5 of its fastening.
Fuel may also leak through the outer spacer 1. This occurs when the working diaphragms 8 are damaged. If the screws 7 securing the housing to the bottom cover are loosened, air may leak into the vacuum cavity, and therefore the fuel pump will work intermittently, supplying fuel to the mixture with air.
If you find traces of oil leakage, check first of all that the fuel pump is securely attached to the cylinder block, and then determine the condition of the sealing heat-insulating gaskets. The fact is that oil often leaks in these places when the seal is broken.
Without removing the fuel pump, you can check its functionality. To do this, simply disconnect the fuel line coming from the carburetor and, using the manual pumping lever, check the strength of the fuel supply. Remember that manual pumping is impossible if pusher 1 (Fig. below) is at the top of eccentric 2, and the diaphragm rod is correspondingly in its lowest position.
Fuel pump pusher position
In this case, you need to use the starting handle to turn the engine crankshaft just one revolution. This will allow the eccentric and the rod to take a position in which the manual fuel pumping mechanism will be operational.
A working fuel pump delivers gasoline in a full pulsating stream without noticeable air. To be more confident, you can check the operation of the fuel pump using a mechanical drive by turning the engine crankshaft with the starter. At the same time, you should not be embarrassed by the fact that a stream of gasoline will not appear from the first revolutions.
If you suspect a malfunction of the internal elements of the fuel pump, it is, of course, necessary to remove it, disassemble it and eliminate the defects.
When is it necessary to change the gas tank of a VAZ 2107
As stated above, there are two reasons for replacing and repairing the fuel tank:
- Corrosion. Rust particles can get into the engine along with the fuel and damage the mirror-like walls of the cylinders, and through corrosion of the tank leads to fuel leakage, which is very costly and unsafe. A leak can be noticed by the strong smell of gasoline, increased consumption and a drop in fuel level while parked.
- Deformation of the walls, making it difficult to supply fuel to the engine.
It is also useful to periodically remove the VAZ 2107 gas tank to rinse from dirt and drain condensate. It is advisable to carry out this operation once every 3 years. After removing the fuel tank of the VAZ 2107 and washing it, you must thoroughly drain the sediment and rinse it with clean gasoline.
Sometimes it is necessary to remove the fuel tank to gain access to body parts during welding or other body work.
Removing and installing the fuel pump
Removing and installing the fuel pump is a simple operation. The fuel pump, together with the gaskets, is mounted on two studs and secured with nuts, which must be unscrewed with a 13 mm wrench. To remove the fuel pump, you need to disconnect the supply and discharge fuel lines, unscrew the fuel pump mounting nuts, remove the spring washers, and then the fuel pump itself.
When removing it, be careful, as you can damage the thin gasket, which often sticks to both the pump and the thick heat-insulating gasket. The thermal insulation gasket itself, as a rule, can be easily removed by hand without the use of any tools. In the worst case, make it easier to remove by lightly tapping it with the handle of a screwdriver. Do not forget also that under the thick thermal insulation gasket there is another thin installation gasket, which is also a sealing gasket.
Installing a repaired fuel pump has its own characteristics. First of all, install a sealing gasket A with a thickness of 0.70-0.80 mm, and then a heat-insulating one. Next, install a thin gasket B with a thickness of 0.27–0.33 mm.
With such a set of gaskets between the fuel pump body and the cylinder block, the minimum output of the pusher (its inner end touches the back of the cam) should be in the range of 0.8-1.3 mm. This dimension (d) can be easily checked by installing spacers and a pusher (rod). If the pusher protrudes from the gaskets by an amount less than 0.8 mm, then gasket A is replaced with gasket B with a thickness of 0.27-0.33 mm.
In the case where the pusher protrudes more than 1.3 mm, instead of gasket A, it is necessary to install a thicker gasket type C with a thickness of 1.20-1.30 mm. It should be clarified that a gasket with a thickness of 0.27-0.33 mm should always be installed between the fuel pump body and the heat-insulating gasket.
Having thus established the normal position of the pusher, the fuel pump is strengthened, the nuts are tightened, the fuel lines are connected and the engine is started.
With the engine running, make sure there are no fuel leaks. If the engine continues to operate normally after 1 - 2 minutes, without interruptions, then the operation was performed well.
Once the fuel pump has been removed and, moreover, disassembled, it is possible to perform a whole series of other works, such as checking the operation of the intake valve and diaphragm using the method already described for the carburetor cover shut-off needle, i.e. if the fuel pump provides the necessary vacuum for fuel intake, then your tongue or finger applied to the suction pipe during test pumping should feel it.
Disassembly and repair of the fuel pump
Before disassembling, it is necessary to thoroughly rinse the fuel pump, for which you can use the gasoline in its cavity. It is best to start disassembly with the top cover 4, screwed with a bolt 5 with an 8 mm socket head. Under the lid there is a nylon mesh filter.
Let us remind you that the deformed cover and the broken filter must be replaced with new ones. Under the strainer in the fuel pump housing you will see a pressed and rolled suction valve 6. There are cases when, due to valve failure, you have to replace the entire fuel pump housing since the valves are not supplied separately as spare parts, and replacing them at home is quite difficult .
To remove the fuel pump housing, you need to unscrew six screws 7 with a screwdriver. Before separating the housing from the bottom cover, try to replace their relative positions. This will come in handy during assembly.
The discharge valve is pressed and rolled on the inside of the removed housing. Wash the housing thoroughly in clean unleaded gasoline.
Remember that even the smallest grains of sand trapped between the valve and the seat disrupt the tightness of the valves, which leads to failure of the fuel pump.
Using a thin screwdriver or a match, you can check the mobility of the valves and the tightness of their fit to the seat under the action of the springs. If you can check the operation of the suction valve again on the assembled fuel pump, then the operation of the discharge valve can only be checked now, with the pump disassembled. When blowing air into the discharge pipe, monitor the behavior of the valve, which should sit in the seat and not allow air to pass through.
Theory
The fuel pump, mechanically driven by the camshaft (or by changing the pressure in the push-pull crank chamber), moves a lever connected to the pump diaphragm. The diaphragm, moving down, sucks fuel from the tank through the valve, after which the spring returns the diaphragm to its original position, as a result of which the sucked fuel is pushed through the second valve into the carburetor.
Thus, the suction stroke of the pump is determined by the movement of the lever driven by the cam, while the discharge stroke is determined by the spring compressed during suction. These types of pumps are also equipped with a lever for manual pumping, for example after a long stop and fuel has leaked from the pump. To avoid having to crank the starter for a long time, simply use the lever and prime the carburetor float chamber by hand.
Typically, the fuel pump sump is equipped with a simple fuel filter - a dense mesh built into the top of the suction channel. The gasoline, before it enters the valve, is in a sump and only when it reaches the overflow level does it enter the suction valve channel. This pump design allows thicker impurities to settle at the bottom of the sump, and smaller ones to settle on the pump filter. However, this type of filter is often insufficient, so it is worth installing a flow-through filter on the hose and forget about problems with dirty fuel.
The second option differs in that the unregulated pressure control valve remains in the open position, which causes the pump chamber to become leaky; in order for the controller to start the pumping process, it must close the valve by controlling it.
Only when the chamber is sealed does the pressure increase due to the decrease in chamber volume. Fuel will flow to the high pressure side when the exhaust valve opens, and this occurs when the pressure in the chamber is higher than the main pressure. When during the pressing phase we reach the appropriate pressure in the main line, the controller turns off the flow control valve, which causes the chamber to unseal and thus ends the pressing process and the fuel from the chamber flows to the low pressure side.
The pressure then drops and the outlet valve closes due to the pressure difference. This concept also allows only the required amount of fuel to be compressed, although from the control side it is clear that the opposite is true. This concept is also rectangular in shape, and its frequency is equal to the stroke frequency of the piston, and a decrease in duty cycle under conditions of increasing rotation speed does not necessarily mean a decrease in pump flow, since the piston travels the same path, albeit in a shorter time.
What fuel pumps were equipped with classic VAZ models?
Classic VAZs include all models of the Zhiguli family, produced from 1970 to 2012 and their modifications:
- VAZ 2101;
- VAZ 2102;
- VAZ 2103;
- VAZ 2104;
- VAZ 2105;
- VAZ 2106;
- VAZ 2107.
Depending on the year of manufacture, the engines of these vehicles were equipped with different fuel systems. In all the first Zhiguli models, the fuel mixture was injected into the cylinders using a carburetor, and the fuel was supplied by a mechanical fuel pump. The latest modifications of the VAZ 2104, 2105 and 2107 had an injection system and an electric fuel pump.
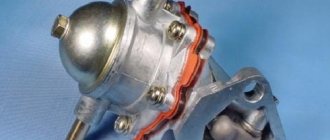
Carburetor cars of the Zhiguli family were equipped from the factory with mechanical fuel pumps of the diaphragm type DAAZ 2101 (catalog number 1106010) produced by the Dimitrovgrad Automotive Unit Plant. Thanks to their simple design, reliability and maintainability, they have proven themselves well not only on the “classics”, but also on cars of the Sputnik and Samara families, which were equipped with their modified versions.
Carburetor VAZ 2101–2107 were equipped with DAAZ mechanical fuel pumps
Injection Zhiguli models were equipped with domestically produced electric fuel pumps. They were produced by the Pekar and Utes enterprises under catalog number 21073–1139009. The latest modifications of the Zhiguli were equipped with products (catalog number 2112–1139009). The same devices were installed on all models of the Samara and Lada families.
Injection models of classic VAZs were equipped with electric fuel pumps “Pekar”, “Utes”, “Bosch”
Diagnostics
The primary conclusion whether the fuel pump is working or not can be assessed by ear when the ignition is turned on. If you can’t hear a quiet buzzing sound from behind, then you need to check the voltage supply to the gas tank block and later draw a conclusion about its malfunction.
Add to the group on VK https://vk.com/autovaz2107 Donation to pay for the web: WEBMONEY- R394885703159 YANDEX.
You can check the serviceability of the fuel pump using the MTL-2 pressure gauge; this is the most correct way. You can somewhat roughly estimate the pressure using air pressure gauges to check tire pressure. To do this, screw a rubber hose to the sensor and connect it to the fuel system.
The pressure of the VAZ 2107 injector fuel pump when the ignition is on should be 4.0 atmospheres, and when the ignition is running 2.8-3.2. In reality, the pump pressure is different and was slightly less, but this may be an error in the pressure gauge.
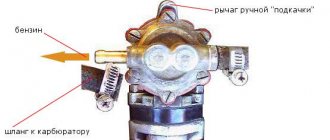
The carburetor pump is checked by setting the camshaft position by cranking the engine so as to ensure free movement of the pump foot. The hose is unscrewed from the carburetor or filter and the presence of fuel supply is determined by pressing the foot.
Where is the fuel pump located on 2106, 2107 and other models
The location of the fuel pump on carburetor and injection classic VAZs is different. In the first, it is installed on the left (as viewed from the passenger compartment) on the engine cylinder block on a special boss, and is attached to it using studs through a heat-dissipating ebonite spacer. The mechanical fuel pump is driven from the engine intermediate shaft through an eccentric and a pusher (rod).
The mechanical fuel pump on the classic is mounted on a special boss on the engine cylinder block
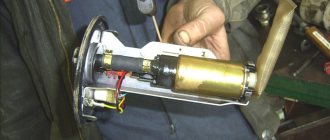
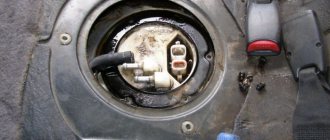
In injection Zhiguli cars, the pump is included in the design of the fuel module. It is located inside the gas tank. The design of an electric pump consists of a DC electric motor and a specially shaped impeller mounted on its shaft. The electric motor is powered from the vehicle's on-board network. The electrical circuit of the device is protected by a separate fuse and relay.
The electric fuel pump on injection classic models is installed in the gas tank
Checking, repairing and replacing a mechanical fuel pump
Methods for diagnosing fuel pumps for carburetor and injection engines of Zhiguli are also different. Checking a mechanical pump consists of determining its performance, as well as assessing the condition and performance of its component elements.
How to check the performance of a mechanical fuel pump
The productivity of the DAAZ mechanical pump is 1 liter per minute. To check the amount of pumped fuel you will need:
- a piece of gas-resistant hose (50–80 cm);
- 2 clean containers with a volume of at least 2 liters (plastic bottles are acceptable);
- 1.5 liters of gasoline;
- watch with stopwatch;
- crosshead screwdriver;
- assistant.
- Using a screwdriver, unscrew the screw on the clamp of the pump outlet fitting. We remove the hose from it.
Remove the fuel hose from the outlet fitting
We estimate the amount of fuel pumped by the pump per minute
If the amount of gasoline is less than 1 liter, the fuel pump is faulty.
Assessment of the condition and performance of component parts
The following pump elements must be checked:
- intake and exhaust valves;
- mesh filter;
- diaphragms;
- pusher (rod).
Design of the DAAZ fuel pump
- crosshead screwdriver;
- slotted screwdriver;
- key to 10;
- key to 13;
- caliper or ruler.
- Loosen the screws of the clamps of the inlet and outlet fittings of the pump, remove the hoses from them. We place a finger on the outlet fitting, and with the other hand we press the manual pumping lever several times. You should feel the air escaping under pressure with your finger. Next, plug the inlet fitting with your finger and pump it up manually again. A vacuum should be felt at the pump inlet, i.e. the finger should be sucked inside the fitting. If nothing like this happens, the valves of the device are faulty and must be replaced.
Checking the valves consists of determining the air pressure at the outlet fitting and the vacuum at the intake
The mesh filter should not show signs of damage or deformation
If the pump diaphragms are damaged or deformed, they must be replaced.
Removing the pump thermal spacer
The length of the pusher should be 82.5 mm
Do-it-yourself repair of a mechanical fuel pump
It is not advisable to purchase faulty fuel pump parts separately. It is much more profitable to purchase a repair kit, which includes elements that may fail, namely:
- valves;
- set of diaphragms;
- pusher;
- thermal spacer;
- gaskets and washers.
Diagnostics and replacement of the electric fuel pump on cars of the Zhiguli family
In injection engines of classic VAZs, the fuel pump may lose its functionality both due to problems with the power supply to it and due to a malfunction of its electric motor. In the first case, the situation can be corrected by diagnosing and repairing the electrical circuit of the device. But if the electric motor of the pump fails, only replacing it will help.
Checking the protection devices for the electrical circuit of the fuel pump on injection VAZs of the Zhiguli family
If there is a problem with the electrical equipment of the fuel pump circuit, it usually does not turn on at all. Turn on the car's ignition without starting the engine and listen. First, you should hear a click from the relay, and then a characteristic “squeal” emitted by the pump’s electric motor. If you don’t hear anything like this, start diagnosing with the electrical circuit of the device.
The pump circuit is connected to the on-board network via a separate relay, and its protection is provided by a fuse. Both of these devices are located in the vehicle's optional mounting block. You will find it under the glove box. It contains 3 relays and 3 fuses. The fuel pump relay (indicated R2 in the diagram) is located in the middle, and the fuse (F3) is to the left of it. We pull the fuse out of its seat and check it by “ringing” it with a tester. If a malfunction is detected, we replace it, not forgetting to comply with the rating (15 A).
You can check the functionality of the relay by installing a known working device in its place. Instead, replace it with the relay located to the right of the one being diagnosed, which is responsible for the radiator fan circuit. If this option does not suit you, turn on the ignition and measure the voltage between the pink wire going to the relay and the vehicle ground. The device should show 12 V. This means that the device is powered. After this, you need to connect the pink wire with the gray one at the relay terminals. So we will connect the fuel pump directly to the battery. If it works (that same “squealing” sound will be heard), simply replace the relay.
The fuel pump relay is located in the middle (R2), and the fuse is located to the left of it (F3)
Checking the fuel pressure in the system
The main indicator of the operation of a fuel pump is the pressure it creates in the system. If the device turns on, pumps fuel, but the engine runs intermittently, take the time to check the pressure. To do this, you will need a pressure gauge with a measuring range of 5–7, equipped with a gas-resistant hose and a threaded fitting (if there is no special one, you can use a regular tire pressure gauge). The sequence of actions is as follows:
- On the fuel rail we find a fitting closed with a plastic cap. Unscrew the cap and connect the pressure gauge hose to the fitting. If your device is not equipped with a special threaded fitting, the hose can be secured to the “nipple” using a small clamp.
Pressure connection
The pressure in the ramp should be 2.8–3.2 atmospheres
When removing the vacuum hose from the regulator, the pressure should drop by 0.2–0.7 atmospheres
Another version of the VAZ-2101 scheme
Outdoor Lighting
1 – Headlights 2101 2 – engine compartment lamp; 3 – battery; 4 – generator; 5 – reverse light switch; 6 – fuse block; 7 – indicator lamp for external lighting in the instrument cluster; 8 – glove box lighting lamp; 9 – instrument cluster lighting lamp; 10 – plug socket for a portable lamp; 11 – instrument lighting switch; 12 – external lighting switch; 13 – brake light switch; 14 – ignition switch; 15 – lamp switches located in the front door pillars; 16 – lamp switches located in the rear door pillars; 17 – lampshades; 18 – trunk lighting lamp; 19 – rear lights; 20 – license plate light; 21 – reversing lamp