Owners of popular Lada Kalina models often encounter situations when the cooling fan does not turn on. This situation forces the driver to periodically stop to allow the engine to cool down. If a malfunction occurs in frosty weather, then it has almost no effect on the functionality of the system, but in warm periods it significantly prevents the LADA Kalina from moving smoothly.
Most Lada Kalina owners are not able to independently diagnose the reasons why the cooling fan does not turn on, much less eliminate them. Tow trucks and services, as well as a switching diagram, are happy to come to their aid.
Reasons for fan failure
Here we indicate the most likely places in the cooling circuit, which you should take a closer look at if the cooling fan does not turn on.
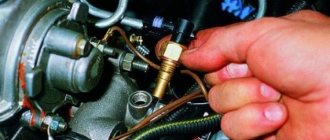
- Thermostat. When the specified product fails, the fan also begins to make itself known through malfunctions and incorrect activation. To diagnose the thermostat, you will need to touch the outlet pipe (located at the bottom) of the LADA Kalina radiator on a warm engine. If this hose is warmed up, then the unit is normal; when it is cold, we determine that the thermostat is faulty. Since a part can break down quite often, it is recommended to carry a spare part with you. Replacement is not a difficult operation. To perform this, you will need to first drain the liquid from the circuit.
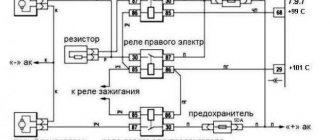
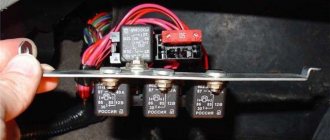
- Fuse and switching relay. These elements of the electrical circuit are also capable of frequent failure. Using the diagram of the location of the fuse links, we find the required fuse in the mounting block, remove it and check for burnout of the working “hair”. The block with these elements is located inside the cabin under the dashboard. To protect the fan circuit, an insert with a maximum current of 50 A is used. The fuse number is “3”.
The relay responsible for the operation of the node in question is listed as number “1”.
- Additional module for controlling fan functionality. To remove it, you will need to dismantle the air duct for supplying a warm air stream and, using the “10” key, unscrew the fasteners. Having taken out the block, we find a pair of switching relays responsible for the “command” to switch on and the maximum speed. Both elements can be diagnosed using a tester.
- Let's move on to the electrical switching of the fan. Using the same device, we check the wire lines of the node. If we find a break, we replace the wire with a new one with the same cross-section.
- Fan winding. Here the owner of the Lada Kalina feels despondent, since with such a malfunction, a replacement option is very likely, which is not cheap.
- Device activation sensor. If it is faulty, the fan will not activate, thereby causing the risk of overheating the power unit.
Replacing coolant temperature sensors on Kalina
Welcome! Coolant temperature sensors - if we talk specifically about the Lada Kalina car, then there are only two sensor data in it, one goes to the controller (This is the brain, to put it simply), and the other to the device, that is, one sensor shows what the temperature of the coolant in the car is and displays this is all for the device, and another one (which gives readings to the controller) turns on the cooling system fan when the car is boiling, and also regulates the fuel-air mixture (Simply put, when the car is cold, thanks to this sensor it will warm up faster, because the sensor richens the mixture and the temperature immediately rises), both of these sensors are important and if they fail they will cause quite a lot of trouble, especially for the sensor that gives readings to the device, if it stops working, then you simply will not know the temperature of the coolant and in connection with which you can overheat the engine.
Note! To replace both sensors (you will most likely only replace one), stock up on: Wrenches, as well as sockets and a wrench for them, you will also need a multi-meter (This is in case you want to check the functionality of the old sensor ) and a screwdriver!
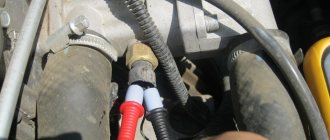
Where are the coolant temperature sensors located? We would like to immediately note one very important fact, just below we have posted a photo in which we have already indicated with arrows the location of both sensors, but the photo shows a VAZ 2110 car, and you have a Lada Kalina, in general there is not much difference in the engines and these sensors are also on them are located practically in the same places, we just wanted to warn you so that you are not too surprised when you look at your engine, because they may differ slightly, but in general, as already said, they are almost the same, in general the sensor that measures coolant temperature and gives it to the controller, screwed into the thermostat and indicated by a red arrow, the second sensor that gives readings to the device is already indicated by a green arrow, but since it is not visible in the photo, we also indicated with a blue arrow the wire that is connected to this sensor .
When should coolant temperature sensors be replaced? The sensors themselves should last quite a long time, but they don’t always come across high-quality ones, and even literally after a month new sensors already fail, it’s not difficult to understand this, especially if it’s a sensor that goes to the device (the gauge will immediately stop showing the coolant temperature, the arrow will just will lie, for clarity this indicator is indicated by an arrow), but with the sensor that goes to the controller it’s a little more complicated and you won’t even immediately understand that it’s time to change it, well, let’s move on to the symptoms, firstly, if the sensor going to the controller comes in unusable, then the car will consume more gasoline (This is due to the fact that the mixture will always be rich) and the cooling fan will not work when the engine overheats, if you notice all this in your car, then immediately change the sensor to a new one or simply remove the old one and check it (we explained in this article a little lower how both sensors are checked, so read it and you will understand everything as you read).
How to replace a fan in Kalina?
The replacement process, if the cooling fan does not turn on, is quite a troublesome task, which is influenced by the tightness of free space for manipulation. So let's get started.
- 1. Here it is necessary to avoid the need to remove the radiator, which involves draining the fluid and takes more time.
- 2. Dismantle the housing of the filter element of the air intake system.
- 3. Remove the front grille.
- 4. Unscrew the fasteners of both head lighting devices.
- 5. We use a “10” head, through which we unscrew the fasteners of the upper front panel.
- 6. Now you need to disconnect the connectors that serve to connect the electrical fan module with the on-board network. We take the wires to the side to avoid interference.
- 7. The fan frame is secured with 4 bolts that need to be unscrewed.
- 8. We remove the fan with extreme care so as not to damage the nearby components of the engine compartment.
Installing the device involves performing manipulations using the reverse algorithm.
Malfunctions of the Kalina cooling fan resistor
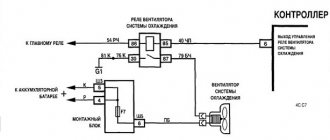
The electric fan only operates at high rotation speeds - The main sign that the additional resistor of the Kalina cooling fan is faulty. The electrical diagram for connecting LADA Kalina fans provides for the simultaneous activation of two blowing systems:
- electric radiator cooling fan;
- air conditioner cooling fan,
If at some point in time only one of them rotates, then we can conclude that the power supply circuit of the second one is broken. The same thing happens when the radiator fan does not spin after the engine warms up. There are several reasons for this phenomenon. This could be either a bad contact or a broken wire, or a faulty electric fan resistor.
Causes of malfunction of the Kalina fan resistor
The main reason for the failure of the additional resistor of the Kalina fan is the blown thermal fuse, which protects the electric motor winding and the power circuit from overload. In this case, it is necessary to repair or replace the Kalina cooling fan resistor. You can do the work yourself, it does not take much time, does not require high qualifications or special tools.
What is needed to check and replace
To remove, check and repair (replace) an additional resistor you will need:
- ohmmeter;
- crosshead screwdriver;
- a set of keys;
- soldering iron;
- rosin;
- solder;
- a new resistor or part of it - a thermal fuse (16A and 180 degrees).
If the car has engine (crankcase) protection installed, it is better to remove it from a pit or on a lift.
Replacing relays and fuses
These protective and fan control components are fairly easy to replace. We remove the burnt element from the mounting socket and install a new analogue. It is convenient to use suitable tweezers here.
Steering rack Kalina
How to drain antifreeze from Kalina
Adjusting the Kalina generator belt
System diagnostics
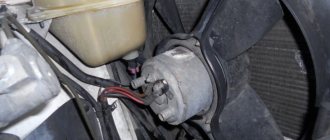
If Kalina's fan does not turn on, first of all, you should start looking for the problem in the electric motor. To do this, disconnect the wiring, and then connect the device directly to the battery. This way you will know whether there is a problem with the fan, or whether you need to look for another reason for the faulty cooling system.
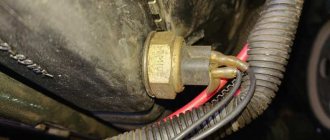
Next we check the contacts, relay and fuse. They should be found on the additional mounting block, which is located just to the right of the instrument panel. To check the fuse we use a tester. If this does not help solve the problem, look at the temperature sensor. Just warm up the engine, turn off the engine, and then turn off the sensor.
You can find it on the thermostat housing. After disconnecting the sensor, the fan will start in automatic mode. We start the engine. If it warms up and the Kalina cooling fan does not work, we begin to look for broken wiring.
Improvements to the Kalina fan
In the Lada Kalina, the cooling circuit can be upgraded, which will significantly reduce the risk of forced shutdown due to the failure of one of the system components. The first step is to install a more reliable thermostat. Some LADA Kalina owners install a 6-hole unit and also supplement the circuit with a second stove valve and install another pump.
The second improvement option involves installing a “sports” version of the fan. This product is equipped with its own controller that can show the functioning of the system. Here you simply cannot do without making certain adjustments to the electrical circuit.
It would also be a good idea to install an additional button for forced activation of the fan. Most often it is located on the panel.
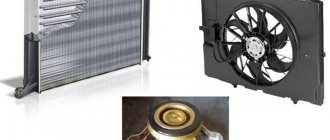
How the cooling system works
This system works in conjunction with a wide variety of parts that measure:
- heating the engine oil;
- ambient temperature.
In addition, the operation of the system largely depends on a variety of electrical sensors included in the electrical circuit of the Kalina. Thanks to the joint work of all these parts, the cooling fan relay is automatically turned on on the Kalina car. Automation monitors the operation of the entire system and ensures the best cooling of the engine.
Temperature affects the movement of fluid. Kalina has two movements:
- small circle;
- big circle.
When the fluid moves in a small circle, it bypasses the radiator. At this time, the thermostat is closed. As soon as the temperature of the power unit begins to increase, the thermostat slowly opens. The path to the radiator is opened for coolant. Here it is cooled due to a powerful flow of oncoming air. If such cooling is not enough, the fan switch sensor will work, it will turn on and begin forced cooling.
Let's sum it up
If a cooling circuit fan in a Lada Kalina fails to operate, then such a malfunction can be corrected independently. We have reviewed almost the entire list of reasons that could cause a malfunction, and also provided an algorithm for replacing the unit. Use our material as instructions for action and tend to periodically inspect the cooling system; a switching diagram can also help you. This will minimize the risk of unpleasant circumstances occurring on the road.
Modernization of Kalina SOD
The main problem of the Kalina cooling system is the formation of air locks. Today there are a number of effective ways to eliminate this defect. The reason lies in the design features of the SOD. The operation of the cooling system is based on the interconnected functioning of many parts. The use of the large and small circuits depends on the temperature of the antifreeze circulating through the system. The normal operation of the entire power plant depends on this.
You can modify the cooling system yourself or at a service center. Professionals rarely engage in all sorts of modifications, recommending replacing or repairing a particular component. This method may be more expensive, but not always more effective.
Classic ways of improvement
In order to solve the problem with the formation of air locks, you need to remove the expansion tank cap and start the engine. Then wait until the coolant temperature rises to the critical red zone until forced cooling by the fan comes into operation. After this, you need to press the gas pedal several times and turn off the engine.
If the method is ineffective, there is another method. To do this, you need to dismantle the engine protection, loosen the clamp and remove one of the tubes of the throttle body heating fitting. Then unscrew the cap of the expansion tank and, applying a rag, start blowing into it until antifreeze begins to flow from the removed pipe. In order to modify the standard cooling system, many car owners install a more efficient 6-hole thermostat, install a coolant filter and another heater faucet.
To increase circulation efficiency, an additional pump is often installed.
Other upgrade options
If the car is equipped with an electronic gas pedal, the hose that previously went to heat the throttle assembly is now looped into the cooling system. To prevent the formation of air pockets, an additional pipe with a smaller diameter is used, which is installed instead of the above hose. The hose for the air duct is placed near the thermostat; for this, a tee is used, mounted in the pipe fitting to the radiator. The second end of the pipe is connected to the steam removal hose near the expansion tank (you will need another tee).
The modification ensures a stable operating temperature of 90 degrees in urban conditions, and the stove begins to warm up at 50 degrees.
The next improvement method is to equip the steam outlet with a special hydraulic fence. To do this, a tube from a dropper is mounted in the steam removal hose, which is immersed in antifreeze at the bottom of the expansion tank. As it cools, the antifreeze is drawn into the outlet pipe, which prevents air from the cooling system. If desired, you can combine both methods.
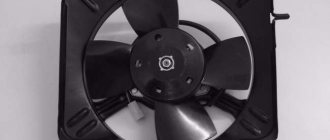
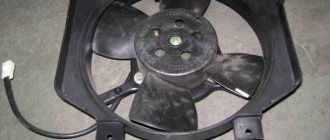
Replacing the SOD fan
Replacing a cooling fan is not the most difficult procedure; the first stage involves preparing the necessary tools:
- 10 mm socket head with wrench;
- wrench (socket or socket) 8 mm;
- figured screwdriver;
- pliers.
The replacement process is as follows:
- To make it easier to dismantle the unit, remove the air filter housing by unscrewing the two mounting bolts.
- Using pliers, disconnect the plastic latch of the expander hose.
- Disconnect the wire connector from the mass air flow sensor (mass air flow sensor) by pressing the latch from below.
- Disconnect the wire connector from the canister purge valve on the air filter box.
- Remove the pipe clamp and move it to the side.
- Unscrew the 4 mounting bolts and remove the housing cover.
- Remove the adsorber by pulling it up.
- Unscrew the air intake mounting nut (near the radiator at the top).
- Remove the rubber cushion near the battery and remove the air filter housing.
- Unscrew the two fastening nuts with a 10 mm wrench on the right side, and then unscrew the two nuts with an 8 mm wrench on the left.
- Disconnect the wire plug from the electric fan.
- Remove the electric fan assembly by moving it to the left.
If the node changes, the procedure is repeated in reverse order. To replace the electric motor, you will need to dismantle it. This is easy to do by unscrewing the three mounting bolts with a 10 mm wrench. On the other hand, you need to disconnect the metal latch and remove the motor with the impeller.