Why block him?
In certain situations this is necessary. To make it clearer, let's look at everything in order. If a car turns sharply or goes over rough terrain, its drive wheels travel different lengths. For example, when turning, the path of the outer wheel will be longer, and the path of the inner wheel will be shorter. Previously, when car speeds were low, this circumstance did not particularly worry anyone. But gradually the speed of the cars increased, and problems began to arise:
- tires wear unevenly;
- handling is seriously degraded.
All this happens due to the fact that the torque on the drive wheels of the car is always the same. Therefore, it became necessary to separate the drive wheels so that each of them had its own torque. This task is performed by the VAZ 2107 differential. If the road is smooth, there are no problems with this unit. But as soon as the car finds itself on rough terrain with the differential engaged, the wheels begin to slip, and driving the car becomes much more difficult. It is in this situation that the driver should lock the differential to increase the vehicle's maneuverability.
Privacy Policy
General provisions
Some objects posted on the site are the intellectual property of SATOX. The use of such objects is established by the current legislation of the Russian Federation.
The SATOX website contains links that take you to other websites. SATOX is not responsible for the information published on these sites and provides links to them only to provide convenience to visitors to its site.
Personal information and security
The SATOX LLC company guarantees that no information received from you will ever be provided to third parties under any circumstances, except in cases provided for by the current legislation of the Russian Federation.
In certain circumstances, SATOX LLC may ask you to register and provide personal information. The information provided is used solely for official purposes, as well as to provide access to special information.
Personal information can be changed, updated or deleted at any time under Account > Profile.
To provide you with certain types of information, StoreLand, with your express consent, may send informational messages to the email address specified during registration. At any time you can change the subject of such mailings or refuse it.
Like many other websites, SATOX LLC uses cookie technology, which may be used to promote our product and measure the effectiveness of advertising. In addition, with the help of this technology, SATOX LLC is configured to work with you personally. In particular, without this technology it is impossible to work with authorization in the control panel.
The information on this website is for informational purposes only and is subject to any changes without any prior notice.
To opt out of further communications with our company, change or delete your personal information, write to us via the feedback form
- Before starting work, 2 bushings are made from bronze or brass according to the drawing given below.
Locking brass bushing for VAZ 2107 gearbox
A pair of bushings in a spring from a valve of a VAZ 2110 car
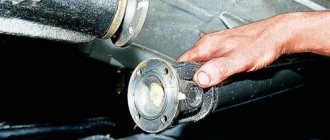
Axle shaft removed from VAZ 2107
Standard gearbox removed from a VAZ 2107
A pair of bushings is inserted into the VAZ 2107 gearbox
To summarize, it should be said that differential locking on the VAZ 2107 was and remains a very controversial issue. On the one hand, the car's cross-country ability increases, it corners better, and acceleration becomes more dynamic. On the other hand, it is not so easy to keep an accelerated car on a straight line, and its tendency to skid increases. In a word, whether to install it or not is up to the driver to decide.
Types of blocking
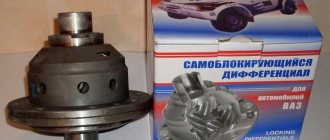
There are three of them: manual (forced), automatic (self-locking differential) and partial.
- The driver turns on the manual locking himself when he finds himself on rough terrain. It's simple: a switch is pressed in the cabin, after which a special limiting unit begins to operate, preventing torque from being distributed to the drive wheels depending on the path they travel. The advantages of such a lock are obvious: the driver himself decides when to engage the limiting mechanism, and the rest of the time this device does not work and, accordingly, does not wear out. There are also disadvantages: to lock the differential manually, the driver will have to take his mind off the controls. And he gets distracted in extremely difficult road conditions. The driver should also not forget to disable the lock when he is on a flat road. If you don't do this, you can break the differential itself. And finally, you will have to install not only the limiter itself, but also the system that will operate it, which is associated with certain technical difficulties.
An example of forced differential locking on VAZ and Niva cars
- Automatic blocking - works constantly. That is, while the driver’s foot presses on the gas, the lock works and adapts to the driving style of the car owner. Pros: the driver does not need to be distracted by turning on the device, and installing automatic locking is much easier than manual locking. There are also disadvantages: since the automation works constantly, you have to make a significant effort to turn the steering wheel. On sharp turns the tires are noisy, literally biting into the ground. And when the gears of the device engage, clicks are clearly audible, which not everyone likes.
An example of a finished lock on a VAZ from Val-racing - Finally, there is partial blocking. It also prevents wheel slipping, but does it less intensively. Partial locking is also automatic and does not require constant driver control. And its main advantage is that it does not heavily load the transmission, which prevents its premature wear.
Bearing wear.
Another common cause of gearbox noise is bearing wear. Only, unlike worn gears, the gearbox does not hum for long due to the bearings. The bearings are destroyed, and the gearbox housing is often damaged. So if it starts to buzz, there’s no point in delaying repairs. Repairs will be much more expensive later. When reassembling, the bearings must be inspected very carefully. A typical symptom is pitting on treadmills:
Of course, such a bearing is immediately obvious that it is discarded. But you need to carefully examine those that seem good, and change the slightest spots too. However, keep in mind that not all bearings are equally durable. The weakest is of course the rear input shaft bearing. In the photo there are just clips from this one. It works when the engine is running, regardless of whether the car is stopped or not, but most importantly, when accelerating, it has the same speed as the engine. In addition, the more intense the acceleration, the greater the load on it. This bearing is subjected not only to radial but also to axial loads. The teeth of the gears are oblique and under load the shaft tries to move in the longitudinal direction; only this bearing keeps it from shifting. Well, the bearing is held in one direction by a locking ring, and in the other by a locking plate. I would like to note that in similar boxes of famous foreign cars, such units use conical rollers or structures with thrust bearings that can withstand much greater loads. In second place in terms of frequency of breakdowns, I would put the same 305th bearing, which is installed on the secondary shaft. Therefore, if you want to make a good box, it is better to replace these two, as well as the seals, with new ones, regardless of the condition. Of course, provided that these new ones are of high quality, because the new ones can be even worse than the old ones. Next is the roller bearing at the front end of the secondary shaft. This one is already quite reliable, although recently it also happens that it breaks down, usually with a crankcase rupture. Well, the most reliable are the front input shaft and differential bearings. They very rarely require replacement. Therefore, if they look decent, you can safely leave the old ones. A few more words on the choice of bearings. The ones from Vologda are usually considered the best, but in fact, among them there are also often defective ones. On boxes new from the factory, they can start buzzing after fifty thousand. In fact, choosing a bearing is a lottery; if you're lucky, it will last a long time. As for roller ones, I don’t recommend using the ones in the photo on the right:
You see, the rollers are smaller in size and number. These are very short-lived, but this is understandable; small rollers will not be able to bear the same load as the original bearing. Also, do not forget to check the steel plate that secures the rear bearings. Very often a deep groove appears in it; if the hole is not significant and there is no new one, you can push it down a little with a hammer. It is made of mild steel, the main thing is that this plate presses the bearings:
Which one to choose for VAZ 2107
The answer to this question directly depends on the operating conditions of the vehicle. If the car owner never goes into the city and moves exclusively on country roads and rough terrain, a full manual differential lock is suitable for him. If the driver drives around the city, but the quality of the roads there leaves much to be desired, it makes sense to opt for automatic disc locking. Finally, if a car owner drives on good city roads all year round, a partial differential lock mechanism is quite suitable for him. The best devices of this type are produced by Quaife, Lokka and Torsen. These are expensive components, the installation of which is best left to qualified specialists. At the same time, you can do simple blocking yourself. This is exactly what will be discussed below.
DIY differential repair
What can you do on your own to fix this part? Several consistent recommendations will help you solve the problem.
Since it has already been said that the differential is located in the gearbox, therefore, for repairs this unit must be removed from it. To do this, read the article, which talks about how to remove the differential (step No. 30).
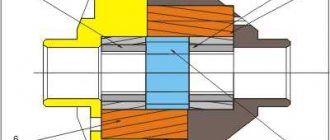
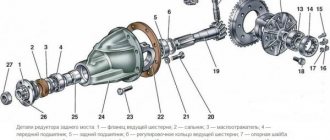
Differential diagram VAZ 2110
1. Take out the semi-axial gears, turning them around the axis of the satellites 90 degrees.
2. Before removing the satellites, you need to remove the retaining ring from their axis.
3. Now you can easily remove the axle and two satellites.
4. To release the driven gear, you need to unscrew the mounting bolts in the differential housing.
5. Remove the part from the body using a hammer and chisel.
6. Everything that has been disconnected: satellites, their axle, gear - carefully inspect for defects. If the surfaces of these parts, and the surface of the body itself, have irregularities or polyps, carefully remove them with fine-grained sandpaper.
Be prepared for the fact that some defects cannot be eliminated, which means you will have to buy a new part.
7
Pay special attention to the driven gear in the gearbox. Defects in this part may interfere with the normal operation of the differential.
If you find significant tooth wear, chipping or wear, the gear will have to be replaced.
Tip: Drive and driven gears are sold together (as a pair). Therefore, it is better to replace both at once. On the driven gear, the manufacturer must indicate the number of teeth of both the first and second gears. However, “trust, but verify,” says the proverb, and to check, it is better to count and check the number of teeth.
8. Check the suitability of the bearings. Their damage is indicated by pitting and indentation marks on the running tracks and rolling elements. Verdict: requires replacement.
Attention! To successfully repair and replace this VAZ 2110 and 2112 unit, you must purchase instructions, a diagram and a set of additional tools. If you do not have these 2 components at your disposal, it is best to entrust the repair to professionals in a car service center.
For adjustment and repair you will need:
- Set of socket wrenches (heads),
- Universal round nose pliers,
- Special version of pliers for removing the retaining ring system,
- Thin chisel
- An ordinary hammer.
Stages of repair.
The stages of work on adjusting and replacing the differential on the VAZ 2110 and 2112 are as follows:
First, dismantle the assembly itself directly from the gearbox. Turn the central axis of the satellites 90°, then use a socket wrench to remove the axial gear from the housing structure. Remove the retaining rings from the central axis of the satellites. Remove the axle itself and each of the two satellites from the metal case. Remove all secured bolts in the driven gear structure. Insert the chisel into the gap that appears between the inner race of the bearing and the end of the differential box. For convenience, you can press the driven gears from the metal body of the unit. Next, you need to inspect the working surface of the satellite set, the central axis, the semi-axial gear and the surfaces of the body itself in contact with them. Minor unevenness can be removed using fine-grained sandpaper. Parts on which you find significant defects must be replaced. It is imperative to check the gearbox driven gear. If chips, breaks, small chipping or significant wear of the teeth are detected, this gear must be replaced
Attention! At the factory, specialists select a set of gears for the main drive only in pairs according to the characteristics of the contact patch. That is why replacing the driven gear must be accompanied by replacing the drive gear. If faults are detected in the bearings, they must be replaced by first pressing them into the metal differential structure using a puller. All that remains is to press the outer set of rings from the gearbox housing and clutch using a special puller
If you do not have a puller, you must first press in a set of axle shaft seals, and from the outside, use a punch to remove the bearing rings themselves. When replacing all defective elements, all that remains is to assemble the VAZ 2110 and 2112 differential in the reverse order. Be sure to pre-lubricate each part with any brand of gear oil before installing it in the gearbox. The driven gears must be installed with the outside of the tooth markings facing up.
At this point, the stages of replacing and repairing the differential end. All that remains is to adjust and check the operation while driving around the car.
Disassembling the gearbox and replacing satellites
The satellites are additional gears installed in the differential gearbox. Their purpose is to transmit torque to the axle shafts of the rear wheels. Like any other part, pinion gears are subject to wear. After this, they will have to be changed, since this part cannot be repaired. To restore worn teeth, the car owner has neither the necessary skills nor the necessary equipment. In addition, any gear in a car undergoes a special heat treatment - carburization, which is carried out in a nitrogen atmosphere and strengthens the surface of the teeth to a certain depth, saturating this surface with carbon. An ordinary car enthusiast cannot do anything like this in his garage. Therefore, there is only one solution: purchase a repair kit for the rear axle gearbox. It costs about 1500 rubles. Here's what it includes:
- a pair of gears for axle shafts;
- a pair of satellites for the differential;
- satellite axis;
- support washer.
In addition to the repair kit for gearboxes, you will also need a set of regular open-end wrenches, a screwdriver and a hammer.
Sequence of operations
To disassemble the gearbox, it is best to use a regular bench vice. Then the work will go much faster.
- The gearbox removed from the machine is clamped in a vice in a vertical position.
- A pair of adjusting locking bolts are unscrewed from it, under which the locking plates are located.
- Now the four bolts (two on each side of the gearbox) holding the bearing caps are unscrewed.
- The covers are removed. Next, the roller bearings themselves are removed. They must be carefully inspected for wear. At the slightest suspicion of wear, the bearings should be replaced.
- After removing the bearings, you can remove the satellite axis and the satellites themselves, which are also carefully inspected for wear.
- Now the drive shaft and bearing can be removed from the gearbox housing. The shaft is installed vertically and knocked out of the roller bearing using a hammer (to avoid damaging the shaft, you need to place something soft under the hammer, for example, a wooden mallet).
- At this point, the disassembly of the gearbox can be considered complete. All parts, including satellites and bearings, should be thoroughly washed in kerosene. Damaged satellites are replaced with satellites from the repair kit. If wear is also detected on the axle gears, they too are replaced, along with the support washer. After this, the gearbox is reassembled and installed in its original place.
So, an ordinary car owner is quite capable of removing the gearbox from the rear axle of the “Seven”, disassembling it and replacing its worn parts. There is nothing complicated about this. Certain difficulties may arise only at the stage of adjusting the new gearbox. But you can also deal with them by carefully reading the above recommendations.
Eliminate vibration with additional fasteners
Replacing the rear axle gearbox seal of VAZ 2107, 2106
Vibration in the body is the main “disease” of the Niva; it often occurs due to improper alignment of the transfer case. Most often, vibration occurs on VAZ 21213/21214 cars, since the transfer case is mounted only on two supports on the sides of the body; on the Chevrolet Niva, the transfer case is already installed on three supports.
- driveshafts are poorly secured;
- wheels are not balanced;
- there is play in the cardan crosspieces (vibration is especially affected by play in the rear driveshaft crosspieces);
- The vibration comes from the engine itself.
Vibration when starting off on a Niva can also occur for the following reasons:
- the mounting supports of the transfer case have become loose;
- The rubber on the RK supports themselves broke.
Installing the third support of the transfer case on VAZ 21213/21214 vehicles allows you to reduce the level of vibration of the transfer case; with this support it is easier to center the transfer case. The part can be purchased at auto stores or made yourself. The finished product comes with three long studs (for model 2121); to install the third support on this machine, you will need to unscrew the short studs from the transfer case housing and install new studs from the kit. We carry out repairs as follows:
- dismantle the front passenger seat in the cabin;
- remove the floor tunnel lining;
- in the cabin we move aside the carpet covering the body amplifier (in front of the handbrake lever);
- remove the transfer case (alternatively, you can simply hang it up, but removing the third support makes it easier to install);
- We attach the bracket of the new support to the body of the RC;
- we install the transfer case in place, center it in the optimal position, and fasten the side supports;
- we combine the third support with the body, drill two holes in the bottom;
- Using washers, bolts and nuts (from the kit) we attach the support to the bottom of the body.
In order to install the subframe, the transfer case must be removed. It is more convenient to carry out such work in a pit; we carry out repairs as follows:
- leave the car in neutral gear;
- disconnect the propeller shaft from the transfer case, it is advisable to mark the driveshaft flange and the drive shaft so that during installation, align the driveshaft according to the marks - this way, the occurrence of unnecessary vibrations is eliminated;
- dismantle the muffler mounting bracket;
- remove the gearbox traverse;
- jack up the transfer case, remove the side fastenings of the transfer case;
- We treat the places where the subframe fits to the body with Movil;
- place the subframe on the gearbox studs;
- we mark the attachment points of the subframe on the side members, drill holes, attach bolts to the body;
- we tighten all fastenings, except for the transfer case supports themselves;
- we perform alignment of the steering wheel;
- Finally tighten the transfer case supports.
It should be noted that installing an additional support or subframe on the steering wheel does not always lead to the desired effect; in some cases, vibration only increases.
Rear axle gearboxes of VAZ 2101-07 (classic) cars, assembled with differential locks.
First, a little theory.
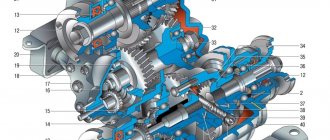
The rear axle gearbox in classic cars is designed to distribute the rotational motion of one input shaft (cardan) to two output shafts (axle shafts) and distribute angular velocity from the driveshaft in the required proportions to two axle shafts. Rear axle gearboxes of a VAZ car are classified by gear ratio or gear ratio, that is, the ratio of the angular speed of the drive shaft (universal shaft) to the angular speed of the driven shafts (half axles).
The gear ratio is a figure characterizing the purpose of the gearbox.
For example: the gearbox of the VAZ-2102 station wagon, intended for transporting goods, had a gear ratio of 4.44, and the passenger VAZ-2101 had a gearbox with a gear ratio of 4.3. This means that for one revolution of the driven gear on the output shaft of the gearbox, each of its teeth will engage and come out of the drive gear 4.3 times, that is, the higher the gear ratio, the greater the vehicle’s load-carrying capacity.
The standard VAZ gearbox has one drawback - when the car's wheels hit surfaces with a low coefficient of adhesion (snow, ice, sand), the car begins to slip. To combat this unpleasant phenomenon, there are differential locks or self-blocks.
In this section of the online store we presented rear axle gearboxes for VAZ cars of the classic family, assembled with already proven S-1 TEAM locking systems. By purchasing assembled gearboxes with already installed S-1 TEAM interlocks, you receive an assembled, adjusted and ready-to-install unit, thereby saving your money.
This section also presents gearboxes (gearboxes) in the most popular combinations:
All gearbox components are adjusted, the gearbox is assembled and tested on a stand to control noise during operation.
Source