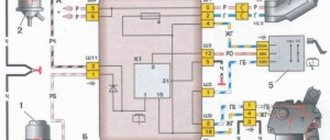
Before troubleshooting, you need to get acquainted with the electrical circuit of their power supply. Let's take a look at the diagram for switching on external lighting devices.
Electrical diagram of external lighting devices of VAZ 2114
How it works? When button 6 is turned on, the on-board power supply voltage is supplied to the mounting block. Having passed through fuses F10 and F11, it goes to the control relay K4. Fuses are necessary to protect the power circuits of the left (F10) and right (F11) side dimensions.
The relay controls the correct operation of the side light - if any of the lamps or its circuits malfunctions, it commands the on-board control system 12 to turn on the warning light located on the instrument panel. Having passed through the relay, the voltage is supplied to the side lamps 1 and 8.
Important! In some modifications of the VAZ 2114, instead of the K4 relay, there may be jumpers in the mounting block. Their location in the diagram above is indicated by arrows.
Expert opinion
It-Technology, Electrical power and electronics specialist
Ask questions to the “Specialist for modernization of energy generation systems”
The stops of the VAZ 2114 (2113) car do not work. In the mid-20th century, the international automotive community adopted certain standards regarding the color design of automotive lighting devices. Ask, I'm in touch!
What lamps are in the dimensions of the VAZ 2114
The standard equipment of VAZ 2114 cars includes installation of the following lamps in the dimensions and front/rear headlights:
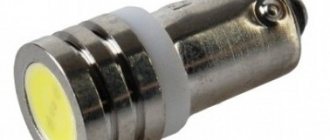
Recently, users are increasingly replacing standard light bulbs in the dimensions of the VAZ 2114 with LED ones, since they have a much longer resource, consume less energy and shine with a beautiful color. In order for the diodes to produce spectacular side lights with a bluish tint, weak 1-5 diode lamps are not suitable. It is better to use 12-15 diodes.
They will give a bright white glow in the daytime, and in the dark this glow will be blue-white. It is advisable to replace all side lights, or at least the front or rear lights on both sides, with such lamps at the same time. In this case, the car looks organic, and the difference in the shades of the glow of the dimensions will not mislead other road users.
What kind of lighting do you prefer?
Built-in Chandelier
With your own hands
We remove and disassemble the rear lights, take out the board from them, pry off the sockets (plastic) with a screwdriver and take out the tape itself.
The VAZ 2115 flashlights use double bulbs for stops and dimensions, which means that the store buys double sockets for stops and dimensions, and single sockets for turns. In other VAZ 2108-2114 cars, all cartridges are single. You will also need a wire (single soft copper with a cross section of 2.5 mm), connectors (I took them from a computer), and M3 bolts.
Here is the standard connection diagram, VAZ 08-15. Everything is clear here, the plus goes to its cartridge and the total mass.
Let's be patient and get to work. We mark the places for the cartridges and drill them out, the places are the same as before. Metal cartridges need to be slightly modified in the brake light cartridges and dimensions, namely, we take pliers and move the terminals for the tips 180 degrees. Then we take the cartridges from the turn signals and bite them out there altogether.
Then we take M3 bolts and nuts and use them to secure the cartridges to the plastic. It turns out neatly, but the work is painstaking and requires patience
The store did not have cartridges for turn signals with a single contact; I had to solder a jumper in a double cartridge.
Once all the cartridges are attached, we proceed to the electrical part, that is, laying and soldering the wires.
Replacing rear light bulbs on a VAZ 2114
Attention: when everything is normal, but the lights do not light, the reason may be the contact of the lamp, so even when screwing in a new one, you must check its functionality. As the people say, it’s no joke, because a breakdown can be the easiest, but it can lead to a lot of troubles.
Expert opinion
It-Technology, Electrical power and electronics specialist
Ask questions to the “Specialist for modernization of energy generation systems”
Diagram, tuning and modification of the rear lights of the VAZ 2115: why the brake lights do not work and do not light up. The connection of LEDs and standard wiring is carried out using soldering, and it is necessary to have limiting resistors in the circuit, the junctions of which with the diodes are best insulated using heat shrink tubes Ask, I'm in touch!
Content
The exterior of each car consists of several basic elements that determine its design characteristics. There are optics in front and behind, which determine not only the characteristics of the car’s exterior, but also perform quite important functions: indicate the direction of movement, illuminate the road and indicate the car when driving at night. Headlights for VAZ 2114 tuning are performed to refine the exterior of the car and improve its driving performance. There are several methods for replacing headlights, some involve the use of new units, others involve a major overhaul of existing ones.
Side panel: Important: Please note that the headlights must still perform their primary functions, otherwise the safety of the vehicle will be significantly reduced.
Let's take into account all the features of the problem under consideration and give several examples of dismantling.
Tail light bulb VAZ 2114.
Stop lights (brake lights) of VAZ 2114 (2113) do not work, causes of malfunction
Either one brake light or two at once may not work.
— The brake light bulb in the rear light has burned out
Most often, only one lamp burns out, but sometimes two lamps burn out.
Brake light (stop) lamp in the rear light of a VAZ 2114 (2113) car
In this case, you will have to replace the lamp with a new one or a known good one. The brake light uses a P21W lamp. Similar lamps for the turn signal, reverse light, and fog light are in the same rear light. They can be used to check the brake light by replacing it.
— The contacts in the stop lamp socket have oxidized
In this case, a “break” occurs in the electrical circuit of the lamp. Most often, in this case, one brake light will not work, while the other will be on.
Cartridge and contacts of the brake light lamp in the rear light of VAZ 2114, 2113
To restore contact, you need to turn the light bulb in the socket several times, or remove it and clean the oxidized contacts with fine-grained sandpaper.
— The wiring block for the rear light is faulty (chip)
Either it is not securely fastened, or the contacts have oxidized. In any case, there will be an open circuit in the electrical circuit.
It is necessary to remove and put the block on the terminals of the rear light board several times to restore oxidized or unreliable contact. Subsequently, you can clean the pins on the board and the wire tips in the connecting block.
— The fuse in the mounting block has burned out
If the fuse is blown, both brake lamps in the taillights will not light.
The electrical circuit for turning on the brake lights of the VAZ 2114 (2113) is protected by fuse F3 (7.5A) in the fuse and relay mounting block. Check the integrity of the fuse. If faulty, replace with a new one. If the fuse is blown again, you should look for a short circuit in the circuit. According to the connection diagram shown below.
— The track in the rear light board has crumbled
As a result, the electrical circuit will be broken (“open”), and the brake light lamp will not light up.
It is necessary to remove the rear light board where the brake light is not illuminated and inspect it for damage to the tracks. If you cannot visually detect the location of the damage, you should “ring” the tracks with a multimeter or test lamp. Wiring is soldered to the damaged track and the board continues to function. For details, see the article “Checking the rear light board.”
— The “ground” of the rear light has disappeared
In this case, one or two lights may not work. The negative wire of the lamp of each of the rear lights comes out of its connecting block of wires (chips) and is attached to the body next to it. Over time, this connection oxidizes and the contact disappears (the circuit opens).
Expert opinion
It-Technology, Electrical power and electronics specialist
Ask questions to the “Specialist for modernization of energy generation systems”
We are modifying the rear lights of VAZ 2108-2115,2110-2112 – Auto diagram – DIY car crafts As they say in the language of a motorist, everything that is in the car must function properly, the safety of vehicle traffic depends on this. Ask, I'm in touch!
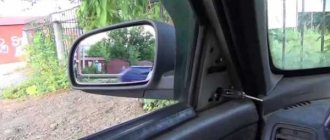
Relay location
So, the rear fog lamp relay is located on the driver’s side, under the steering wheel (just to the right of the fuse box, sometimes they are all covered with a plug or cover). There are only 3 pieces there. Sometimes they are covered with plugs. It should be noted that it is connected to a non-latching power button. This means that if you press it, it returns to its original state. But this is normal, since in it the contacts are paired through an electromagnet.
The PTF relay in old variations of VAZ cars was located under the hood, towards the fuse block. Now, more and more often, it is placed in the interior, under the steering wheel, in the area of the electronic unit. There is also a relay responsible for supplying power to the dashboard and a signaling device (if provided for by the design).
The rear fog light relay simultaneously combines 3 electrical circuits plus one spare line for 12 volts of static voltage. By the way, because of this, if it partially fails (meaning broken contacts due to vibration), you can fix the problem in a matter of minutes - simply transfer contacts from 1-2 to 6. The only caveat is that this procedure must be performed with the engine turned off and a disconnected battery terminal - some contacts are always energized, but without load. It can also cause a short circuit!
It is important to understand that initially the fog lamp relay does not connect this circuit, since the manufacturer by default installs conventional headlights without additional lighting. The circuit is closed after the fog lights are installed.
Step by step replacement
4. The lamp is secured at the corners with four bolts. Eight-piece nuts.
6. Take a new lamp and install it. Namely, we get the bolts into the holes on the body.
9. Connect the power connector and close the hatch.
Expert opinion
It-Technology, Electrical power and electronics specialist
Ask questions to the “Specialist for modernization of energy generation systems”
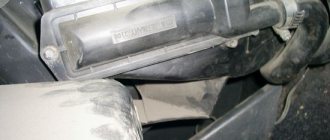
Removing the rear light board To change the fuse, remove it from the block using tweezers, then install a new device in place of the old device. Ask, I'm in touch!
Installation of fog lights
You can adjust the car's optics by installing fog lights. An additional light source allows you to increase road illumination at night, in case of fog or rain. Installing additional fog lights can be quite simple:
- First you need to create a website for new optics. To do this, you need to purchase a new bumper or make special niches. Please note that making homemade niches for fog lights is quite difficult, since changing the structure of the plastic can damage the paint.
- You should pay attention to the fact that there must be a special switch in the cabin, with which you can turn on the headlights at the right time. To do this, the speaker is dismantled. After disassembly, two connectors will be available: one for the indicator, the second for the fog lights.
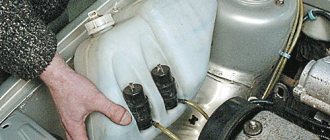
- The next step is to remove the fuse box under the hood.
- Next you need to stretch the wires from the relay to the fog unit.
- We connect the terminals to the connector in the mounting block.
- We ground the housing.
- We connect the PTF to the power harness.
Fog lights not only improve road illumination when driving at night or in the rain, but also significantly change the appearance of the car. Holes in the bumper for fog lights make the car's exterior more aggressive and sporty. Using a new bumper can significantly change the appearance of your car.
Why don't FZH work?
- The light bulb has burned out and you simply need to replace it by checking the contacts.
- The fuse has failed, which can disrupt the functionality of the complete circuit of contacts.
- Lack of mass on the board, which is located under the lamp.
- Plaque and oxidation have formed on the contacts.
- If the wiring is broken, you can check it visually and also make a call.
- The contact on the headlight film burned out.
- Malfunction of the gearbox mechanism.
- The reverse frog of a VAZ 2114 is broken.
Useful tips Connection diagrams Principles of operation of devices Main concepts Meters from Energomer Precautions Incandescent lamps Video instructions for the master Testing with a multimeter
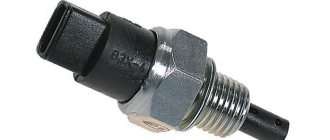
How to check the functionality of the frog?
The contacts from the sensor are removed and clamped together, after which the ignition is turned on. If there is light, then you need to replace the sensor. And if not, then the problem is in the circuit, but the frog is fine.
When the reverse lamp does not light up, it is often necessary to replace the old sensor with a new one.
What should be done:
- place the car on the overpass;
- install the handbrake;
- remove protection;
- remove the contacts of the old sensor;
- place the container and remove the frog;
- Unscrew the faulty device and replace it with a new one.
Then let it sit for a while and check the oil in the gearbox. Fill it up to the required level and put the entire structure back together.
Attention, the price of a new sensor is within 250 rubles.
The next option is if the reverse light does not light up on a VAZ 2114, then the problem is in the light bulb. To replace it, you need to disconnect the wiring block, remove the plastic contact panel from the flashlight, while squeezing the side fixing elements.
We rotate the light bulb counterclockwise and, pressing slightly on the socket, remove it. Now we install a new one, check the contacts and put the entire unit back together.
We visually assess the condition of the wiring; if necessary, we strip the wires, check for breaks using the ringing method, and check the contacts on the headlight film.
Why aren't the reverse lights on yet?
A blown fuse is a common cause, which means you need to know exactly where they are located and how they change.
The products are located in the fuse box, which can be found under the steering wheel on the left side. It can be easily removed with just one touch of your hand. There is no need to unscrew anything.
When the reverse light does not light, you need to check the condition of the fuses. How to do this? You can visually look at the fuses and determine the breakdown - the integrity of the middle part.
But the burnt jumper is not always so clearly visible, so you need to turn on the dimensions and, without removing the fuses, check the voltage; if one end is on and the other is not, the device is faulty.
Attention: when such a breakdown often occurs, you need to check the entire electrical wiring system, which causes such malfunctions in the car.
To replace the product, you don’t need tools, just take tweezers, remove the old unit and install a working one.
Angel eyes
A fairly popular tuning is the use of LEDs to create “angel eyes”. They look quite attractive. To perform optics replacement work you will need the following tools:
1. Resistors. 2. LED. 3. Jars with an outer diameter of 7 centimeters. 4. 9 volt batteries. 5. Plexiglas sticks with a transparent structure.
Headlights for tuning a VAZ 2114 will look quite interesting, for which you need to do the following work:
- First you need to heat the stick until it becomes soft. Thermal deformation is necessary for the stick to become flexible and become a kind of ring.
- After heating, you should take a stick and twist the jar with it. After giving the required shape, it is left to cool. When the stick cools, its shape will not change.
- After hardening, you can trim off the excess ends.
- The two LEDs must be connected in series using a resistor.
- We sand the ends.
- Using a tape measure, make a notch at the same distance around the circumference of the rod. This must be done to ensure uniform lighting.
- The formation of grooves should be done at the ends.
- All LED connections must be isolated.
- The gap in the ring should be covered with foil.
- You must use sealant to secure the ring to the projector. In this case, the notches should face the inside of the projector.
The last step is to connect the system to a power source. The results obtained will be very interesting.