Unfortunately, not all car owners know what a lambda probe is and why it is needed. A lambda probe is an oxygen sensor that allows the electronic system to monitor and balance the correct ratio of air and gasoline in the combustion chambers. It is able to promptly correct the structure of the fuel mixture and prevent destabilization of the engine operating process.
This rather fragile device is located in a very aggressive environment, so its operation must be constantly monitored, since if it breaks down, further use of the car is impossible. Periodic checking of the lambda probe will guarantee stable operation of the vehicle.
Lambda probe (oxygen sensor in a car) - what is it
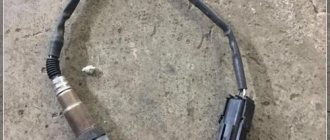
A lambda probe (oxygen sensor) is a small device that is part of the exhaust system of a vehicle. Its main function is to monitor the level of oxygen in exhaust gases that are formed as a result of fuel combustion in an internal combustion engine. The device looks like a small tube with wires. It connects to two machine systems:
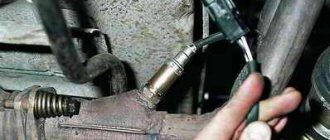
- On one side - to the exhaust pipe of the catalyst in front of the manifold. There is a threaded hole in the pipe into which the sensor is screwed.
- On the other hand, to the electrical connector, which connects to the electronic control unit (ECU) of the motor. The probe looks like a fork with four teeth, and the connector looks like a plane with four holes.
An oxygen sensor in a car is installed on any vehicle. These are cars, trucks, buses, special equipment. Most lambda probes are designed for 60-80 thousand kilometers. If the device fails, it must be repaired or replaced. In the absence of a working device, most modern cars go into emergency mode.
Third party sensors
To improve engine performance or simply notice a failed oxygen sensor, car owners turn to options from third-party manufacturers who also produce wideband sensors. To do this, it is better to take products from well-known companies, among which the following are popular:
- AEM performance electronics;
- INNOVATE motorsports;
- Depo Racing.
Each of these brands offers several types and generations of oxygen sensors that offer acceptable levels of accuracy and reliability. There are certain complaints about the broadband probes from Depo Racing, but many experts would argue here too.
INNOVATE motorsports probes require prior calibration. To do this, they need to be connected in air so that they set the desired value, and only then installed in the exhaust system. Sometimes they have problems with controllers and other electronic components. AEM performance electronics have the fewest problems, but they are the most expensive.
When installing a broadband lambda probe, you need to know that it does not tolerate overheating. Therefore, they are installed at a distance of at least 40, and preferably 50 cm from the turbine or the beginning of the exhaust manifold.
Why do you need a lambda probe?
To answer this question, it is necessary to understand the physics of fuel combustion in an engine. For efficient combustion of fuel in an engine, the presence of two components is required - fuel and oxygen. The fuel enters the core using injectors connected to the fuel tank. The oxygen level is controlled by a mass air flow sensor device.
Physical experiments show that the optimal level of fuel combustion is achieved when there are 14.7 parts of air and 1 part of fuel in the core. This relation is called the lambda relation, and is denoted by the Greek letter λ. If in the core oxygen in relation to the fuel is in a proportion of exactly 14.7 to 1 , then the λ indicator is equal to unity.
Fuel combustion scenarios depending on whether the optimal fuel/oxygen ratio is achieved:
- λ is less than 1. There is a lack of oxygen in the core. Some of the fuel does not burn (there is not enough oxygen), which leads to an increase in fuel consumption.
- λ is equal to 1. This is the optimal scenario. The fuel burns completely in the core, and the engine runs stably, without jerking.
- λ is greater than 1. In the core, fuel burns quickly, since there is a shortage of it (while, on the contrary, there is a lot of oxygen). The engine begins to run jerkily, which will impair the functioning of the machine.
The lambda probe does not regulate the amount of oxygen and fuel in the core. It evaluates the oxygen concentration in the exhaust gases and provides this information to the engine ECU. If there is a lot or little oxygen, the electronic unit reduces or increases the fuel supply, which leads to the reduction of the fuel/oxygen ratio to the standard value λ.
Mechanics of lambda probe operation:
- When an internal combustion engine operates, fuel (gasoline, diesel) is injected through the injectors into the engine active zone. During combustion, gases are formed that enter the exhaust manifold, which is shaped like a pipe. Some of the gases enter the active zone of the lambda probe.
- The device determines the amount of oxygen in the exhaust gases and compares it with standard values. If the optimal amount of oxygen is contained (14.7 to 1) , then nothing happens and the device does not send a signal to the engine control unit. The gases enter the filtration chamber (usually a catalyst).
- If the lambda probe detects a deviation from the standard values (up or down), it will send an electrical signal to the engine ECU. Then the unit sends a signal to the injectors, which leads to a decrease or increase in the amount of fuel injected. Now the fuel burns and hits the active zone of the lambda probe and the cycle repeats again.
- Many modern cars have not one, but two lambda probes. The second device is installed immediately after the catalyst. The second lambda probe performs a different function - it allows you to determine the quality of gas purification in the catalyst in order to change its operating mode if necessary. It can also signal to the driver that something is wrong with the device.
Note! The same device is used as the second lambda probe. It has a similar structure, works on the same principles, connects to the car in the same way, and so on. It differs in functions and location.
Causes of malfunction
The average service life of wide-band sensors is 100–130 thousand mileage. The following indicators can significantly reduce the performance of the device:
- low-quality gasoline;
- diesel fuel with a high sulfur content, additives;
- use of low-temperature sealants during installation (the coating is destroyed and gets into the exhaust manifold and sensor block);
- wear of oil caps, rings, oil penetrates into the exhaust manifold system;
- incorrectly set ignition, systematic entry of enriched fuel assemblies into the cylinders;
- crack in the body;
- wiring fault, unstable contact, open circuit.
Each of the reasons affects the service life of the oxygen sensor. When replacing parts, use only original products, checking the catalog numbers. Manufacturers insist that wide-bandwidth oxygen sensors can only be replaced with similar ones with matching catalog numbers.
Types of lambda probes
- Zirconium. The body is made on a metal base (usually steel). Contains a ceramic block onto which a zirconium dioxide compound is sprayed. Thin platinum plates are installed on top, capable of generating electric current (they act as electrodes). The device operates at a temperature of 300-350 degrees. Heating of gases is not provided due to the fusibility of zirconium and individual elements of the lambda probe.
- Titanium. The design is similar to the previous model, but the coating is made of titanium. This metal belongs to the category of refractory, therefore a heating element is additionally installed on the titanium lambda probe. The heater increases the temperature of the gas in the core. This allows you to obtain more accurate values for the gas mixture and increases the shelf life of the probe.
- Broadband. The zirconium and titanium lambda probes that we discussed above are usually made in the form of narrowband devices. But there are also broadband devices (based on zirconium and titanium). They contain two additional cells that play a number of auxiliary but extremely important functions. They seriously improve the quality of measurements, increase the shelf life of the device, and so on.
If you have a choice, preference should be given to broadband devices based on titanium. They are expensive, but provide the highest quality measurements and have a long shelf life.
A little history
This element can be considered the most popular among all other sensors in the car. Automotive diagnostic specialists often deal with it. There have been oxygen sensors before, this is not a new thing. The first lambda probe was a kind of sensitive element without heaters. The element was heated by the temperature of the exhaust gases. The heating process took some time.
As the years passed, the environmental situation around the world constantly deteriorated. Therefore, it was necessary to take measures to tighten the harmfulness and toxicity. The requirements for cars have become stricter. At this point, the sensor began to develop and evolve. It was equipped with a special heater.
How does a car oxygen sensor work?
To understand the operating mode of the lambda probe, you need to know its design. Essential elements:
- Frame. It has a hollow cylindrical shape, inside which the functional elements of the lambda probe are contained. Usually made on a steel basis.
- Seal with thread. It is attached to one of the edges of the lambda probe. The thread is used to attach the spare part to a pipe that contains corresponding recesses.
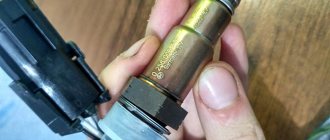
- Ceramic tip with protective shield. Located next to the seal. It has a ceramic base that contains sensitive elements based on zirconium/titanium oxide and a thin layer of platinum. Needed to collect exhaust gases. Can generate electric current (acts as an electrode).
- External screen. It is attached to the middle of the body and contains a coating based on zirconium or titanium dioxide. Can generate electric current (acts as an electrode).
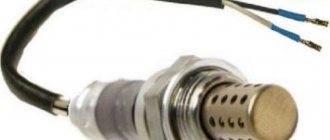
- Output wires. They are attached to the other side of the body. Transmits an electrical signal, if present, to the engine ECU. The total number of wires can be from 2 to 4.
- A heating element. Attached to the body of the lambda probe, it is capable of heating the body. This improves the quality of gas analysis and extends the shelf life of the lambda probe.
- The sensor also contains other auxiliary elements. These are electrical wires for transmitting the impulse inside the probe, a current collector, a cuff and others.
The mechanics of the lambda probe are simple. The outer screen is in contact with atmospheric air, while the inner screen is in contact with exhaust gases. At a sensor temperature of 300-350 degrees, a potential difference occurs between the internal and external screens due to the unequal oxygen content in the air/gases. The higher the difference, the stronger the voltage. The resulting electric current is supplied to the wires, which are transmitted through the wires to the engine ECU.
Connection nuances
If the device breaks down, you can install a sensor recommended by the manufacturer or a similar zirconium probe. Here are the basic rules:
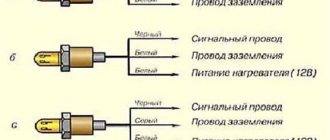
- The colors of the sensor wires vary, but the color that supplies the signal to the electronic circuit is always dark.
- “Earth” comes in yellow, white, and gray shades.
- To connect a 4-wire probe in place of a 3-wire probe, connect the ground wires of the heater and the negative signal system to the ground of the car. The heater wire is connected through a relay circuit to the positive pole of the battery.
Connecting a new probe would be better done by a specialist from a car service center.
Lambda probe is faulty: causes and repairs
The lambda probe fails for various reasons. These are high loads on the exhaust system of the car, damage to electrical wiring, the use of low-quality gasoline, and others. Below we will consider the main scenarios of malfunctions, and also find out how these problems with the lambda probe are resolved.
Carbon formation
One of the popular reasons for the failure of a lambda probe is the formation of a layer of carbon in the area of the active zone of the spare part. If the engine is started too quickly, small portions of gasoline enter the exhaust system of the car and settle there on the surface of the lambda probe. Carbon deposits also form for other reasons - the use of low-quality fuel, improper starting of the engine.
Failure is determined based on the following criteria:
- The engine runs in slight jerks.
- The ignition often fails.
- The “Check Engine” light flashes periodically.
Related article: Check Engine light (engine error): causes and best solutions to the problem
To fix this problem, it is recommended to remove the old one and install a new lambda probe. You can also try cleaning the tip yourself. This is done like this:
- Dismantle the device, carefully remove the protective cap.
- Pour 80-100 ml of orthophosphoric acid into a container.
- Place the cap in the container so that its edge remains outside (for example, tie it to something).
- After 20-30 minutes, remove the sensor, rinse with water and dry it.
- Reinstall the tip, apply protective paste and weld the structure (for example, using argon welding).
Device overheating
The lambda probe may temporarily fail due to overheating of the exhaust system. The key word here is “temporarily” - under increased load, the “Check Engine” button begins to flash. Whereas during normal driving such a problem is not observed. This is due to the fact that zirconium-based sensors are installed on cars, and such lambda probes cannot operate at high temperatures. This leads to failure of the device.
Overheating is determined by the following signs:
- The problem only occurs under high loads (driving at high speed, climbing uphill).
- Fuel costs are rising significantly.
- The performance of the acceleration and braking system deteriorates.
To fix this problem, it is recommended to dismantle the zirconium and install a titanium lambda probe. Sometimes this does not help - for example, if the car system as a whole cannot cope with high loads (and not just the lambda probe). In this case, simply reduce the load level to correct the problem (for example, drive more slowly).
Damage to electrical wiring
Another popular reason for lambda probe failure is damage to the wiring. Each device is equipped with electrical wires (from 2 to 4) that transmit a signal to the motor control unit. If the wiring is damaged, the signal becomes unstable, which leads to unbalanced motor operation. Damage to wires is often mechanical in nature (for example, the driver was involved in an accident).
Damage to electrical wiring is determined by the following signs:
- The engine runs intermittently and there may be ignition problems.
- Noticeable increase in fuel consumption.
- The “Check Engine” light comes on periodically, but then goes out.
If the wires are damaged, it is recommended to install a new lambda probe. You can replace a damaged section of the circuit if you have wires from an old probe lying around. To repair, the old oxygen sensor is removed from the system, then the old damaged element is cut off (with or without a connecting plug). In its place, undamaged electrical wiring from the old lambda probe is installed.
Heater failure
Another reason for the failure of the lambda probe is a breakdown of the heating element. A heater failure does not always damage the probe. This defect usually does not make itself felt at low loads, but at medium and high loads it manifests itself. The main signs of heater failure:
- Under increased loads, the engine begins to stall.
- Fuel consumption increases when climbing a mountain or while driving fast.
- The spare part was purchased a long time ago (approximate mileage - 30-50 thousand kilometers).
The heating element is firmly attached inside the lambda probe, so it is difficult to disassemble the spare part and remove the damaged heater. If you have such a problem, buy a new probe and replace it with the old one. If you do not plan to drive under high loads, then you do not need to replace it. That is, you can drive a damaged lambda probe until it completely fails.
Methods for diagnosing an oxygen sensor
Experts advise checking the correct operation of the lambda probe every 10,000 km, even if there are no problems with the operation of the device.
Diagnostics begins with checking the reliability of the connection between the terminal and the sensor and for the presence of mechanical damage. Next, unscrew the lambda probe from the manifold and inspect the protective casing. Small deposits are cleaned.
If, during a visual inspection, traces of soot, strong white, gray or shiny deposits were detected on the protective tube of the oxygen sensor, the lambda probe should be replaced
How to check a lambda probe with a multimeter (tester)
The sensor is checked for functionality using the following parameters:
- Heating circuit voltage;
- "Reference" voltage;
- Heater condition;
- Sensor signal.
Connection diagram to the lambda probe depending on its type
The presence of voltage in the heating circuit is determined with a multimeter or voltmeter in the following sequence:
- Without removing the connector from the sensor, turn on the ignition.
- The probes are connected to the heating circuit.
- The readings on the device must match the voltage on the battery - 12V.
“+” goes to the sensor from the battery through the fuse. In its absence, this circuit is called.
“—” comes from the control unit. If it is not detected, check the terminals of the lambda probe - ECU circuit.
The reference voltage measurements are carried out using the same devices. Sequencing:
- Turn on the ignition.
- Measure the voltage between the signal wire and ground.
- The device should show 0.45 V.
To check the heater, set the multimeter to ohmmeter mode. Diagnostic stages:
- Remove the connector from the device.
- Measure the resistance between the heater contacts.
- The readings on different oxygen pumps are different, but should not go beyond 2-10 ohms.
Important! The absence of resistance indicates a break in the heater circuit.
A voltmeter or multimeter is used to check the sensor signal. For this:
- They start the engine.
- Warm it up to operating temperature.
- The probes of the device are connected to the signal wire and the ground wire.
- Engine speed is increased to 3000 rpm.
- Monitor voltage measurements. Jumps should be observed in the range from 0.1 V to 0.9 V.
If during at least one of the checks the indicators differ from the norm, the sensor is faulty and needs to be replaced.
Video: checking the lambda probe with a tester
Checking with an oscilloscope
The main advantage of this lambda probe diagnostic over checking with a voltmeter and multimeter is the recording of the time between similar changes in the output voltage. It should not exceed 120 ms.
Sequence of actions:
- The probe of the device is connected to the signal wire.
- The engine is warmed up to operating temperature.
- Engine speed is increased to 2000-2600 rpm.
- Based on the oscilloscope readings, the performance of the oxygen sensor is determined.
Diagnostics with an oscilloscope gives the most complete picture of the operation of the lambda probe
Exceeding the time indicator or crossing the voltage limits of the lower 0.1 V and upper 0.9 V indicates a faulty oxygen sensor.
Lambda probe service life
The service life of a device depends on many parameters. This is the quality of spare parts, the purity of the fuel used, the nature of the driver’s control of the car, and the level of load. Most zirconium devices are designed for 60-80 thousand kilometers . Narrowband titanium and broadband titanium operate up to 100 and 120 thousand kilometers . The service life can be found in the instructions for the device, and can also be checked with the seller upon purchase.
In the case of normal non-commercial use of the machine (that is, not for transporting goods or delivering passengers), the device operates for 1-3 years . Therefore, it is recommended to keep a couple of spare devices on hand so that, if necessary, you can always quickly replace a damaged device. Also follow these tips and tricks to extend the life of your sensor:
- Fill the engine only with high-quality, clean gasoline (not lower than class A-92). Refuel at trusted gas stations, do not trust private hot sellers and online stores.
- If you tried to start the engine, but it did not start, then the second attempt should be repeated after 25-30 seconds (but not earlier ). Otherwise, unused gasoline will enter the sensor, which will lead to its damage.
- Do not use sealants to fix the lambda probe. When the engine warms up, vulcanization of sealants may occur, which will lead to irreparable consequences not only for the sensor, but also for the entire car.
- Periodically inspect the place where the device is attached to the pipe where the exhaust gases flow. The optimal frequency of checking is every 15-20 thousand kilometers.
If you do nothing
First of all, the motorist himself will suffer, as fuel consumption will increase, and the exhaust gases will have a toxic smell with strong hues from the pipe. In the case of modern cars with a lot of electronics that know how to check the health of the oxygen sensor, the lock is activated. In such a situation, any movement by car will become impossible. But the worst option is depressurization. The car will not move at all or will have difficulty starting. This can lead to complete engine failure. In the event of depressurization, all gases will enter the air intake channel instead of the exhaust pipe. When engine braking is performed, the probe will detect toxicity and give negative signals. This will completely damage the injection system. The main sign of depressurization is loss of engine power. This can be felt while driving at speed. Also, knocking and popping noises and a smell will be heard from under the hood. Previously, motorists needed to know how to adjust the carburetor. Now nothing has changed - you need to remember how to check the oxygen sensor (VAZ-2112 is no exception).
Replacing the lambda probe
There is nothing difficult about the replacement. Before carrying out work, put the car on a lift, and also buy a new device. An approximate algorithm for replacing a part is discussed below.
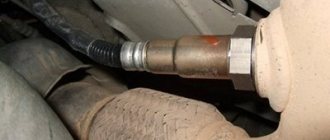
- The sensor is mounted in front of the catalyst in the exhaust manifold of the car under the hood. If two devices are installed in the system, then the first is mounted in front of the catalyst, and the second is mounted after it. Modern manifolds are protected with a metal plate - before replacing it must be removed to gain access to the lambda probe (one or two). Use screwdrivers to remove the protective plate.
- Now warm up the car engine to a temperature of 80-90 degrees. This will make it easier to unscrew the old sensor (it sits tightly on the car). When heated, the metal expands slightly, which makes it easier to unscrew the part. There is no need to warm up the engine for a long time. The best option is to start the engine and wait until the temperature is 80-90 degrees, warm up the engine for a few minutes and turn off the ignition.
- Use a wrench to disconnect the negative terminal on the car battery. The nuts on the electrical components are not tightly tightened, so there should be no problems with their disconnection. As you loosen the nut, move the terminal to the side to completely disconnect the electrical components of the car.
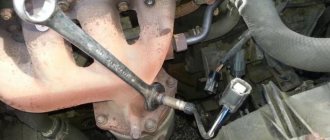
- Find the lambda element on the exhaust system and carefully disconnect the electrical connector. The old oxygen sensor fits snugly, but not tightly, in the connector, so you can easily disconnect the device with a few hand movements. The connector should be moved to the side so that they are located at a distance of at least 20-30 centimeters from each other.
- Now the most difficult stage of work is being carried out - the actual dismantling of the device. To carry out the work, it is recommended to purchase a nozzle with an extension, which makes the work easier. Attach the nozzle to the lambda probe, rotate the nozzle counterclockwise to loosen the fastening. Take a wrench and loosen the nut on the exhaust pipe, and then carefully pull out the oxygen sensor.
- You can get rid of your old device – you won’t need it anymore. It does not contain any useful spare parts or components. Pick up a new lambda probe and treat its threads with any good lubricant (for example, it could be copper paste). The use of lubricant simplifies the installation of the device and also seriously reduces the risk of damage to the threads on the exhaust pipe.
- Now take the new sensor in your hands and secure it until it stops in the hole on the pipe. For installation, you do not need to use a nozzle with an extension - installation by hand will be sufficient. Use a wrench to tighten the nut to secure the part into the hole. But don't overdo it! If you overdo it, it will be difficult to remove the lambda element in the future, which will create many unnecessary problems.
- Connect the new part to the electrical connector leading to the engine. Take the “fork” end of the lambda probe in your hand, treat it with electronics cleaning spray and insert it into the motor electrical connector. It is recommended to fix the resulting structure with clamps. You can also put them on a special “shelf” made in the form of hanging hook-supports (all modern cars have them).
- At the final stage, reinstall the metal plate and connect the negative terminal to the battery. Reset the settings or update the memory on the electronic unit that controls the engine. You can reset the settings on the control panel or using a program on your smartphone, if your ECU supports such a function. To activate the sensor, remove the car from the overpass and drive it for several tens of kilometers. After this, the device will begin to function as usual.
It is recommended to carry out work wearing thick, clean gloves. Many parts of the exhaust system will be hot (gloves will help you avoid getting burned). Gloves will also help protect against electric current discharges at the stage of dismantling the terminal.
Tips and tricks
At the first signs of malfunction of the lambda sensor (the car begins to jerk sharply when starting to move, the gas pedal does not work so quickly, warning messages should be displayed on the panel, engine overheating during operation, unpleasant toxic gases from the exhaust pipe), you need to decide on some questions:
- Accurate detection of probe malfunction.
- Correct selection of a new sensor.
- You should not be tempted to install a used sensor (its remaining life is unknown) if you want to keep the engine in good condition.
- There is no need to try to disassemble the device; it is sealed and cannot be repaired.
It is advisable to buy an original probe or a universal one (for engines of a certain manufacturer).
Which brand is the best lambda probe and how to choose it
You can find hundreds of different lambda probes on sale. The total number of manufacturers in Russia is 20-30 companies. The best manufacturing companies are the following organizations:
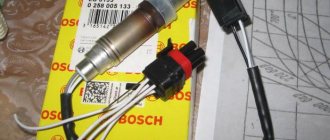
- Bosch. Makes expensive, but high-quality and reliable lambda probes. They are suitable for all categories of vehicles. Supplied with protective cap and lubricant. The main disadvantages are the high price and many fakes.
- Profit. A Czech brand that sells lambda probes in the mid-price range. Available in various configurations and sold in any store. Therefore, the driver will be able to choose a spare part to suit his needs. The main disadvantage is mediocre wire protection.
- Denso. A Japanese brand that produces broadband and zirconium lambda probes. The brand's products are distinguished by good quality, a wide variety of probes in thread design, and a fairly reasonable price. The main disadvantage is that it is sold mainly online.
- NGK. Another Japanese brand that produces high-quality, reliable lambda probes. The parts are inexpensive, which is another advantage of the brand. NGK has one major drawback - the electrical connector is unsuitable for European and Russian cars. The buyer will have to cut and solder with a different connector.
Video “Review of decoys for oxygen controller”
User Victor Tokar in his video talked about devices for bypassing lambda probes, describing the main features and disadvantages.
Do you have any questions? Specialists and readers of the AUTODVIG website will help you ask a question
Was this article helpful?
Thank you for your opinion!
The article was useful. Please share the information with your friends.
Yes
No (100.00%)
X
Please write what is wrong and leave recommendations on the article
Cancel reply
Rate this article: ( 1 vote(s), average: 4.00 out of 5)
Discuss the article:
Lambda probe decoy
Oxygen sensors are sensitive devices that are usually designed for 60-80 thousand kilometers. If the sensor fails, the engine check . The car itself can be put into emergency mode. To restore the car's operation, you should install either an original probe or a decoy device. It sends a false signal to the electronic system, which avoids putting the car into emergency mode. There are two categories of deceptions:
- Mechanical. It is made in the form of a small steel or bronze cap, inside of which a filter catalyst is installed. The mechanical blende is installed directly on the faulty probe. When gases enter, the blende filters the air to the required levels. Then a signal with the required oxygen levels is sent to the engine control unit. Installation of the “mechanics” is simple - the lambda probe is removed and a blende is installed in its place. At the end, a non-working oxygen probe is connected to it.
- Electronic. It is made in the form of a small controller chip, which is installed on a circuit that goes from the lambda probe to the electronic engine control unit. Electronic snag corrects the signal, setting the required standard indicators. This allows you to fool the engine. The installation method for electronic decoy depends on the device model. Usually it is made in the form of a microcircuit block with wires of different colors feeding the elements. These wires are connected to the necessary elements of the circuit.
Use “cheats” only in extreme cases, as this is fraught with the following consequences:
- Deterioration in driving characteristics of the car. The deception does not determine the oxygen concentration, but only imitates this process, deceiving the engine control unit. Therefore, an oxygen/fuel imbalance may occur in the engine, which leads to various consequences. The most common problems are increased fuel consumption, deterioration in vehicle performance, and others.
- Refusal of warranty service. Almost all modern cars are covered by a factory warranty, which is 2-4 years depending on the brand of vehicle. To carry out repairs, the driver must take the car to a service center. If, during an inspection, a mechanic discovers a snag, this may be a reason for denial of warranty service. In this case, the law will side with the service center.
- Possible problems with the law. The technical regulations of the Customs Union directly prohibit making unapproved changes to the design of the exhaust system. In case of violation, the driver can theoretically be held accountable under Article 12.5 of the Code of Administrative Offenses of the Russian Federation. In practice, drivers rarely have problems with the law, since it is almost impossible to install deception without special equipment. And the punishment under Article 12.5 is mild - a 500 ruble fine.
Conclusions and results:
- A lambda probe is a small device that is attached to the catalyst pipe in front of the manifold. Its main function is to determine the oxygen concentration in the exhaust gas mixture in the pipe.
- Causes of lambda probe malfunction:
use of low-quality gasoline, high loads, incorrect engine start-up, and others. - If the lambda probe fails, you need to buy a new one and install it: disconnect the battery, carefully unscrew the old probe, apply lubricant to the new one, screw it to the pipe, reset the engine ECU to reset the settings.
- Tools for replacing the lambda probe: analyzer, auxiliary tools. This is a suitable wrench, a special socket with a flexible extension (sold in many car dealerships), a suitable lubricant (say, copper paste).
Main reasons for failure
There can be many reasons for the breakdown of the oxygen sensor, among them, of course, the quality of the fuel used. Let's look at the main ones:
- Damage or shaking of the probe due to careless driving (hitting an obstacle, a hole).
- Probe overheating due to a malfunction in the ignition unit.
- Clogging of the ceramic surface with combustion products of low-quality gasoline.
- Engine malfunction (oil getting into the exhaust).
- Short circuit in the sensor wires.
Sensor failure can occur gradually, causing the engine to malfunction. On modern cars there is a second probe after the catalyst, which improves the quality of the internal combustion engine and protects the atmosphere from fuel combustion products.
Instructions for repairing and replacing the sensor
You can replace or restore the controller yourself.
How to remove the sensor
Removing the device, regardless of the machine model, is done as follows:
- Warm up the surface of the part to approximately 60 degrees. To do this, you can use a regular lighter or torch. Warming up will make it easier to remove the device from the seat.
- Disconnect the wires connected to the part.
- Carefully unscrew the oxygen sensor. It is not recommended to use special tools for dismantling.
- Remove the protective cap.
Diman Stepanenko spoke about dismantling the lambda probe on his own.
Cleaning and Soaking
There are two options for restoring the oxygen sensor:
- the first - using orthophosphoric acid;
- the second - with phosphoric acid and a burner.
It must be taken into account that phosphoric acid or another similar product belongs to the category of hazardous substances. When working with a substance, it is important to remember safety rules. Acid should not be allowed to enter the mucous membranes or inside the body.
First way
This method cannot be called accelerated, since the consumer needs to gain full or at least partial access to the ceramic surface of the device. This component is hidden behind a protective cap made of metal; it is not easy to dismantle. Do not use a hacksaw for removal as it will damage the work surface. Dismantling is carried out using a lathe - at the base of the oxygen sensor, you need to cut off the protective cap using a cutter. The cutting is done close to the thread.
If it is not possible to use the machine, you can use a file. It is not possible to completely remove the cap with this tool, but you can make small windows about 5 mm in size on it. Approximately 100 ml of orthophosphoric acid is used for cleaning. If it is not available, you can use a rust converter.
Device recovery:
- Pour the liquid into a glass container. You can use jars, glasses, etc.
- Place the oxygen sensor core into the container. The controller cannot be completely immersed in liquid. Wait about twenty minutes.
- Remove the sensor from the container and rinse its base with tap water. Wait until the device is completely dry.
- If you are unable to remove the dark deposits on the core the first time, repeat the procedure. It is necessary to ensure that the element again becomes a metallic color.
- If, after several attempts, high-quality cleaning fails, you can use a brush to enhance the effect of the product. The base of the device is wetted and treated with it. As a result, the plaque should be removed. If the protective cap has been removed, then the brush will not be needed. It is better to use a toothbrush instead.
- After cleaning has been completely completed, the sensor is washed. If the cap has been removed, then after restoration it must be put back in place. For this, argon welding is used.
This is interesting: Steering rack knocking: causes and solution to the problem
When using this method, please note:
- If the device is heavily soiled, then twenty minutes will not be enough to restore it. For critical blockages, the soaking procedure can be extended to three hours. In some situations, cleaning may take a full night, at least eight hours.
- After cleaning, you need to check how effectively the procedure was performed. Diagnostics will require some time for the car owner to understand how the car behaves and how much fuel it “eats.” If the malfunction indicator on the device remains lit, then the controller could not be repaired.
- If the machine is equipped with a sensor whose protective cap is equipped with a double shell, then it will not be possible to make a hole in it with a file. To solve the problem, you need to soak the device in acid or another product with the cap itself.
Second way
To restore the controller you will need the same acid, as well as a gas burner or stove. When using a household stove, give preference to a small burner.
Cleaning procedure:
- The lid is removed from the burner. Then it is turned over and installed back, with a slight offset to the side. It is necessary to install the lid so that it covers the pipe itself from liquid getting inside.
- The fire on the burner is lit.
- The lambda probe core must be dipped in a container of acid, then taken with pliers and heated over a fire. This will cause the acid to boil and the substance will begin to splash. A greenish tint of salt will appear on the working surface of the device.
- Wait until the substance has completely boiled away. Rinse the controller with clean water and then repeat the cleaning procedure. These steps must be continued until the controller is completely shiny. This may take ten minutes or more. Before further installation, the thread of the lambda probe must be treated with graphite lubricant, which will prevent the oxygen sensor from sticking to the threaded hole.
Installing a lambda probe
Installation of the device is carried out in the reverse order:
- A protective cap is installed on the sensor.
- Wires are connected to the device.
- The controller is installed in the seat and screwed in.
Check with an oscilloscope or motor tester
The main advantage of checking the O2 sensor with an oscilloscope is to record the period of time during which the output voltage changes.
You cannot take such readings with a voltmeter or multimeter.
Even the vehicle control system is not able to detect a slow response of the lambda probe to changes in the volume of oxygen in the exhaust gases, therefore, with such a malfunction, the likelihood of “CHECK ENGINE” appearing on the instrument panel is minimal.
Although cars produced recently already have ECUs installed that cope with this task.
The standard indicator of voltage change is 120 mSec and no more. If the reaction time exceeds the standard (the sensor is slow), then it looks like this on the graph.
In this case, you need to check the lambda probe for coking; if this does not help, it means that the ceramic element has aged.
The graph below shows how slowly it responds when you press the gas pedal hard.
The correct operation of the lambda probe is shown in the graph below.
Here you can see that the upper voltage limit does not exceed 0.8 volts, and the lower one does not go beyond 0.1V. Temporary indicators are also normal.
If you look at another chart, you can see a different situation here.
Here the lower limit has gone beyond the 0.1V mark, and this is unacceptable, which means the lambda probe is faulty. “CHECK ENGINE” will appear on the instrument panel.
Diagnostics using electronics
It is possible to find out what condition the lambda probe is in only with the help of specialized equipment. An electronic oscilloscope is also suitable for testing. Specialists know how to check the probe in other ways (multimeter), but this way they can only find out whether the element is working or broken.
Before checking the serviceability of the oxygen sensor, you must start the engine. In a calm state, the probe cannot fully show its entire working picture. If there are minor deviations from the norms, it is better to replace the part with a new one.
Device types
Zirconium oxygen sensors (we are missing titanium ones) come in two types - threshold and broadband.
It is not easy to check the latest types of devices using conventional methods, since they are complex in design and are installed on the latest car models. The connection diagram is shown below.
For more details on what a lambda probe is, the evolution of its development, what types there are, read here; we will not dwell on this in this material.