Good day to all! In this video (below) we will talk about replacing thresholds with a profile pipe. I’ll also tell you about replacing rotten sections of the bottom and wheel arches with ordinary steel sheets. Well, briefly about the restoration of door hinges. And at the end of the video I’ll explain why this is necessary. Now let's talk about everything in order.
The text is then fully voiced in the video.
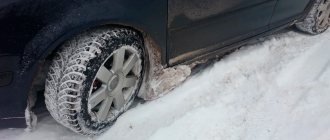
In our case, the left threshold on the VAZ-2111 will change. The right one was already replaced a few weeks ago, the link to the video will be in the description. In a similar way, you can change the thresholds on most cars. I don't think the work will be fundamentally different. We will cook using a semi-automatic device, but you can get by with regular electrodes.
Right threshold
Replacement of thresholds VAZ 2110, 2111, 2112
By examining the condition of the thresholds and bottom of the VAZ 2110, you can easily determine the age of the car.
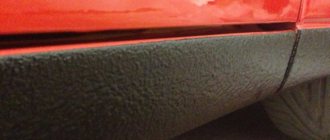
It should be recognized that the factory anti-corrosion treatment is not of very good quality and without proper care, after 7-10 years, through holes may appear on the thresholds as a result of corrosion. In this article, we will analyze the process of replacing VAZ 2110 thresholds, list the tools and materials for the work, and also talk about why thresholds rust and how to extend their life when there is no severe corrosion yet.
The need to install an amplifier
Natural wear and tear on car sills is inevitable. In the case of the VAZ 2110 configuration, the situation is aggravated by the lack of a full-fledged standard amplifier. Moisture and aggressive reagents quickly penetrate into the threshold box, which structurally consists of two panels and an amplifier. Corrosion begins to destroy the metal body 12 months after purchasing a new car.
Most drivers replace the standard elements with thresholds made of profile pipes on the VAZ 2110, which are characterized by low wear due to the metal thickness of 1 cm and proper anti-corrosion treatment. When producing a profile, the metal is galvanized using the galvanic method.
Causes of rust and preventive measures
The first versions of the VAZ 2110 were characterized by the fact that their paintwork began to peel off in the area of the windshield frame. The problem began to develop from the seal and gradually spread to the entire body element.
Soon the manufacturer changed the painting and installation technology, but still the problem of a body that was not resistant to corrosion could not be completely overcome.
We will look at the main reasons for the probable appearance of rust on the sills, bottom, arches, and side members. We will also give some tips on how to deal with them.
Causes
Prevention measures
After 5-7 years, traces of corrosion may appear on the body and bottom. There are no remedies against age, so listen to the following protective measures
It is easy to advise avoiding accidents. In this case this is the only recommendation
Do not try to save money on body repairs, since an unqualified specialist will not really do anything, but will only waste your time and money. Choose experienced, proven craftsmen and service stations
The worst thing is snow and rain. Try to knock down and wash away the snow stuck under the bottom. Especially if you often drive on roads sprinkled with salt or snow and ice melters.
Humidity in the garage
Think about the issues of moisture protection of the room; in winter, periodically turn on the heater or heat fan in the garage in order to at least partially combat the high level of rust
Small stones destroy the anti-gravel coating within a year, after which corrosion begins to appear. Avoid such roads, carry out periodic preventive maintenance
It gets through wet shoes and snow brought into the cabin. As a result, the bottom begins to rot from the inside. Be sure to lay down rubber mats with sides in winter; be careful that water does not get inside the cabin during rain or car wash.
To increase the service life of the underbody of your own car, periodically perform anti-corrosion treatment. Pay special attention to the hidden cavities of the side members and sills.
Rusted thresholds
Problem Definition
It is not difficult to determine the presence of rust on the bottom. Although if you bought the car second-hand, these problems can be carefully disguised.
- Be sure to inspect the body from below. Traces of corrosion may be hidden behind a layer of anti-gravel coating or putty. Use a hammer or awl to hit these areas lightly. If rust is present, you will see it.
- Check the condition of the body along the thresholds, in the cabin at the feet of the driver and front passenger. It is these places that are quite weak in the case of the VAZ 2110.
- If the bottom is rotten, you can notice this by the sagging of the floor under your feet under load.
- When the driver's seat comes off or cannot be moved, a rotten body may also be the cause.
- One of the most unpleasant situations is rotten thrust pads designed for lifting a car on a jack. But this way you will immediately determine that there are problems and they need to be solved.
Preparatory stage
Preparation when replacing a threshold takes a sufficient amount of time. Reinstallation involves the use of welding, so the floor covering and part of the interior are removed from the car. To do this you need:
- Remove side doors, fenders, lockers.
- To properly connect the electrical wiring, craftsmen advise labeling the wire plugs.
- Disconnect the negative terminal from the battery and drain the fuel.
- Pull out the seats and flooring.
- Check the condition of the bottom. In 50% of the options, when repairing a threshold, it is necessary to partially replace the bottom in the area of the jack and spar.
- Place the car over the inspection hole and jack it up. When replacing a threshold with a profile, experienced repairmen prefer to turn the car on its side, installing it on the channels.
- Protect front and rear windows and plastic interior elements.
Dismantling
The process of dismantling the threshold step by step:
- Clean the paintwork with a grinder to find where the outer part of the sill is welded to the body.
- Using a grinder or chisel, cut out the lower connector, the outer part of the threshold, and the internal amplifier.
- Thoroughly clean the surface with a brush and treat the metal with a rust converter.
It is worth paying special attention to those places where there was corrosion, and if necessary, weld metal patches.
Thresholds on VAZ
Replacement of thresholds for VAZ 2110 cars
The body of the VAZ 2110 is not of high quality, as is the case with many other VAZ models. Very often the same procedure is required for VAZ 2101-2107 cars. Unfortunately, the body of all these machines is also highly susceptible to corrosion. If you did not treat the car body with anticorrosive, and the car was operated in harsh conditions, then after 8-10 years the rust will be through. Is it possible to repair VAZ thresholds yourself? Yes. And we'll show you how to do it.
To repair VAZ thresholds yourself, you will need:
- wheels for grinder.
- cleaning disk.
- carriage for an angle grinder.
- thresholds for VAZ 2110. Can be purchased in our store.
- (possibly) rear wing repair kit.
- right side of the bottom of a VAZ 2108.
- mastic.
- tassels.
- primer.
- solvent 646.
Tool:
- set of auto tools.
- Bulgarian.
- semi-automatic welding machine 220V
- drill
We are preparing the car for restoration. First you need to disconnect the battery and start disassembling the desired side of the car (right or left): remove the rear wheel and locker, front fender, front and rear doors, seal, seats, side trims, seat belt, remove carpets and sound insulation.
After this, you need to cut off the rotten pieces of the bottom using a grinder. The glass must first be covered (with cardboard, for example). There will be a threshold and part of the bottom of the connector. If somewhere (at the top, for example) the condition of the metal is better, then this area can be left.
At the final stage of preparation, you need to clean it with a carriage brush down to the metal.
Now you can begin the repair process itself. Using a semi-automatic welding machine, you need to weld the connector (after cleaning the welding areas). When working with an angle grinder, follow safety precautions (glasses, buckets of water just in case, etc.).
Now you can weld an amplifier to the threshold purchased in our shop. After this, you need to coat the internal parts with mastic. We do this in such a way that it flows in all directions.
Next you need to clean all the seams with a grouting disc. We roll it at the bottom (i.e. we clamp the threshold onto the connector), there is a special bend on the threshold at the bottom for this. You need to patch the holes in the bottom, then clean everything that needs to be done underneath and coat it with mastic. Essentially reverse assembly occurs.
How to buy?
The order can be placed directly on the website, by filling out an application form, or by phone or in person, directly in the store at the Fortuna-Don car market.
Purchasing goods on the site occurs as follows. By clicking the “quick order” button, you are taken to the page for filling out the form. After filling out all the fields and checking the information, you click the “Place” button, confirming the order. After that, you can choose a payment and delivery method convenient for you.
How to pay?
Payment for goods is possible in any way: by cash or bank transfer, or using a plastic card. If you use the purchase form through the website, the order is transferred to work after assigning it the status “paid”.
How to receive the goods?
When placing an order in any form (via the website, by phone or directly in the store), you can choose a delivery method that is convenient for you. The goods can also be picked up in person by visiting our store at the Fortuna-Don car market, or you can choose the desired delivery method, including courier delivery.
Preparing for work
First of all, you need to raise the left side of the machine to make it more convenient to work. We just drove it onto its wheels. Thus, the body remains on natural support points and does not experience additional loads that could lead to its deformation during operation. Be sure to secure the opposite wheels with stops.
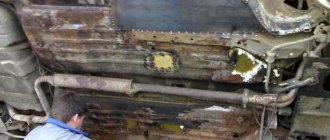
Next, we remove everything that will interfere with the work: fender, fender liner, plastic trim, interior trim, seats, wiring, etc. Only bare metal should remain. As you can see, the part of the front arch located at the threshold, the threshold itself, especially at the front and rear, as well as the areas of the bottom adjacent to it, were primarily affected by corrosion. The situation is, one might say, classic. On the right side the picture was similar, perhaps a little sadder.
Removing the old threshold and rotten areas of the bottom
We take a grinder and cut off the outer side of the threshold, trying to immediately cut through the amplifier located behind it. We cut not right down to the door, but a little lower; This will make it easier to weld the pipe. Bend the cut section down and remove it. Then we move on to the inner wall of the threshold; We also cut it approximately along the fold line.
We bend the amplifier towards the outer wall of the threshold, and shorten the elements sticking out between it and the inner wall as much as possible and bend them upward. You can weld them to the top of the threshold, or you don’t have to weld them, because... a little higher they are already connected by spot welding to the threshold and amplifier.
Let's get to the bottom. Here you just need to cut out the rotten areas. In some places it’s more convenient to crawl up from the interior, in others from below.
Why a square pipe and not repair thresholds?
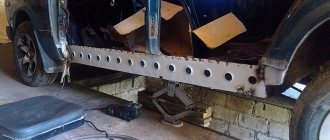
It’s not difficult to find body parts for classics, in particular sills, on sale. Yes, and they are inexpensive. Only their quality leaves much to be desired. I have heard this many times from different people. As you understand, I don’t want to change the thresholds so that they rot in a year. This is largely why it was decided to weld a 60×60 profile pipe instead of the thresholds.
Also, the decision was influenced by banal curiosity - I was just wondering what would come of it all. The idea itself is not new. I have repeatedly seen how the thresholds on the Niva are changed in a similar way.
And of course, one cannot help but admit that simply welding a pipe without worrying too much about aesthetics is somewhat easier than fiddling with repair thresholds.
Average prices
For a VAZ 2111, re-welding the thresholds from a corrugated pipe will cost up to 1,500 rubles. for self-repair, provided that you have a semi-automatic welding machine. Prices for consumables:
- pipe - from 700 rub. for 3 meters;
- bitumen mastic - 500 rub. jar;
- primer, putty - 300 rub.
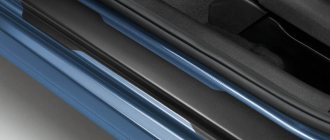
The installation of decorative overlays on a metal structure will add originality and style. Plastic covers with backlight, shagreen, chrome, etc. can be installed in 30 minutes.
Prices for repairs at a car service center start from 10,000 rubles. The price includes replacement of a body element, use of original replicas, putty, painting. In most cases, owners have to pay extra for reinforcement of the bottom, since part of the body on half of the models requires repair.
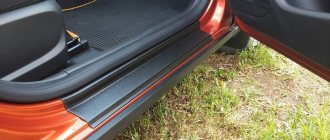
Characteristics of door sills for VAZ 2110
Typically, plastic 2 millimeters thick, black, is used to make linings:
- For the VAZ 2110, manufacturers have mastered making door and sill trims from fiberglass.
- The more expensive door sill trim for the VAZ 2110 is made of aluminum or stainless steel sheet.
- Car enthusiasts often place plastic sill covers with mesh on top of metal thresholds.
- The thresholds are well absorbed and retain their appearance for a long time.
- Although they seem fragile, they are able to withstand a decent impact on an obstacle, which indicates not only protecting the car from scratches, but also protecting it from serious damage.
- The cost of repair, even from a strong blow when the pad itself is broken, will not be expensive. In this case, it is enough to straighten the curved part of the threshold and purchase a new trim.
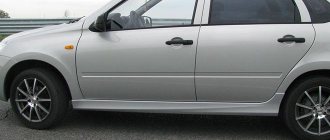
Replacing door sill covers for a VAZ 2110 car
Thresholds on a VAZ that is more than ten years old require frequent replacement; they are practically the first to fail. The proposed instructions will allow you to learn how to properly remove and install the threshold trim on a VAZ 2110. These useful tips will help you do all the operations yourself:
- First, the condition of the door hinges is checked. If the door sag or becomes loose, you need to repair the hinges, and then begin replacing the threshold trims. If there is a lot of wear in the hinge, the gap between the threshold and the bottom of the door becomes uneven, which can lead to it touching the trim.
The front fender fairing is removed.
- To do this, the corresponding wheel is removed.
- Two bolts are unscrewed with a TORX T30 wrench, and a screwdriver is used to unscrew one screw that secures the engine mudguard.
- The shield is removed.
- Unscrew the screw that holds the front wing fairing to the threshold using a key set to “7”.
- The same key is used to unscrew the screws that secure the front fender fairing to the wing and fender liner, and at “10” the nuts securing it to the body are unscrewed.
- The fairing is removed.
- Unscrew the nut with a “10” wrench, and use a screwdriver to turn the screw on the fender liner.
- The fender liner is removed.
- Remove the screws that secure the fender guard to the bumper.
- The casing is released from its attachment to the bracket and bumper.
- The protective cover is removed.
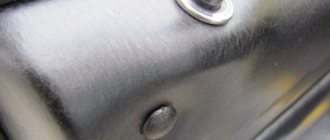
- The bracket holding the decorative trim is removed from below.
Removing the bracket holding the trim
- The fastening screws in the openings of the front and rear doors and linings are turned out.
- The part is removed as shown in the photo.
Removing the door sill of the VAZ 2110
Practical recommendations
There are two original components for the VAZ 2110 on the market:
- Old style amplifier.
- A new element is cataphoresis coating.
Both spare parts are produced by AvtoVAZ (Rostov) and are installed on the model without additional height adjustment.
The old-style amplifier is a rough metal panel with perforations around the perimeter. Installation on a car is carried out through semi-automatic welding. The cost of one part is from 150 rubles. The element is supplied in transport primer, which must be removed manually without using a sander.
The new threshold amplifier with cataphoresis coating structurally follows the shape of the threshold; the part has perforated transitions. Due to cataphoresis coating and new anti-corrosion protection technology, the amplifier has increased resistance to corrosion. The indicator increased by 20% in comparison with parts that were hot-dip galvanized. The price is from 1500 rubles. a piece.
Experienced drivers and tinsmiths at service stations recommend not using a standard amplifier when doing DIY repairs if the metal thickness is below 1 cm.
The best option is to use a profile pipe as a threshold. Advantages of replacing a standard element with a profile:
- Metal thickness from 1.5 cm.
- 90% of the profile pipe is galvanized using the production method.
- Installed as an amplifier, connector and internal element of the threshold, in rare cases it replaces the entire part.
- The price is 70% lower than the new amplifier with cataphoresis coating.