In this article I want to talk about how you can make a lambda probe or oxygen sensor with your own hands. Usually such decoys are made when cutting out the catalyst, its poor performance, or when the second lambda probe is faulty, then you can install a decoy without buying a new one.
A lambda probe or oxygen sensor converts data on how much oxygen is contained in the exhaust gases into an electrical signal. The sensor sends an electrical signal at the moment when it detects changes in oxygen, the signal is transmitted to the controller, which receives the signal and compares the received data with the indicators stored in memory.
If the received data does not coincide with the optimal values for the current mode, the control unit changes the fuel injection duration accordingly. This is done to achieve maximum engine efficiency, save fuel and reduce the amount of harmful emissions into the atmosphere.
Usually, recently, two sensors are installed on cars, one before the catalyst, the second after the catalyst, the signals from these two sensors should be different, then the control unit regulates the injection duration according to the received signals from 2 sensors, but if one of the sensors fails or the car owner removed the catalyst, or alternatively replaced it with a flame arrester, the signals from the 2 sensors will begin to coincide, which will be perceived by the control unit as an emergency mode.
In this case, the controller will select average injection control parameters, which will ultimately lead to an increase in fuel consumption with a simultaneous decrease in engine power and its unstable idling, and “Check-Engine” will light up on the dashboard, indicating an error.
So, let's consider the mechanical type of blende, this is when a spacer is installed in place of the second sensor, and then a lambda probe is screwed into it.
The spacer can be made according to the drawing below, which has been tested for more than one year of operation.
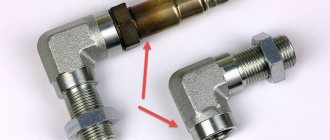
But I think it’s more effective to make a blende using the second method, since I don’t know a turner, but I can probably solder one resistance and a capacitor. The figure below shows how to install a capacitor and resistor into the wires that go to the oxygen sensor.
This method is also time-tested and has proven itself on the positive side.
And I also want to note one point that sometimes the heater of the sensor itself fails, in this case the “Check-Engine” error also appears, but even here you can put a trick.
This can be done this way, without unscrewing the oxygen sensor, we connect to two white wires that go to the sensor heater, a simple car light bulb, for example, from the dimensions, it is desirable that it has a resistance of 4 to 12 Ohms (the resistance varies on different cars).
The resistance of the light bulb will tell the ECU that the heater is in good condition and will not generate an error. This is only acceptable for the second oxygen sensor, which is located after the catalyst.
And to summarize, making a fake oxygen sensor is not such a difficult task. Good luck to everyone on the roads.
In cases where the neutralizer is removed or replaced with a flame arrester , the ECU begins to malfunction, causing emergency operation. At such moments, experienced motorists use a corrector for the operation of the oxygen lambda probe, which allows them to avoid mistakes and continue operating the car.
Do you need an oxygen sensor emulator?
- The ECU puts the engine into emergency mode when the engine operates according to the specified fuel maps without taking into account the readings of the oxygen sensors.
- The “Check Engine” indicator lights up on the dashboard and an enriched fuel mixture enters the cylinders.
- Soot on the spark plugs increases, the power of the internal combustion engine decreases and the oil becomes contaminated.
- Increased fuel consumption entails extra financial costs.
Almost all automakers recommend replacing a faulty converter. But not every car owner will do this, because the price of some copies, for example, for VAZ, reaches 60,000 rubles. It is also worth adding the cost of installing the device. Therefore, many car enthusiasts are interested in what a do-it-yourself catalyst blende is and the scheme for its implementation.
The essence of the emulator's operation is to change the real sensor readings, after which the ECU switches to normal operation. In this case, the neutralizer itself can be cut out or replaced with a flame arrester. The procedure for installing a simulator is no more complicated than increasing the ground clearance of a Renault Duster.
How to make a mechanical corrector for the exhaust system?
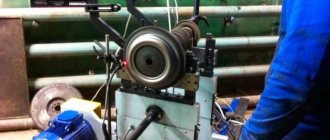
To implement a mechanical blende for the catalyst with your own hands, it is recommended to use blanks made of heat-resistant steel or bronze. This way the parts will not be deformed due to high temperature. There are two designs, but both options require a lathe or the help of an experienced turner.
First option
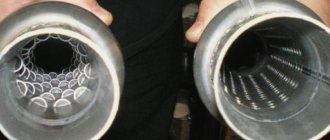
It is a sleeve 40-100 mm long. On one side, a standard sensor is screwed in, and on the other, the circulation of gases is limited by a small diameter hole. The essence of the “device” is that the composition of the exhaust mixture is averaged, because the lambda probe is removed from the gas stream itself and, accordingly, catches fewer toxic substances. Due to this, it is possible to deceive the ECU.
A typical drawing with spacer dimensions can be changed in terms of dimensions, it depends on the model and brand of the car. The optimal inlet diameter remains unchanged - 1.5-2 mm. In some cases, the length of the bushing may not allow it to be installed in its original place. As a result, you have to weld the mount elsewhere in the exhaust pipe.
Second option
- Exhaust gases enter the bushing body through a small diameter hole.
- In the volume of the spacer, excess CH and CO are subject to oxidation by oxygen, as a result of which the concentration of harmful substances decreases.
- The ongoing processes change the shape of the sinusoid, and the electronic system believes that the catalytic converter is operating normally.
A do-it-yourself catalyst blende made according to the above diagram has advantages similar to the previous option. Here the standard probe will be raised by 32 mm, although this is less than 40-100 mm.
Features of spacer installation
The installation procedure is not difficult, and begins with placing the car on an overpass or lift. Further actions occur according to the following scheme:
- Disconnect the negative terminal of the battery.
- Unscrew the controller.
- Screw the bushing onto the probe.
- Screw the upgraded unit into place.
- Connect the battery.
Do-it-yourself electronic catalyst blende and emulator circuit
A real electronic emulator is a microprocessor device consisting of a single-chip microcircuit. The principle of its operation is based on the formation of an output signal, which in shape corresponds to the information in the working neutralizer. This option is difficult to do on your own, so you should immediately consider a simpler method. To implement it you need to prepare:
- Electric soldering iron.
- Solder and rosin.
- Knife and side cutters.
- Resistance 200 Kom, power 0.25 W.
- The capacitor is non-polar with a capacity of 4.7 microfarads.
The principle of operation of the system is to average the readings of the oxygen sensor, which is installed after the converter. The method of connecting emulator components is simple and universal. All elements are connected directly to the vehicle’s on-board network conductors. Before connecting the electronic decoy to the catalyst with your own hands, you should disconnect the battery to eliminate the possibility of a short circuit. After the implementation of the project, the car demonstrates good dynamics. However, the effect of over-enrichment of the combustible mixture may occur, which causes the deposition of a layer of soot in the exhaust manifold. In addition, on some models error P0133 appears, indicating a low response rate of the lambda probe.
What might the installation of various deceptions entail?
Of course, all our actions have consequences, and an incorrectly installed 1 lambda probe can lead to the most unpleasant consequences. What could go wrong after installing the device incorrectly? Here are some really common things that can go wrong:
- The remaining sensors will be damaged;
- The performance of the engine will be impaired due to a broken adjustment of the mixture injection into the combustion chamber by the controller;
- The tightness of the electrical wiring will be broken and the controller itself will be damaged, which will break the operation of the on-board computer.
WATCH THE VIDEO
To avoid such problems, consult a specialist if you do not have the proper experience. Also, do not order the decoys yourself on the Internet or buy them in the markets. It is better to cook yourself or watch the work of a master.
What do spare parts manufacturers offer?
On the shelves of auto stores you can find all kinds of parts for tuning the exhaust system. The production of mechanical simulators of the normal operation of the catalytic converter is made of bronze or chrome-plated steel. The price of such devices ranges from 400 to 800 rubles, and a standard installation at a service station will cost about 500 rubles.
A spacer with a minicatalyst is offered much more expensive than its elementary counterpart, its cost is 1,500-4,000 rubles. Simple electronic emulators of industrial production are sold for 1,500-3,000 rubles. The range of prices for flashing ECU software is quite wide - from 1,000 to 30,000 rubles.
Good day everyone! In previous entries I wrote that I wanted to install a lambda probe (mechanical) but the idea was not successful... - I could not unscrew the sensors...
In the end, I decided to make an electronic deception and install it, read a lot of information on the Internet, consulted with smart people and began to implement the decoy =)
Then, as usual, the photo is of poor quality =)
I don’t have a photo from the installation, I didn’t have time to make it clear from the diagram how to install it
I’ll tell you a few things right away:
1. wires we have black (signal), gray (ground) and 2 white (heating)
2. experimentally and on the advice of “experienced” people, it turned out that all the diagrams on the Internet are nonsense... the installation is correct, but the components are not the same...
Everywhere they write that you need to install a non-polar capacitor - I agree with this, but a 1 MΩ resistor gives a not entirely accurate amplitude on an oscilloscope... yes, if Jackie-Chan appears, this option will work, but the sensor will not work quite accurately... But during installation a 150 kOhm resistor, the amplitude will be almost similar to the amplitude when there is a catalyst...
in general, think for yourself... I decided to try both options... 1 was dropped immediately, because after riding for a couple of days, I didn’t notice any difference at all, but when I installed the second option... then it’s a completely different matter! I’ve been driving with it for about a week now, so far the consumption has dropped, but not by much... earlier, with active driving, the BC showed more than 13 liters... which was not pleasing, now it’s 10.5 with active mode, 9 with “grandfather” mode, in general, consumption has dropped and is not increasing =)
Excerpt from Murzilka:
Excess air in the mixture is measured in a very original way - by determining the residual oxygen content (O2) in the exhaust gases. That's why the lambda probe is located in the exhaust manifold in front of the catalyst. The electrical signal from the sensor is read by the electronic control unit of the fuel injection system (ECU), which in turn optimizes the mixture composition by changing the amount of fuel supplied to the cylinders. Some modern car models have another lambda probe. It is located at the outlet of the catalyst. This achieves greater accuracy in preparing the mixture and controls the efficiency of the catalyst.
Asking price in the store and at the service station
The trick is positioned as a cheap alternative to flashing it for EURO 2. Indeed, they ask for at least 15,000 rubles to change the ECU software. Even the most expensive standalone emulator with installation costs a maximum of 8-10 thousand rubles. At the same time, the factory engine control program is preserved, and hence the reliability of the system as a whole.
If you take the best option, a fake with a minicatalyst, then the problem with the ECU can be completely solved for 1,000-2,000 rubles. And for owners of cars with low-sensitive sensors (EURO 3) it will cost even less: 500-1,000 rubles.
Oxygen sensor
The lambda probe is a residual oxygen sensor. Installed in the exhaust manifold of vehicle engines, as well as in the chimney of modern heating boilers. Indicated by the Greek alphabet symbol λ probe. In simple terms, a lambda probe is a sensor that reads how much unburnt oxygen is left in the exhaust gases. To comply with international environmental standards, car manufacturers are required to install such electronic devices. They reduce the amount of harmful substances.
Catalytic convectors burn carbon and nitrogen oxides in the exhaust system before it all goes outside. The lambda probe is one of the components of this device and is an integral part for the proper operation of the device. Why and how to fake a lambda probe?
Due to the poor quality of the road surface and not always high-quality fuel, it often happens that the lambda probe breaks along with the catalyst.
In this case, it is necessary to replace broken parts or install a fake oxygen sensor.
Note: why does the catalyst fail prematurely?
Low quality gasoline and careless dosing of cleaning additives can impair the permeability of the catalytic converter honeycombs. This is the main reason for the reduction in its service life. Therefore, ask which gas station is better to refuel at
in your region, and how to properly use
additives to improve the quality of gasoline
.
The catalyst also painfully endures strong vibrations, such as driving on a bad road at high speed, and sudden temperature changes. If you throw snow onto a hot surface, critical deformations are inevitable.
Automotive oxygen sensor
The ECU, after receiving information from the oxygen sensor, determines what concentration of the fuel-air mixture to supply in the following cycles. Thus, the computer regulates the balance in the operation of the internal combustion engine.
Where is the oxygen sensor located? Answer: The lambda probe is located in front of the catalyst on the exhaust pipe or on the manifold outlet pipe.
Principle of operation
The working element of the oxygen sensor is a galvanic cell, which consists of a solid ceramic electrolyte based on zirconium dioxide.
A galvanic cell has electrodes made of a sponge plate. Coated with doped sodium oxide.
One electrode of the device determines how much oxygen (O2) is contained in the exhaust gases, and the second - how much oxygen is in the environment. When the oxygen sensor heats up to +300 degrees and due to the difference in oxygen content, an output voltage appears.
Based on the voltage value, the on-board computer determines which mixture is supplied to the engine.
If the lambda sensor or controller malfunctions or breaks down, the following symptoms will appear:
- A critical error message appears.
- The exhaust gases from the muffler will be expressed in a bright shade, maybe black smoke, maybe white. The normal color of exhaust gases is grey.
- The engine does not pull either uphill or in a straight line.
- Fuel consumption is higher than before.
Second lambda probe
Some makes and models of cars have two oxygen sensors. In this case, one sensor is installed on the manifold or on the intake pipe, and the second is installed in the catalytic converter.
Engine detonation may be caused by a faulty oxygen sensor.
The second lambda sensor measures how much air is contained in the exhaust gases at the outlet of the catalyst.
Some drivers install a deceptive lambda sensor, either store-bought or home-made.
What is a lambda probe emulator, how does it work and what is it needed for?
A lambda probe emulator is a device that, roughly speaking, “replaces concepts,” that is, it imitates or intercepts and corrects the signal coming from the lambda and sends it further in the required correct form, that is, to the ECU. The lambda probe emulator is installed on injection cars that have oxygen sensors, either during or after installing the LPG. Depending on the type and manufacturer, the emulator copies the lambda probe signal and thereby prevents errors from occurring when the engine is running on a gas-air mixture.
Varieties of hand-made trompe l'oeil
A decoy, also known as an emulator, is a device that does not determine the oxygen content in gases. It only serves to fool the car's electronic control unit.
Changed controller firmware
You can reflash it yourself by downloading the software and instructions on how to do it. It's better to give it to a specialist. In electronic mode, the oxygen sensor is turned off through a certain program. In fact, it should turn out that the ECU will receive only the most correct value from the catalyst and there will be no errors on the instrument panel.
How can deception help us?
- Google+
- LJ
- Blogger
The catalytic converter sensor does almost the same thing, but at a significantly lower cost. This device allows the engine to ignore problems and operate in its normal standard state without activating the alarm.
This tool was invented a long time ago and was used by a very large number of car enthusiasts who can share their experience on the forums. Actually there is a good recommendation. It would be very correct to disconnect and replace not both sensors, but only one, since we do not want our fuel to be consumed too much and the engine performance to be problematic.
Buy a lambda probe decoy
The easiest and most effective way in terms of installation and saving time is to purchase a ready-made oxygen sensor.
In Moscow, a lambda probe blende can be purchased in 2022 for:
- 1500 rubles is for a catalyst emulator (electronic blende). Installation will cost about 500 rubles.
- Up to 1400 rubles - this is for the corner version of the blende.
- Up to 1200 rubles - this is for the second lambda sensor with a metal minicatalyst. Suitable for vehicles with Euro 4 engines.
- 500 rubles is for the most common option, a mechanical blende manufactured by Fort Luft. It does not contain a microcatalyst. Installed on cars up to 2001.
Which lambda decoy is better?
Unambiguously answer the question “Which lambda decoy is better?” impossible. Each device has its own pros and cons, and different compatibility with certain models. Which lambda probe decoy is best installed depends on the purpose of this manipulation and specific conditions:
- mechanical blende operate only in conjunction with a working oxygen sensor;
- To simulate the normal operation of an oxygen sensor on an old gas equipment, only electronic fakes with a microcontroller (pulse generator) are suitable;
- on old cars of a class no higher than Euro-3, it is better to install a screw-in screw - cheap and reliable;
- on more modern cars (Euro-4 and higher) it is better to use mini-catalysts;
- the option with a resistor and capacitor is a cheaper, but less reliable type of blende for new cars;
- An emulator of a second lambda probe on a microcontroller, powered by the first one, is the best option for a car with a failed or removed second oxygen sensor.
Generally speaking, a mini-catalyst is the best option for a working DC, because it highly reliably imitates the operation of a standard converter. A microcontroller is a more complex and expensive option, and therefore is only appropriate when there is no standard sensor at all or it needs to be tricked to drive on gas.
Possible consequences
This method of fooling a car computer is a risky endeavor. The following may happen:
- Failure of all sensors without the right to restoration.
- Many different errors can appear in the on-board computer.
- Wiring problems.
- The engine may malfunction because when the computer should give a signal - to supply a rich mixture or, conversely, a lean mixture, but it will not do this, because the snag shows that everything is normal.
Third option: flashing the controller
Sometimes they decide not to change the sensor itself, but reflash the controller itself. This is a rather convenient option, because for some, making a fake for the second lambda with your own hands is an impossible task, since there are not enough suitable materials.
To do this, you simply need to change the computer's algorithm. However, this is a rather labor-intensive task that requires knowledge, because if configured incorrectly, you will end up with a faulty computer. Factory firmware of the controller is much more expensive than replacing a lambda probe, so you should entrust the work to a professional. But buying firmware on the Internet or on the market is highly discouraged, because there is a high risk of falling for scammers.