Hello auto mechanics. I have a VAZ 2107 (150 thousand miles), Bosch injector, I recently changed the oil and filters, but the problem does not go away. And the problem is this: when it’s cold, it starts with difficulty, I give it gas for the first 4-5 seconds, but the ignition doesn’t work. The spark plugs are new, so I blame the injector. In general, tell me how to properly clean the VAZ 2107 injector?
Injectors are constantly in contact with an aggressive environment, so the question of their reliability and service life is always relevant, especially in the “classic” ones. The cause of deterioration in the performance of the power unit and injector is most often injectors clogged with various deposits. What does thorough cleaning of the VAZ 2107 injector mean? Next I will cover this issue, which I dealt with not so long ago in my “seven”.
How to clean injectors on a VAZ 2107 injector at home
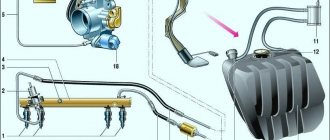
The injector nozzle operates on the principle of a spray, dispensing the mixture into the working chamber of the engine. The duration of the injection cycle and the amount of fuel supplied are set in the program of the internal combustion engine control unit. For each of the injectors these parameters are the same. The fuel injector is located inside the intake manifold. The air flow passes through the manifold and carries the fuel particles ejected by the injector into the combustion chamber. The diagram of the "Seven" fuel system is shown in the picture below.
Checking the idle air control circuit
Before moving on to diagnosing the regulator itself, it is necessary to check its circuit, because the reason that it stopped working could be a simple break in the wires or a malfunction of the electronic control unit. To diagnose the circuit, you only need a multimeter with the ability to measure voltage. The procedure is as follows:
- Raise the hood and find the sensor wiring harness on the throttle assembly.
- Disconnect the wiring harness block.
The voltage between ground and each of the terminals must correspond to the voltage of the on-board network, i.e. approximately 12 V. If it is less than this indicator, or is absent at all, you need to diagnose the wiring and electronic control unit.
Comprehensive diagnostics of the operation of injectors on the ramp
For such a check, the fuel rail will need to be removed from the engine along with the injectors attached to it. After this, you need to connect all electrical contacts to the ramp and injectors if they were disconnected before removal. It is also necessary to return the negative terminal of the battery to its place.
- The ramp must be placed in the engine compartment so that a measuring container with a scale can be placed under each of the injectors.
- It is necessary to connect the fuel supply pipes to the ramp and additionally check the reliability of their fastening.
- The next step is to turn on the ignition, after which you need to crank the engine a little with the starter. This operation is best performed with an assistant.
- While an assistant rotates the engine, check the efficiency of all injectors. The fuel supply must be the same on all injectors.
- The final step will be to turn off the ignition and check the fuel level in the containers. The specified level must be equal in each container.
In addition to self-checking, you can use the injector diagnostic service at a car service center. This operation is performed on a special testing stand. Testing an injector on a bench allows you to accurately determine not only the efficiency of fuel supply, but also the shape of the torch during fuel spraying.
Injector malfunctions - causes and characteristics
During operation, injectors more often than other components of the fuel supply system have to come into contact with aggressive environments. If the injectors on the “seven” are faulty, this can be determined by the following signs:
- “Stalling” of the car when trying to move away;
- Significant drop in power;
- Extraneous noise and vibration during engine operation;
- Excessive amount of exhaust gases released;
- Change in fuel consumption;
- Unstable “behavior” of the internal combustion engine at idle.
The deterioration in the functional state of the "Seven" injectors is primarily due to their contamination. Due to low-quality fuel, deposits appear on the walls of the injectors, reducing the throughput of the injection holes.
Injector purpose
Installing an injector in the VAZ 2107 made it possible to significantly improve engine performance. Changing the type of fuel system increases the amount of energy that is produced during the combustion of gasoline. Compared to a carburetor engine, a fuel injection system is more efficient in the initial stages, but over time its performance decreases. What does this depend on?
The injector plays the role of the final element in the fuel system of the car. The air mixture, together with a cloud of atomized gasoline, creates a huge amount of energy. Over time, this atomization may become less effective, the fuel jets will become weaker, and all due to low-quality gasoline.
The main cause of injector failure is poor fuel. Car fuel consists of many chemical components; in addition, various impurities are added to it, which should improve the overall performance of the engine. This factor cannot be ignored, since such gasoline leaves sediment on the walls of the fuel system. The thinnest channels are in the injectors, and it is these devices that suffer first. During operation, deposits from fuel only accumulate. What needs to be done to stop this?
Do-it-yourself injector washing - various methods
Welcome, friends, to the DIY auto repair website. Against the backdrop of poor fuel quality, clogging of the injection system is a matter of time.
In this case, the most sensitive elements of an injection engine, the injectors, most often suffer.
Their task is high-quality atomization and supply of the mixture to the cylinders of the power unit, where, in fact, ignition occurs.
If the injector malfunctions, many problems can occur, including problems with starting the engine.
To save the situation, you may need to wash the injector yourself. But more about everything.
Main causes of injector contamination
As we have already mentioned, in modern operating conditions the injector has a very hard time.
The cause of its malfunction may be a violation of fuel storage standards, low quality gasoline, the presence of sediment in it, fuel overload and other problems.
It is difficult to control this, so at one moment you come face to face with a breakdown. What to do?
Work principles
To better understand the principles of cleaning, let's look at how the injector works.
Here the algorithm is as follows:
- Inside the nozzle there is a special channel through which fuel passes;
- the regulating body in this channel is the shut-off needle (it is responsible for the supply of gasoline);
- the needle is pressed against the nozzle channel using a special spring;
- at the moment the needle leaves, a stream of fuel appears, which enters the combustion chamber (before this it is mixed with air);
- after the needle is lowered into place, the fuel supply stops;
- the main organ is the ECU, which gives instructions to the electromagnetic coil.
The latter adjusts the position of the needle. As soon as tension appears, the needle opens a hole. As soon as the voltage is removed from the coil, the needle closes the output.
Symptoms of malfunction
Any contamination of the injector leads to a decrease in the quality of atomization of the fuel mixture. In this case, gasoline is supplied in a narrow stream, which is difficult to ignite. As a result, the entire operating cycle of the engine is disrupted.
It's easy to recognize the problem:
- Engine malfunctions appear at XX;
- the power of the power unit decreases;
- “dips” appear in the operation of the engine, floating speed;
- gasoline consumption increases (sometimes this becomes very noticeable);
- the time of non-stop operation of the power unit is reduced;
- cylinder life is reduced.
But that's not all. During operation you may notice:
- The car begins to “stupid” during acceleration;
- engine detonation appears;
- From time to time, strong pops are heard in the exhaust system;
- sensors fail (most often the catalyst sensor suffers);
- problems arise with starting the car (this is especially true in the cold season).
When to clean injectors
Cleaning of injectors on Lada cars is carried out according to the condition of the car. If there are no problems with your car, then there is no need to clean them. Also, to find out for sure whether the injectors need to be cleaned, you first need to diagnose the fuel system. You can learn more about how to diagnose the fuel system in our article.
The manufacturer recommends cleaning the injectors every 50,000 km. Since the fuel at our gas stations leaves much to be desired, just before this mileage they begin to become clogged and flushing them will be useful. You can wash it at a service station, or you can do it yourself. Next, we will look in detail at how to wash the injectors on a VAZ car at home.
Characteristics of oils for VAZ
The service life of the engine depends on the correct selection of oil for injection VAZ 2107. The recommended quality standard for the lubricating fluid is given by the manufacturer. Any type of oil that meets API SJ/CF, SG/CD quality standards can be filled into the car.
The abbreviation API means that a lubricant meets the following basic criteria:
The letters indicate performance characteristics. The further away the letter is from A, the better the quality of the product.
It is recommended to use the following types of oils.
| Oil brand for VAZ | SAE viscosity groups | API standard |
| RAVENOL LLO | 10W-40 | SJ/CF |
| SHELL HELIX SUPER | 10W-40 | SG/CD |
| TNK SUPER OIL | 5W-40, 10W-40, 15W-40, 20W-40 | SG/CD |
| TOTAL QUARTZ | 5W-40, 10W-40 | SL/SF |
| MOBIL SUPER M | 15W-40 | SJ/CF |
| LUKOIL LUX | 5W-40, 10W-40, 15W-40 | SJ/CF-4 |
| NOVOIL-SINT | 5W30 | SG/CD |
| CONSOL | 5W-40, 10W-40, 15W-40 | SG/CD |
| BIZOL GREEN OIL | 10W-40 | SL/SF |
| ESSO ULTRA | 10W-40 | SJ/CD |
| LUKOIL SUPER | 5W-40, 10W-40, 15W-40, 10W-30 | CF-4/SG |
| RAVENOL SUPER HD | 15W-40 | SJ/CF |
| LUKOIL SUPER | 5W-30, 5W-40, 10W-40, 15W-40 | SG/CD |
| ANGROL-SUPER | 5W30, 5W-40, 10W-40 | SG/CD |
| LUX | 5W30, 5W-40,10W-30, 10W-40, 15W-40, 20W-40 | SG/CD |
| ESSO UNIFLO | 10W-40, 15W-40 | SJ/CD |
Self-check of injectors
Let's start with the fact that automobile injectors are divided into several types, of which two types have found widespread use at different times: mechanical injectors and electromagnetic (electromechanical) injectors.
Electromagnetic injectors are based on a special valve that opens and closes the injector to supply fuel under the influence of a control pulse from the engine ECU. Mechanical injectors open as a result of increased fuel pressure in the injector. Let us add that modern cars often have electromagnetic devices installed.
To check the injectors with your own hands without removing them from the car, you can use several methods. The simplest and most affordable way to quickly check injection nozzles without removing them from the car is to analyze the noise emitted by the engine during operation.
Causes and symptoms of malfunctions of the seven injection nozzles
Injectors are one of the most important parts of the fuel injection system. If it fails, which happens extremely rarely, the operation of the engine is disrupted. Most often, fuel injectors become clogged, which occurs due to contact with aggressive media. An aggressive environment is not only the fuel, but also the burned fuel assemblies. Before cleaning the injectors on a VAZ 2107, you need to determine by the signs that diagnostics of these particular parts is required:
- At idle, unstable operation of the internal combustion engine is observed.
- When trying to move away, the engine stalls.
- Reduced power and agility.
- When moving, jerks and dips occur.
- Excessive amount of exhaust gases from the muffler.
- Increased fuel consumption.
- Extraneous sounds and noise are observed when the engine is running.
If these signs are detected, you will need to check the condition of the injectors. The reason for their clogging is low-quality gasoline, which causes deposits to form on the walls. If your car has a faulty or missing fuel filter, then the need to clean the fuel nozzles arises quite often.
After removal, you will need to check the devices, or rather their condition. How to check the injectors on the seven, we will figure it out in the next section. If diagnostics show that they are unsuitable for use, they will need to be replaced.
It is important! When purchasing, you need to know the article number of the device, which has the number 21110-1132010-82.
Device diagnostics
To make sure that the injectors need to be cleaned or replaced, you will need to first perform some diagnostic procedures:
- Testing performance by ear. The principle of testing is that you need to start the engine and listen to the work. The presence of a ringing sound indicates that the fuel nozzles need to be cleaned.
- The injector is checked with a multimeter. This method is more objective, as it allows you to obtain more accurate information. The principle of checking is that you need to disconnect the chip from the atomizer and connect the probes of the device to the contacts. The device is set to resistance measurement mode. If the resistance value fluctuates between 12-17 Ohms, then the device does not need to be cleaned.
- To make such a diagnosis, you will first need to remove the injectors from the car by disconnecting them from the fuel rail and cylinders. The test consists of installing the injectors on a special stand. The stand is used to pass fuel through nozzles under appropriate pressure. Based on the parameters of the resulting jet, the serviceability of the nozzles is assessed. If the fuel in the nozzles is sprayed unevenly, the device needs to be cleaned.
If, after diagnostics, it is determined on the injection seven that one or more injectors need cleaning, then it is necessary to resort to this procedure. Regardless of how many nozzles need cleaning, the procedure must be carried out for all four.
How to clean injectors with additives
If, during diagnostics using a multimeter, it was determined that one or more nozzles need cleaning, then the easiest way to do this is to use special chemicals. In this case, the injectors do not need to be removed from the car. However, this method is not appropriate in all cases. If the sprayers are in a neglected state, they will need to be removed and cleaned on a stand.
Washing of VAZ 2107 injectors is carried out on a special diagnostic stand. To carry out the procedure, you will need to remove all 4 sprayers from the car and install them on the stand. Special products are used as cleaning fluids. The disadvantage of this method is that its implementation will require an expensive stand. Such stands are available in car service centers, and the principle of washing nozzles is as follows:
- All 4 sprayers are secured to the stand.
- A cleaning liquid is poured into a special container; as a rule, it is a carburetor cleaner.
- The program starts, and the stand automatically cleans the injectors for a certain time.
Troubleshooting
To quickly check the injectors without removing them, you will need an indicator screwdriver. It consists of a metal rod and handle on which a switch and a contact are located to create a conductive circuit, clamped by one of the fingers. When moving the switch forward towards the rod, the device becomes less sensitive; when moving to the upper position, its sensitivity increases. In the first case, the red indicator lamp will light up or flicker, in the second case, the green lamp will light up.
Before carrying out the test, the screwdriver switch must be moved forward, towards the working part (rod) until it stops, and your finger must be pressed against the open contact located on the handle of the indicator screwdriver. The hand must remain in this position during the entire test, closing the electrical circuit, otherwise there will be no indication.
The working rod of the screwdriver must be positioned so that it touches the metal bracket on the block holding the nozzle. There is an opinion that it is enough to simply bring the rod to the block for an indication to occur, but this is not so. The metal clamp catches the electromagnetic pulse generated during the operation of the injectors; a potential difference and alternating currents arise in it, which the device records.
This test checks the injector while the engine is running, so it must be started and left at idle. When the rod of the indicator screwdriver comes into contact with the metal bracket on the screwdriver, the red indicator should light up. This checks performance on all cylinders. If the injector of one of the cylinders is not working, the indicator will not light or blink.
Using the indicator does not necessarily indicate that the injector is faulty, it signals that it is not working. The problem may be there, or in the voltage supply system, poor contact, failure in the electronic control unit, etc.
Some models do not have metal pad clamps in which currents are generated; in this case, is it possible to determine the faulty injector without removing it from the engine? Yes, this can be done using the same indicator screwdriver. To do this, you need to set the switch in the uppermost position (this is the highest level of sensitivity of the device) and perform additional manipulations.
After starting the engine, the screwdriver rod is brought to the injector block, and no indication will appear, even if it is working. Therefore, you need to attach a metal bracket to the screwdriver shaft, which will serve as an antenna where electromagnetic oscillations will occur. A paper clip carefully pressed around the rod with pliers is suitable for this.
During the fuel injector test, the switch remains in the highest sensitivity up position. With the engine running at idle speed, you need to bring the bracket as close to the block as possible, it should cover it. A blinking indication should appear on the device due to currents excited by the electromagnetic field that occurs during operation of the nozzle. If there is a non-working injector under the column, there will be no indication. This technique is also suitable for pads equipped with a metal bracket.
Fuel rail of a VAZ 2107 car – removal – installation
We remove the fuel rail from the VAZ 2107 car to check or replace the injectors, as well as when removing the intake manifold pipeline. To check the injectors you will need an ohmmeter.
Removing the fuel rail and injectors from a VAZ 2107 car 1. We prepare the VAZ 2107 car for operations (see “Preparation of the VAZ 2107 car for maintenance and repair”). 2. On a VAZ 2107 car, we relieve the pressure in the engine power system (see “Relieving pressure in the power system of an injection engine”). 3. Disconnect the wire from the negative terminal of the battery (see “Battery VAZ 2107 - removal and installation”). 4. Having released the latch, disconnect the injector wiring harness block from the engine harness.
5. Using an ohmmeter, we check the resistance of the injector windings by connecting one probe to terminal E (“ground”) of the wire block, and the other - alternately to four terminals (F, G, B, C), measuring the resistance of each injector, which should be within 12 -14.5 Ohm. 6. Remove the receiver from the VAZ 2107 car engine (see “Receiver - removal and installation”). 7. Using a 17 mm wrench, unscrew the fitting of the fuel drain tube from the fuel rail, holding the hose tip with a wrench of the same size.
Engine optimization options
Many drivers tune the VAZ 2107 engine in order to improve performance and increase power. An important factor that affects power performance is clean injectors. Their contamination reduces engine performance, impairs efficiency, reduces the injected volume of fuel, which will lead to failures when pressing the gas pedal.
Usually the problem occurs due to the use of low-quality gasoline. Such fuel will contain heavy paraffins that build up on valve plates, injectors and the throttle valve. There are several options for cleaning them.
The first is cleaning and bench testing.
| Names | Indications |
| Number of injectors tested | 6 |
| Supply voltage, V | 220 |
| Injector control voltage, V | 6;12 |
| Diameter of injector sockets, mm | 11;14 |
| Resistance, Ohm | 2…6; 11…20 |
| Maximum power consumption, W | 60 |
| Extreme limit pressure in the ramp, atm | 6 |
| Extreme limit pressure during cleaning, atm | 6 |
The permissible imbalance should be within 1.5%. If the deviation is more than:
The second option is to use special flushing fluid and equipment. Cleaning can be done at home. To do this, you need to dilute the flushing fluid with gasoline and add it to the power system. As a result, the deposits are corroded and enter the cylinder, where they are completely burned.
The quality of the oil used has a great influence on keeping the car in working condition.
Repair of injectors VAZ 2114/2115
Repairing injectors involves carrying out a number of works at once:
replacement of rubber seals.
After the products have been removed from the fuel rail, you need to take a good look at each of the four nozzles. If there are visible signs of leakage on the body, repair will not be practical. You will have to immediately replace the nozzle with a new one. The differences in flushing and cleaning procedures for 8-valve and 16-valve engines are not significant. Therefore, you can be guided by the same scheme.
If the body is clean and there are no deformations or cracks on it, then repair work is allowed. To do this, you will need to remove the seal from the body and the sprayer. It is recommended to leave these parts in acetone or solvent for 1.5–2 hours. While the parts are being washed, you can use a vacuum cleaner to clean the fuel rail. Next, you need to carefully clean the place where the injectors fit into the ramp using a toothpick or a needle.
After this, you can start purging the nozzle from the inside. You will need a roll of electrical tape, an aerosol can for cleaning carburetors and a syringe. An aerosol cleaning liquid is supplied through a thin syringe into the nozzle cavity. It is better to wrap the joint between the syringe and the tube of the canister for sealing with electrical tape. It is recommended to repeat washing the nozzle from the inside three times. Afterwards the product must dry. As soon as the body itself, as well as the seal and sprayer dry after washing, you can assemble the nozzle and install it on the ramp.
A cheap product will perfectly remove dirt and deposits from the nozzle
Before installation, each nozzle is tested for resistance. The tester readings should be in the range of 11–15 ohms.
There is also a simple way to clean the injectors, without dismantling the fuel rail. However, it is only appropriate in cases where the injectors have not yet exhausted their entire service life (120–150 thousand kilometers). The use of cleaning additives in gasoline is allowed. In this case, all elements of the fuel system will be cleaned, but its closed nature does not allow removing dirt and sediment from low-quality gasoline.
The liquid is poured into the gas tank and, together with fuel, cleans all elements of the system
Replacing rubber rings and seals on injectors
Usually, when washing or repairing injectors, car enthusiasts immediately change all rubber elements. This is due to high wear rates. The cost of rings and seals is very low, but after replacement you can immediately observe the stability of the motor.
Rings and seals can be removed with one movement of the hand. However, installing new ones will require care, as it is easy to damage the rubber. The plastic element is first lubricated with gasoline, and then pulled in place of the old seal.
Spare parts for VAZ injectors can be purchased at a minimal price
Almost every driver can clean or replace the injectors on VAZ 2114/2115 cars on their own. Difficulties can arise only in the process of unscrewing the fuel rail or reconnecting the wires to the injector contacts. However, if each stage of work is carefully carried out, even a beginner can independently maintain this element of the fuel system.
Logbook VAZ 21074 (2006)
Do-it-yourself: Cleaning VAZ-2107i injectors with Laurel ML101
Hello everyone, this fall I decided to replace the fuel filter during off-season maintenance, and at the same time wash the injectors, which I have never cleaned since the purchase, fortunately an acquaintance brought me a bottle of Lavra from work, the same brand had previously decoked the rings when changing the oil.
So, there were no special comments on the operation of the injectors, only the tachometer needle moved a little at idle, I filled up with gasoline at a proven network of gas stations, but I decided to clean it as a preventive measure. The previous owner also cleaned them regularly, using an old pump that was connected under the hood to a pipeline; I don’t have one, so I decided to make do with the standard one from the gas tank. Since the wash cannot be diluted, I had to disassemble the tank and pull out the pump, dip it in the product and let the motor run on it.
It looks like a greenish liquid with ammonia odor. The smoke from the exhaust was a little smoky, but the engine ran smoothly as usual.
Everything was done according to the instructions.
The remainder of the product was then poured into the gas tank.
At the same time, I checked the mesh on the pump - it was as clean as it was when I cleaned the gas tank a year earlier.
Then I put everything back together and replaced the fuel filter with a new one, since all the crap from the fuel lines should have accumulated in it.
I also replaced the air filter - I change it once a year before winter. Old and new.
So, after washing, the oscillation of the needle did not change much, it also “walks” a little + -50 rpm.
But the low-end thrust and engine response have noticeably increased, acceleration has become more dynamic, in 4-5 gears this is no longer so noticeable. Perhaps this was also influenced by the replacement of filters, or the catalyst was also cleaned), I don’t know. But there is an effect from this procedure.
Also, apparently, the float was bent a little during assembly and disassembly - the fuel level light began to light up only when there were already 2-3 liters left in the tank, because of this, then it almost stopped on the road.
But over time, everything seemed to return to normal and it started blinking at about 5-7 liters, but this kind of devilry happened the last time I cleaned the tank, only then it initially came on at half the tank). Once again I decided not to go there again.
Removing and washing injectors
In this article I will describe the process of removing injectors on a VAZ-2107 car. The owner complained about tripping and rough operation of the engine when running on gasoline. After diagnostics, it was discovered that the injectors were clogged. The car is additionally equipped with 2nd generation gas equipment, the so-called “cracker”. In this regard, the view in the photographs may differ slightly from yours (presence of a firecracker, injector emulator, etc.). In Fig. Figure 1 shows the appearance of the engine compartment of the vehicle being serviced.
Let's get started. We unscrew the clamps securing the air pipe using a Phillips screwdriver or a 7 mm socket.
We remove the pipe.
Remove the throttle cable clamp using a “flat” screwdriver, carefully prying it up.
Open the throttle valve and remove the throttle cable.
We unscrew the fastening of the throttle cable using a 10 mm “head”.
We unscrew the fuel lines with two 17 mm open-end wrenches. We unscrew the fastening of the tubes with a Phillips screwdriver.
Remove the vacuum hose from the fuel pressure regulator.
Remove the brake booster hose by unscrewing the clamp with a flat-head screwdriver.
We unscrew the two nuts securing the throttle assembly using a 13 mm “head”. We remove it, holding the washers on the studs, and move it to the side.
Unscrew the intake manifold mounting nuts using a 13 mm “head”. We remove the washers.
Removing the fuel line fasteners
Remove the intake manifold and put it aside.
Unscrew the fuel rail mounting bolts with a 5 mm hexagon.
Remove the injector harness connector by slightly pulling the lock towards you.
We take out the ramp along with the injectors. If the injectors fit tightly on the rings, then you can carefully pry off the ramp with a pry bar.
Remove the injector harness by pressing the latches on the connectors.
Remove the injector clamps by sliding them to the side along the fuel rail.
We take out the injectors. To do this, we stagger and pull them towards ourselves.
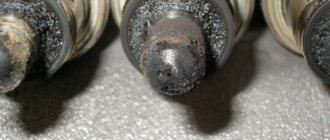
We see rust both in the injectors themselves and in the fuel rail. Somewhere a man was filled with gasoline and water.
If you are installing new injectors, you can skip the next few steps. Otherwise, wash the dirt on the injectors with a brush in gasoline. We wash them in an ultrasonic bath. We check injectors for performance and leakage in a test bench.
We install new sealing rings on the injectors, having first removed the old ones, prying them off with a screwdriver.
It is better to put a brown rubber ring on the bottom of the nozzle; it is more heat-resistant and will last much longer. If the condition of the old rings is good, then it is better to leave them, since the quality of the new ones leaves much to be desired.
If necessary, replace the injectors with new ones. You need to buy according to the number on the nozzle. In our case, Bosh 0 280 158 502.
We wash the fuel rail with gasoline or Abro carburetor cleaner and blow it with compressed air.
Before installing the injectors into the fuel rail, the rings on the injectors must be lubricated with something, for example WD-40. This helps to avoid damaging the rings during installation.
We install the injector clamps in place. Please note that the fourth injector is installed with the connector in the opposite direction.
We put on the injector harness. We install the nozzles in place, also lubricating the rings with WD-40.
Before disassembling, we noticed that the clapper and the throttle valve were very dirty.
Now is the time to wash the throttle assembly, idle air control (IAC) and gas firecracker.
Next, we collect everything in reverse order, but take into account some points. Don't forget to put the hose on the fuel pressure regulator.
We look at the condition of the throttle assembly gasket and, if necessary, replace it with a new one.
We install new sealing rings for the gas lines.
Be sure to change the fuel filter. For VAZ cars there are filters of the old (with “screws”) and new (with “snaps”) models. In our case, an old-style filter is installed.
To remove the fuel filter, first unscrew the fuel lines using a 17 mm open-end wrench, holding the filter housing with a 19 mm open-end wrench. Then unscrew the filter itself with a 10 mm head.
This is what came out of the filter in our case.
We install a new fuel filter and gas line O-rings. Do not forget to take into account the direction indicated by the arrow on the fuel filter housing.
We tighten the fuel lines without overdoing it and hold them, excluding cutting the fuel rings.
Let's check if we have any extra spare parts left ;). We start the engine and check for fuel leaks and air leaks.
Diagnostics, repair and replacement of idle air control
To check and replace the regulator itself, you will need to dismantle the throttle assembly and disconnect the device from it. The following tools and resources will be needed:
- screwdriver with Phillips bit;
- slotted screwdriver;
- round nose pliers;
- socket wrench or socket 13;
- multimeter with the ability to measure resistance;
- calipers (you can use a ruler);
- clean dry cloth;
- coolant for topping up (maximum 500 ml).
Dismantling the throttle assembly and removing the IAC
To remove the throttle assembly, you must:
- Raise the hood and disconnect the negative cable from the battery.
- Using a slotted screwdriver, hook the end of the throttle cable and remove it from the gas pedal pin.
- On the throttle block, use round pliers to disconnect the clamp on the throttle valve drive sector.
Video: removing and cleaning the throttle assembly on a VAZ 2107
Cleaning by removing injectors
Heavy contamination of the injection system is removed in a way that involves removing the injectors and cleaning them separately. This method allows you to achieve the best results. The main advantage of cleaning injection nozzles with liquid is the restoration of the performance of such injectors, which structurally have a complex configuration of their internal channels.
The injector is dismantled and each nozzle is individually cleaned on a special stand. This approach allows you to compare productivity, torch shape, spray direction and quality before and after cleaning. Additionally, you can compare and analyze the performance of the entire group of injectors together.
The principle of operation of the cleaning stand is that its control system simulates the operation of the injectors on the engine. Instead of gasoline, liquid is passed through them to flush the injectors. The stand operator controls the frequency of electrical oscillations of the nozzle valve. The main task is the occurrence of cavitation in the fuel supply channel. Cavitation refers to the formation of air bubbles in a liquid.
Hydrodynamic cavitation ensures the movement of the nozzle needle in the flow of cleaning liquid at high speed. A vacuum is created behind the various convex parts. Under the pressure of the surrounding liquid, the vacuum instantly divides into a large number of microscopic bubbles that “pop.” The effect of micro-explosions is obtained, and the energy from them affects the varnish and dirt deposits that have formed inside the fuel channel of the injector and on the needle itself.
The result of this operation is the effective destruction and removal of deposits and dirt in the nozzle channels, as well as the washing of the injector strainer. The operator determines the cavitation that has arisen visually. The stream of light liquid coming out of the nozzle turns brown. The color of the liquid at the outlet changes due to exfoliating slag.
The stand allows you to additionally identify changes in the operating parameters of the electrical and mechanical elements of the injectors. Thanks to this, you can make a decision in advance about the need to clean the injectors, the advisability of their continued use without flushing, or a complete replacement.
The injector performance indicator is determined both before and after cleaning. In cases where cleaned injectors show different performance indicators with a variation of more than 5%, then they need to be replaced. Faulty injectors are replaced either one at a time or in groups.
Flushing reveals that the solenoid valve is worn out and does not close completely. This means that such a nozzle flows at a time when no electrical impulse is applied to it. This malfunction leads to excessive fuel consumption, increasing carbon deposits on valves, pistons, etc. It is better to replace injectors with a similar problem immediately.
Cleaning the injector with ultrasound
One common way to clean injectors is to use a unit that cleans previously removed injectors in a special ultrasonic bath. This method provides good results, although some experts consider the best way to clean injectors using hydrodynamic cavitation.
An ultrasonic bath is an open container that is filled with cleaning liquid. From the outside, a device is mounted into the bottom of such a bath, which is an emitter of ultrasonic vibrations. The cleaning nozzle is lowered into the bath. While passing through the cleaning liquid, the ultrasonic wave starts the cavitation process. During cavitation, bubbles are formed, which burst and form shock waves. These waves have a destructive effect on the dirt and deposits that accumulate on the surface of the injector nozzle and in the channels.
Injector cleaning options and basic tools
Now let's take a closer look at how to clean the injector, and what tools can be used to solve such a problem.
Automotive chemistry
As noted above, the simplest option is to use a special additive, which is added to the fuel tank, mixed with fuel, passed through the system and cleans the injectors. This product is recommended to be used as a preventive measure, once every 5000 km. In addition, it should be used in “young” cars with low mileage.
What is the reason for such a requirement? If the vehicle's fuel system has not been cleaned for a long time, a large number of deposits accumulate in it.
If the car owner decides to clean the injector using additives, the latter cause the dirt to fall away from the walls, after which the main elements of the system become clogged. The first thing that gets dirty is the fuel pump.
The main representatives of auto chemical products include:
Liqui Moly (Liqui Moly) Injection Reiniger High Performance series.
According to the manufacturer, this product can help out even with serious contamination.
Its use eliminates the consequences of using low-quality fuel. After cleaning, engine power increases, fuel consumption decreases and the volume of harmful emissions into the atmosphere decreases.
How to clean an injector using Injection Reiniger High Performance? The packaging contains instructions according to which it is recommended to add 300 ml of liquid to a full tank of fuel from time to time.
Regular use of the product helps to avoid contamination, keep the system clean, and increase the efficiency of intake valves and injectors.
The use of the composition is recommended in case of problems with starting, a decrease in engine power, deterioration of exhaust gases, as well as in the event of other malfunctions associated with contamination of the injector.
Liqui Moly (Liqui Moly) series Langzeit Injection Reiniger.
The product also fights existing stains and prevents the formation of new deposits. Used to clean injectors, intake valves and other elements of the fuel system.
Regular use of the product allows you to maintain engine power, reduce the risk of failures in its operation and extend the service life of the catalyst.
To clean the injector, just add 10 ml of liquid per 10 liters of fuel. The additive mixes itself with gasoline and performs a cleaning function.
Liqui Moly (Liqui Moly) series Injection-Reiniger.
Another modern product that provides quick cleaning of injectors and other elements of the fuel system.
The use of the additive guarantees the removal of carbon deposits and deposits that appear on fuel lines, intake valves, dispensers and other components.
Periodic use of the fluid ensures smooth running, engine response, better combustion of the combustible mixture, reduction of harmful emissions, and reliable protection against rust.
Features of the product include compatibility with catalysts, as well as the possibility of use on all types of gasoline engines with an injection system.
According to the manufacturer, the anti-corrosion characteristics of the additive are maintained for 2000 km.
To clean the injector using this product, just stir it in a ratio of 1 to 230.
So, 200 ml of additive is enough to prepare 70 liters of fuel. The tank should be 75% full when adding.
Liqui Moly (Liqui Moly) Injection Reiniger Light series.
This is a mild cleaner that is suitable for gasoline engines with various injection systems. Used as preventive maintenance and periodic cleaning of the fuel system.
The manufacturer claims that the cleaner does not lift dirt from the fuel tank and does not clog fuel lines. Existing contaminants are dissolved and removed from the system.
If you clean the injector in a timely manner using Injection Reiniger Light, engine starting is improved, the volume of harmful emissions is reduced, and reliable protection against corrosion is provided.
The peculiarity of the additive is that it has no negative effect on the catalyst.
To clean the injector, you need to add 0.25 liters of additive to a full tank of fuel. The volume of gasoline should be no more than 70 liters.
Liqui Moly (Liqui Moly) Injection Reiniger Effectiv series.
This composition is suitable for cleaning injection power systems in the presence of obvious symptoms of contamination - engine problems, engine failures, and others.
The best option is to use the product every 2000 km. The additive is especially useful when low quality fuel is poured into the car.
To clean the injector, 300 ml of additive per full tank of fuel is enough. The product is mixed with gasoline, cleans the fuel system, protects it from corrosion and deposits in the future.
JET 100 ULTRA XADO.
Universal cleaner for injector and carburetor.
Its advantages include high efficiency, as well as the ability to remove all types of contaminants (dust, deposits, gasoline films, varnishes and others).
The use of the additive helps restore the factory characteristics of the injector, remove existing dirt from the fuel system, as well as the line through which the air flow is supplied.
The advantages include safety for catalysts, reduced fuel consumption, and restoration of the previous engine power.
Before cleaning the injector, it is recommended to start the engine and spray the mixture onto the throttle valve.
After this, the engine should run at high speeds for 4-5 minutes.
You can clean the injector in another way - spray the composition directly into the fuel tank. In this case, 20 liters of fuel requires spraying for 12-15 seconds.
The advantage of this method is the possibility of comprehensive cleaning of the system - intake valves, fuel tank, gas lines, injectors and other elements.
XADO MaxiFlush.
Concentrated additive containing highly effective elements. Purpose: cleaning the fuel system of gasoline engines.
The result of using the additive is to normalize engine operation, eliminate problems with idling, and reduce the volume of harmful emissions in the vehicle exhaust. Used in injector cleaning installations.
The advantages include quick removal of contaminants, cleaning of the combustion chamber, fuel nozzles and other elements.
If you clean the injector using XADO MaxiFlush, you can reduce fuel consumption, restore the spray pattern and optimize the fuel combustion process.
Regular use of the additive helps to increase the reliability of the system and increase the efficiency of injectors by 3-4 times.
To completely clean the system, 300-350 ml of product is required. If the composition is used in professional installations, mixing is carried out in the ratio of 300 ml of additive per 700 ml of gasoline.
If you need to clean the injector without additional equipment, you should add the product to the tank at the rate of 300 ml of additive per 40-80 liters of gasoline.
Features of the composition include a mild effect on catalysts and lambda probes. Cleaning frequency is every 15-20,000 km for prevention.
EGR Verylube XADO.
A modern product for cleaning the recirculation system valve, as well as the injector flap. Can be used for carburetor engines.
The use of an additive helps restore factory parameters. To clean the injector valve, it is recommended to heat the engine and spray the mixture onto the throttle valve, after which the engine should run at high speed for 4-5 minutes.
XADO VERYLUBE.
A universal composition designed for cleaning carburetor and injection engines. Its advantages include high speed of action and increased efficiency.
As a result of application, it is possible to clean the injector, remove carbon deposits, films and deposits from the elements of the fuel system.
The use of the composition as a preventive measure helps maintain engine performance and injector efficiency throughout the entire service life of the vehicle.
As a result of use, the volume of harmful emissions into the atmosphere is reduced. The product has a loyal effect on oxygen sensors and catalysts.
To clean the injector using this additive, you need to warm up the engine and spray the composition onto the car's throttle valve. The engine should run for another 4-5 minutes at high speeds.
An option with complex cleaning is possible, when XADO VERYLUBE is added directly to the car tank. In this case, the intake valves, pipelines, spark plugs and other elements are cleaned.
To achieve the result, it is enough to spray the additive into a tank with 20 liters of fuel for 12-15 seconds.
Ultrasonic cleaning, its features and disadvantages
An excellent option is to clean the injector using ultrasound. In this case, the injectors are removed from the engine, after which they are diagnosed on a special stand, and then, if necessary, placed in a bath with a special liquid.
After this, the part is exposed to ultrasonic waves. The ultrasound source is located at the bottom of the container into which the sprayers are lowered.
The following happens: under the influence of ultrasonic waves, the water in which the nozzles are located begins to vibrate. But since the liquid cannot vibrate at a frequency equal to the frequency of the ultrasound acting on it, microbubbles are formed and explode.
During microexplosions, water under high pressure acts on the nozzles, clearing them of contaminants.
As a result of such manipulations, the nozzles and the outer part of the nozzles are cleaned of contaminants.
It is worth noting that removing contaminants from the inside of the nozzles is only possible by opening and closing the nozzles directly in the bath. Otherwise, you will only be able to clean the outer part of the part.
In general, the use of ultrasound is most effective, because even the most persistent contaminants are eliminated. The disadvantage of this method is that it costs a pretty penny for the car owner.
The principle of ultrasonic cleaning is simple. First, the injectors are removed from the machine, they are inspected and installed in a special stand.
At the initial stage, the quality of the spray is checked, after which the sprayers are cleaned in an ultrasonic bath in a gentle mode. Once this work is completed, the check is performed again. If the result cannot be achieved, cleaning is carried out a second time.
If required, a new filter and o-rings are installed. Then the injectors return to their place.
According to experts, it is possible to clean the injector using ultrasound even after 100 thousand kilometers. But here everything depends on the degree of contamination of the part.
As for the disadvantages of this method, there are two of them - high price, as well as risks for nozzles, which may fail during the cleaning process.
There is a danger that the car owner will spend a lot of money on cleaning, but there will be no result.
Chemical method (liquid washing)
Another way to clean the injector is to use special chemical compounds.
The bottom line is that cleaning equipment is connected to the injector using adapters. In this case, it is not fuel that is supplied to the injectors, but a flushing composition (for example, Liquid Moly, Carbom Clean, Vince). The washing mixture is supplied using tubes.
Thanks to the use of a fitting, the fuel pump, filter, tank and fuel line are not involved in cleaning.
The mixture of gasoline and cleaner is supplied under pressure, which is set taking into account the manufacturer’s recommendations. As a result, contaminants are broken down and released through the nozzle holes, after which the residues are burned in the cylinders. The procedure takes 30-50 minutes.
Despite its apparent effectiveness, this method does not always guarantee results. It is rarely possible to clean the injector 100%, because a small amount of the flushing compound remains in the injectors and oil system. Therefore, immediately after completing the work, it is recommended to drive 12-15 km in forced mode, and then change the oil and filter.
The disadvantage of this method is its high time and financial costs. The method is suitable for cars that have traveled a short distance, and dismantling the sprayers is associated with great difficulties.
Let's look at liquids that can be used to clean injectors:
- WYNNS - a German product intended for cleaning the injector. It is versatile and suitable for all types of gasoline engines (with direct injection and carburetor). As a result of the application, it is possible to clean the fuel system, reduce the volume of harmful emissions and improve the characteristics of the injector. There is no need to change spark plugs after cleaning is completed. The frequency of application is once every 20-30 thousand kilometers.
- Runway — flushing liquid for injector, sold in 0.3 l container. Its action is aimed at flushing the injector, maintaining and normalizing the injection quality. The composition lubricates the system and protects fuel injectors from contamination. Regular use guarantees improved vehicle response, reduced emissions, and reduced fuel consumption. The advantages include the absence of soot and deposits after use. To clean the system, just pour the liquid from the bottle into a tank with 50-60 liters of fuel. The frequency of manipulations is once every 3-5000 km.
- WYNNS Injection System Purge is a flushing fluid for removing deposits and contaminants in injection engines. Using the product, it is possible to clean the combustion chamber, valves and their stems, injectors and other elements of the injection system. The result is restoration of injector efficiency, normalization of engine operation, improvement of compression ratio and other parameters. The cleaning liquid is safe for catalysts and spark plugs. Used once every 20-30 thousand kilometers.
- KENT - a powerful carburetor and injector cleaner. Available in 0.5 liter bottles. This is a fast-acting composition that has the following advantages - versatility, high drying speed, safety for catalysts, removal of various contaminants (varnish, glue, grease), as well as ensuring uninterrupted operation of the engine.
- Toyota D-4 Fuel Injector Cleaner - a composition with which it is possible to clean various types of fuel systems from the accumulation of carbon deposits. The use of the composition helps remove moisture, provides protection against corrosion and the appearance of ice “plugs”. Use for preventive purposes ensures cleanliness and maximum efficiency of injectors. Recommended for use on Toyota vehicles.
The use of a cleaner is important when fuel consumption increases, engine malfunctions at idle, and “dips” appear during the acceleration process. It is not recommended to use the composition on carburetor engines. The optimal time to clean the injector is during the oil change period. To do this, just add Toyota D-4 Fuel Injector Cleaner to a half-empty tank. Immediately after mixing, fuel must be topped up to 100%. One bottle of the composition is enough for 70 liters of gasoline.
How to convert a VAZ 2107 carburetor engine to an injection engine
Some owners of carburetor “classics” independently convert their cars to an injector. Naturally, such work requires a certain amount of experience in auto mechanics, and knowledge in the field of electrical engineering cannot be done here.
What will you need to buy
The kit for converting a carburetor fuel system to an injection system includes:
- electronic control unit;
- gas tank;
- cylinder head (new or used from VAZ 21214);
- receiver;
- ramp with nozzles;
- fuel pump assembly;
- fuel filter;
- fuel line with rubber hoses;
- throttle assembly;
- accelerator pedal with cable;
- air filter assembly with sleeves;
- front engine cover;
- crankshaft pulley;
- ignition module;
- sensors for mass air flow, damper position, detonation, coolant temperature, oxygen concentration, crankshaft position, detonation;
- high voltage wires;
- harnesses, cables, wires, terminals, thermal casings;
- brackets.
The cost of all these elements is about 30 thousand rubles. The electronic control unit alone costs approximately 5–7 thousand. But costs can be significantly reduced if you buy used parts rather than new ones.
Characteristics and principle of operation of the engine
The operation of the fuel injection system is to supply fuel separately to each cylinder. This mechanism is called distributor injection. All modern cars are equipped with a distribution or electronic injection system.
The injection mechanism is classified according to its operating principle, installation location and number of injectors. “Seven” is equipped with 4 nozzles, which are controlled by an electronic control unit. The ECU prepares the mixture depending on the engine load, throttle position and other parameters read by special modules.
The main control element of the VAZ 21074 injector is an electronic control unit. Using built-in sensors, the ECU monitors the quality of the air-fuel mixture supplied to the combustion chamber, sets the ignition timing depending on the speed, and turns the fuel pump on and off. In addition, it regulates the idle speed, controls the emission of CO in the exhaust gases and determines the operating mode of the cooling fan.
The VAZ 21074 injector works in the following order.
The pump supplies fuel from the gas tank through filters to the fuel rail. Next, the fuel is supplied to the injectors. The pressure in the injectors is maintained by a special regulator within 300 MPa. Excess fuel is sent back to the tank. The injector is a sprayer with a solenoid valve, which operates from ECU pulses.
By reading readings from the piston position module in the cylinder, the central unit determines the moment of opening and closing of the injector. The optimal quality of the air-fuel mixture is prepared based on the readings of the mass air flow sensor and the throttle position.
Other parameters are also taken into account:
Dismantling
Before replacing or cleaning the injectors, they will need to be removed from the fuel rail. To achieve this, the following activities are carried out:
- Make sure the engine has cooled down properly. It is not safe to work on a hot engine;
- Disconnect the power wires from the fuel pump to de-energize the device;
- Try to reduce the pressure in the engine power system as much as possible. To do this, the engine starts, and then you need to wait until it stalls at idle speed;
- Repeat this procedure several times until the car simply stops responding to turns of the ignition key;
- That's it, now our goal is the fuel rail. To remove it, you must first remove the terminals from the battery, turn off the power to the ramp itself, disconnect the fuel supply hoses, and also disconnect all electrical appliances going to it. These are pressure, idle, throttle position sensors;
- If you have an 8-valve engine, then you do not need to remove the receiver. This step is relevant for engines with 16 valves;
- Experts do not recommend removing the intake manifold without dismantling the throttle valve and the hose going to it. It is better to unscrew and disconnect everything at once, which will allow you to continue working more conveniently;
- Cover the exhaust manifold openings with something to protect them from foreign objects;
- Using a hex wrench, you can unscrew a couple of bolts and remove the fuel rail along with the injectors;
- Make sure that there are no distortions when removing the ramp, otherwise problems may arise with the dismantling processes;
- We remove the injectors. To do this, remove the mounting brackets that hold the electrical connector. You also need to remove the bracket that holds the injector in its seat.
After dismantling the elements, be sure to close the seats to prevent debris and other objects from getting in, and place the nozzles themselves on a table or floor, after laying down a dry rag.
Here you can decide whether to change or clean the elements of the fuel system. If replacement is required, install new injectors in place of the old ones and follow the assembly procedure.
Cleaning
Here proceed as follows.
- Remove the rubber rings from the injectors, and when cleaning is finished, replace them with new seals.
- The cleaning process should begin with the nozzles, on which various deposits form as the car is used.
- Be sure to thoroughly clean the funnel-shaped surfaces where tar deposits accumulate.
- The next step is the fuel mixture supply channels.
- To open the solenoid valve to supply fuel, you will have to trick the device with a 5-7 V power supply.
- Some use stabilized voltage sources, phone chargers, or even a car battery. If using a battery, the voltage should be supplied through the light bulb. It will play the role of a current damper. Otherwise you risk burning the winding.
- Electricity is supplied through two wires, in the gap of one of which a button is installed. It will close and open the network. This creates an imitation of the operation of an injector in an engine due to the influence of a pulsed electric charge.
- You can supply the cleaning liquid to clean the injectors through a can of carburetor cleaner. Inexpensive and effective, even better than specialized chemicals.
- Be sure to tightly connect the cylinder and nozzle with a rubber tube, clamps and any other means.
- All is ready? You can then apply electricity to open the injector. At the same time, press the button on the cleaning agent canister.
- Soon the torch of the liquid jet, which will exit through the fuel atomizer of the injector, will change its “clumsy” direction and will begin to uniformly exit the nozzle. This indicates that you have removed all carbon deposits.
Homemade cleaning device Before putting the cleaned nozzle back in place, check its actual condition.
Examination
To check you need:
- Measure the injector resistance using a multimeter. If the readings are within 10-15 ohms, the injector is working;
- If you deviate from these limits, cleaning is pointless. You only need to change the injectors;
- Check devices for leaks;
- To do this, when cleaning, do not turn on the electrical pulse so that the nozzle does not open;
- Under pressure, a device with a broken seal will begin to show signs of leakage. Therefore, the element must be replaced.
When to replace
According to the manufacturer's instructions, replacement should be carried out after traveling 10 thousand km when driving long distances and every 6 thousand km if trips were carried out mainly over short distances.
Also, the moment of replacement can be determined by the oil pressure sensor. Long service life dilutes the oil, so a cold engine shows high pressure, but after warming up the indicator drops significantly. Such differences signal the need for maintenance.
Let me start by saying that with the advent of frost, this winter became a problem for me. Due to the fact that the car began to have difficulty starting in the morning, I was using buckets of gasoline and at the same time had trouble driving. Since the car has already done 210 thousand, I immediately thought about the boost. I didn’t put this matter off, I drove the car into the garage and heated the stove. And forward.
So, first, I’ll list what you’ll need if you want to repeat this procedure. 1. Hi-Gear carb flush 2. 5 mg syringe. 3. Set of keys 4. Wires 1m 5. Tea, beer, cigarettes (optional)
Twist everything without exception until it looks like this. Then we unscrew the receiver itself, it is held on by 5 nuts. Two on top and three on bottom. After removing the receiver, the picture no longer pleased me. The tube directing the air flow to the center of the receiver had fallen off and its walls were dirty yellow jelly.
I filled it with cleaner and set it aside. I set to work on the ramp. It is held on by two hexagon bolts. We remove the fuel supply and return with the same hexagon, and disconnect the power supply to the injectors. And we pull out the entire ramp assembly.
Unfortunately, there are no further photos showing how to hook everything up, but it’s a no brainer. We pull the forces out of the ramp. We attach the injectors to the Akum through a button and put the syringe on the butt of the injector. We press the button, power is supplied, the force opens and we spray the cleaner. So, with all 4, place the injectors in order just in case.
As a result, instead of a clear liquid, I got this dark crap. Next, we collect everything, put it in place and rejoice at our crazy hands.
I was extremely surprised by the result. The car started better, revved the engine faster, and throttle response increased noticeably. I concluded for myself that now I will wash the engines in any incomprehensible situation)))) I won’t say anything about the quality of gasoline for crazy money, so it’s clear to everyone that the whole country drives like poop))))
Thank you for reading my article, I hope it will be useful to someone. Press the buttons if necessary. Love, kindness, dough and quality gasoline to everyone!
The VAZ 2107 injector has a number of advantages, but also several significant disadvantages that you should know about in advance. If you have this car model at your disposal, it is worth familiarizing yourself with the maintenance features of its injection system. But first we need to discuss the design of the VAZ fuel system.
Things to take note
To repair the fuel system yourself on a VAZ, you will need to remove the receiver.
This is carried out in several stages:
- First, remove the throttle controls from the receiver, then loosen the retaining clamp and disconnect the vacuum hose.
- The fuel pipe holder is being dismantled.
- The bracket-clamp of the throttle drive cable is removed.
- The 5 fastening nuts are twisted and the pressure adjustment hose is disconnected. After this you will be able to remove the receiver from the studs.
This is the only way to gain access to the fuel rail.
Wednesday, February 14, 2022
Do-it-yourself cleaning of VAZ-2107i injectors. Laurel ML101 - is there an effect?
This type of washing can be carried out by directly connecting the flushing station (or a second fuel pump) to the fuel line under the hood - this is easier, but not always available. However, you can remove the standard pump from the gas tank for this, which is a little more difficult, but does not require additional equipment. Therefore, we will use this method - remove the pump from the gas tank and dip it in the flushing liquid, letting the engine run according to the instructions.
It is advisable to carry out this work in combination with replacing the fuel filter, since, along with the injectors themselves, the product will dissolve deposits on the walls of the fuel pump and pipes, which will contribute to filter clogging.
For work we will need:
- Fuel filter with O-rings
- Fuel pump mesh filter
- Flushing fluid
- Keys and socket heads for 7, 10, 13, 17, 19
- Plastic container 1.5-2.0 l
- Rags
To remove the pump from the gas tank, you must first relieve the pressure in the fuel system. To do this, you need to wait at least 2-3 hours after stopping the engine until it goes away on its own, or do it forcibly: pull out the fuel pump fuse box located under the glove compartment.
When cleaning injector nozzles may be useless
Routine washing of the injector and injectors without removing it yourself or at a service center should be carried out every 10-20 thousand kilometers. If you clean the injectors after a longer distance, there is a risk that this procedure will no longer be useful.
Such neglect can ultimately lead to severe damage not only to this part, but also to other interconnected engine components. In this case, simply cleaning the injector will not get rid of it; the engine will need repair.
Buying new components, including injectors, is labor-intensive and not cheap. Therefore, cleaning the injector should not be put on hold, especially in cases where signs of a malfunction have already appeared.
But the best option is to prevent the problem from occurring by cleaning the injectors from time to time without removing them, for example, before changing the engine oil. Such prevention will help protect your car from unnecessary problems with engine injectors.
Damage diagnostics
How to understand that an injector needs to be replaced, checked or repaired? Even without sensors, you can understand that repair of fuel system elements is required if there are 1 of 2 main signs in models 2107, 21074:
The cause of such failures is clogged injectors; even diagnostics are not needed. Cleaning helps restore the engine to its original performance. If the problem has not been resolved after cleaning, it is worth checking the tubes and injectors for damage or breakdowns. In such cases, it is better not to start repairs, but simply replace the damaged parts with new ones.
Sometimes it is impossible to determine on your own where the damage is, and only then will diagnostics at service centers come in handy. A blockage can cause quite serious damage to the VAZ 2107 injector, as well as rupture of channels. The pressure that arises inside the system can easily destroy the most fragile parts. Here you won’t be able to fix the situation with your own hands, even if you have a complete diagram of the car at hand. There is only one conclusion - you need to devote a lot of time and attention to cleaning injectors and do it regularly.
How to clean injectors
There are many different methods for cleaning injectors. The use of a specific option will depend on the degree of contamination of the holes. For preventive cleaning or removing light blockages, special chemicals can be used, the use of which does not require removing the injectors.
Cleaning injectors with additives
This method makes it possible to clean not only the injectors, but also the fuel system in general. However, this method is effective only with the systematic use of cleaning chemicals.
It is worth noting that additives must be used every 17,000-20,000 kilometers. To clean, the fuel injection line must be connected to a reservoir through which the cleaning agent is transferred under pressure, and the standard fuel pump must be turned off.
The engine must be started and should be idling for the next fifteen minutes. Then you need to turn off the engine and wait about fifteen minutes.
After this, the engine should be started again, but this time the speed should be increased to the maximum speed to remove sludge fragments. In this mode, the internal combustion engine should run for about thirty minutes.
Manual cleaning
If we are talking about an advanced case, when cleaning with additives is virtually meaningless, it is necessary to dismantle and subsequently replace the injectors.
To clean the injectors manually you will need:
- Clean rags;
- Can of cleaner;
- Syringe 5-7 ml;
- Set of spanners;
- Screwdriver set.
In order for the event to be a success, you must adhere to the following algorithm:
- Dismantling the clamps securing the air pipe and its subsequent removal;
- Dismantling the throttle cable locking mechanism;
- Removing the accelerator cable and its bracket;
- Dismantling fuel lines and pipe fasteners;
- Removing the vacuum brake booster hose;
- Dismantling the fuel line brackets;
- Removing the intake manifold brackets;
- Removing the fuel rail mounting bolts;
- Loosening of the injector mounting harness;
- Removing injectors with fuel rail.
Cleaning should be carried out according to the instructions on the packaging of the chemical product.
How to check the idle air control
To check the IAC, perform the following steps:
- Turn the multimeter into ohmmeter mode with a measurement limit of 0–200 Ohm.
- Connect the probes of the device to terminals A and B of the regulator. Measure the resistance. Repeat the measurements for terminals C and D. For a working regulator, the resistance between the indicated terminals should be 50–53 Ohms.
If the resistance value between the listed terminals does not correspond to the specified values, or the stem overhang is more than 23 mm, the idle air control regulator must be replaced. There is no point in trying to repair the device. In the event of a break or short circuit in the stator windings, and it is these faults that cause changes in the resistance at the terminals, the regulator cannot be restored.
Cleaning the idle air control
If the resistance is normal and the length of the rod is fine, but it does not move after connecting the voltage, you can try to clean the device. The problem may be that the worm mechanism that moves the rod is jammed. For cleaning, you can use a rust-fighting liquid such as WD-40 or its equivalent.
The liquid is applied to the rod itself where it enters the regulator body. But don’t overdo it: you don’t need to pour the product inside the device. After half an hour, grab the rod and gently twist it from side to side. After this, check its functionality by connecting the wires from the battery to terminals D and C, as described above. If the regulator rod begins to move, the device can be used again.
How to determine that injectors need to be cleaned
Fuel injectors are an important part of the injector. With their help, gasoline is sprayed into the combustion chambers. There is a misconception that parts become dirty due to bad gasoline, which contains sand and various harmful additives. But in fact, the gasoline supply system to the internal combustion engine is equipped with filters that clean gasoline from various contaminants.
Clogging of the injector does not occur immediately, only during operation of the machine. The main version of contamination is that heavy fuel components are deposited on the walls of the injectors. This happens mainly after turning off the car, when the heat rises at the base of the injectors.
Sources
- https://ServizNaBis.ru/rul/forsunki-vaz-2107-inzhektor.html
- https://TeamsPro.ru/transmissiya/zamena-forsunok-vaz-2107-inzhektor.html
[collapse]