The gas distribution mechanism is one of the most important systems of an internal combustion engine. The timing belt controls the engine valves, ensuring the normal functioning of intake and exhaust. During intake, the fuel-air mixture enters the combustion chambers as a result of the opening of the intake valve. The next phase opens the exhaust valve, and the gas distribution mechanism removes exhaust gases from the combustion chamber. The VAZ 2190 uses a standard gas distribution unit, differing only in the number of engine valves.
Characteristics of Lada Granta timing belt
The Lada Granta gas distribution mechanism is driven by a belt. This type of device has been familiar to car enthusiasts for a long time. After all, the timing belt design migrated from the VAZ 2108 engine, which became the basis for all subsequent modifications of VAZ power plants. The Grant is equipped with two types of engines: an 8-valve engine and a 16-valve engine. The gas distribution system of the 16-valve power unit has a complex structure and increased dimensions compared to the 8-valve one. Accordingly, replacing the Granta timing belt becomes more complicated.
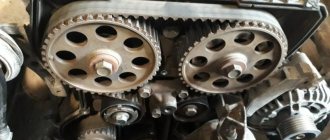
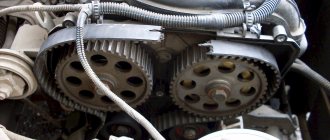
The main feature of the 16-valve device is the presence of two camshafts operating synchronously, in parallel with the crankshaft. The structure is located in the cylinder head. All three shafts are synchronized via a toothed belt. The main disadvantage of a timing belt drive is the unreliability of the belt itself. When it breaks or jumps, the valves meet the pistons and bend. The structure of the 16-valve timing belt is clearly shown in the photo.
16 valve unit
- Installation mark on the drive cover.
- Lid.
- Intake camshaft pulley.
- Phase disk (sensor).
- TDC mark on the camshaft.
- Exhaust camshaft pulley.
- Support roller.
- Tensioner roller.
- Drive belt.
- Pump pulley (coolant pump).
- Installation mark on the oil pump.
- Crankshaft alignment mark.
- Crankshaft pulley.
You can change the timing belt kit yourself. The main thing is to know about the presence and correct placement of installation marks. By the way, most foreign cars do not have such marks, so in this case VAZ cars have the advantage.
The eight-valve timing drive of the Lada Granta, compared to previous modifications of the car, looks simpler. The scheme is simple, because there is no idler roller and there is only one camshaft. The 8-valve timing device can be seen clearly in the photo.
8 valve system
What's the result?
On the dashboard of many modern cars, if the marks are set incorrectly, a “check” will be displayed when the engine starts. This is another sign that the work was carried out incorrectly and further operation of the car is undesirable. Skipping the belt by one “tooth” can result in unpleasant consequences. Even a novice driver can set the markers correctly, but you need to have enough free time and patience.
Hello everyone, I've been struggling with this sound for 5-6 months
Aposlya, I bought a roller, prepared for the replacement for a long time and tediously, and it was this morning))))) I started changing it, unscrewed the roller, the belt loosened and slipped by 1 tooth... bastard! I’ve already assembled everything, I’m trying the car, but it doesn’t drive, as if the handbrake is on... I take it apart again, I did it, but it won’t start at all ((((((((((((whoops, the ignition is completely off and the marks are gone... A couple of minutes later - (I went to eat))), I did everything, set the marks and the ignition was set, everything was in chocolate... spent 3 hours on everything)))))
if you do not have a carburetor, then you should start by removing the air filter housing
Now there is much more space to work
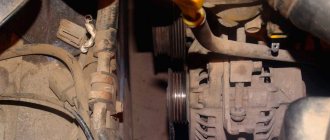
remove the alternator belt (and air conditioner, if equipped)
A timing belt is a relatively simple solution for driving timing gear and other equipment compared to a timing chain. In this case, the specified belt serves less than the chain, that is, it needs periodic replacement. Most drivers know that when replacing a timing belt, the drive pulleys are marked, which is necessary for precise synchronization of the operation of the engine and the gas distribution mechanism.
At the same time, not everyone fully knows how to correctly set the timing belt when replacing it themselves and why it is so important. Let us immediately note that if the timing belt is not aligned with the marks, then a failure of the valve timing occurs. As a result, the engine may not start after such a replacement, it will operate unstably, or even the internal combustion engine may break down. In this article we will talk about what are the symptoms of an incorrectly aligned timing belt, as well as how to align the timing belt with or without marks.
Timing belt malfunctions on Grant and methods of elimination
Failures of the distribution device in advanced cases can lead to failure of the power plant. This can be avoided if you inspect all gas distribution elements in a timely manner and correct defects and breakdowns in a timely manner.
Main symptoms of malfunctions and procedures
| Cause | Remedy option |
| The engine does not develop maximum power, insufficient dynamics. | |
| Violation of the gaps between the pusher and the camshaft cams. | Adjusting the gaps. |
| Gap between seat and valves. | Grinding seats, replacing valves. |
| Engine operation is unstable and often stalls. | |
| Violation of the clearances of pushers and cams. | Adjusting the gaps. |
| Valves burnt out or deformed. | Replacement of worn elements. |
| Oil consumption has increased. | |
| Worn or deformed valve gaskets. | Replacing gaskets. |
| Worn valves or guide bushings. | Replacing valves or guides. |
| Valves are knocking. | |
| Large gap between the camshaft cams and the drive levers. | Set the correct gap. |
| The spring has failed. | Change the spring. |
| Large gap between rod and guide. | Replacement of worn elements, repair and grinding of cylinder head. |
| Camshaft cam wear. | Replacing the camshaft. |
| The drive belt is noisy. | |
| The belt tension has weakened. | Pull the belt. |
| Worn tensioner roller. | Part replacement. |
| The tensioner rod is jammed. | Remove the jam. |
| The camshaft is noisy. | |
| Camshaft cams and levers are worn. | Replacement. |
| Bearings are worn out. | Replacing bearings. |
| The compression in the cylinders is reduced. | |
| Valves burned out. | Install.new.valves. |
| Loose fit of valves to seats. | Grinding of seats and valves. |
Diagnosing timing belt faults is a complex procedure. Signs may also indicate other components and assemblies. To accurately determine the cause of the failure, it is necessary to dismantle the cylinder head. In a private garage, this procedure is quite labor-intensive, and you also need to have special skills and equipment.
Selection of components
The VAZ catalog contains the elements:
- 21126-1006040 – timing belt (137 teeth);
- 21126-1006238-00 – automatic tension roller;
- 21126-1006135-00 – guide roller.
Gates produces analogues:
- 5631XS – drive belt;
- T43147 – roller with automatic tension;
- KO15631XS – repair kit: belt + roller T43147 + guide roller.
For those who have lost the fastening elements of the covers, we provide the catalog numbers:
- 21110-1144026-10 – T30 key screw;
- 00001-0011977-73 – spring washer.
Happy replacement!
The need to replace the timing belt
According to the maintenance regulations, the timing belt must be changed no later than 75 thousand kilometers. In fact, if we take into account the quality of consumables for domestic cars, it is recommended to replace them at least every 45–55 thousand kilometers. Failure to comply with the regulations leads to the need for serious engine repairs. A belt break (cutting of teeth, jumping) will inevitably result in the valves being damaged as a result of a strong impact on the pistons. Moreover, it may be necessary to replace not only the valves, but also the entire piston group. Therefore, it is important to inspect the belt at least once every 15 thousand km for cracks, traces of oil, etc.
To better understand the importance of replacing the timing belt, you need to know how it functions. Due to the belt, the engine torque is transmitted through the crankshaft to the camshaft (to several camshafts in the case of a 16-valve engine). In turn, the camshafts are responsible for the synchronization of the valve timing. If the belt breaks, the correct operation of not only the timing belt, but also the entire mechanism is disrupted. Even with a slight slip of the belt, a phase shift will be observed, and accordingly, engine operation will be disrupted.
The situation is as follows: power is significantly reduced, the engine overheats, fuel and oil consumption increases sharply. If the belt simply breaks, this will cause the exhaust and intake valves to open in front of the piston. As a result, they will be damaged. This development of events leads to a major overhaul of the engine. If this happens on the road, the driver needs to call a tow truck, and this is an additional expense. In order not to take unnecessary risks, it is necessary to promptly replace all faulty parts and consumables of the timing mechanism.
On the question of motors
Grants are equipped with five power plants. Two of them are equipped with 8 valves, 3 - 16. We will consider 16-valve engines as the most technologically advanced, powerful and in demand.
The leader in popularity is the VAZ 21126 modification, which is a redesigned and improved version of the unit under the symbol 21124.
Other 16-valve engines have indexes 21127 and 21126-77 (sports version). All of them deserve a lot of flattering reviews in terms of reliability and power, but a common disadvantage is the inevitable deformation of the valves when the timing belt breaks, which is fraught with a major restoration that requires huge expenses.
That is why it is extremely important for the owner to detect signs of imminent belt breakage in time and replace it with a new part.
Replacing the belt on an 8-valve and 16-valve Grant engine
The procedure for different types of engines differs from each other in some ways. It is not recommended to replace the belt yourself unless you have certain knowledge and skills. Incorrect installation of the drive can only cause harm. Therefore, if in doubt, it is better to address this issue to specialized service stations for qualified assistance.
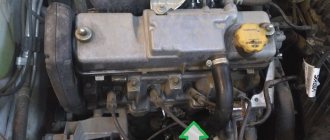
Replacing the timing belt on an 8-valve engine
First of all, you need to remove the alternator belt. If there is an air conditioner, the accessory belt must be removed at the same time. Using a 5-point hex key, unscrew the 4 fastening elements on the front timing drive cover, after which the casing is removed. The crankshaft position sensor terminal must be disconnected to avoid accidental damage. To do this, disconnect the minus terminal from the battery and use a screwdriver to press out the clamp of the wire block, after which the block is removed from the sensor. To be more reliable, it is better to remove the sensor as well. To do this, use a 10mm head to unscrew the fastening bolt.
From the hole located in the pump cover, you need to carefully remove the oil fill sensor and put it aside. The area should be clean and free of metal filings that could damage the sensor. Before removing the timing belt, it is necessary to correctly set the timing of the gas distribution mechanism. To do this, you need to set the piston in the first cylinder at top dead center (TDC). This is done using a 17mm socket or wrench. Using tools, you need to turn the camshaft pulley clockwise by the mounting bolt until the installation mark on the camshaft pulley matches the mark on the rear cover (as in the photo).
Next, you need to make sure the crankshaft is positioned correctly. To do this, you need to remove the rubber plug from the inspection hole in the clutch housing. The mark on the flywheel must exactly match the large slot on the scale. This can be clearly seen in the photo. If this does not happen, you need to tighten the camshaft pulley again until all the marks are in the right place.
Before unscrewing the generator pulley mounting bolt, an assistant must insert a screwdriver into the inspection window of the clutch housing between the flywheel teeth. This will prevent the crankshaft from spinning. Now all you have to do with a 17mm head is unscrew the bolt that secures the generator drive pulley. It is worth considering that it rarely unscrews so easily. You will have to stock up on an extension cord for greater force, unless, of course, you don’t have special equipment at hand. After unscrewing the bolt, the washer and pulley are removed.
Using a 5mm hex key, unscrew the three fasteners of the back cover, after which it can be removed. Using a 15mm wrench, you can loosen the tensioner roller bolt. As you turn the key, the roller will loosen, and with it the belt tension. Remove the belt from the pulleys and remove it from the engine compartment. It won't be needed anymore. After the timing belt is removed from the pulleys, do not turn either the camshaft pulley or the crankshaft pulley. Otherwise the pistons will rise too high and hit the valves.
The tensioner roller is a consumable item, so it also needs to be replaced. You need to unscrew the bolt securing it, remove it and remove it from the engine compartment. As a last resort, it is permissible to leave the old one if its rotation is silent, it does not jam or jam. But such savings are undesirable, since there is a possibility of another breakdown when the belt will have to be changed again. It is recommended to immediately check the presence of defects and the functionality of the pump (water pump). To do this, you need to twist and swing the pulley to the sides. If there is play and jamming, it is better to replace the pump with a new part, since a jammed pump quite often causes the timing belt to break.
Now the tensioner roller (new) can be installed in place. There is no need to tighten it all the way. Sometimes there are two mounting holes in the engine block - in this case the roller is attached to the top one.
Final stage
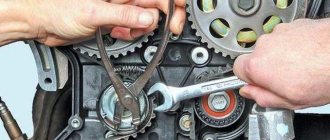
Now the timing belt can be reinstalled by performing all the steps in reverse order. To be more convincing, it is advisable to once again make sure that all installation marks match. First, the belt is put on the crankshaft pulley, then with the toothed side on the water pump pulley. Next, you need to put it behind the tensioner roller and (last of all) pull it onto the camshaft pulley. It happens that the teeth of the camshaft pulley do not coincide slightly with the teeth on the belt. In this case, you can turn the pulley slightly towards a smaller stroke until the grooves and teeth on the belt match.
To tighten the belt, you need to turn the tensioner roller using a special key. If there is none (which is not surprising in garage conditions), you can use two metal rods with a diameter of 4 mm (nails will also do). The rods are installed in the holes on the roller, and a screwdriver is inserted between them. By rotating counterclockwise, the roller begins to tension the belt. For these purposes, you can also use pliers to remove retaining rings. Typically, a sign of correct tension is the coincidence of the cutouts on the outer disk of the roller and the protrusion on the bushing, as shown in the photo.
It is better to tighten the fastening bolt with a torque wrench to a torque of at least 34 Nm and no more than 41 Nm. If the belt is overtightened, this will dramatically reduce its service life. In addition, the tensioner roller and water pump bearing will quickly fail. Weak tension also does not promise anything good. In this case, the drive will also quickly fail, and a shift in valve timing may occur. Now you can turn the crankshaft pulley a few turns. The marks on it and the marks on the camshaft must match. The belt must be tensioned correctly (that is, with little effort, turn left and right no more than its width). The coincidence of the marks on the crankshaft pulley and the mark on the oil pump cover is shown in the photo.
If you have doubts about your own abilities, you should not try to replace the timing belt yourself, as you can cause even more damage. In addition, in a car service center such a procedure, performed on an 8-valve engine, is inexpensive. But in the case of a 16-valve engine, the price tag is usually much higher.
Replacing the timing belt on a 16-valve Granta engine
Access to the gas distribution device drive is covered with a plastic casing. To remove the cover, you need to unscrew five screws with a 5mm hex key. Pay special attention to the location of these screws. In the photo, number 1 shows the fastening screws of the top cover, and number 2 shows the fastening screws of the bottom cover. After unscrewing the five screws, the top cover must be lifted and removed from the engine.
If the car has a manual transmission, you need to engage fifth gear, lift the right front wheel and turn it clockwise. At the same time, it is necessary to inspect the belt for cracks, abrasions, delamination, etc. If the car is equipped with an automatic transmission, you need to remove the right front wheel and the boot (protective shield) on the right. Using a 17mm head, rotate the bolt securing the drive pulley for additional equipment (air conditioning, generator) and inspect the belt. If various defects and damage to the belt are diagnosed, it must be urgently replaced. Replacement will also be required if oil leaks, a malfunction of the water pump or tensioner roller are detected.
On a 16-valve engine, a broken belt drive will lead to a discrepancy in the angular position of the crankshaft and camshafts. As a result, the piston group will come into contact with the valves. As a result, repair work will be required.
Checking belt tension
Using a 17mm wrench, turn the generator drive pulley mounting bolt clockwise until the mounting marks on the camshaft pulleys coincide with the marks on the rear cover of the casing. If the belt is tensioned correctly, the cutout on the outer disk of the tensioner pulley should align with the protrusion on the inner bushing. If there is a slight discrepancy between the cutout and the protrusion (up to 5 mm), the belt must be tightened. To do this, the tensioner roller mounting bolt must be loosened with a 15mm wrench. Turning the roller counterclockwise leads to tension on the belt. clockwise - to weaken it. The methods for adjusting the tension and tools are the same as in the section described above for the 8-valve engine.
Ideally, you need to make two partial revolutions of the crankshaft pulley - and the marks on the camshaft pulleys and on the rear cover should coincide. In addition, the cutout on the disk and the protrusion on the inner sleeve must coincide on the tension roller. If the results differ, it is necessary to adjust the tension from the very beginning. If the marks do not match and the belt has obvious defects, then the next step is to replace this consumable.
Too much or too little tension on the timing belt will reduce the service life of the product. In addition, overtightening threatens to wear out the water pump bearing and tensioner roller. Weak tension will lead to a violation of the valve timing, which will lead to damage to the valves and pistons.