There are fans of direct-flow exhaust, when a loud roar of the engine is heard. But there are also those who think about how to reduce the sound of the muffler. If you make a quiet muffler with your own hands, then the ride will be more comfortable, because the cabin will be quieter. Especially on domestic cars like the VAZ 2109, the question of how to make a silent muffler is relevant. If you can make a quiet muffler on the nine, then the car will bring more joy to its owner.
Ways to muffle the exhaust sound
Before tuning the exhaust system, you need to understand the reasons why the sound of the engine becomes louder over time. The operation of the engine itself is a fairly loud process, but the muffler and other components of the exhaust system perfectly suppress this loud noise. Without a muffler, the engine noise is very loud.
The noise occurs because the fuel mixture explodes in the combustion chamber, releasing gases that then exit into the exhaust pipe. We will not talk in detail about the operation of the engine, you can read about this in another article, but here we will talk specifically about how to muffle the exhaust sound.
The explosion releases energy that pushes the piston, and when the piston has moved the required distance, the exhaust valve opens, through which the exhaust gases exit and go further through the exhaust system. To effectively absorb noise, thick metal parts are used. So, the thicker the metal used in the exhaust system, the quieter the car will drive due to the fact that there will be less vibration. The very first one that absorbs the noise is the exhaust manifold, which is why it is made so large and thick, so it dampens the noise best, which comes from the cylinder block. Even if you compare the exhaust pipe of any more or less normal foreign car with the exhaust pipe of a domestic car, you can see that in foreign cars the pipe is heavier and thicker, which is why such a car runs quieter.
This is why when you drive an old VAZ 2114, the noise is such that you can’t hear what the passengers in the rear seats are saying, which is why you start thinking about how to muffle the exhaust sound.
The exhaust system also has a resonator, which is needed to reduce the speed of gases through the exhaust pipe. And after the resonator comes a muffler. When exhaust gases pass through the resonator, they lose some energy and continue to flow more slowly.
Gases lose the largest share of their energy in the muffler. If we consider a good muffler, then it contains several separate housings, after passing through which little remains of the noise.
Where is it located and how does it work?
The muffler is installed on the underbody of the vehicle at the end of the exhaust system.
As a rule, a resonator is installed in front of it, closer to the engine, which reduces low-frequency vibrations and plays the role of an additional component in the exhaust system.
Despite the seemingly small size of the device, the sound wave travels through it for several kilometers. This is achieved by the presence of labyrinths inside the muffler, which attenuate sound waves.
The further a wave travels, the more energy it loses and the smaller the sound becomes.
To understand what a muffler consists of, you need to understand what types of devices there are and how they differ from each other.
How to make the quietest muffler for a car yourself?
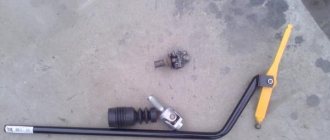
When the issue with noise during car operation has gone too far, and you have decided to make the quietest muffler for the car, then you need to start by preparing the tool. We will need:
- welding machine, an inverter or semi-automatic will do;
- angle grinder and discs for it;
- workbench with a vice.
The surest and most inexpensive way to make a muffler quieter is to weld in an additional resonator. This can be done in a garage yourself.
An additional resonator can be placed between the standard resonator and the muffler. You can install a ready-made resonator; you just need to weld it into the desired place in the pipe. Or you can assemble the resonator yourself. For those who doubt whether the exhaust will become quieter if an additional resonator is welded in, the answer is clear - the exhaust will become quieter. If everything is done correctly.
How to make an additional muffler resonator with your own hands
Making a muffler resonator with your own hands is quite simple; now we will discuss each step in detail. First you need to make an outer casing, it can be made from any steel pipe with thin walls: which looks like this:
The end part looks like this:
Then you need to take perforated iron with a thickness of 4.5 mm. This is enough to insert it into the end part, as in the photo below:
Next, you need to fill the resonator with something; ordinary tin sponges are perfect for this purpose.
Then you need to pull the resonator body onto these washcloths, as in the photo:
Then you need to take rivets and rivet the entire structure, so you don’t even need to weld it, like this:
For those who like to cook, you can also brew the end parts to the central part.
When everything is ready, you need to process the seams and you can paint them with heat-resistant paint, and after that the quietest muffler on your car is ready.
Possible inconveniences associated with a quiet muffler
The car will now be quieter, which is what we wanted to achieve, but there may be some disadvantages - an increase in the overall weight of the exhaust system. Therefore, it is necessary to hang stronger brackets so that the exhaust pipe does not come off on rough roads. There are also cases when rubber shock absorbers are hung. But in fact, a homemade resonator will weigh about 2-3 kg.
It is also necessary to test in action how the exhaust system works so that gases exit normally through the exhaust pipe. Therefore, it is necessary to check at higher speeds, then it will be possible to draw the right conclusions. But as a rule, gases will escape through such a resonator without difficulty.
And then in the video there is another way to reduce the sound of the muffler, making a really very quiet exhaust system:
Engine power is the factor that people pay attention to first when getting to know a car. And in the future they will never forget about her. In addition, many sometimes have a desire to increase it. And one of the ways to achieve this would be a direct-flow muffler or direct-flow muffler installed on a production car.
We make direct flow from scratch
To do this you will need to use the services of a turner. We order two pipes:
- One made of steel 2 mm thick with a diameter of 130 mm and a length of 42 mm.
- The second is made of steel with a thickness of 2.5 mm, a diameter of 52 mm and a length of 42 mm with holes with a diameter of 8-10 mm, every 2 cm;
Two flanges with a diameter of 130 mm with an internal hole of 52 mm, metal thickness 2-2.5 mm can be ordered separately.
Prepared:
- Asbestos rope;
- Glass wool or mineral wool.
Asbestos rope is wrapped around the inner pipe. This is done in order to protect the mineral wool, which will be the top layer, from overheating.
We fill the top layer, assemble and scald the structure. We weld the fasteners and attach the forward flow to its regular place. For beauty, you can put a muffler attachment on it.
Another design of the device is shown below.
Blueprints
There are a lot of ways to make a direct-flow muffler; the main thing here is to understand the principle of operation of the device and use your imagination. And for car owners who find it difficult to do this, use the methods and drawings described above, they are simple and accessible to many.
Also tell us in the comments what type of forward flow is installed on your car and how you can do it yourself, this will help many people understand this topic.
General information about the exhaust system (ES)
As you know, the muffler is part of the exhaust system, and it is necessary to remember about it before you begin to understand what forward flow is. It performs more tasks than it might seem at first glance. The very first and most obvious is the removal of vehicle exhaust gases. Another, no less important function of the aircraft will be to provide ventilation to the engine cylinders.
This is achieved in a rather original way - at the moment the valves of one cylinder are closed, a vacuum is created in the exhaust manifold, which moves through the system at the speed of sound. Having been reflected from obstacles, it returns to the manifold by the time the next valve opens, creating an area of reduced pressure at the outlet of the cylinder, thereby improving ventilation and purging of the internal volume.
The speed and time of movement of the vacuum depend on the length of the path (exhaust pipes) and engine speed, but this is taken into account when calculating the standard exhaust system. Well, another task will be to combat noise, which is what the muffler does on the car. In general, a traditional aircraft can be represented as shown in the picture.
Direct-flow car muffler device
When tuning a car, a direct-flow muffler is often installed instead of the usual one. What is this connected with? The fact is that direct flow allows you to solve two problems:
- change the sound, making it bassy and growling, which creates the impression of a powerful, “charged” car, although in reality this may not be the case;
- slightly, by a few horsepower, increase the actual engine power, reducing losses to overcome the resistance to the movement of exhaust gases in the muffler.
Now that we have figured out what direct flow does, we can study its structure. You can compare what a direct-flow muffler (one of its possible options) and a standard one looks like in the figure below.
As you can see, the difference is that the direct-flow muffler has a simpler device. This simplification allows in many cases to make a homemade forward flow, especially for domestically produced cars, for example, the VAZ 2114.
How to make a direct-flow muffler with your own hands
Therefore, there is no need to fully describe, for example, the forward flow on the VAZ 2109 or the forward flow on the VAZ 2106; it is enough to give the general principle according to which such a device is created. Usually, when considering how to make a forward flow with your own hands, a regular muffler is used as a blank, especially if you are making a forward flow for a VAZ or for some similar car (for example, VAZ 2114).
The standard muffler is removed from it, and then it is opened using a grinder, and all internal partitions and pipes are removed. The result is a direct-flow muffler blank, as shown in the photo.
But then, when you make a direct flow with your own hands, creativity begins. Although in this case we cannot talk about real forward flow. The fact is that for the most part we are talking about a forward flow muffler.
There are a variety of options for its implementation. Some people weld one pipe between the ends, some two, and some create several compartments and additionally use asbestos, basalt wool, and metal shavings to reduce the noise of a car engine. Various examples showing how to make a forward flow are shown in the photo below.
Moreover, the above options do not exhaust the methods by which such a device is made. To complete the work, it is necessary to weld the cut hole, and the forward flow for the car can be considered ready.
Muffler design for VAZ 2101/2107/2109/2110/2015
Despite the fact that the principle of operation of all VAZ muffler classics and later models is the same, they still have design distinctive features.
For example, consider the muffler design on a VAZ 2101.
The product has three cameras, the general structure is presented below:
- Upper half-body;
- Thermal insulation;
- casing;
- Partitions of the right and left chambers;
- Inlet pipe;
- Front partition;
- Perforated exhaust pipe;
- Perforated pipe internal;
- Perforated intake pipe casing;
- Rear partition;
- Semi-hull lower;
- Exhaust pipe;
- Front exhaust pipe;
- Main muffler;
- Suspension strap;
- Pillow suspension;
- Grazing pipe.
Muffler design of late models using the example of a VAZ 2110.
- Reception pipe;
- Bracket;
- Clamps;
- Resonator;
- Suspension cushions;
- Main muffler;
- Exhaust pipe;
- Perforated rear resonator tube;
- Posterior partition;
- Front partition;
- Perforated front resonator tube;
- Frame;
- Front perforated pipe;
- Inlet pipe;
- Outlet pipe;
- Frame;
- Posterior partition;
- Middle partition;
- Rear perforated pipe;
- Front partition.
Additional Information
The desired result was achieved thanks to a whole range of measures affecting literally all elements of the car: the camshaft, combustion chambers, inlet and outlet manifolds, gas exhaust paths (their shape, length and location) and mufflers. And the solid, bass sound of the running engine was only a concomitant factor of the real direct-flow exhaust system. In fact, the purpose of creating such a device was to maximize the use of engine power and reduce its losses during engine operation.
And they achieved this, as already mentioned, with a whole set of measures that are impossible for an ordinary user to implement in a garage. So there is no need to create illusions that by acquiring a muffler that is in some way different from the standard one, you have significantly increased engine power and improved the dynamics of the car. The result of all such work will be, at best, a change in the sound of its exhaust. Although if this is your goal, then you will achieve the desired result.
Power and forward flow, three different opinions
Many owners of VAZ cars or, for example, Mitsubishi Lancer 10, Mazda 3, installing direct-flow exhaust systems on their vehicles pursue several goals, as a rule, there are two of them:
- Tuning your car;
- Increase the engine power, they say installing a sports analogue will leave many behind when starting at a traffic light.
The first opinion is that this is true. There is no debate about tuning; we are missing this point. But there is another opinion about increasing power, and it is the opposite.
The second opinion is that a sports muffler without deep tuning of the engine will not give an increase in power and partly it coincides with the opinion of experts.
The third opinion from professionals is that a noticeable increase in engine power is possible only after significant processing, and a direct-flow muffler is a secondary part of the issue.
The tuned power unit produces more exhaust gases, and, therefore, the standard exhaust system will not cope with its tasks, especially at high speeds.
Therefore, it will be necessary to increase the diameter of all pipes, install a tuned manifold, and only then a direct-flow muffler.
It is on sports cars that they install not simple engines, but ones that require special attention. And the direct-flow exhaust system fits into the overall picture of the tuning engine.
Types of mufflers and their differences
There are 4 types of mufflers based on the method of absorbing acoustic waves:
- reflective;
- restrictive;
- absorption;
- resonator.
The reflective circuit is reverse-flow, the rest are direct-flow.
Reflective
If one muffler is installed in a car, then a reflective version is used. It uses the principle of “breaking” the flow of exhaust gases by creating several partitions, expansion chambers and turns. Exhaust volume is reduced to standard levels. For this reason, the vast majority of factory vehicles are equipped with the reflective type.
most popular for factory vehicle configuration
The disadvantage of this type of muffler is the reduction in engine power due to the resistance of the exhaust system to the flow of exhaust gases.
Resonator
A resonator muffler is installed as the first stage in the exhaust system of powerful engines. It consists of a perforated pipe placed in a housing. The body is divided into two or three sections. The energy of the exhaust gases is weakened due to a stepwise reduction in pressure.
installed as the first stage of exhaust energy suppression
The part reduces the force of sound vibrations and maintains engine power with a free flow of exhaust gases.
Restrictive
In restrictive mufflers, the gas flow passes through a diaphragm or cone narrowing, which leads to a decrease in engine power. The acoustic protection of such devices is low, since the diaphragm does not interfere with the rectilinear movement of the sound wave.
Absorption
The damping function for sound vibrations in the absorption muffler is performed by a finely porous non-flammable material located in the space between the perforated pipe and the housing. The design is similar to the resonator type. This type has little effect on power reduction.
What is important to know about the resonator
Structurally, the pre-muffler is identical to the forward flow described above - a straight perforated pipe passes through the cylindrical body. The only difference is the partition that divides the tank space into 2 chambers.
Resonator tasks:
- dampen primary sound vibrations of large amplitude;
- facilitate the work of the main muffler and extend its life;
- remove some of the heat from the flue gases.
The resonator bank resembles a forward flow, only the part size is smaller
The principle of operation of the element is based on the physical phenomenon of resonance - repeatedly reflecting from the partition and the inner walls of the can, sound waves cancel each other out.
The VAZ 2107 car is equipped with 3 types of resonators:
- The classic option for carburetor engines, used in the first models with an injector, is a long pipe with one or two banks (depending on engine size).
- On injection models that comply with Euro 2 exhaust standards, a shortened resonator section with a flange was installed at the front end of the pipe.
The catalytic converter was bolted to it. The latest VAZ 2107 models were equipped with a neutralizer that took away part of the length of the resonator pipe - After the introduction of Euro 3 standards, the length of the catalyst increased and the length of the resonator decreased. The section for the injection version of the “seven”, which meets these requirements, is equipped with a front flange with 3 bolts.
Euro 2 and Euro 3 resonators differ in the shape of the mounting flange and the length
When operating resonators, the malfunctions described above occur - burnouts, rust and mechanical damage. Troubleshooting methods are similar to repairing a muffler - welding or temporary sealing with a bandage. Removing the resonator section is not difficult - you need to unscrew the fastening to the gearbox, then disconnect the muffler and “pants” pipes. On a VAZ 2107 with an injector, the flange is disconnected instead of the front clamp.
Find out how you can control fuel consumption: https://bumper.guru/klassicheskie-modeli-vaz/toplivnaya-sistema/rashod-topliva-vaz-2107.html
Replacing a return flow muffler with a direct flow one with your own hands
When manufacturing a direct flow, it is advisable to use the positive properties of several types of structures.
Reasons for replacing a standard muffler with a direct-flow muffler
Car owners change the factory muffler to a direct flow one for several reasons:
- obtaining an increase in engine power;
- subjective improvement of acoustic parameters of the exhaust;
- increasing the aesthetic parameters of the car;
- complete modernization of the exhaust channel;
- The installed muffler has failed.
Tools and materials for work
A direct-flow muffler is often purchased, but for lovers of tools and an insatiable thirst for creativity, we recommend making it yourself. It is preferable to make parts from stainless steel with a thickness of 0.8–2.0 mm. Select ferrous metal blanks with a thickness of 1.0–1.5 mm for the case, the rest 2.0–4.0 mm to avoid premature burnout of parts, and also use standard blanks. For the body, use a suitable size: a fire extinguisher, a thermos, an empty gas or scuba cylinder.
To fill the muffler chamber, non-flammable porous material or a combination of them is used:
- basalt or other mineral wool;
- fine mesh metal mesh;
- metal mesh for the kitchen;
- metal shavings.
- angle grinder (grinder);
- drill or drilling machine;
- welding machine;
- consumables: metal discs for grinders, drills, electrodes, etc.
Reworking an old muffler
- We dismantle the old muffler, disassemble it using a grinder, leaving the body parts and the inlet pipe. While preserving the partitions, we drill holes in them for the passage of exhaust gases. The cameras further reduce exhaust volume.
We cut out everything that is not needed from the old muffler
We perforate the inner pipe in an accessible way. The diameter of the perforated pipe is equal to the diameter of the inlet pipe or more up to 30%.
a small number of small holes will help preserve the rich bass rumble from the engine when exhausting
Keep in mind that mineral wool fibers will be “blown out” of the chamber faster through large holes and grooves.
Stainless steel helps to increase the service life of parts and mechanisms several times
In the future, the diameter of the inner pipe can be reduced by simple manipulations, but increasing it is disproportionately more difficult.
cut the length of the pipe to the required size
We put metal mesh for the kitchen in place of the perforation of the pipe.
cover the internal perforation with fine-porous non-flammable material
Wrap the kitchen mesh tightly with metal mesh in 1-3 layers. We fix the mesh with annealed steel wire with multiple twists or crimp it with several clamps.
We enhance perforation, reducing its permeability to mineral wool
We coordinate and clean the welding points, weld the perforated pipe into its regular place.
We carry out welding in compliance with all safety rules
We fill all free space inside the muffler tightly with the selected filler.
the presence of several chambers contributes to greater functionality of the muffler
Working with mineral wool requires personal protective equipment.
Assembling a direct flow in the body of an old muffler
If for one reason or another you are not satisfied with the option of purchasing a ready-made direct-flow muffler, there are two options for creating it yourself:
- assembly in the body of an old muffler;
- construction of a new part.
The first option is simpler and cheaper. To carry it out, relatively straight arms and a welding inverter are enough. The advantage of this method is the minimal impact on the computer settings for the oxygen sensor and a slight (if assembled correctly) change in engine noise. The sound will become more bassy at revs, no more.
Ready homemade forward flow
Work algorithm:
- Remove the old muffler and cut out a full-length window in the body.
- Remove contents and outlet pipe.
- Make and weld into the muffler a “flute” from a perforated pipe or an ordinary pipe, in which cuts are made with a grinder or holes are drilled with a drill. This design disperses the flow of gases, reduces noise and exhaust temperature.
- Weld the exhaust pipe. For aesthetics, you can use a single or double chrome pipe. Perforate the part that is inside the muffler with a drill.
- It is advisable to fill the muffler with mineral wool. You can also use asbestos sheet, glass wool or other heat-resistant material.
- Weld the window in the housing.
To minimize the carryover of filler through the holes in the perforated pipe, it can be pre-wrapped with a metal mesh.
How to make forward flow quieter
To reduce exhaust volume, devices are used that reduce the flow area of the exhaust pipe of the muffler. Let's look at the damper and flute commonly used on cars.
Damper installation
The damper is installed either before or after the muffler. The volume of the forward exhaust will be clearly reduced only when the damper is completely closed. Technological clearances of 3-5% remain for the passage of exhaust gases - so the engine does not stall. In this regard, engine power is significantly reduced due to blockage of the exhaust system.
the damper is made by hand
A damper is also used to switch from a direct-flow to a return-flow muffler and vice versa, if necessary. In this case, a new muffler is installed parallel to the old one, and the damper is mounted in front of them. This scheme is already used on some brands of cars from the factory.
mechanical adjustment of the damper is carried out on the move by the driver from the cab
You can drive a short distance with the throttle closed, but driving constantly is unacceptable for the engine.
the damper is installed in front of the muffler
Making and installing a flute
The flute (silencer) has more preferable characteristics. It dampens the exhaust pipe clearance much less than a damper. You can buy a flute, knowing the internal diameter of the outlet pipe, or make it yourself. Various silencer designs are shown in the photo.
Flute mounting options
Possible versions of the flute.
- External - for outlet pipe diameters up to 50–60 mm.
method of attaching a flute to a small diameter exhaust pipe
a properly designed flute “helps” you ride more quietly
the sound becomes “more pleasant” to the ears of the traffic inspector
Tools and materials for making a flute
- Bulgarian;
- electric drill;
- welding machine;
- spanners.
It is better to choose blanks from stainless steel with a thickness of 0.8–1.2 mm, which guarantees long service life. Blanks made of “ferrous” metals are acceptable with a thickness of 2.0–2.5 mm or less if we plan to use the flute for short periods. As blanks we use two pieces of pipe and sheet metal for the flange.
Making a flute with your own hands
The order of work performed:
- We adjust all parts to the required dimensions. We measure the dimensions of the flange and larger pipe “on site”.
- We drill holes.
the notch divides the gas exhaust into two streams, which reduces the exhaust volume
To further relieve the exhaust system from excess exhaust gas pressure, holes are drilled in the flange.
additional holes allow for a freer exhaust
the flow of exhaust gases is suppressed due to unloading holes and counterflow
There is no need to paint stainless steel
Videos about the flute
Video: sound of exhaust through forward flow without flute
Video: sound of a flute on the same car
Pros and cons of installing direct flow on a car
Installing a direct-flow system has both pros and cons.
Each motorist decides for himself how appropriate it is to modify the car muffler in favor of direct flow. Pros of direct flow:
- If a pipe with a slightly larger diameter than originally installed is welded on, it is possible to increase the exhaust gas throughput. An increase in airflow leads to an increase in engine power, up to 15%;
- Increasing the service life of the muffler. Most often, the muffler “from the factory” is not made from the best materials, but with such a modification, the motorist can use good pipes, even titanium options. If you want to increase the “lifetime of the pipes,” then after welding the resonator, you need to remove the end of the muffler with a grinder and solder a new pipe in its place, having thoroughly cleaned and primed it in advance.
Disadvantages of forward flow:
- Increased noise. Many car enthusiasts consider this parameter a plus and install the direct flow with their own hands solely for the purpose of increasing the “rumble” of the car when driving;
- Reducing the vehicle's ground clearance if pipes of larger diameter are welded onto the muffler;
- Problems during maintenance. Increased noise and the absence of a catalyst will lead to problems during maintenance;
The method of installing a direct flow with your own hands, described in this article, can be called “collective farm”. In professional racing cars, the direct-flow system is much more complex and is designed primarily to improve engine performance. At the same time, such a forward flow is unlikely to bring much benefit, only changing the sound of the car, which, in most cases, is the goal of independent tuning.
Materials and tools for manufacturing: - pipe, diameter is selected depending on the brand of car (VAZ usually has a diameter of 52 cm); — welding; — grinder and discs for cutting metal; — iron sponges for washing dishes (50-100 pcs.).
The manufacturing process of a direct-flow muffler based on a standard one:
Step one. Removing the muffler
First of all, you need to remove the muffler from the car. A VAZ car is considered as an example. Next, take a grinder and cut out a piece in it, as can be seen in the photo. Subsequently, all the insides of the standard muffler are dismantled.
According to the author, at engine speeds of 2500-3000 rpm, the engine sound is not audible in the cabin. At higher speeds the sound is already audible, but it is not as bassy as that of the “can”. From the outside, this muffler looks like a standard one, but is slightly longer.
Another way to make a direct-flow muffler
There is another option to make a direct-flow muffler, here only individual elements are used. Most often, two schemes for manufacturing such mufflers are used. Diagram No. 1 shows a reverse flow exhaust, and diagram No. 2 shows how a sports direct-flow muffler works. This muffler will be made exactly of this type.
The photo shows another similar direct flow with your own hands
The muffler is an element of the engine exhaust system. Its presence does not depend on the type of fuel the engine runs on - gasoline, diesel fuel or methane. The muffler dampens sound vibrations, helps attenuate, subside and resonantly reduce sound waves from engine exhaust. Interlocutors will not be able to communicate around a running engine without a muffler. The noise of the engine will drown out their speech. Nevertheless, many car owners dream of remaking the exhaust system and making it forward-flowing. Some people can create it with their own hands.
Noise standards and liability for exceeding them
Responsibility for loud exhaust from a muffler is provided for under Article 8.23 of the Code of Administrative Offenses. The driver is charged for operating a vehicle with excess noise levels in accordance with the Technical Regulations of the Customs Union 018/2011 “On the safety of wheeled vehicles”, paragraph 9.9.
Table: dependence of the maximum permissible sound level on the vehicle category
| Vehicle category | Sound level (in decibels) |
| M1, N1, L | 96 |
| M2, N2 | 98 |
| M3, N3 | 100 |
Category M1, N1 and L are passenger cars with no more than 8 seats, trucks with a permissible maximum weight of no more than 3.5 tons, motorcycles/mopeds/ATVs. Category M2 and N2 are cars with more than 8 seats (except for the driver), but whose maximum weight does not exceed 5 tons, and trucks with a permissible maximum weight from 3.5 to 12 tons, respectively. Category M3 and N3 are full-fledged buses and trucks with a permissible maximum weight of more than 12 tons (trucks, most dump trucks).
According to 12.5.1 of the Code of Administrative Offenses, the driver (or owner) is charged for making changes to the design of the car without the permission of the supervisory authority - the traffic police.
So, the fine for a straight-through muffler can be either a warning plus a fine of 500 rubles, or two fines of 500 rubles each (in practice, two warnings cannot be issued).
The manufacture of a direct-flow muffler and its further improvement is within the power of most car enthusiasts. Despite the restrictions on the operation of such devices in our society, there are more and more people who want to make their own and install a direct-flow muffler on a car. Thanks to detailed instructions with photographs and videos, it will be much easier to make a forward flow.