A few years after purchasing the car, a breakdown may occur. Most often, car owners encounter problems with the generator. In order to get rid of the problem you need:
- remove the device;
- disassemble, detect an error, fix or purchase a new generator;
- install a functioning device.
removing the belt, replacing brushes and bearings
In a VAZ 2112 car, the generator is designed to power electrical equipment when the engine is running. If this unit fails, full operation of the car will be impossible, so the driver may encounter certain difficulties while driving. You can read more about the principle of operation, as well as the replacement of some elements of this unit, below.
Technical characteristics and principle of operation of the generator set on the Dvenashka
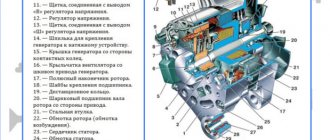
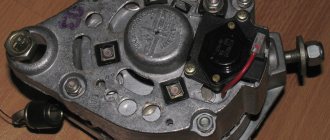
First, let's look at the operating principle of the 2112 generator. One of the main design elements is the rotor, which performs the function of generating a magnetic field. This component is a shaft on which the field winding is mounted. The halves of this winding are installed in special pole parts, and the winding is supplied with current thanks to slip rings. The rotor rotates thanks to a belt drive from the drive.
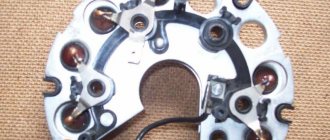
Another equally important component is the stator, consisting of a core and a winding. This mechanism produces alternating current that passes through the electrical network through slip rings. To supply current to the rings, the design of the unit is supplemented with special brushes. After them, according to the scheme, a rectifier unit is installed, which is used to convert the voltage that the device produces. Depending on the device model and its technical features, different winding connection diagrams can be used.
The generator unit relay is used to maintain the voltage within specified limits. This element, if necessary, changes the frequency and duration of electrical pulses. By design, a relay consists of several controllers, as well as executive components. The purpose of these components is to determine the time during which the field winding must be connected to the network. If the relay fails, an unstable voltage will be supplied to the battery.
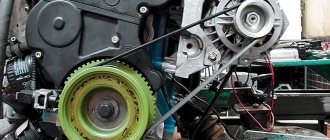
As for the technical characteristics of the generator on the VAZ 3701010-07, the voltage limits generated in the winding are 13.2-14.7 volts. The unit itself allows you to generate current up to 80 amperes. It is important that the VAZ generator belt is tensioned properly, otherwise the operation of the device as a whole may be incorrect. If you want to check the belt tension with your own hands, then keep in mind that when there is pressure on it with a mass of about 10 kilograms, the deflection of the belt should be at least 8 mm (the author of the video is the channel In Sandro’s Garage).
Service Features
The need to repair the generator unit on a VAZ 2112 16 valves does not arise often, but in order for the unit not to have to be repaired, it must be properly maintained. In general, this unit has a fairly high margin of reliability.
What maintenance features must be observed to prevent repairs:
- It must be remembered that the outer surfaces of the unit must always be clean.
- When carrying out maintenance, you also need to check the quality of fastening of the unit - it must be securely fixed at the installation site.
- It would be a good idea to check the functionality of the voltage regulator; a multimeter is used for this.
- The same applies to belt diagnostics. As stated above, first of all you need to check its tension - the belt should not be too tight, but it should also not be loosened. In addition, diagnostics of the condition of the strap should be carried out every 10 thousand km - there should be no signs of damage, cracks, and the belt should not peel off.
Photo gallery “Main device malfunctions”
Possible malfunctions and ways to eliminate them
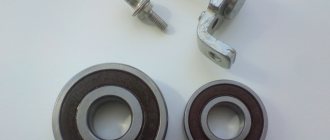
The need to repair a generator unit may arise for various reasons. As practice shows, the most common of them are failed brushes or bearings. Read below about repairing these components.
Brush replacement procedure
Replacement of VAZ generator brushes is carried out as follows:
- First of all, you need to release the three latches on the device’s body, on its sides. These latches secure the cover to the mechanism.
- The cover itself can be detached and put aside. This will allow you to access the regulator.
- There are two bolts on the regulator that secure the device - they need to be unscrewed. Then pull the regulator and remove it.
- Assess the condition of the brushes - if they are working, then the length of these elements should be at least 0.5 cm. If their size is smaller, then you have two options - either repair it by replacing the brushes, or change the device assembly. If repairs are being made, you will need a soldering iron since the brush assembly is soldered to the relay. First, you need to unsolder the wires connected to the brushes, and then dismantle the assembly, replacing it with a new one and securely soldering it to the relay contacts. Or you simply change the relay, and further assemble the device in the reverse order (the author of the video is the IZO channel)))LENTA).
How to change bearings yourself?
To replace the bearings, follow these steps:
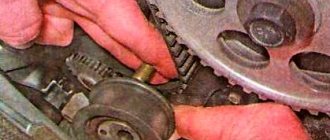
- On the dismantled generator, you need to block the rotor; to do this, use a screwdriver, then unscrew the pulley.
- Next, by pulling the latches, you need to remove the device casing. You need to make marks on the two halves of the case, and then, using a screwdriver, you will need to remove the front cover.
- Then you will need to knock the bearing out of its seat; to do this, you will need to place it on a more suitable object. Alternatively, you can use a 27mm socket.
- After this, you can take a new bearing device and fill it with grease. This element should be hammered through the old one. To make the device more securely fixed at the installation site, you can use a chisel to flare the edges.
- Now let's move on to the rear bearing. To do this, you need to place either a thick screwdriver or a thin chisel under it, and hit the top several times with a hammer, while simultaneously moving the screwdriver in the opposite direction. The device can be dismantled using an open-end wrench.
Video “How to change the alternator belt?”
Visual instructions for replacement are given in the video below (author - channel In Sandro's Garage).
Generator
In order to disassemble machine parts yourself, you need to know what they are intended for. So, a generator is a structure that is designed to provide electricity to all parts by converting mechanical energy into current. That is, the battery is charged while the engine is running.
- the generator is located in front of the engine;
- With the help of the crankshaft, work begins.
Today there are two types of devices: compact and traditional. There are significant differences between them, for example, different fan layout, type of case, etc. But the basic details remain the same. Therefore, if the car owner has at least once figured out the details on his own, then when disassembling devices of another type he will be able to easily work. Components: rotor, brush assembly, stator, rectifier unit.
Mounting the generator on a VAZ 2112
VAZ 2112, mounting the generator should not be difficult, since in almost all brands of domestic cars the installation is similar. But in order for the work done with your own hands not to cause dissatisfaction, you need to remember all the nuances.
- Before attaching the generator to the VAZ 21124, you need to make sure that the negative terminal of the battery has been disconnected. This is one of the important points in the work, since otherwise a short circuit may occur.
- Next, you need to position the generator correctly, while holding it constantly. Using wrench No. 13, tighten the bolts as shown in the photo below.
- Install the tension bar.
- Using a special socket wrench No. 10, tighten the adjusting bolt in the upper bracket.
- Correctly tension the alternator belt to avoid future breakdowns.
- Using a No. 10 wrench, screw the nut intended for fastening the wires to the generator drive with positive polarity. Thus, both wires are installed.
- Connect the device excitation wire.
- Install the engine splash guard.
- Connect the negative terminal to resume operation. After complete installation, it is better to check the generator drive belt; you need to adjust the tension.
The fastening process is preceded by the removal of the device, identification of the breakdown, and subsequent repairs. In order to remove the structure, you need to perform the steps in the reverse order.
The machine cannot continue to operate if there are problems with the generator. It is necessary to check the device after a run of 15,000 km. Diagnostics determines the condition and if there are any malfunctions, it is necessary to urgently correct the situation without delay. Repair always includes disassembling the part. For this, keys No. 10, 13 are used. Most often, the reason is determined at the stage of demonstrating the main bolt of the rectifier block. If the breakdown could not be determined, you need to continue the analysis to the end.
Possible negative consequences
There are a number of consequences that can occur when installing a generator in a bottom bracket. For example, because of the bushing, the entire structure is difficult to fit in; the belt is tensioned only after a special tension bolt has been tightened using a No. 10 wrench. The nuts (No. 13) must be tightened after checking the belt, and its tension must also occur while tightening the nuts located on top.
In the event that the structure was tightened much more than required, rapid wear of parts (such as a belt, pulley, bearings) will occur, and, consequently, an early breakdown. A weak tension will lead to damage to spare parts, a peculiar whistle during operation, the inability to charge the battery and subsequently, to its replacement.
Correct belt adjustment
In order for the generator to serve for a long time, it is necessary to determine the position of the belt.
- The part should bend slightly - approximately 10 mm, during a force of 10 kgf between the device and the crankshaft pulleys. If the number is different, it is better to make the adjustment immediately. First of all, you need to loosen the nuts of the upper as well as the lower generator.
- Then place the entire structure on the cylinder block, turning from right to left (so that the belt is noticeably released). Therefore, in order to tighten, you need to do the steps in the opposite direction - move the device away from the cylinder, turn the bolt from left to right, that is, clockwise.
- Using a wrench, turn the crankshaft clockwise two times using the pulley bolt.
- Next, you need to check the fastening again. If the result is bad, it is better to repeat the steps immediately.
- Tighten the remaining two nuts.
There is also a second option for checking. It is more convenient and better to carry out work at the bottom of the car, but to do this you need to remove the right front wheel. When replacing or removing the belt, loosen the tension of the nuts in the lower and upper parts. The bolt intended for adjustment is turned out to the maximum value, the generator is moved towards the cylinder block and the belt is removed. After inspecting the existing belt, you can begin installing a new one. Initially, it is better to put on its crankshaft pulley, and then the generator itself.
Lower bracket for generator 2112 VAZ
Leave your review of the product: Lower bracket for generator 2112 VAZ
Delivery to regions
- Delivery of goods is paid upon receipt of the goods in your city.
Attention: Orders are processed every day, seven days a week, from 09-00 to 21-00 inclusive
Order of shipment to regions of the Russian Federation.
- Place an order through the website or by phone.
- You pay the bill through the bank, after the money arrives in our bank account (usually 1-3 days after payment for the goods), when paying through electronic money systems (funds are credited within a day), we deliver the goods to the transport company.
DIY instructions for mounting a generator on a VAZ 2112
A few years after purchasing the car, a breakdown may occur. Most often, car owners encounter problems with the generator. In order to get rid of the problem you need:
- remove the device;
- disassemble, detect an error, fix or purchase a new generator;
- install a functioning device.
Purpose of the generator
The electric generator in a car is one of the most important elements, since it is it that ensures uninterrupted operation of the electrical on-board network and charging the battery. All batteries installed in cars are not intended for constant power supply without recharging the main electronic components in the car (this includes: headlights, signal, wipers, music, heater motor, etc.). The generator plays a big role in this connection, converting mechanical energy into electrical energy and charging the electronic battery.
The operating principle of the electric generator is quite simple. Its main task is to generate electricity and supply it to the battery contacts. The generator can only be activated when the engine is running, but in several ways:
- through an individual belt;
- through the common belt of additional units.
An individual belt (or a belt of additional units) is fixed on one side to the generator pulley, and on the other, to the crankshaft or intermediate shaft pulley of the engine. The generator mounting may be different:
- on 2112 it is located below;
- on the “classic” - in the middle;
- on UAZ vehicles the mount is located at the top.
While the engine is running, the crankshaft (or shaft) rotates, which transmits energy through a belt to the electric generator and spins it. The resulting energy is converted into electrical energy and supplied to the battery contacts, thereby maintaining a stable battery voltage and protecting it from discharge and failure.
The battery acts as a kind of storage device that constantly accumulates and supplies electric current to the vehicle’s on-board network. When the engine is not running, the battery does not receive recharge and operates in recoil mode. Many car enthusiasts are familiar with situations when the engine barely turns and the headlights shine quite dimly. In such cases, inexperienced drivers immediately begin to blame the battery or other electronic components of the car. However, the culprit is not always so easy to find, because problems can be with the battery, or with the generator itself or the electrical wiring.
Don't worry ahead of time. If the car is parked outside for a long time and does not start, the battery will spontaneously discharge, and this is absolutely normal. Such problems especially often arise when the car is parked for a long time in winter, when negative temperatures have a negative impact on the condition of the battery.
If the car does not sit idle on the street, but constantly starts and drives, then the above problems (when the engine barely turns) can be caused by the following factors:
- serious problems with electronics (current leaks, poor connections, etc.);
- poor battery condition;
- a crack in the generator mount (often found on VAZ 2107 and 21213);
- malfunctions in the electronic part of the electric generator;
- belt stretching, incorrect installation or loose upper and/or lower fastening of the generator (on the VAZ 2110 and other front-wheel drive VAZs the problem occurs quite often).
Video “How to change the alternator belt?”
Visual instructions for replacement are given in the video below (author - channel In Sandro's Garage).
Often, many VAZ 2110-2112 car owners are in too much of a hurry at the first generator malfunction and prefer to replace it with a new one, instead of simply finding out the cause of the breakdown and eliminating it. In this case, we will not consider repairing this device, but will only look at the procedure that must be performed to remove and install the unit.
So, to dismantle it without problems, we will need a tool such as:
- Socket heads for 10 and 13
- Ratchet handles or cranks
Before starting repairs, be sure to disconnect the car’s battery by removing the negative terminal. Otherwise, you risk getting a short circuit when disconnecting the positive wires of the generator.
Electric generator device
The internal structure of a self-generator is very similar to a typical electric motor, but with certain differences. Moreover, differences in detail are present both external and internal. So, in the circuit of a self-oscillator there are such elements as:
- special voltage regulator;
- rectifier assembly (diode bridge).
In conventional electric motors, the above elements are rarely present, and their presence depends on the industry and the specific application of electric motors. But in autogenerators, the presence of such electronic components is simply necessary, since without them voltage surges can occur, as well as exceeding the maximum permissible voltage. Severely over or undervoltage in the on-board network negatively affects the condition of the on-board network, up to the fire of electrical appliances in the cabin (radio, subwoofer, alarm, etc.).
The self-generator is based on a rotor on which the primary winding with parts forming the poles is located. During operation, a magnetic field appears on the winding as a result of the supply of electrical voltage from the battery. The rotor is installed in the housing on special bearings, and a pulley for the belt and an impeller with blades for cooling are also attached to the rotor.
The second main element of the autogenerator is the stator; it is a round metal part (core) with special grooves through which the secondary winding (copper thread) is passed. The design also contains graphite brushes, which are responsible for transmitting voltage to the winding.
To regulate and output the resulting voltage, a diode bridge (converts alternating current to direct current) and a voltage regulator (does not allow overvoltage or undervoltage) are used. The external component of the autogenerator is a ventilated metal case, reinforced with stiffening ribs and having special fasteners for installation in the engine compartment.
Service Features
The need to repair the generator unit on a VAZ 2112 16 valves does not arise often, but in order for the unit not to have to be repaired, it must be properly maintained. In general, this unit has a fairly high margin of reliability.
What maintenance features must be observed to prevent repairs:
- It must be remembered that the outer surfaces of the unit must always be clean.
- When carrying out maintenance, you also need to check the quality of fastening of the unit - it must be securely fixed at the installation site.
- It would be a good idea to check the functionality of the voltage regulator; a multimeter is used for this.
- The same applies to belt diagnostics. As stated above, first of all you need to check its tension - the belt should not be too tight, but it should also not be loosened. In addition, diagnostics of the condition of the strap should be carried out every 10 thousand km - there should be no signs of damage, cracks, and the belt should not peel off.
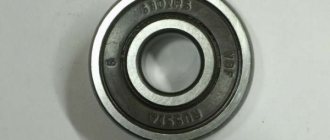
- Another point in maintenance is checking the condition of the bearings. For diagnostics, you need to remove the strap, and the rotor of the unit must be rotated by hand. If during rotation you feel a gap or even slight jamming, then the bearing devices need to be changed. The same applies to the appearance of sounds uncharacteristic of their normal operation.
Photo gallery “Main device malfunctions”
Fastening design
The design of fastening elements for electric generators on AvtoVAZ vehicles varies. Differences in fasteners are caused by the peculiarities of the structure and location of the power unit. For cars of the VAZ classic and Niva family, with a longitudinal engine, the autogenerator is typically located longitudinally, along the block, near the first cylinder. The generator is driven through a belt from the crankshaft pulley. On front-wheel drive models with a transverse engine, the electric generator is located opposite the front right side member in the direction of travel.
The compatibility of the installation grooves on classic and front-wheel drive models differs, but depending on the specific model. The installation locations of the electric generator on classics and the first front-wheel drive cars (08, 09 and 99 families) are the same. However, to install an electric generator from a tens or Chevrolet Niva to a classic, you will need to purchase pulleys, a special strip and a mounting bolt for installing the generator. In other cases, the installation and fastening of generators from 21214 and other Nivas to rear-wheel drive VAZ models does not require additional work.
To install powerful devices from Kalina or Priora, the generator mount for other VAZ models will need to be changed. It is very important to select the appropriate components. For installation on the 08, 09 and 99 family, we select all generator mounts from VAZ (2110, etc.) for an 8-valve head, and not for a 16-valve one.
The fastener itself is a metal L-shaped structure made of durable steel. The design provides special holes for its combination with the autogenerator itself. In addition, the mounting strip is equipped with a technological cutout into which a screw is inserted to align the device relative to the cylinder block.
The lower mount of the generator is presented in the form of a special metal bracket with technological holes (in the bracket itself and in the counter part of the generator). A bolt passes through these fasteners, which rigidly connects the elements together. This is necessary in order to avoid vibrations and belt slippage during engine operation.
Fastening drawing
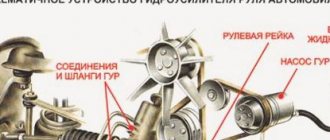
The drawing suggests moving the generator to the place of the hydraulic booster. To do this, you need to make a bracket and install it next to the power steering. You need to select washers for the bracket ears in advance.
This option uses a belt with a size of 1220 mm. It is important that the angle of its wedge must be exactly 40 degrees. An excellent solution would be to buy a belt with ZIL 157. The return hose has a center length of 1115 millimeters, and the high-pressure pressure hoses are 1450 mm.
Check all dimensions carefully, remember the saying: measure 7 times, cut once, there is no need for mistakes here. There is no standard hole for these hoses in the right casing, so you will have to take it and cut it yourself.
The bracket itself for moving the device upstairs is made according to this drawing:
The pump must be turned upside down so that the generator is completely seated. The result of the transfer looks like this:
If you don’t have much experience in carrying out such upgrades, then you can buy a ready-made kit. It will include a new bracket for the Niva and the necessary fastenings. Reviews from motorists indicate that the cost of this simple part is too high.
Removing the generator
The procedure for removing an electric generator from a car is simple, but its implementation requires basic skills in working with equipment and at least superficial knowledge of the units in the engine compartment. The stages of work can be divided into several steps:
- Disabling the electronic part.
- Removing the upper retaining device.
- Removing the lower mounting platform.
- Correct removal of the belt and tensioner.
You can remove the generator mount both on the VAZ 2110 and on other VAZ models if you follow certain instructions. Fundamentally, the process of working with autogenerators on VAZ cars is almost identical, and the main difference is only in the location of the power unit. On the VAZ family 2101 - 2107, 21213, 21214, the engine in the engine compartment is located longitudinally, and on front-wheel drive models the engine is installed transversely. The mount drawing for front-wheel drive models is identical, only the electric generators themselves, their power and pulley sizes differ.
Depending on the engine layout of your car, certain difficulties may arise. So, on classic VAZs, as well as Nivas, the procedure for removing the autogenerator is easier to carry out due to the accessibility of the components. While on front-wheel drive models, access to the components is difficult due to the transverse location of the power unit. There are often cases when it is not so easy to get to the soured bolts that fix the “gene”.
To carry out work on removing the generator on the VAZ 2115, 2114 and other front-wheel drive models, you will need a set of socket heads and open-end wrenches, a flashlight, WD-40 lubricant (or other similar) and a set of new components (belt, pulley, fasteners and bolts). It is worth remembering that on front-wheel drive VAZ models, access to the units is difficult, so an inspection hole or a lift may be required. If there is no access to a pit or a lift, you can jack up the car and remove the right front wheel (in the direction of travel) and after that access to the electric generator will be simplified.
First of all, with the car turned off, you need to remove the terminals from the battery and remove it. This procedure is done in order to protect yourself and the car’s electronics from short circuits. After that, two wires are removed from the autogenerator - one is power (usually red), and the second is control (a thin wire with a white or gray connector). The power wire is located in a special thermal casing; it must be moved, only then will access to the terminal on the unit be opened.
As soon as the wires are removed, we take them away so that they do not interfere with subsequent manipulations to remove the unit. Now you need to loosen the belt tension. To do this, unscrew the tension screw and move the generator to one side. While the generator is moving, check the degree of belt tension.
When the belt tension is loosened, you can completely unscrew the tension screw and unscrew the lock nut of the upper fastening structure. Now you have access to the tension bar; you can easily remove it from the mount and put it aside.
To unscrew the lower fixation bar you will need a pit or a lift. The electric generator is installed on the lower platform using special “ears” in the structure, and they are directly fixed on the bracket itself. You need to unscrew the bottom bracket with an open-end wrench or a socket head. After unscrewing the fixing nut, remove the metal sleeve and the long bolt (pulled out from the other side). The process of removing the electric generator is completed.
bracket
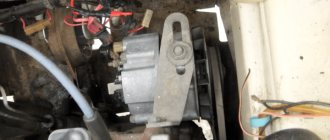
Most often, the reason for poor performance of cars lies not in the design itself, but in its bracket. The mounting bracket for the VAZ 2112 generator is fragile, as it is not made of metal. If the parts are installed incorrectly, the fastening of all nearby devices becomes beveled, which, in turn, causes a crack in the bracket.
Many car owners complain that car parts have to be replaced every three months. So, for example, of all cars, the VAZ 21124 generator mount breaks most often. In this case, it is better to consult with specialists and, if possible, make a metal bracket yourself or order it from a specialist.
It must be remembered that a broken bracket is a kind of indicator indicating the existence of a misalignment, improper installation of the generator, excessive tension or weakening of the belt. Only after the cause is identified and eliminated will the parts serve for a long time.
The instructions described above allow you to understand the structure and stages of installation of parts. But in order to better understand the sequence of actions, you need to familiarize yourself with the information provided in the attached video. Based on the fact that the work must be done independently, its price will be low.
With sequential steps, removal and installation will allow beginners to better understand the internal workings of the machine. The main motto in such work is care, since if the fastening is incorrect or there is a slight bevel or deviation, then many spare parts may break down, which will lead to costs.
Installation of the generator with subsequent adjustment
When installing a generator on a VAZ 2109 (no matter the injector or carburetor) and other models, be sure to check whether the purchased clamps, bolts and nuts fit the installation locations. Also, we must not forget that the mounting holes on old-style electric generators are different from new ones. Therefore, when installing a modern autogenerator on front-wheel drive models of the first generations (08, 09, 99), you should purchase the appropriate fasteners.
The generator mounting mount cannot be taken from Grants or Prioras. You can take a new potassium generator and no additional modifications will be required, but the mounting plates must be type 21082. In addition, you will need to purchase a pulley 2110 and a tensioner type 21082.
The installation process is identical to the removal process. If the standard strips are worn out, they are replaced with new ones; this will require unscrewing several bolts and installing new strips.
When installing the electric generator, start from the bottom fastening plate, tighten (but not completely) the fixing bolt (do not forget to put the bushing), put the belt on the pulley and move to the top. To fix the generator, install the top fastening, but do not screw it all the way. Then the tension bar is inserted. Then tighten the tension bolt, checking the belt tension.
The belt should not bend more than 1-1.5 cm when pressed with a force of 10 kgf. It is quite difficult to maintain these indicators in garage conditions, so you should focus on the gap between the frame and the tension bolt of 15–20 mm. There should be a small gap (15–20 mm) between the tension frame and the screw (from the thread side). Then turn the engine crankshaft two turns with a wrench and monitor the position of the belt and its tension.
If, after checking the engine by turning the key, the gap changes, then the bolts securing the electric generator should be tightened. As soon as, after a control rotation of the crankshaft with a key, the gap remains the same, and the belt bends slightly when you press it, the bolts of the upper and lower fastenings are finally tightened, a control rotation of the crankshaft is performed two turns, the wires are connected to the electric generator and the engine is started.
If, when starting the engine, the belt does not make unwanted noise or whistle, and the charge level is normal, then the installation procedure was completed correctly. If a whistle appears, then most likely the belt is too tight and should be loosened.
Video about tightening and adjusting the belt:
Installation of generator from 2110 to 2109/08/99 – video:
Mounting the generator VAZ 21214
Niva is an excellent domestic SUV that can compete with modern jeeps. VAZ 21214 received a durable body, a powerful power plant and a reliable suspension. Like any car it has its drawbacks. These include the location of the generator - the unit is installed in the lower part of the body. When testing for strength in forest and mountainous areas, dirt, sand, and water get into it. Another unpleasant point is that coolant constantly drips onto the unit.
The problem can be solved by moving the generator upstairs.
After reading this article, you will learn:
- What is needed to move the generator upstairs. How does the process work for cars with and without power steering? Is it worth buying a new unit for VAZ 21214.
Study this drawing carefully. The author decided to make a bracket for moving the generator with his own hands. The part is made of metal, the thickness of which should be 4 mm, and the width and length should be 80 mm. To assemble the bracket, you will need parts from other domestic cars:
- Belt 6РК1290; Adjustment bar; Crankshaft pulley from tens.
Photo, details of the manufactured bracket 21214:
As you can see in the photo, the standard fan is installed on a pump pulley from GAZ 3110, we also take a crankshaft pin from 2110 and a 6RK1290 brand belt. The generator should be located on the top left side. It must be attached to the top using an M8 cylinder head bolt; at the front, a standard bolt and studs are used. For fixation, the bracket must be secured with an additional lock nut.
This generator transfer drawing differs from the first one in that it uses a belt with a size of 1375 mm. There are fewer steps here, but you will have to work with a grinder - you need to reduce the plane on the head located in the area of the M8 bolt.
The front cover will need new bolts and studs. This drawing of a bracket for mounting a generator is also suitable for other models, for example, for 21213.
The drawing suggests moving the generator to the place of the hydraulic booster. To do this, you need to make a bracket and install it next to the power steering. You need to select washers for the bracket ears in advance.
This option uses a belt with a size of 1220 mm. It is important that the angle of its wedge must be exactly 40 degrees. An excellent solution would be to buy a belt with ZIL 157. The return hose has a center length of 1115 millimeters, and the high-pressure pressure hoses are 1450 mm. Check all dimensions carefully, remember the saying: measure 7 times, cut once, there is no need for mistakes here. There is no standard hole for these hoses in the right casing, so you will have to take it and cut it yourself.
The bracket itself for moving the device upstairs is made according to this drawing:
The pump must be turned upside down so that the generator is completely seated. The result of the transfer looks like this:
If you don’t have much experience in carrying out such upgrades, then you can buy a ready-made kit. It will include a new bracket for the Niva and the necessary fastenings. Reviews from motorists indicate that the cost of this simple part is too high.
Should I install a more powerful current generation unit?
We have already described above why the unit wears out quickly. An excellent solution is to install a new generator. Another common reason is the installation of off-site equipment that consumes a lot of electricity. The current strength of a standard unit is not always enough, so you should think about installing a more powerful generator.
The model depends on the year of manufacture of the car and engine. For example, the first Nivas with a 1.6 power plant have a device with a remote regulator, which was used in the “classics”. In more modern machines the regulator is already built-in.
If you want to buy an aftermarket unit, it would be wise to get a 2003 model year Chevrolet. The selection must be made according to the catalog numbers and parameters that are present in this table:
If you can modify the fastenings yourself, then the list of available gHepaTopoBs can expand significantly. Craftsmen even install devices from foreign cars.
In any case, you should strive to modernize and improve your car. And this applies not only to electricity. The Niva is a reliable SUV, but it lags far behind its foreign competitors in terms of comfort. You can move on to this issue immediately after improving the technical component of the car.
Generator NIVA
Bracket for transferring generator VAZ-2121 for NIVA
It took me a long time to decide to do this kind of work. I really didn’t want to deal with the change in the recently put order in the engine compartment: the electrical wiring was neatly laid in its place, the cross-section of the wires was chosen with reserve and satisfied my “today’s” needs, and to all that was said, you can also add the embarrassment of using a non-standard V-belt , which can only be obtained upon order. I became the proud owner of a VAZ-2121 generator transfer bracket
.
Generator transfer bracket from Z-IQ
The generator belt was not included in the kit and its size was not known to me, but a simple empirical method was used to determine, in my opinion, the most optimal belt size - 1350mm
.
V-belt, purchased to order
To install the bracket, you must: — unscrew and replace two studs and two M6×20 bolts of the camshaft drive cover with four M6×25 bolts; — use a file to modify the bead around the cylinder head bolt and the bead on the cylinder block (shown in the figure below) under the bracket mount. Carry out the work locally; the approximate work time, if you have suitable and working tools, is 1/2 hour.
The design of the bracket consists of three parts and implies the possibility of installing generators from different manufacturers. In my case, the KZATE VAZ-21214 80A generator is installed in the middle vertical position. Before finally assembling and pulling the bracket, you must first check the alignment of the belt on the pump, generator and crankshaft pulleys.
Finally, we move on to the final part: disassemble, break and assemble. There are also positive aspects, for example, I used a large cross-section wire for the generator from the battery, in connection with its transfer, and reduced the length of the wires to the ignition switch from the generator.
Disassembled
Ultimately
Transferring the KZATE 80A generator (step-by-step instructions for a carburetor internal combustion engine) for NIVA
What you need: - Generator 21214 or similar - Generator mounting bracket 21214-3701650 with two nuts and bolts with a thin head for fastening to the KIT kit - KIT generator transfer kit - generator belt 1350 mm long - mounting bolt for generator 2110 assembly - two M8x20 bolts and M8x30 with nuts
1) Remove the spare wheel from under the hood, unscrew the extension on which it rested 2) Unscrew the two studs and two bolts above the crankshaft pulley. We replace them with four longer bolts. If there are no problems with unscrewing the bolts, then there may be an ambush with the pins. It’s not difficult to solve; you can either weld it to the stud, or sharpen the stud with a file on both sides and turn it out with pliers. Everything turned out for us without any problems!
3) Now we take a grinder or a file and sharpen the engine block for the upper mounting of the bracket (the bolt to the left of the distributor, if you stand at the driver’s fender). On the block the tide has a round shape, but we reduce it to a rectangular shape!
4) We attach the generator mounting bracket 21214-3701650 to our massive structure
This is where the first difficulties appear. The generator bracket 214 should not rest against the outlet fitting of the fuel pump. On the KIT bracket there are three positions for installing the bracket from the 214 generator. We chose the middle one, there are also possible options: -upper (a 1375mm belt is required) -lower (replacement of the fuel pump with a 2108 is required) 5) Attach the bracket to the engine block 6) Disconnect the “-” from the battery, remove the belt from the generator, disconnect the wires from the old generator . We unravel the braid of wiring from the lower generator to the level of the battery itself and the electrics. wiper motor (this length was enough for me to reach the upper generator) We pack the wiring in corrugated paper.
7) Install the generator on the upper bracket, put on the belt. We check the alignment of the pulleys. If necessary, adjust the position of the bracket from the 214 generator. Install the tension bar. Let's tighten the generator belt!
We connect the wires, start the engine, check the voltage! (we didn’t succeed the first time due to a defective regulator relay. We secure the wiring with plastic clamps. We pull the coolant hose to the gas hose mounting eyelet, which goes from the fuel pump outlet fitting to the carburetor
9) We inspect the engine compartment for the presence of jambs, making sure that they are absent, close the hood.
Installation of a generator from VAZ 2110-2112 in Niva
I started to notice that the battery was undercharging. Especially when the lights, heater and wipers are on. I got up several times because of this. You arrive, turn off the car, and then you can’t start it. It was necessary to change the generator. I wasn't happy about buying a new one. I bought it used from 2110. Well, then I needed to install all this. I found several reports on the Internet about how people put them on classics. But... I went a different way. So, there is a generator with 2110-2112
You will also need the following parts: 1. Lower mounting bracket for generator 21214 2. Mounting bolt for generator 2110 assembly 3. Tension bar 21214 4. Bolt M8x1.25x75 5. Nut M8 for generator bolt 2110 6. Washer 8X24 - 5 pcs. 7. Collapsible generator pulley 2101 8. Rear shock absorber spacer bushing 2101 9. Generator lower mounting bushing 2110
I removed the pulley under the semi-V belt. There are two holes on the front of the generator housing; you need to insert M6 bolts into them and thereby lock the rotor. I have a generator with a pulley diameter of 15 mm. The pulley from 2101 fits perfectly on the shaft; its hole is also 15. (I also tried on pulley 21214, but its hole diameter is 17 mm.) To install, you only need to trim the thrust bushing. And the fan and the second thrust bushing will not be needed. I additionally welded the pulley halves, but in principle this is not necessary.
The steel bushing needs to be knocked out of the new lower mount 21214; it will be replaced with 2110. I unscrewed the old generator, the old tension bar and the lower bracket of the generator. And I screwed on the bottom bracket from 21214. I also had to buy one more bolt since the old bracket had two bolts.
Then I tried on the generator, but turned it upside down. So that the upper ear is below. I set the belt to be level and measured the distances between the front ear of the bracket and the ear of the generator and, accordingly, between the ear of the generator and the rear ear of the bracket. I got 6 mm at the front, 21 at the back. I put 3 8x24 washers in front, each 2 mm thick. I made a spacer back. To do this, I sawed off a 2101 piece from the spacer sleeve of the rear shock absorber and inserted a steel bushing for the lower mounting of the generator 2110 into it, it fits there perfectly! Here in the photo is just the manufactured bushing and the bushing for the lower mounting of the generator.
Then I just screwed on the generator.
The generator turns out to be upside down and the bottom mount is on top. To secure it from above, just use an M8x1.25x75 bolt, two 8x24 washers and a nut from the bottom bolt of the generator 2110.
The belt used is standard.
The only thing I encountered later was the generator’s unwillingness to start. It started working only at 3000 rpm. As it turned out experimentally, if 12V was applied to the contact of the battery charging lamp, the generator immediately started working. Unlike the old Nivsky, the new one does not have a self-excitation system. The voltage to this contact comes from the dashboard and is reduced to 3.2V by three 160 Ohm resistors each connected in parallel. I unsoldered them, after which the generator starts at 1500 rpm. Apparently the gear ratios of the pulleys also have an effect.
Sound signal NIVA
Sound signal GAZ in NIVU Installing a sound signal from GAZ (PAZ) in NIVU Sound signal repair