Thermostat is a device in the engine cooling system that automatically regulates the temperature of the coolant.
The device maintains optimal thermal operating conditions of the engine; with its help, the engine warms up faster.
Structurally, it is a valve, inside of which there is a heat-sensitive element that blocks the flow of water, antifreeze, antifreeze through the radiator until the engine is completely warmed up.
Installation location: in Chevrolet Niva it is located on the left front edge of the engine, connecting the lower pipe of the stove, pipes from the radiator, engine and throttle valve.
Replacing the thermostat on a Niva Chevrolet: photos and videos
The correct operating temperature of the engine largely depends on the condition of the thermostat. A simple Niva Chevrolet engine cooling system will allow you to remove, check or replace the thermostat yourself, spending a minimum of time. Let’s figure out how to do this quickly and without loss of antifreeze right now.
Pre-check the thermostat on the Niva Chevrolet
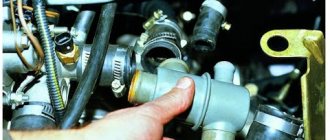
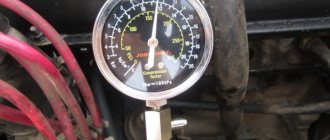
Thermostat removed for testing.
Of course, no one will remove the thermostat for fun. Just for the preliminary check, we will carry out several simple operations in order to make sure that it is not working or, conversely, that it is working properly.
To do this, start the cold engine and touch the lower radiator pipe. It should be cold.
This means that the thermostat is closed and the coolant flows in a small circle: expansion tank, pump, thermostat valve, cylinder head and cylinder block, throttle heating system (in an injection engine), heater radiator.
At this engine temperature, the lower hose should already be hot.
As soon as the engine warms up to operating temperature (82-85 degrees), as can be judged by the temperature gauge on the dashboard, the lower radiator hose should begin to warm up.
This indicates that the thermostat valve has opened and antifreeze flows in a large circle through the radiator of the cooling system. Fast and easy. If the hose begins to warm up when the engine is cold or does not begin to warm up when the engine is hot, the thermostat must be checked in more detail or replaced. Let's start with replacement.
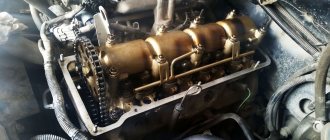
How to remove the thermostat on a Niva Chevrolet for replacement
After removal, we saw that the valve in the thermostat was stuck.
Before removing the thermostat on a Chevrolet Niva, you need to let the engine cool down if it has been warmed up. After this, there are two options for the development of events: remove the thermostat with partial draining of the antifreeze, or without draining it at all. The fundamental difference is that with partial draining, we in any case lose some of the liquid.
Without draining coolant
To avoid draining the liquid, you can do this:
- We take two identical open-end wrenches, two screws 30-40 mm long and two corresponding nuts.
- Clamp the antifreeze supply hose with two wrenches.
- We fix them with a threaded pair.
- We pinch the hose.
Not a drop of antifreeze will spill, except what is in the thermostat itself. However, before starting this operation, you should make sure that the hoses are in good condition, without cracks and have not lost their elasticity.
With drain
Let's drain the antifreeze!
If you don’t want to experiment, then drain all the antifreeze that is located above the thermostat. To do this, we use the drain plug in the cylinder block. At the same time, you must continue to ensure that antifreeze does not get on the generator. He doesn't like it. After the antifreeze has been drained or the hose is pinched, you can begin dismantling the thermostat.
The algorithm of actions is as follows:
- Using a Phillips screwdriver, loosen the clamps and unscrew the clamping screws.
This must be done first on the inlet hose, then on the outlet hose. Unscrew the clamps. - We do the same with the heater hose and the hose that goes to the cylinder block and the upper hose.
- Carefully remove all the hoses, making sure that no liquid gets on the generator.
- We remove the thermostat and install a new one.
Traces of spilled antifreeze are visible.
Installing the thermostat is carried out in reverse order.
Thermostat disassembled. Apparently it is not repairable.
Now all that remains is to check at home to understand whether to change the thermostat or try to deal with the old one. It is non-separable, therefore, if the test shows that the valve does not work as it should, it is scrapped. But the new thermostat is still worth checking. Anything can happen.
Which thermostat is better to install?
More details in the material: Choosing which thermostat is better to install on a Chevrolet Niva.
The price of any thermostat existing on the market is quite low, within 500 rubles. This is a real gift, since a non-native Volkswagen one costs from 1,700 rubles.
Since 2006, on the GM-AvtoVAZ assembly line, Chinese-made thermostats with article number 21230-1306010-05-0 have been installed. They are manufactured at the DFT factory in China. Trade name ThomsonAuto.
Not original Luzar thermostat.
In addition to Thomson, there are Luzar, Pramo and MetalInkar thermostats on the market with a plastic case, these are the cheapest, but there are also thermostats from the same company in a metal case.
Judging by user reviews, the native Chinese thermostat, which comes in a branded box, suits the vast majority, and the price in the range of 500-600 rubles is not particularly bad. I wish everyone a stable operating temperature and successful replacement of the thermostat!
Articles and prices
To make it easier for you to decide which one is best to install on your car, the table below shows the article numbers and prices for the previously discussed models.
| Model | vendor code | Price, rub |
| Thomson | TA2123-1306010 | 390 |
| Zommer | 2123-1306010-06 | 420 |
| Metal Inkar (polyamide) | 10.0300.01 | 515 |
| Pramo | 2123-1306010-02 | 600 |
| WEEL | 181-0034 | 630 |
| Luzar | LT0123 | 605 |
| Herzog | HL36010 | 520 |
| Vkt | VT29003 | 480 |
| Fenox | TS009E7 | 490 |
| Finord | 21231306010 | 510 |
| Baker | 21231306010 | 450 |
| Finwhale | FinwhaleT123 | 520 |
| Gallant | GLTH14 | 500 |
| Hofer | HF 445 730 | 550 |
Operating principle
When the driver turns the key in the ignition switch, the contacts close, passing through the starter relay. The Chevrolet Niva and its engine are still switched off. Power is supplied to the holding and traction windings. The magnetic field in them with a certain force pulls the armature into the housing, thereby compressing the return spring.
After this, the anchor pushes the rod and contact plate. It closes the contacts on the solenoid relay. The electric starter motor begins to spin. At the same time, the armature fork extends the starter bendix (Niva Chevrolet 1600 is also equipped with it). There is a gear installed on the bendix. It engages with the flywheel on the car engine.
When the flywheel rotates faster than the starter and Bendix gear, the overrunning clutch comes into play. It prevents the torque from being transmitted to the bendix and then moves back with the help of a lever. And due to the return spring, the part goes back to its original position when the engine starts.
Unit design and reasons for failure
The Niva-Chevrolet thermostat is unified with all modern LADA car models. The basis of its operation is a mechanical system with a heat-sensitive element. While the latter is not sufficiently heated from the antifreeze, the flow of the coolant is limited to a “small circle” from the engine with its simultaneous return to it. As soon as the wax, which acts as a defining element, warms up in the thermostat, the internal piston will block the pipe coming directly from the engine, and the mechanism itself will open the flow of coolant from the radiator.
There are two main reasons for the failure of this system. The first is the ingress of dirt particles into the mechanism itself and the second is wear and tear of the wax valve over time. Regardless of what happened, it is recommended not to repair the unit, but to completely replace it.
Self-dismantling
These diagnostic methods can only be performed if the device is removed. And for this you need to know how to remove the starter. On the Chevrolet Niva it is made as follows:
Before dismantling, it is necessary to disconnect the negative voltage cable from the battery. Judging by the advice of owners, it is best to disassemble the starter through the lower part of the car. In this case, you need an overpass or a pit. Once the battery is disconnected, the engine protection will be removed. The starter itself is secured with three bolts. To turn off the device, you just need to unscrew it. Lower the bolt from the bottom. it's more convenient. The remaining two bolts should be removed from the top. The most problematic is the top bolt. By loosening the nuts, the thermal protection is dismantled. On the side of the test point, the tin is bent and bolted so that the tin can be unscrewed from the bottom
The starter can then be carefully pulled out. And reached out better along with the wires
There are only two of them here.
First of all, the device is cleaned, contacts and fastenings are freed from dirt, and the mechanism is lubricated. Replace faulty parts if necessary. You can install a new Niva Chevrolet starter. The price of new units, depending on the manufacturer, ranges from 4,000 rubles.
Problems with the starter
Like any mechanism in a car, the starter works very often, which leads to periodic breakdowns. In order to deal with this, it is necessary to clearly identify the cause and then eliminate it. Only in this case can this system be returned to stable operation at minimal cost. For example, if the starter does not turn, then most likely the problem is in the battery. You need to charge it or buy a new one. It may also happen that the battery is fine. Then the reason may be oxidation of the wires. In general, problems and difficulties may arise on a Chevrolet Niva, the solution to which is completely different.
Trouble turning on
For example, if after several turns on the traction relay turns off. This problem may be caused by an unsuitable battery (low voltage) or oxidation by the wire. There are cases when it is impossible to find out the cause without removing the starter and conducting research on a special stand. Based on the results of this work, a decision is made whether to replace the clutch, gears or anything else.
Troubleshooting
In most cases, problems on a Chevrolet Niva can be identified as follows. It is necessary to take a current source and an ammeter and attach it to the mechanism. After this, turn on the voltage at 12V, periodically changing the braking. Based on the results of the device’s behavior, it will be possible to draw a conclusion: disassemble it and inspect each part separately or replace it completely.
Perform full braking tests to effectively determine the cause of the problem and repair (replace) it. It is better to entrust all this work to professionals who can do exactly what is needed. If you have the necessary equipment, you can carry out the repairs yourself.
Symptoms of the problem and consequences
The main signs of a malfunctioning thermostat in a car are abnormal coolant temperatures when the engine is running. It may be too high when the radiator fan is working correctly and there is a sufficient amount of antifreeze itself, or too low when the engine is warm. A concomitant sign of the last symptom is a sharp jump in coolant temperature when the engine stops.
Valve malfunction can also be monitored by the behavior of the temperature sensor when the machine is moving. When the speed increases, it shows values below normal, and when it decreases, on the contrary, higher.
A thermostat failure on a Niva reduces the service life of the motor and its final operating life, accelerating the wear of mechanisms due to constant overheating.
Radiator replacement process
Independent replacement of the radiator is carried out with a set of tools, including a flat and Phillips screwdriver, pliers, and small socket heads (8, 10, 14).
Preliminarily: the battery terminal leading to ground is disconnected. It is better to remove the ignition key. It is advisable to start the process after 2-3 minutes in order to completely discharge the reserve capacitor.
Drain the antifreeze
Adhering to the stage of preparatory operations, antifreeze is drained from the heating system.
The usual option for draining the antifreeze is offered, which involves removing the bottom bolt and opening the expansion tank cap.
The second alternative method is performed by opening the reservoir cap and disconnecting the throttle body cooling tube. In place of the tube, another hose is inserted through which the antifreeze is drained. To speed up the process, the barrel can be purged to remove any remaining liquid.
Technology without removing the instrument panel
The basis for replacing the heat exchanger is the experience of drivers, which allows one to eliminate complex procedures for dismantling the dashboard.
Disassembly steps:
- The so-called glove compartment and the passenger (leg) heating duct are removed by unscrewing the self-tapping screw.
- Loosen the clamp, remove the rubber tube, and drain the remaining liquid into a pre-prepared container. The upper clamp is loosened and the pipe is pulled towards itself.
- The radiator, after removing two screws, pulls out until it hits the air duct.
- The nut securing the relay cover is unscrewed and then removed. It is visually noticeable how the corner of the plastic frame of the heat exchanger prevents the removal of the radiator.
- Use wire cutters (side cutters) to bite off the interfering piece of plastic.
- The outer edges of the new radiator along the perimeter are covered (“moment”) with thin strips of foam rubber. This is done to prevent air from penetrating through the cracks.
As when dismantling the old unit, the frame of the new radiator with a cut off corner is inserted into the standard socket.
Equipment with air conditioning
Dismantling the heater radiator is complicated if the car is equipped with air conditioning. The operation is painstaking, but ingenuity and curiosity greatly simplify the process.
Of the existing two methods of replacing a stove radiator, the preferable option is to remove the instrument panel. The process guarantees the safety of the air conditioner. In another case, it becomes necessary to break its seal and then refill it with freon.
Removing the panel involves steps identical to the procedure for removing a heat exchanger without an air conditioner. With some exceptions:
- The battery terminal is disconnected and the antifreeze is drained into the prepared container. The barrel should be purged so that all the liquid flows out.
- The bolts are unscrewed, and the radio tape recorder is removed along with the slide. After unscrewing the screws (self-tapping screws), the side panels and instrument panel are removed. At the same time, do not forget to remove the fastening buttons. Having released the latches, we move the panel to the right and a little towards ourselves, freeing it from the grooves.
- It is advisable to mark the chips and connectors with a marker, which will speed up the assembly process. By unscrewing the speedometer drive, the bolts are released, as well as the torpedo itself. o By freeing the side shield and steering wheel casing, the control unit is removed. The backlight connector is disconnected.
- The steering column and the shield mounts (from below) are unscrewed and the spacer is dismantled.
- The panel amplifier is disconnected (4 bolts).
- Having released the fan mounts, the stove is removed along with the air conditioner and amplifier. The bolts securing the latter to the body are also unscrewed.
So, the stove is free after removing the tee from it. To ensure that there are no extra fasteners left during assembly, adhere to a strict, reverse sequence.
Conviction that the radiator is faulty comes after checking the supply pipes, pipes, and hoses for leaks.
Replacing antifreeze VAZ 21214
Replacing the coolant is a regulated maintenance procedure, which is prescribed in the operating instructions. There is nothing complicated about it if you clearly and carefully follow the described action plan.
Suitable for Niva cars:
Coolant drain
Before starting the draining procedure, you should prepare tools, containers for used antifreeze, as well as new liquids for subsequent refilling. If protection is installed under the engine, it can also be removed for convenience.
Next, we perform the procedure for draining the liquid from the VAZ 21214 (Niva):
- turn the temperature regulator in the cabin to the maximum position to the right (Fig. 1);
Flushing the cooling system
If there are deposits in the drained liquid or there is a transition from antifreeze to antifreeze, the system should be flushed. To do this you need to do the following:
- Flush the system with plain water through the expansion tank of the VAZ 21214. The plugs must be open;
- tighten the drain plug and bolt;
- fill the system with a flushing agent (you can use Liqui Moly Kuhlerreiniger or Lavr cooling system flush) with distilled water (6-7 liters);
- start the engine. Warm up to 90 degrees;
- leave it idling for 5-10 minutes, depending on the contamination of the system;
- muffle it. Allow the engine to cool to approximately 60 degrees;
- drain the flush using the same steps as removing the old fluid;
- tighten both plugs;
- fill with distilled water to rinse the cooling system;
- start the car and warm up to 90 degrees;
- turn off and let cool to 60 degrees, drain;
- repeat steps 8, 9, 10 and 11 if necessary.
Filling antifreeze into Niva 21214, 21213 without air locks
To fill new fluid into the cooling system, you can use the instructions described in the book on car repair and operation. But when doing this, motorists very often end up with air jams.
So, let's start filling it correctly:
- before filling, unscrew the hoses supplying antifreeze to the throttle valve heating unit and lift them slightly up (Fig. 1);
The filling of the liquid is completed, all that remains is to wipe off the spilled antifreeze and wait for the engine to cool. With the car now cooled down, check the level in the expansion tank again and top up if necessary.
Instructions for a complete diagnosis of the starter
The starter does not transmit torque to the crankshaft
| Diagnostics | Possible reasons | Remedy |
| When trying to start, a constant noise is heard, the starter clicks, the voltage at the battery terminals is less than 12V | The battery is low | Charging the battery |
| The voltage readings at the battery terminals are normal; when starting the starter, a crackling sound is heard with the voltage dropping twice | Decrease in battery capacity | Slow charging of the battery with a current of no more than 1A |
| During startup, a crackling sound is heard; when measuring the wiring from the battery to the starter with a voltmeter, a voltage drop of more than 1V was detected | Oxidation of battery terminals or starter terminals | Cleaning terminals, treating with anti-corrosion compound |
| Inspection of flywheel gears, drive shaft, bendix on a dismantled starter | Worn or broken teeth on the flywheel or shaft drive gears | Replacing the flywheel or a new starter |
| Failure to operate the solenoid relay when the 12V wiring is running at its contacts | Breakdown of the solenoid relay, damage to the wiring on the contacts, oxidation of the relay terminals | Replacing the relay with a new one, or cleaning the contacts and eliminating broken wiring |
| When 12V is supplied to the relay, no click is heard, the starter turns off | The relay is faulty, breaks in the armature winding, contamination or moisture ingress into the commutator, short circuit | Replacing the relay, cleaning the internal components of the starter |
| The starter drive rotates slowly when the relay is operating, the starter is turned off | Wear of the brush assembly, burnout of the commutator winding or armature | Replacing brushes, cleaning the commutator, or replacing the starter |
| When the starter starts, the drive armature rotates, but the flywheel remains stationary | Drive coupling wear | Replacing the clutch or starter with a new one |
| When the ignition is turned on, a grinding noise is heard, the drive shaft rotates, but the flywheel and crankshaft remain in place | Worn gear on flywheel | Flywheel replacement |
| The starter armature does not rotate when the relay is running | Breakage or burnout of the armature winding | Replacing the starter with a new one |
Activation of torque on the starter without starting the engine
| Diagnostics | Possible reasons | Remedy |
| Visual inspection of the starter at the mounting points | The starter mounting bolts on the engine are loose | Tighten the threaded connections, replacing the bolts with new ones if necessary. |
| The starter is inspected in disassembled form | Loose terminal contacts on the armature | Tighten the nuts on the terminal contacts, having previously cleaned them |
| The starter is inspected in disassembled form | Worn bushings, damaged drive bearings | Starter replacement |
| When starting, the bendix rotates, the flywheel rotates slowly, the engine does not start, a loud noise is heard | Breakage of teeth, wear of flywheel gears | Flywheel replacement |
| The starter continues to operate after turning the key back in the ignition switch | Malfunction of the ignition switch, weakening of the reverse buffer spring, malfunction of the traction relay | Replacing the contact ignition unit, replacing the relay or spring on the reverse clutch |
| Slow rotation of the starter without starting the engine with extraneous noise and good wiring | Malfunction of the crankshaft, oil thickening at low temperatures, failure of the piston group system, generator failure | Diagnostics and maintenance of cylinder-piston mechanisms |
| The starter operates at increased loads without starting the engine | Insulation in high-voltage wires is broken, voltage surges in the circuit, short circuits | Diagnostics and repair of electrical wiring |
Replacing the thermostat Niva Chevrolet
The need to remove the thermostat may arise to replace it if the engine temperature is unstable - overheating or insufficient heating. In this case, it is not necessary to completely drain the coolant. To check the thermostat on your car, start the engine and touch the lower radiator hose with your hand - it should be cold. After the coolant temperature reaches 80-85°C, the hose should begin to heat up. If this does not happen, remove the thermostat and check its functionality.
The thermostat failure is associated with a jammed thermal valve. The thermal valve may jam in the open position, and the engine will take a long time to warm up. The thermal valve may become stuck in the closed position, causing the engine to overheat.
It is necessary to remove the thermostat only when the engine has completely cooled down.
You will need a screwdriver.
1. Drain some of the coolant by removing the plug from the drain hole of the cylinder block (see “Replacing the coolant”).
Use a screwdriver to loosen the clamp securing the radiator outlet hose.
Remove the hose from the thermostat pipe
Loosen the clamp securing the outlet hose of the throttle body heating unit and remove the hose from the thermostat pipe.
Depending on the engine configuration, the design of the thermostat may differ. If the throttle unit with an electronic damper drive, the pipe for heating the throttle unit is closed. And the throttle assembly heating hose does not depart from it (Fig. 5).
Loosen the clamp securing the bypass hose and remove it from the thermostat pipe.
Loosen the clamp securing the heater radiator outlet hose to the thermostat pipe and remove the hose.
Loosen the clamp securing the coolant supply hose to the pump
We remove the thermostat.
Before installation, check the thermostat by lowering it into water heated to 70-75 °C.
Heat the water, stirring it constantly, to (80±2)°C.
At a temperature of (80±2)°C, the main thermostat valve should begin to open. If this does not happen, replace the thermostat.
Install the new thermostat in the reverse order of removal.
To eliminate the possibility of coolant leakage in the future, lubricate the thermostat pipes with a thin layer of silicone sealant before installation.
Fill in the coolant and remove any air pockets from the cooling system (see “Replacing the coolant”).
The thermostat with a solid heat-sensitive filler has a main and bypass valve. The opening of the main valve begins at a coolant temperature of 79–82 °C, the stroke of the main valve is at least 6 mm.
On a cold engine, the thermostat valve closes the pipe leading to the radiator, and the liquid circulates only in a small circle (through the thermostat bypass pipe), bypassing the radiator. The small circle includes the heater radiator, intake manifold, carburetor heating unit (on engine 21213) or throttle assembly (on engine 21214). At a temperature of 78-85°C, the valve begins to move, opening the main pipe; in this case, part of the liquid circulates in a large circle through the radiator. At a temperature of about 90 ° C, the main valve opens completely, and the bypass valve closes, and all the liquid circulates through the engine radiator. The main valve stroke must be at least 6.0 mm. You can evaluate the serviceability of the thermostat by heating the lower radiator pipe: it should be cold until the liquid temperature (according to the indicator) reaches 80-85°C, and hot when it rises to 85-90°C. The thermostat is beyond repair. In case of malfunction, loss of tightness, or deformation of the pipes, it is replaced.
Types of thermostats
The standard Niva thermostat is a fairly reliable element and serves faithfully for a very long time. The opening temperature of the factory thermoelement is 85⁰С, which is not enough for the stove to operate efficiently in cold weather. There are a huge number of analogues of the factory thermostat, and one of them is a thermocouple with a large circle opening temperature of 92⁰C, which will allow the internal combustion engine to operate at higher temperature conditions and will make the interior heater work much more efficiently, which will not affect the operation of the internal combustion engine.
The starter does not transmit torque to the crankshaft
| Diagnostics | Possible reasons | Remedy |
| When trying to start, a constant noise is heard, the starter clicks, the voltage at the battery terminals is less than 12V | The battery is low | Charging the battery |
| The voltage readings at the battery terminals are normal; when starting the starter, a crackling sound is heard with the voltage dropping twice | Decrease in battery capacity | Slow charging of the battery with a current of no more than 1A |
| During startup, a crackling sound is heard; when measuring the wiring from the battery to the starter with a voltmeter, a voltage drop of more than 1V was detected | Oxidation of battery terminals or starter terminals | Cleaning terminals, treating with anti-corrosion compound |
| Inspection of flywheel gears, drive shaft, bendix on a dismantled starter | Worn or broken teeth on the flywheel or shaft drive gears | Replacing the flywheel or a new starter |
| Failure to operate the solenoid relay when the 12V wiring is running at its contacts | Breakdown of the solenoid relay, damage to the wiring on the contacts, oxidation of the relay terminals | Replacing the relay with a new one, or cleaning the contacts and eliminating broken wiring |
| When 12V is supplied to the relay, no click is heard, the starter turns off | The relay is faulty, breaks in the armature winding, contamination or moisture ingress into the commutator, short circuit | Replacing the relay, cleaning the internal components of the starter |
| The starter drive rotates slowly when the relay is operating, the starter is turned off | Wear of the brush assembly, burnout of the commutator winding or armature | Replacing brushes, cleaning the commutator, or replacing the starter |
| When the starter starts, the drive armature rotates, but the flywheel remains stationary | Drive coupling wear | Replacing the clutch or starter with a new one |
| When the ignition is turned on, a grinding noise is heard, the drive shaft rotates, but the flywheel and crankshaft remain in place | Worn gear on flywheel | Flywheel replacement |
| The starter armature does not rotate when the relay is running | Breakage or burnout of the armature winding | Replacing the starter with a new one |
Reviews from Chevy Niva owners
Alexey Bondarenko, Kazan
For a year now I have been driving with a WEEN thermostat, article number 181-0034. The device turns on at a temperature of 87°C. My first thermostat was also a WEEL brand. I traveled with him for less than a year. He stopped maintaining his temperature. I've had my current device for one year and a summer. There were never any problems. The temperature always stays between 85-92 degrees.
Maxim Kalashnik, Pskov
I have been operating a VAZ Chevrolet Niva for more than 10 years with a Thomson thermostat. I have no complaints about the thermostat. Its peculiarity is that thermal inserts work for about 2 years in normal mode. Then they begin to underestimate their indicator. The standard temperature for them is 81°C. In the summer they work fine, that is, 87°C, and in the winter it feels a little cool at 81°C.
Sergey Poltorak, Bologoe
Finnord installed it on the previous Shniva, it worked 100%, last year it started to freeze on the new Shevik, but I couldn’t find Finnord, I installed Luzar - not cold but not so hot either...
How to remove and replace the starter on a Niva Chevrolet?
- Preparation for quick removal of the starter in extreme conditions.
Quickly remove the starter and eliminate the cause of a possible malfunction. For Donat, Sponsors, order advertising https://www.youtube.com/user/SamiDlyaSebya1/about?disable_polymer=1 THANK YOU. How to remove the acoustic pipe from a Niva receiver Why do you need an acoustic pipe? As you noticed, the lower bolt of the starter was deliberately never screwed in again, after the first removal of the starter during the initial period of operation of the car. Also, the heat shield of the starter, whose lower mounting bolt quickly sticks when driving through mud, was not put in place. Because of this, in order to remove the screen, you have to cut off the lower attachment point or tear the screen itself. I don't want to go through this procedure a second time. The fact that there is no lower mounting bolt for the starter and a heat shield has its advantage for field drivers who often operate their vehicles, for example, in the conditions of Siberian swamps, river fords and frosts. Very often the cause of a starter malfunction is simple. For example, as in this video, or even funnier - the red wire (also shown in the video) from the solenoid relay has simply oxidized or weakened. It is enough to MOVE it and the starter will spin. You can make the starter spin if the nickels in the solenoid relay are burned by closing (carefully, with something not large in size, but massive and iron, without touching the mass of the engine body) the power wires on the solenoid relay. It's easy to do all this without a screen. And if necessary, the starter can be easily removed. It happens, for example, that the starter breaks down, and the car is parked at the entrance, and it’s -30 outside! Yes, even in the summer! You still need to remove the starter. Negotiate with your neighbor about a garage? Or take it to service? But you can remove it EASILY AND QUICKLY yourself, right at the entrance. Buy a new starter or solenoid relay from your local store. And an hour later the car drove off. And if the car is parked in a puddle or mud, then crawl under the car and turn the bottom bolt? In short, there are many life situations where the absence of a bolt and a heat shield will greatly simplify your life. The author of the video does not pretend that others will perceive his opinion and his proposed method of solving the problem as the only correct one. Decide this for yourself. The author simply suggested an option: How to remove the Niva 21214 starter in 10 minutes and determine the cause of the malfunction of the removed Niva 21214br /> Subscribe to Andrey Lapochkin’s channel: “For Yourself.” https://www.youtube.com/user/SamiDlyaSebya1 Here you will find a lot of useful information on the maintenance and repair of the NIVA VAZ 21214, VAZ 21214m, VAZ 21213, Chevrolet Niva. Lots of tips and tricks that you won’t see on other channels. All videos were shot in a detailed style covering the topic of repairing or finding the causes of malfunctions of the Niva car and not only Niva. There are videos for NIVOvod beginners. How to overcome obstacles and dangerous areas on NIVA. The channel has other interesting videos about travel and adventures. Holidays on the Black Sea. Fishing, travel. Underwater filming. Tourism. Jokes, funny stories. Dollar exchange rate analytics. Search for gold, search for treasures. How to pump up your body at home and have time to prepare for the beach season with very little effort, time and money. On the channel you will find many videos on how to start shopping on AliExpress (ALIEXPRESS). Tactics for communicating with sellers on AliExpress (ALIEXPRESS). How to start working with video camera SJ4000, SJ5000. How to make video camera settings SJ4000, SJ5000. How to shoot with video cameras. And much more on various topics. - From our roads...smooth...the magnet in the starter fell off...replacement)
- Removal, repair and installation of the starter, Chevrolet Niva 2008, with air conditioning, mileage 180 thousand km. Filmed with a first-person action camera. Perm region Krasnovishersk November 28, 2016
- Regular sponsor. https://vk.com/smm96
Types of radiators for the Niva stove
It doesn’t immediately become colder in the Niva’s cabin – the stove stops working normally for several reasons:
- the heating tap does not switch (stays sour in the closed or half-closed position);
- The motor rotates at low speed;
- the heater radiator is clogged;
- an air lock is created in the cooling system;
- parts turn out to be defective;
- the valve in the thermostat opens prematurely;
- poor circulation is created in the cooling system due to the water pump.
It may still be cold inside the car due to a blown cylinder head gasket in the engine. To make the interior warmer, car owners often install on Niva 21213 cars:
- three-row copper radiators of the stove, they have better heat transfer;
- The heater motor is 2108, they are more efficient than the standard ones on the Niva.
RP for the VAZ 21213 is produced by various companies, and the quality of stove radiators may vary. On the auto parts market you mainly find parts from manufacturers:
- "Orenburg radiator";
- luzar;
- DAAZ;
- SHAAZ;
- "Likhoslavl Radiator Plant";
- Iran;
Based on the material used, RPs can be made of copper or aluminum, each of them has its own advantages and disadvantages. Aluminum radiator:
- heats up quickly;
- cheaper than copper;
- has high rigidity and low weight.
But aluminum RP is not repairable, it is practically impossible to solder it. Other disadvantages of aluminum include:
- rapid cooling, this metal does not retain heat well;
- susceptibility to corrosion, which is why aluminum RPs fail more often than copper ones.
The main disadvantage of copper RP is that it takes a long time to heat up the interior, but even after stopping the engine it retains heat for quite a long time
Copper heater radiators are approximately 30-50% more expensive than aluminum ones, but this is not so important - in general, the parts are still relatively inexpensive. The problem with copper RPs is different - the quality of the products is low, and it is not so easy to buy parts of acceptable quality.
Chevy Niva car owners often have problems with heating the interior; the car can be cold even in frosty temperatures of -15ºC - the aluminum radiator of the stove does not heat very well. Another problem on VAZ 2123 cars is that stove radiators often leak.
Aluminum heater radiators on a Niva car are inexpensive:
- VAZ-2123 (Chevrolet Niva) - on average from 700 to 1000 rubles;
- VAZ-21213 (21214/2105) - from 650 to 1100 rubles.
Copper RPs are sold more expensive, their prices range from 1,500 to 2,500 rubles, the cost depends on the brand of the product, the region of sales and the sellers themselves.
This is interesting: Tightening torques for threaded connections of the Chevrolet Lacetti engine management system 2004 - 2013
How to remove the starter on a Chevrolet Niva with and without air conditioning
Sometimes it happens that a car enthusiast, having overcome some particularly deep puddle, discovers that the car has stopped starting. This can happen with any car, but it happens especially often with the Chevrolet Niva. We will tell the reader how to independently remove the starter from this machine in this article.
Node location
Starter for Chevrolet Niva
If you open the hood of a Chevrolet Niva, the starter will be located to the left of the engine, immediately under the intake manifold. However, you won’t be able to see it, since it is covered with a heat-protective casing on top. It is also impossible to see it from below, since the crankcase protection covers it there. So the only way to get to it is to remove all these protective devices.
Required Tools
- Flat blade screwdriver (medium size).
- Set of socket heads with ratchet.
- Set of open-end wrenches.
- Set of spanners.
How to remove protection and starter
- The machine is installed above the inspection hole. Open the hood, use a 10mm open-end wrench to unscrew and remove the negative terminal of the battery.
- From the inspection hole, using a 13mm socket, unscrew all the crankcase protection mounting bolts.
The crankcase protection is removed with a socket head
- There is a mounting rod in front of the starter.
It is held in place by two 14mm bolts (1 on top, 1 on bottom). Both bolts are unscrewed with a socket head, then the rod is removed. The lower mounting bolt of the rod is unscrewed - Now the heat shield is removed.
It is secured from above with two 10mm bolts (to unscrew them you will have to get out of the hole and work from above, through the hood). One 10mm fastening bolt is unscrewed from the bottom (for this it is best to use a socket head with a ratchet). After unscrewing all the bolts, the casing is removed. This cover must be removed - Access to the starter opens. It is held in place by three 13mm bolts, two at the top and one at the bottom. One of the upper bolts can be unscrewed better with a 13 mm spanner. To unscrew the rest, use a regular open-end wrench.
- Once all three bolts are unscrewed, the starter is easily removed from its original location.
The mounting bolts are unscrewed, the starter is removed
The above is the sequence for removing the starter from a car without air conditioning. On a Chevrolet Niva with air conditioning, the sequence is the same, with the exception of two points.
- The starter heat shield on a Niva with air conditioning has a slightly different shape and is 3 cm shorter.
- In order to gain access to the upper mounting bolts of the starter, you will first have to remove the warm air intake hose. The clamp that secures it to the engine is loosened using a flathead screwdriver and the hose is removed, revealing access to the starter mount.
As you can see, the main problem is not to remove the starter from the Chevrolet Niva, but to get to it. It should be noted here that the above method for removing the starter is not the only one.
Some car enthusiasts prefer to remove the starter from the top, without using an inspection hole. However, it takes more time and requires considerable experience to carry out this procedure.
It is for this reason that the article presents the traditional version of the “bottom” removal of the starter.
- Alexey Stepanov
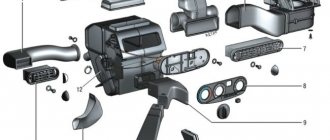
Interior heater repair
The stove in the Chevrolet Niva is considered one of the most reliable components of the car. However, it can sometimes fail.
Replacing the heater cable
Sometimes it is not possible to change the position of the heater damper. The reason for this is a broken cable. To replace it, you will need a standard set of tools and a headlamp. Replacing the cable is carried out as follows.
- The driver's seat moves back.
- The handles are removed from the damper control panel and the screws are unscrewed.
- The panel is dismantled on the left side at the location of the driver's feet. To access the cable you will need to remove the heater control mechanism
- The cable fastening latches are removed.
- The recirculation damper mechanism is dismantled and the cable is removed.
- A new cable is installed. Each end must be twisted into a ring and securely fixed. Using a cable, the position of the air supply flap is changed
- Assembly is carried out in reverse order.
- The functionality of the mechanism is checked.
Starter on Niva Chevrolet
It happens that the car starts intermittently or does not start at all. One of the common reasons for this may be a faulty starter on a Chevrolet Niva. To accurately understand whether there is a problem or not, you need to dismantle it and carry out diagnostics.
This part is a direct current electric motor and is activated by a permanent magnet combined with a planetary gearbox and relay. Before dismantling, it is advisable to understand whether this is the reason why the power unit does not want to start. This can be understood both by its appearance by conducting diagnostics and by replacing the battery with a new one.
Diagnostics
- All connections between the battery and the starter should be checked, as if there is poor contact there may not be enough power to crank the crankshaft. This problem can be solved by cleaning the contacts.
- It is necessary to check the battery, and if it is faulty, replace it
Replacement
If you are wondering how to remove the starter on a Chevrolet Niva, then you will find the answer to this question below:
- First of all, to prevent a short circuit, disconnect the battery
- The crankcase has a protection that needs to be removed
- Unscrew several bolts that secure the starter.
- Removing thermal protection
- Pull the part to be replaced towards you and disconnect the wires from it
- We clean the power wires since they could be the cause of unstable operation
When the part has been removed, you can diagnose it and try to repair it.
If you decide to try to make repairs, first of all pay attention to the planetary mechanism; you can understand the condition of the parts of this unit by disassembling it; just unscrew a few bolts. Most craftsmen claim that this mechanism cannot be repaired and in case of breakdown it is better to immediately replace it with a new one.
Most craftsmen claim that this mechanism cannot be repaired and in case of breakdown it is better to immediately replace it with a new one.
Retractor
To ensure that the starter does not experience additional loads, a special Niva Chevrolet starter relay is installed, it is also called a solenoid relay, consisting of:
- Two windings
- Magnet
- Anchors
- Springs
When power begins to flow, the armature, under the influence of an electromagnetic field, begins to compress the spring, which leads to the rotation of the bendix. When the engine starts, the power is turned off and the spring relaxes.
Malfunctions
- Burnout or oxidation of contacts
- The winding is damaged
- The armature with the spring wears out
- The hull is destroyed
It consists of a solid body, so if it breaks, it is impractical to repair it.
You can understand that replacement is required by the following signs:
- Bendix does not return when starting the engine, and a whirring sound can be heard under the hood
- When the starter is working, the power unit does not work
- When turning the ignition key, clicks are heard, but the element itself does not rotate.
Check and replacement
To check, just take a screwdriver and close its contacts, which are located on the back of the device. When the circuit is closed, the starter should work, but if it remains stationary and only a click is heard, then it should be replaced.
In order to replace the starter relay on a Chevrolet Niva, you need to do the following:
- Unscrew the three bolts that secure the part
- Removing the relay
- Installing a new part
- Checking the work
If everything is done correctly it should start
If you have an idea of how everything works and you are sure that the cause of the malfunction is in the retractor, then you can safely proceed to replacement and repair. If there are any doubts, then you need to check it on a stand under load, since it happens that without load it works perfectly, but under load it stops working.
Starter on Niva Chevrolet Link to main publication
Symptoms of a problem
You can judge whether the thermostat is malfunctioning by finding signs of a malfunction in your car, such as insufficient coolant temperature, that is, when driving on the highway or in the cold season, the antifreeze temperature begins to drop rapidly or does not rise to operating temperature at all.
It should be noted that if the engine overheats, the reason may be not only the thermostat, but also the breakdown of the water pump blades.
Diagnostics
So, first of all, the device is connected to the battery and to the multimeter. You can connect through the contact bolt on the traction relay. It is recommended to use wires with a cross-section of at least 1.6 square meters for this purpose. see. You should also make sure that the brushes are well ground into the commutator and that the temperature of the assembly is normal.
A circuit of a starter, battery and multimeter will help diagnose the device. The switch is closed by supplying 12 V to the terminal. This procedure is carried out three times, constantly changing the braking conditions. The circuit is turned on for short periods of time.
If the unit does not rotate and extraneous noise is heard during its operation, it is easy to conclude that the device is faulty.
The starter is also tested under full braking. This diagnostic method allows you to find out the causes of the breakdown and will help to successfully repair the unit. For this procedure, it is necessary to turn on the starter and at the same time check the ammeter readings. Perform voltage measurements with a multimeter, and also measure the braking torque. The current should be no higher than 700 A. The voltage should be no more than 5 V, and the braking torque should be less than 13.72 Nm.
If the indicators are different, then the starter is faulty. If the current is higher and the torque is lower, then the cause of the malfunction is related to a short circuit inside the armature winding. It's worth checking the coils. A short to ground in the armature winding is also possible.