How to replace the timing belt tensioner pulley of Lada Granta
If, when the engine is running, a strong noise of a rotating bearing is heard in the area under the front timing belt covers, you should check the condition of the tension roller and, if necessary, replace
it. This can be done without removing the belt.
Also, the roller should be replaced during routine replacement of the timing belt (article - “How to check and replace the Lada Granta timing belt”).
Replacing the timing pulley with tension roller
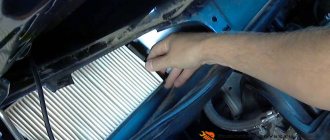
Remove the front timing belt cover
When replacing the tension roller without removing the timing belt, there is a risk of the belt jumping over the pulley teeth, which will lead to a shift in valve timing.
Therefore, before releasing the belt tension, align the mark on the camshaft pulley with the protrusion of the rear belt cover.
After installing the roller, the mark should not move.
Loosen the nut securing the tension roller and unscrew it completely.
Remove the roller from the stud, keeping the belt taut.
We install a new roller on the stud and secure it with a nut and washer, preventing the belt tension from weakening.
We adjust the tension of the timing belt.
Install the front timing belt cover.
Replacing a timing drive roller with an automatic tensioner
We prepare the car for work.
Remove the upper front timing belt cover.
After loosening the timing belt tension, there is a risk of the belt jumping over the pulley teeth, which will lead to a shift in valve timing.
Therefore, before releasing the belt tension, by turning the crankshaft, align the mark on the camshaft pulley with the protrusion of the rear belt cover.
After installing the roller, the marks should not move.
Using a 15 mm wrench, unscrewing the automatic tensioner mounting bolt half a turn, loosen the tension on the timing belt.
Unscrew the tensioner mounting bolt and remove it together with the bolt
We install the automatic tensioner without tightening the fastening bolt.
We put the timing belt on the tensioner roller, make sure that the marks match and adjust the tension (article, “How to check and replace the Lada Granta timing belt”).
We install the removed parts in the reverse order of removal.
Source
General questions about working with the Grant generator
Let's consider general questions: everything except replacement.
Tension check
There are two approaches: visual assessment and physical.
Visual assessment of condition:
- the car is on a flat surface, the gear is in neutral, the handbrake is off, the hood is open;
- We don’t start the car - we put it in 5th gear;
- We opened the hood and found a generator: we push the car back, resting against the bumper;
- We inspect the required part along its entire length: are there any breaks or cracks? It needs to be changed.
Poor quality will lead to unexpected problems on the way.
Physical assessment:
- if you have a tool that measures pressure force: press the belt with a force of 10 kg*s - the deflection should be no more than 10 mm;
- there is no special tool: we try to turn it across - it should turn no more than 90 degrees.
How to tighten the alternator belt on a Grant
This section applies only to machines with a tensioner. No - change the part or see above how to install it.
Subsequence:
- we use ring wrenches 8, 19;
- Throw key 19 onto the lead screw;
- wrench 8 for locknut;
- we touch;
- Now you can turn the lead screw: clockwise to loosen, counterclockwise to tighten;
- got the desired result - tighten the locknut.
It is better to take ring wrenches, since a head with a ratchet or a wrench will not work.
When to change: technical regulations for replacing a VAZ 2190 belt
AvtoVAZ requires checking the condition of this part every 15,000 kilometers.
Replacement is required every 30,000 kilometers, regardless of condition.
How to remove a generator on a Grant
It needs to be removed for repairs, replacement of bearings or rollers.
The step-by-step process involves:
- remove the negative terminal from the battery;
- working with the generator: disconnect the wiring harness from it;
- remove the cover of the power wire nut, remove the nut and remove the wire from the bolt;
- unscrew and pull out the upper and lower fastening bolts - to work with the lower one, you may need to climb into a hole, throw off the tin protection of the internal combustion engine and dismantle it from below;
- move the part to the right mudguard, remove the belt, and remove it.
You can do without a hole. Example:
The easiest way to replace the timing belt, pulley and pump on a Lada Granta with an 87 hp 8-valve engine
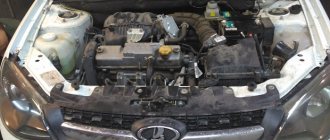
Today our old client came to us in his white Lada Granta to replace the timing belt, roller and pump in the place with antifreeze. From the factory, this engine is equipped with a Gates timing belt with a declared service life of 75 thousand kilometers, but we change it to 60 just in case.
Important! When the timing belt breaks on this engine, all the valves bend. This is true for all engines produced until 2022.
I recently read that starting from 2022, this engine will be equipped with plug-in pistons; when the new Granta arrives, we’ll be sure to see if this is true with an endoscope.
Preparatory operations
This procedure can be carried out even in the field; we don’t need a pit, much less a lift. Replacement time is 30 minutes, excluding engine cooling time.
If you are changing the belt and pump, then you need to drain the antifreeze from the cylinder block. Plug for the head at 13. Place stops under the rear wheel and tighten the handbrake. Remove the front right wheel and plastic mudguard.
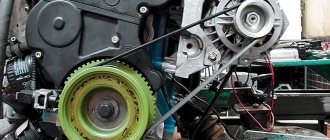
Loosen the tension on the alternator belt and remove the belt. The locking nut is 21, the tension roller rod is 10. Turn the tension roller, if it makes extraneous noise, replace it.
Alternator belt tensioner.
Unscrew the four bolts of the upper timing cover and remove it (hexagon 5).
Upper timing cover.
Set the top dead center
Using the crankshaft pulley bolt, be sure to turn it clockwise until the marks on the camshaft sprocket and the casing match (17mm head with extension). This will be top dead center (TDC).
Crankshaft pulley.
Marks on the camshaft.
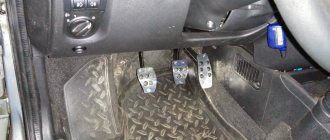
We lock the crankshaft, engage fifth gear and insert a screwdriver into the ventilation duct of the brake disc below the caliper. Unscrew the crankshaft pulley bolt and remove the pulley. Unscrew the fastening of the lower timing belt cover (hexagon 5).
Bottom cover.
The mark on the crankshaft sprocket should be against the ebb on the oil pump.
Marks on the crankshaft.
Unscrew the tension roller fastening and remove it along with the timing belt.
If you are not replacing the pump, then proceed directly to installing a new belt. But we recommend changing the pump together with the belt.
Replacing the pump
We dismantle the camshaft sprocket (head 17).
Fastening the camshaft sprocket.
Next is the timing belt casing (nut and bolts 10).
Casing.
The pump is secured with three bolts (hexagon 5).
Pump mount.
Before installing the new pump, lubricate the gasket with a thin layer of sealant. Reinstall the camshaft housing and sprocket.
Installing a new timing belt
We take out a freshly purchased set.
Timing kit.
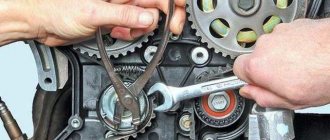
Important! The tensioning direction is indicated on the timing belt tension roller, do not confuse it.
We check that all marks match and install the tension roller; do not tighten the bolt. We install the new timing belt first on the crankshaft sprocket, then on the camshaft, tension roller and pump. The belt section between the camshaft and crankshaft sprockets must be tensioned. Pull the tension roller until the marks match and tighten the bolt.
Review of Manufacturer Prices
| Catalog items | Price, rub.) |
| Tensioner roller for internal combustion engines 1006120 0021647 | From 550 |
| Timing belt 1006040-10 | From 1500 |
| Automatic tension roller 1006226 | From 800 |
| Timing belt 1006040 | From 1500 |
| Roller key – 67.7812.9573 | From 350 |
| 67.7834.9525 | —/— |
| Timing belt GATES 5521 | From 1100 – 1400 |
| BOSCH 1987949095 | —/— |
| DAYCO 94089 | —/— |
| CONTITECH CT527 | —/— |
| Finwhale 1006040 | —/— |
| GATES 5670XS | —/— |
| CONTITECH CT1164 | —/— |
| QUARTZ QZ-5670XS | —/— |
*prices are current as of October 23, 2018.
Snapshot
The surface of the toothed part of the belt should not have folds, cracks, undercuts of teeth and separation of fabric from rubber. The reverse side of the belt should not have wear, exposing the cord threads, or signs of burning. There should be no delamination or fraying on the end surfaces of the belt. If defects are found on the belt or there is a significant discrepancy between the belt tension control elements (see photo above), the belt must be replaced. You should also replace the belt with a new one if traces of engine oil are found on it (before installing a new belt, the cause of oil getting on the belt must be eliminated) or when replacing the coolant pump.
Attention! Failure of the timing belt (breakage and cutting of teeth) can lead to valves sticking into the pistons due to mismatch of the rotation angles of the crankshaft and camshaft and, as a result, to expensive engine repairs.
We replace the timing belt in accordance with the maintenance regulations every 75 thousand km or if defects are detected on the belt.
To avoid damaging the crankshaft position sensor, it must be removed.
Source
Self-check the condition of the alternator belt
Before replacing an implement belt, drivers should perform a visual inspection to determine if replacement is necessary. To perform diagnostics, the vehicle must be stationary. To prevent the car from rolling during inspection, clamps should be installed under the wheels. The generator belt is located in the engine compartment, and is tensioned on the pulleys of the attachment.
The entire product must be checked. Having examined one area, inspect all the others sequentially, turning the belt. You can make a mark at the place where the inspection began.
The following signs indicate the need for replacement:
- cracks and abrasions on the surface, both internal and external;
- frayed, sides;
- peeling of rubber from rubber;
- mechanical damage;
- traces of oil and working fluids are on the surface.
During inspection, you also need to check the belt tension. If it is loosely tensioned, the generator will not work at full capacity. Too much tension causes premature wear of the bearings and strap. To check the tension, press the belt in a place free from equipment. With a force of approximately 10 kg, the deflection should not be more than 7-8 cm.
If the tension is insufficient, then you need to know how to tighten the belt. The tensioner screw acts as a regulator; it is used to perform tension (video author – Remgar).
When replacing a belt, it is advisable to change the tensioner pulley, which should also be inspected. It should be free of scratches, chips, play, and deformation. The roller should rotate freely without delay. You should not neglect regularly checking the condition of the belt drive.
Removing the timing belt
You will need : remove the generator belt, the right wheel and the plastic shield of the engine compartment, prepare a “10”, “17” key, a “19” socket, and a screwdriver.
Procedure:
- Remove the plastic engine cover.
- Remove the timing drive protective cover by unscrewing the three fastening bolts.
- Timing diagram.
Set the piston of the first cylinder to the top dead center position:
- Turn the crankshaft clockwise by the bolt until the mark on the toothed pulley aligns with the antennae on the rear timing cover.
- Remove the window plug at the top of the clutch housing and make sure that the mark is not located opposite the scale slot.
- Secure the crankshaft from turning by inserting a screwdriver through the window between the flywheel teeth.
- Remove the bolt securing the generator drive pulley while holding the screwdriver. Remove the generator drive pulley.
- Loosen the tension roller nut. Remove the timing belt by turning the pulley so that the belt is loosened as much as possible.
- Remove the tension roller by unscrewing the nut securing it.
Have you noticed that the timing belt is eating or slipping? The reason may be a defective belt, rollers, or a pin that is overtightened.
Parts from the VAZ catalog
Let’s immediately look at the list of VAZ components and special tools:
- Tensioner roller for internal combustion engine 11183 – 2108-1006120, nut for it – 00001-0021647-21;
- Timing belt (11183) – 2108-1006040-10;
- Automatic tension roller – 21116-1006226;
- Timing belt (11186/21116) – 21116-1006040;
- Key for automatic roller – 67.7812.9573-01;
- Key for roller VAZ-11183 – 67.7834.9525.
The tension roller of the "2108" family has two slots on one side. These slots should look “up”, that is, away from the engine.
Tensioner roller for motor 11183
The slots were made for special tools. It is designated by the numbers “67.7834.9525” (see list). And for automatic rollers, the key is designated differently - “67.7812.9573”. What it looks like is shown below.
The automatic roller can also be adjusted
It remains to list how the mounting bolts, washers, etc. are designated:
- Three bolts for the VAZ-11183 cover – 00001-0009024-11, washers – 00001-0026406-01;
- Timing drive cover (11183) – 21080-1006146-10;
- Bolts for VAZ-21116 covers – 2108-1003286-00, spring washers – 00001-0011977-73;
- Top cover – 21116-1006226-00, bottom cover – 21116-1006218-00.
We hope no questions arise here.
How to install and tension the timing belt
- Place the timing belt on the crankshaft pulley.
- By tensioning both branches of the belt, we put the rear branch on the pump pulley and wind it behind the tension roller.
- We put the front branch on the camshaft pulley.
- Tension the timing belt by turning the tension roller counterclockwise and inserting a screwdriver (as in the photo).
- Tighten the bolt securing the generator drive pulley and turn the crankshaft by the bolt 2 turns clockwise.
- We check the coincidence of the crankshaft and camshaft marks. If the marks do not match, repeat the operation to install the belt.
The entire process of replacing the timing belt of an 8 valve engine is also shown in the video: