The main malfunction of a capacitor in a contact ignition system is its breakdown to ground. In this case, the car engine may not start at all, or will start and stall, or suddenly stall while driving. Characteristic external signs of a malfunction are: strong sparking between the breaker contacts when starting the engine and a very weak spark or its complete absence.
There are several ways to check the capacitor on VAZ 2105, 2107 cars.
- Using a control lamp.
We disconnect the wire coming from the ignition coil and the capacitor wire from the distributor (they are attached to one terminal “K” of the breaker). We connect a test lamp between them, turn on the ignition and observe it. If it lights up, the capacitor is “broken” and must be replaced. No - OK.
1 - ignition coil, 2 - distributor cap, 3 - distributor, 4 - capacitor.
— Using a wire from the ignition coil.
As in the method described above, we disconnect the wire from the coil and the capacitor wire from the terminal on the distributor. Turn on the ignition. We touch the tips of the wires. Sparking appears - the capacitor is faulty. No, everything is okay.
1 — ignition coil, 2 — distributor cover, 3 — distributor, 4 — capacitor.
- Using a high voltage charge and subsequent discharge to ground.
We turn the crankshaft so that the breaker contacts in the distributor close. We disconnect only the capacitor wire from the distributor. Turn on the ignition. We bring the tip of the central high-voltage wire from the ignition coil to the tip of the capacitor wire. Use a screwdriver to open the contacts of the breaker (or you can turn the distributor slightly by hand so that the contacts move apart). A spark will jump between the tip of the high-voltage wire and the tip of the capacitor wire - the capacitor will be charged with a high voltage current. We bring the tip of the capacitor wire to its body. The appearance of a discharge spark with a click indicates the normal condition of the capacitor. There is no spark - the capacitor is faulty.
Notes and additions
— The capacitor on VAZ 2105, 2107 cars and their modifications with a contact ignition system is installed on the distributor (30.3706-01) parallel to the breaker contacts and serves to increase the secondary voltage and prevent burnout of the contacts. It is charged when the contacts are opened and discharged through the secondary winding of the ignition coil, which causes an increase in the secondary voltage.
Refined check
We check the negative valves by connecting the “plus” of the device to one of the mounting bolts of the rectifier unit, and the “minus” to the generator housing.
If the resistance is low, one or more valves are broken, or there is a short circuit of the stator winding to the generator housing.
To check the positive valves, we connect the “plus” valve of the device to terminal “30” of the generator, and the “minus” valve to one of the mounting bolts of the rectifier unit.
Low resistance means that one of the valves is broken
If the elements of the rectifier unit fail, we recommend replacing it as an assembly.
It is possible to replace individual diodes, but they will need to be repressed into the holder - an operation that requires care and skill.
How to determine why the battery is not charging on a VAZ-2107
Experts recommend several effective steps to identify faults in the vehicle battery charging circuit.
First, diagnose all fuses, especially those marked “F10”. It is this safety element that is responsible for feeding the excitation winding of the generator.
Secondly, check the drive belt: if there are any breaks in it, and if it is tensioned correctly. If you have to adjust the tension of the drive belt, you should take into account an important nuance: you should not allow it to be over-tensioned. This can affect the bearings (they can deteriorate much faster than their service life is prescribed), and the battery will not be recharged.
Thirdly, pay attention to the lamp for monitoring the battery charge level. If it burns at half intensity, it means that the battery is not charging well, and the wiring is to blame. That is, the fault must be looked for in the conductive connections running from the battery to the car body. The cause of the breakdown may be oxidation of the contacts. To check this, you should:
- unscrew the nut;
- clean the contact terminal;
- clean the body surface;
- install the wire in its original place.
When doubt falls on the capacitor
ATTENTION! A completely simple way to reduce fuel consumption has been found! Don't believe me? An auto mechanic with 15 years of experience also didn’t believe it until he tried it. And now he saves 35,000 rubles a year on gasoline! Read more"
The capacitor can fail in rare cases, but on the road the motorist must be prepared for anything. And the ability to test a capacitor for functionality with your own hands is included in the mandatory arsenal of skills of an experienced driver.
Diagnosing an auto-capacitor involves proving that sparking exists and is occurring normally. You should know that sparks appear unevenly and their color is dull red. When checking the capacitor, the entire distributor with the contact group is subject to diagnostics.
Note. Modern cars are equipped not with a mechanical distributor, but with an electronic switch. If a breakdown or failure occurs, the switch is completely upgraded.
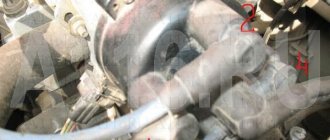
Checking the distributor should begin with the cover. It is from here that, if there are microcracks, road debris penetrates, which leads to difficulties in supplying current. As a result, the impulse does not reach the SZ, they are inactive, and the entire power supply system of the vehicle is disrupted.
The second component that is inspected in the distributor is the contact group. Particular attention is paid to the gap between the contacts. If they are normal, but excessive sparking is observed, doubt immediately falls on the capacitor.
Features of the battery charging system on the VAZ-2107
On the VAZ-2107, the battery or battery performs the same functions as on other vehicles. The battery must support the vehicle's electrical system when the engine is turned off. If the car is in working condition, then all its electrical equipment receives power from the car generator. Its functions include providing electricity to the following equipment:
- Engine ECU (electronic control unit);
- nozzles;
- fuel supply pump (gasoline pump);
- AKB (rechargeable battery).
The fact is that when the engine is running, the car battery must be charged from the generator, which is the source of energy for charging the vehicle battery. But failures occur when there is no charging on the VAZ-2107 (injector).
The reasons for this can be very different, and to find out they need to understand the battery charging circuit.
Capacitor diagnostic option first
Testing a capacitor involves having a meter called an ammeter, tester, or multimeter. The ends of the device are neatly connected to the contacts. The ignition is turned on, the contacts of the distributor must be open. At this moment you need to look at the multimeter readings.
The malfunction of the capacitor can be judged by the tester readings close to 0. In this case, the multimeter mode should be in the discharge position of 2-4 A.
Such multimeter readings indicate a complete malfunction of the capacitor. It is replaced with a new one.
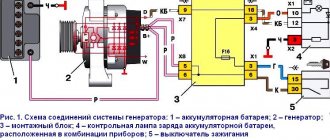
Diagram of the battery charging circuit on the VAZ-2107
The battery charging circuit diagram for the VAZ-2107 is the same as for other passenger cars. The mechanism of its action is as follows:
- The battery is connected by its “negative” terminal to the body using a copper busbar.
- The entire electrical system is connected to the positive terminal of the battery using two buses:
- the first tire goes to the starter;
- the second bus is to the generator.
- The “positive” terminal of the generator transmits voltage:
- on the fuse block;
- to the ignition switch.
- From the ignition switch, electricity is transmitted to the mounting block, which houses fuses (the one that protects this conductive circuit is marked “F10”).
- Voltage is supplied from the fuses:
- to the “Charge Level Signal” control lamp (it is intended to notify you that the battery is insufficiently charged);
- on a voltmeter, which shows digital voltage readings in a current-carrying circuit.
- The next stage in the battery charging circuit is the transfer of current to:
- fuse box;
- generator terminal 61 (brush assembly).
As you can see, a malfunction in this battery charging circuit can appear almost anywhere. For example, the contact breaks down, as a result of which the generator will stop efficiently charging the vehicle’s battery.
Third option for testing the capacitor
The method involves charging with high voltage current. It's done like this.
- The capacitor is fed with electricity directly from the coil.
- Then the discharge is carried out to ground.
If there is no discharge-spark between the electrical wire and the fuselage of the capacitor, we can talk about a malfunction of the capacitor. Yes, and one more thing - if the capacitor is working properly, a characteristic click will be heard.
Note. If after charging the device the spark does not appear again, this is another reason to make sure that there is a current leak from the capacitor.
Using a carrier
Another way to check for proper operation is to have an ohmmeter or a portable lamp. The latter will also help identify capacitor breakdown.
Here's how the diagnosis is made:
- The capacitor wire is disconnected from the switch terminal.
- The power cable on the reel is also disconnected.
- Transport cables are connected.
If the element is damaged, the lamp should light up.
Attention. To reduce the effect of carbonization of the contacts and increase the secondary current, it is recommended to synchronously connect a capacitor to them.
it is powered by the opening spark even if the minimum distance is set. All known automotive power circuits are equipped with their own capacitor, the capacitance of which varies between 0.17 - 0.35 μF. For example, in VAZ models, the capacitance of this device is close to the values of 0.20 - 0.25 μF.
If the flow rate has a deviation, this has a direct effect on minimizing the additional current. Discharging and recharging the capacitor does not solve the problem.
Method four
The fourth option for testing the capacitor involves cranking the crankshaft. If there is a strong current generation during engine startup, this is a sign of a faulty capacitor.
As for the breakdown, it can be easily determined when starting the engine. If a weak spark appears between the central armor wire and the ground, but the contacts spark strongly, this proves penetration. Such a capacitor is no longer able to function normally and will have to be replaced.
Thus, you can test a system element in different ways. Each motorist, depending on his own experience, chooses a more suitable option.
Forget about fines from cameras! An absolutely legal new product - Traffic Police Camera Jammer, hides your license plates from the cameras that are installed in all cities. More details at the link.
- Absolutely legal (Article 12.2);
- Hides from photo and video recording;
- Suitable for all cars;
- Works through the cigarette lighter connector;
- Does not cause interference to radios and cell phones.
VAZ 2107 generator and reasons for lack of charging
To start the engine and proper operation of the ignition system and other electrical circuits of the VAZ 2107, it is necessary to have DC voltage in the on-board network. When the engine is not started, the battery maintains the proper voltage. After the engine starts, the car's generator charges the battery and maintains the on-board voltage at 13.6-14.2 V. Regardless of engine speed, the output voltage at the generator remains constant. A relay-regulator is responsible for this, which changes the voltage of the generator excitation circuit. If the voltage rises above the permissible level, the winding current decreases, reducing the output voltage. And vice versa.
If the VAZ 2107 has lost charging, the reasons may be as follows:
- malfunction of the relay regulator;
- break or poor contact in the excitation network or generator output voltage;
- broken generator belt.
Restoring normal operation of the generator should begin by determining the reason for the lack of battery charge.
Device and connection diagram
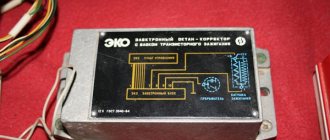
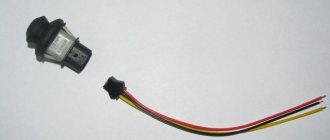
Inside the ignition system module (catalog number 2111-3705010) there are voltage converters and electronic components that distribute pulses based on signals from an external sensor. The elements are connected by jumpers, which are attached with tin-lead solder. The housing is made of dielectric material that does not collapse under the influence of vibrations and temperature changes. The outputs are equipped with contact plates to which mating elements of high-voltage cables are connected.
Ignition system diagram.
Connection instructions
- Install the coil onto the cylinder block and secure with screws.
- Connect the plug of the engine wiring harness.
- Connect the outputs of the coil to the spark plugs with high-voltage wires, observing the serial numbers of the cylinders. The numbers are printed on the module body. On the engine, the cylinders are counted from the accessory drive pulley.
- Connect the battery and crank the crankshaft with the starter to start the engine.
Electronic ignition
Everything is a little simpler here. Let's see how to set the electronic ignition on a VAZ. Instead of a mechanical breaker, the system uses a commutator and a Hall sensor.
The procedure is quite simple. For safety, remove the negative terminal from the battery. Next, rotate the crankshaft until it aligns with the long mark - in this position, the piston of the fourth cylinder will be at TDC (top dead center).
Next, you need to remove the ignition distributor cap. The slider should be looking at the fourth cylinder wire. You can use a spark from a candle or a lamp. There is no particular difference in how to set the ignition on a VAZ-2105. The distributor is slowly turned in one direction and the other. When a spark jumps or a lamp flashes, you need to stop. Next, the distributor is turned quite a bit towards the minus side and secured.
How to change the regulator relay
If necessary, the generator relay 2107 is replaced with a new one if the diode bridge is working properly and the voltage is significantly higher than required or lower than normal.
You can replace the relay-regulator either by removing the generator or carry out repairs without removing it. To do this, of course, you need to know how to attach the relay, since you will have to work almost by touch. The only tool you need is a short screwdriver. The repair is carried out from above, under the hood.
Replacing the brushes of the VAZ 2107 generator is not carried out separately. The brushes are changed together with the voltage regulator, although everything can be done if desired.
How to check the generator
An initial performance check is carried out if the battery charging indicator light on the dashboard lights up while the engine is running. First check the belt tension. When pressing on the middle part of the belt sag with your thumb with force, the belt displacement should be in the range from 1.0 to 1.5 centimeters. With a larger displacement, the belt may slip and the dynamo will not provide the required charging current. Too much belt tension (less than 0.5 cm) leads to premature wear of the bearings. If the belt is very worn, it should be replaced.
Next, with the engine running, use a multimeter to measure the voltage on the battery. The multimeter probes are connected to the battery terminals. The voltage should be between 13.5 and 14.5 Volts. On a weak battery, the voltage can rise to 15 Volts, but no more. If the voltage is outside these limits, then repair is necessary. Before making this decision, you should check the voltages supplied to the generator terminals.
Removing the generator
The instructions for repair and operation of VAZ 2107 vehicles provide a routine sequence of work on how to remove the generator on a VAZ 2107:
- The car is placed on an overpass or lift;
- Remove the battery;
- Using a socket wrench (preferably with a cardan) 17 (model 3701) or 13 (model 9412.3701) the tensioner nut is unscrewed.
- The engine mud protection is removed;
- The belt is dismantled;
- The wires from terminal 30 are disconnected;
- Using a 19mm spanner, remove the fixing bolt;
- The generator is removed from the bottom of the engine.
It is possible to remove the generator on a VAZ 2107 without a pit or a lift without any problems. To do this, you just have to lay down a bedding and, if desired, jack up the front of the car under the beam so that it is slightly higher, although you can remove the protection this way.
Diagnosing switch faults
In 1991, the first domestic cars appeared, the design of which included an ignition switch. This new technical solution has significantly increased the efficiency of the system and improved overall efficiency indicators. Despite the fact that the first production models to have a modernized engine starting system were the VAZ 2108, switches are also installed on later models produced under the Soviet Union. Since the design of classic cars does not provide for the presence of such a mechanism, this complicates the procedure for finding faults when they occur. In most cases, repairs require special equipment. Due to the high price, there is no point in buying it for one-time checks. The main signs of switch failure may be:
How to change the diode bridge of a VAZ 2107
In order to change the diode bridge (horseshoe), you need to unscrew the three screws holding the stator windings.
Before deciding to replace the diode bridge, it is better to test the diodes using a multimeter. If one of the diodes is broken (resistance is close to zero), it is better to replace the entire horseshoe with a new one. Self-repair of a diode bridge is possible if you have the appropriate diodes, but it is not ineffective, since the price is low.
If the stator windings are blackened, this means that during operation they overheated greatly and the stator needs to be replaced.
After the repair is completed, assembly and installation in the car is done in the reverse order. Having installed the generator belt, it is tensioned and secured with a nut. When tensioning the belt, use a tensioner, inserting it between the generator and the engine block. The same is done when replacing the VAZ 2107 alternator belt.
Next, connect the terminals of the wires to the battery in the sequence: positive, then negative.
Upon completion of installation work, a test run of the engine is performed and the battery charge parameters are measured. If the parameters match, the repair is considered completed. A complete replacement of the VAZ 2107 generator is carried out only if it is significantly damaged or, if desired, in the absence of spare parts. The price of a new generator ranges from 3,000 to 5,000 rubles.
Distributor rotor
It is located in the ignition distributor, under the cover. Consists of 2 plates: central and spacer. Models may be different, but the design scheme of operation is the same.
If the internal combustion engine spins poorly or does not start at all, and there is no spark at all 4 spark plugs, doubt immediately falls on the rotor (runner).
Checking the rotor is easy:
Finally, I would like to recommend it to all owners of cars equipped with an old ignition system. Change it to contactless as soon as possible. This way you will save your budget, time and nerves.
Source