The engine is one of those components of the car that over the past decades has undergone major changes in the principle of operation. What were they? The carburetor used to be responsible for the formation and dosage of the combustible mixture to the engine. This principle was reliable, malfunctions occurred only in extreme cases (for example, with serious contamination), they could be quickly and easily eliminated.
But the carburetor could not accurately calculate the required amount of fuel under a certain operating mode and quickly adjust when it changes. This led to excessive fuel consumption.
In modern cars, the carburetor is replaced by an electronic control unit. This made it possible to significantly reduce fuel costs. But the operating principle of the injection system is much more complex; it is equipped with various sensors to monitor parameters. One of these is the crankshaft position sensor.
What is the crankshaft for?
Any car engine is a piston engine.
The principle of its operation is simple: a fuel-air mixture is supplied to the cylinder, which ignites and increases in volume. Excess pressure arises, which pushes the piston out of the cylinder. At the same time, the piston makes a translational movement, which must be converted into a rotational movement in order to transmit it to the gearbox, and then to the axle shaft or driveshaft. This is precisely the function that the crankshaft performs - it converts one type of mechanical movement into another, namely: translational into rotational.
The material from which crankshafts are made is not simple steel, which is why the cost of the product is so high compared to the price of a simple metal blank. The steel from which the shaft is made is alloyed with chromium, molybdenum and other metals, which gives the product special strength. In addition, the manufacturing process itself is important, starting from how the fibers of the workpiece are arranged, ending with the manufacturing method - pressing or forging.
We figured out what the shaft does, but the question remains - where is the crankshaft? The crankshaft is located at the bottom of the engine, covered from below by a crankcase filled with engine oil. The shaft is secured in bearings that hold it and do not allow it to move; sometimes additional stops are used to strengthen it. But there is an exception - in boxer engines the crankshaft is located higher, in the center of the internal combustion engine.
Which machines most often fail?
DPKV is considered a reliable device with a long service life. In reality, nothing lasts forever, and even this part can break.
Most often, the problem manifests itself on VAZ 2107, 2110, 2112, 2114, 2115. It is also typical for Opel Omega B, UAZ Patriot, ZMZ-409 engine, Skoda Octavia, Priora with 16 valves, Kalina with 8 valves and Chevrolet Niva.
This list is not complete, but these are the models that often have problems with this sensor. Much depends on the type of device, the manufacturer and the conditions in which the machine is operated.
Purpose and principle of operation of the crankshaft position sensor
The crankshaft position sensor (CPS, synchronization sensor) is a component of the electronic engine management system.
Therefore, the sensor is only available in modern cars equipped with an electronic engine control unit (ECU). The function of the crankshaft position sensor is to transmit signals to the electronic engine control unit about the position of the crankshaft, as well as the speed and direction of its rotation. Thus, the sensor affects the functioning of the main engine systems, including ignition, gas distribution, power, etc. Based on the readings transmitted by the DPKV, the electronic control unit solves the following range of tasks:
- determines the moment of injection and the duration of operation of the injectors (control of the fuel injection system);
- controls the ignition timing in each of the engine cylinders (ignition system control);
- determines the moment when the pistons of the first or fourth cylinders pass the top and bottom dead centers;
- controls the valve timing system;
- controls the operation of individual components of the fuel vapor recovery system;
- monitors and adjusts the operation of other engine systems.
It is the DPKV that determines the correct functioning of the two main engine systems - ignition (only on gasoline engines) and fuel injection (on diesel and injection gasoline power units).
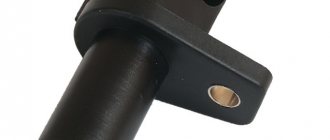
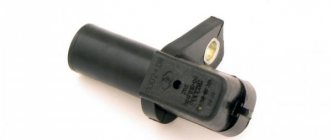
The sensor itself is a steel core with a copper wire winding, filled with a compound resin and placed in a plastic housing. A special feature of the sensor is the presence of a wire 50-70 centimeters long, ending with a special connector that connects to the engine control unit.
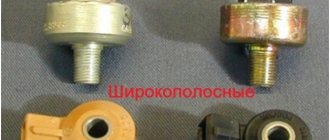
There are 3 main types of DPKV.
- A magnetic (inductive) sensor is the most common option and does not require separate power. A signal is generated to the electronic control unit at the moment when a special tag passes through the magnetic field created in the area where the sensor is located. At the same time, the magnetic sensor can serve as a speed sensor.
- Hall sensor, the operating principle of which is based on the Hall effect (the occurrence of a transverse potential difference). The signal to the ECU is received from the DPKV at the moment when a changing magnetic field approaches the sensor. The synchronizing disk blocks the field, and the teeth of the disk interact with the magnetic field of the DPKV. A sensor of this type can simultaneously serve as an ignition distributor sensor.
- An optical sensor whose operating principle is based on interaction with the synchronization disk by blocking the optical flow passing between the LED and a special receiver. The receiver detects the overlap of the light flux and generates a voltage pulse, which is transmitted from the DPKV to the electronic engine control unit.
Most often, magnetic meters and Hall sensors are found on cars - the versatility of these devices makes them more popular than optical crankshaft position meters, which are an outdated solution.
What types of PCV sensors are used?
DPKVs differ in the way they collect and transmit data.
- Induction. It can also be called magnetic. The crankshaft has a wheel with teeth along its entire outer diameter. Two teeth were deliberately missed. Rotating the wheel near the sensor strongly excites the magnetic field around it. This generates pulses in the coil, which are transmitted to the control center. The location of two missing teeth is perceived by him as the zero state of the shaft. Based on the number of pulses received, the computer determines the current position of the shaft, which is the source code for the spatial change of the dampers.
- Hall Sensor. The movement of electric current begins in them, with the appearance of a magnetic field around it (this is the Hall effect). As the magnetic field parameters change, the electromagnetic parameters in the sensor change, in particular its voltage. The disturbance of the magnetic field occurs due to the fault of the synchronizing disk. It has teeth carved into it. The twentieth position corresponds to the level of the first or fourth cylinder of the engine. The sensitive element of the part is a magnetic heart, in a cocoon of copper wire wound on a coil.
- Light or optical-photonic. Here, too, there is interaction with the plate, which has teeth and holes. It passes perpendicular to the light flow from the LED to the photonic receiver, which detects interruptions in the light beam. A voltage pulse is created, which, in essence, is a code transmitted to the control center.
What is DPKV?
The crankshaft position sensor (CPS) is also called the synchronization sensor. If it fails, the engine stops. Why is this happening? The reason is that, using a sensor, the electronic control unit synchronizes the operation of the gas distribution mechanism. Thanks to it, the moment is determined when a spark is supplied to the spark plugs and fuel is injected into each cylinder. If the sensor fails, problems with fuel injection occur and the engine stalls.
Device
The crankshaft sensor design consists of:
- sensitive element - magnetized steel core;
- cylindrical aluminum or plastic housing;
- bases with flange and mounting hole;
- connector for connecting to car wiring;
- communication cable with enamel insulation.
To ensure the reliability of the structure, the winding is sealed with a compound. The crankshaft synchronizing disk has 58 teeth located around the circumference at the same distance from each other, every 6 degrees. The pulley is missing two teeth that serve to determine the initial position of the crankshaft, thanks to which synchronization pulses are generated.
Synchronization sensor device
Working principle and functions
When the crankshaft turns, the teeth act on the device, changing its magnetic field, thereby generating voltage pulses. Thus, from the crankshaft sensor, a synchronizing pulse is sent to the controller, thereby informing it about the frequency and position of the crankshaft. This is the basis for calculating the moment of time required for the activation of the ignition module and fuel injectors. Communication with the ECU is carried out through a connector.
Obviously, if the synchronization device sends incorrect signals, the cyclicity of the ignition and fuel supply will be disrupted. This will lead to improper operation of the motor or to its stop (video author - StarsAutoCom).
Modern cars are equipped with different types of DPKV.
There are the following types:
- inductive type (magnetic);
- Hall sensor based on the Hall effect;
- optical sensor.
Since there are several types of synchronization devices, to replace it you need to take the device that is specified in the car manual.
Appearance of DPKV
Possible malfunctions and their symptoms
It is important to understand that the DPKV cannot work poorly: it either works without interruption or fails. If there is a malfunction, CHECK lights up on the dashboard.
Signs of a faulty crankshaft sensor:
- car dynamics drop;
- spontaneous increase and decrease in engine speed;
- unstable operation at idle speed;
- under dynamic load, detonation occurs;
- The engine starts poorly or does not start at all.
The listed signs may be symptoms of problems with other devices or components. One of the symptoms is often idle speed. If the number of revolutions fluctuates, this does not always mean a problem with the synchronization sensor. To know for sure that the causes of problems are the failure of the DPKV, it is necessary to check the crankshaft sensor for functionality.
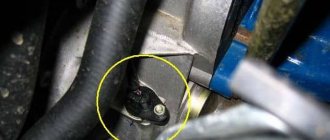
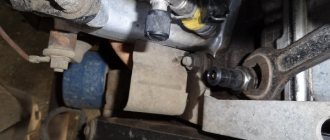
Sensor location
The stable operation of the engine depends on the serviceability of the crankshaft sensor, so automakers place it in an easily accessible place to quickly troubleshoot the problem. Despite the dense arrangement of parts under the hood, it is quite easy to determine where the synchronization sensor is located.
Reference disk. Other names are master or synchronizer.
Most often it is located on a bracket between the generator pulley and the flywheel.
Among other electronic sensors, it stands out because of its wire (70 cm long) with a special connector for connecting to the vehicle’s on-board network.
To replace and install the DPKV, you only need to correctly set the gap between the rod and the synchronizing disk. The gap size varies from 0.5 to 1.5 mm and depends on the make and model of a particular car. The distance is adjusted using special washers located between the device and the installation site.
Something else useful for you:
- P0011: Camshaft Position Error
- Why Renault Logan idle speed fluctuates and how to fix it
- Error P0016 – inconsistency between crankshaft and camshaft sensor signals
Video: Crankshaft position sensor DPKV
Trouble-shooting
So, the nature of the device malfunction and the reason for its occurrence have been determined. Now you can move on to fixing the problem. As a rule, repair work is quite simple and does not cause difficulties even for inexperienced motorists. But if you have any questions, it is better to contact the service center.
Elimination of minor defects in the operation of DPKV
Quite often, to ensure the normal functioning of the device, it is enough to eliminate only minor defects. Such work will eliminate minor interruptions:
- Renewal of varnish insulation. It was described above that quite often corrosion, improper installation, and mechanical stress can lead to damage to the protective coating.
- Cleansing from dirt and moisture. This can also lead to a short circuit in the winding. Clean and dry the device thoroughly. If moisture accumulates inside, blot it out with a cotton swab.
- Changing the polarity of signal wires.
- Replacement of synchrodisc and other spare parts.
- Elimination of design inconsistencies. As a rule, they are caused by incorrect installation of spare parts.
Self-replacement
If repair work to eliminate minor defects does not produce results, the sensor must be replaced. You can perform the replacement yourself.
Preparatory stage
First you need to prepare the device itself, the working field, and the necessary tools. To replace the DPKV you will need:
- set of flat probes,
- new device,
- calipers,
- wrench.
Clean the work surface from dirt and oil deposits.
Removing the sensor
The space is prepared, now you can move on to the next step - removing the sensor. De-energize the device. Using a previously prepared wrench, remove the bolt that secures the device. Remove the sensor itself.
Rinse and dry the device thoroughly. Excess moisture can be removed with cotton swabs.
The drying temperature should not exceed 85 °C.
Next, measure the distance between the core and the timing disk. Check the results obtained with the data specified in the technical data sheet of the device. This distance must be maintained during installation.
Installation
Install a new device. It is recommended to use old fasteners to properly install the sensor in place. Do not overtighten the bolts to avoid damaging the housing.
Connect the DPKV to the network. Check its functionality.
The following tips will help you correctly install yourself:
- Quite often the crankshaft and camshaft sensors are identical. If one of them malfunctions, try replacing it and checking its functionality again.
- It is better to purchase a new device in a service store rather than on the Internet. Firstly, this way you can check the size of the new and old copies. Secondly, on the Internet you can come across Chinese versions of sensors without electronics.
- If you go on a long trip by car, take a spare sensor with you. This is one of those devices that determines whether the car will start or not. In case of force majeure situations, the sensor can be easily replaced.
Working principle of the synchronization sensor
For stable operation of the engine, the DPKV working process occurs according to the following principle:
- The crankshaft has a special gear (reference disk) with two missing teeth - start and zero.
- When the crankshaft rotates, the teeth, passing through the magnetic field of the DPKV, change it - as a result, pulses are formed in the device, the data of which is transmitted to the control unit;
- When a gear with missing teeth passes past the sensor, the nature of the pulses changes, and the unit determines the initial position of the crankshaft;
- Based on counting the received pulses, the computer determines the position of the crankshaft in a certain period of time:
- After processing the information, the ECU sends signals to the appropriate vehicle systems, and their operation is adjusted.
As a result, stable operation of the car engine is ensured.
Video: Operating principle and what the crankshaft position sensor is responsible for
Replacing chips and pinout of DPKV VAZ 2110
Over time, the wires going to the DPKV chip wear out. Located in the lower part of the engine and not far from the front wheel, as a result, dirt, snow, oil, and aggressive chemical media in the form of salt get on the DPKV and its chip and settle, which leads to slow oxidation of the wires on the chip and subsequently to their breakage. Since the wires from the chip are combined into a single bundle, when replacing it, a repair chip is provided with protruding two wires 15 cm long. Having removed the damaged chip, install a new one with a twist. The twist points are insulated using heat shrink or electrical tape.
From the diagram below it can be seen that their pinout is not complicated and two wires are directly connected to the signal input contacts in the control unit, passing along the entire length of the harness. The polarity of the connection between the signal wires of the sensor and the control unit must be observed. If the polarity is reversed, the synchronization system will not work. To restore the operation of the DPKV, you simply need to swap the wires and check the functionality by starting the engine.
Types of sensors
There are three types of DPKV, which differ in their principle of action.
- Inductive (magnetic) . We have already discussed its principle of operation above. It is based on electromagnetic induction. This type of sensor is most widely used due to its efficiency and reliability. It is worth noting that for its operation and the formation of a stable signal, high speeds of the master disk and the absence of obstacles between it and the sensor (contaminants) are required.
- Hall Sensor . This type of DPKV works based on the Hall effect. When the disc teeth pass through the sensor, it produces a small signal voltage. The data is recorded and transmitted to the control unit in the form of a discrete signal. Such sensors use a reference voltage and are highly accurate, but are rarely used as DPKV.
- Optical . The operation is based on a light source and receiver (LED and photodiode). The teeth of the disk pass between them in the gap. At different rotation speeds, the teeth of the disk obscure the LED, as a result, pulse signals are formed on the photodiode, which are fed to the control unit. Due to their impracticality, such sensors are now almost never found in cars.
Related Issues
When identifying defects, it is necessary to ensure that there are no other malfunctions that are directly related to the DPKV.
If the sensor “rings” and there are no complaints about the integrity of the contact group, the malfunction may be due to the absence of teeth on the master disk. Or the tooth may be partially broken off and the operation may not occur in one area of the tooth, as it should be, but in two or even three.
The control device records the omissions and transmits commands to the computer, thereby confusing the control unit. This problem can be diagnosed at a service station, but for repair you need the flywheel crown.
The second related reason is malfunction of the mass air flow sensor (mass air flow sensor).
Its functions include determining air flow, and functionally it influences the DPKV. To diagnose and identify the malfunction, you also need to contact a service center.
The next potential problem is the appearance of a “figure eight” on the flywheel, which causes the DPKV to start working incorrectly. In this case, it is necessary to replace the damaged part.
The main symptoms of a malfunctioning crankshaft position sensor
The crankshaft device is a complex system, all parts of which must always be well lubricated. If the gaps between the bearings increase over time, or poor quality engine oil is used, the crankshaft parts will not be properly lubricated. As a result, damage may occur. In order to determine problems with the crankshaft, it is necessary to perform several checks, such as: check the crankshaft liners, oil seals, journals, etc. There may be several problems associated with the crankshaft:
- The gap between the crankshaft and the liner increases;
- The opening in the bearing increases as a result of a broken crankshaft journal (scuffed journal);
- The surface of internal parts wears out, cracks and scratches form;
- The crankshaft liners overheat or melt;
- The key is cut;
- The crankshaft flange holes intended for mounting the flywheel wear out;
- The crankshaft sensor breaks.
To eliminate the above breakdowns, the entire motor is usually removed. It is worth noting that it is possible to remove the crankshaft without removing the engine, however, many consider this procedure much more complicated and resort to the standard repair method. As for the symptoms of a malfunctioning crankshaft sensor, these include the following:
- the car's power drops sharply;
- revolutions can increase and decrease arbitrarily without control;
- detonation occurs under heavy load on the engine;
- when you turn the key, the engine may not start;
- When idling, the engine operates unstably, lowering and increasing speed on its own,
- or there may be no idle at all.
Replacement features
Before making a replacement, be sure to check the DPVC for serviceability. The only way to fix the problem is to replace the crankshaft sensor. To change the DPKV, you need to prepare a key for “10”.
Replacing the crankshaft sensor consists of the following steps:
- First, turn off the ignition.
- Next you need to disconnect the connector. Through the connector, the device receives power and transmits information to the ECU.
ECU connection connector
When the connector is connected and the car's power is turned on, you can start the engine and check its dynamics, performance at idle, under dynamic load. Thus, signs of problems with the fuel system should disappear.
Crankshaft position sensor: signs of malfunction and checking the DPKV
If the cause of the problem is the crankshaft sensor, symptoms of a malfunction may be as follows:
- a cold or warm engine will not start;
- detonation occurs during operation under load;
- idle speed fluctuates;
- Engine power decreases, dynamics disappear;
- The speed jumps while driving, the speed changes randomly, etc.
Please note that these symptoms may also appear as a result of other malfunctions. For this reason, before starting manipulations with DPKV, other possible problems should be excluded. It should also be added that malfunctions of the crankshaft sensor may not occur all the time. In other words, unstable operation of the internal combustion engine or problems with starting may not always appear, although the “check” lights up. In this situation, it is recommended to perform computer diagnostics of the car engine to more accurately determine the cause.
We also recommend reading the article about what computer engine diagnostics shows. From this article you will learn how the specified diagnostics are carried out, what checking and scanning for errors provides, as well as how to perform computer diagnostics of the car yourself.
You can also check the crankshaft position sensor yourself. For such a test, there are several available methods that allow you to determine the performance of the element with relative accuracy. The device is enclosed in a plastic case, which is usually mounted on a bracket at the location of the generator drive pulley. A longer wire can also be connected to the element. The use of such a wire is due to the fact that the installation site of the DPKV is quite remote.
Note that the crankshaft sensor itself rarely fails. More often the cause is mechanical damage during work in the engine compartment, as well as the entry of foreign objects into the space between the sensor and the toothed pulley.
If a visual inspection reveals nothing, then the synchronization sensor will need to be removed, after which you can proceed to the test. The element should be inspected again, which helps determine damage to the housing, core, and terminal block. It should be added that quite often, after simply cleaning the contacts and cores from dirt, the DPKV begins to work normally.
In the case where no visible defects were noticed, you should proceed to diagnosing the sensor using a multimeter. The device is switched to ohmmeter mode to measure the resistance on the DPKV winding. Normally, readings should be 550-750 Ohms. There is also a method by which the inductance of the synchronization sensor is recorded, but such diagnostics are more difficult to implement in a garage environment and require additional equipment (voltmeter, network transformer).
It should be noted that one quick way to check is to install a known-good or new timing sensor. If the engine starts and runs normally after replacement, then the cause is obvious. You also need to take into account that when installing the crankshaft sensor, you should correctly set the gap that is present between the toothed pulley and the DPKV. A qualified sensor installation assumes that the gap between the sensor core and the timing disk is 0.5 - 1.5 mm. Adjustment of the specified gap is possible by installing additional washers at the location of the crankshaft sensor mounting socket.
Diagnosis of the crankshaft sensor
Before taking any troubleshooting measures, you need to find out the reason why the sensor is not working correctly. To do this, you need to disconnect it from the connector, remove it and check it. It is usually located on the oil pump cover.
Device location
After removing the device, you first need to do a visual inspection to identify mechanical faults. During inspection, you should pay attention to the integrity of the case, the condition of the contacts, core and terminal block. All dirt must be cleaned with alcohol or gasoline.
After a visual inspection, the crankshaft position sensor is checked using special instruments. The two most popular verification options are:
- The first way is with a multimeter. It is used to measure the winding resistance. The optimal winding resistance of the device should be in the range from 550 to 750 Ohms.
- For the second method, you will need several instruments: a voltmeter, a network transformer, an inductance meter, a megger. The inductance should be between 200 and 400 mH. The resistance of the sensor winding is measured by a tester. It must exceed 20 MΩ at a voltage of 500 V. The mains transformer is designed to remove magnetization from the synchronization disk.
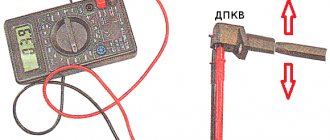
Checking DPKV with a multimeter
Often, to identify a device malfunction, it is enough to measure the resistance of its winding.
We carry out inspections right in the garage
If the engine in the car has stalled, you won’t be able to get away, and even with a faulty engine, going anywhere is a very risky business; you simply won’t get there, so let’s start checking on the spot. First, open the hood and perform the following actions:
- We thoroughly clean the sensor body with a rag soaked in solvent, gasoline, turpentine, or other degreaser. We especially carefully wipe the end on the side of the toothed pulley.
- We check the fastening - suddenly it has become loose, a slightly loosened screw on the sensor allows it to move away from the teeth, the gap between the sensor and the teeth has increased, and the impulse has weakened accordingly.
- We clean the contacts in the connector from oxidation (with a thin screwdriver or an awl).
- We check the wiring so that it is not melted or broken.
- We try to start the engine, is the problem still there? If it disappears, you can go.
- When all the measures I described above did not help, a replacement remains.
Checking with a wrench
DPKV is one of the main control parts, since without it the automobile power unit will not work. It is directly connected to the electric fuel pump, so the functionality of the sensor can be checked by focusing on this device.
This is much easier to do compared to other methods, since it does not require the use of special instruments to measure electrical parameters.
Experienced automotive electrician Valery Chkalov shared a simple testing technology on his Youtube channel.
He suggests using a simple wrench as a diagnostic tool:
- This method requires preliminary preparation. To better hear the operation of the fuel pump, you must first remove the rear seat inside the car and disconnect the sensor.
- Then you should take the key and turn on the ignition.
- You need to bring the key to the metal core of the DPKV, and then tear it off.
- If the sensor is in good condition, the fuel pump will turn on. This point is easy to hear. Otherwise, this part will need to be replaced.
Interchangeability of DPKV
When replacing the DPKV yourself, several important factors must be taken into account:
- Make sure the sync disk is working properly. Otherwise, correct synchronization with the ECU will not be possible.
- replace the device along with the harness.
- Quite often it is necessary to replace not only the device itself, but also the firmware, which may not fit the new model.
So, the crankshaft position sensor is one of the most important devices in modern cars. It is thanks to him that fuel consumption has become much more economical. If there are malfunctions, the crucial point is diagnostics. It can be carried out both externally and using special devices. Only after diagnostics can you begin repair work.
Check on the way
Sometimes breakdowns happen unexpectedly, in the field, on the highway, and so on, where you don’t have a multimeter at hand, then a light bulb from any car lamp, for example, an interior lamp, will help you out:
And so you need an LED light bulb with two wires, which you, after removing the sensor, connect to it.
You act with an iron object as I already described a little higher.
If the crankshaft sensor is working properly, the diode will flicker.
Thank you my readers, now you can independently diagnose such malfunctions and not get confused, see you soon on the sidelines of the blog with new articles, subscribe to my updates on the blog, who has not done so yet, I wish you success in the repair, and that the repair is needed as much as possible less often!
Recommend my blog to your friends on websites, many thanks in advance. Goodbye.
Did you like the article? Share with friends:You may also be interested
What is considered normal engine oil consumption? Hello everyone, it's me again, with useful information about the permissible engine oil consumption
What is engine boost? Hello again everyone, today I’ll tell you about boosting the engine, what it is, why it’s done, and Sections
- Auto documents
- Automotive vitality
- Car devices Engine
- Body
- Suspension and steering
- Salon
- Fuel system
- Brake system
- Transmission
- Tires and wheels
- Electrical equipment
Subscribe By clicking the button, I agree to the newsletter and accept the privacy policy
- Car devices
- Auto documents
- Violation and fines
- Car brands
header>header>
Checking the inductance value
digital multimeter
To test the inductance of the DPKV coil, you will need the following equipment:
- 1.
a multimeter with an inductance measurement function; - 2.
if your multimeter does not support this function, then you will need an inductance meter; - 3.
megohmmeter; - 4.
network transformer.
To obtain the most correct data
, the test should be performed in a room with an air temperature of 21-23 degrees Celsius!
Step #1
You should focus on inductance results in the range of 200 - 400 mH
.
The multimeter supports the function
, you need to connect 2 multimeter probes to 2 coil terminals, polarity does not matter.
The multimeter does not support the required function
, to check we use an inductance meter.
Step #2
You will need a megohmmeter set to an output voltage of 500 V. Check the insulation resistance between the coil wires at least 2 times! The insulation resistance value should not be lower than 0.5 MOhm.
Step #3
At step No. 2, magnetization of the coil “interturn short circuit” may appear, as a result of which the data will be incorrect. It is necessary to use a network transformer, then repeat step No. 2.
Checking on an oscilloscope
As in the previous case, you will not need any tools. If you don't know how to check the crankshaft sensor, then this method is more accurate.
Prepare only an oscilloscope, and for more accurate readings you will also need an alligator clip:
- The clamp is connected to the ground of the motor, and one connector of the oscilloscope should be installed parallel to the signal output of the regulator, namely to terminal A. The second connector is connected to output number 5 of USB Autoscope II. All this must be done so that you can see the signal voltage at the input of the device.
- After this, you should select the operating mode. In our case, to read the voltage readings, you need to activate the “Inductive_Crankshaft” mode, after which you need to start the engine. If the engine cannot be started, you can simply turn the starter.
- If there is a signal from the DPKV, but its output signal does not coincide with the normal one, this may indicate a breakdown of the device. In addition, this may indicate not only a breakdown of the DPKV, but also certain malfunctions of the crank pulley or broken teeth. If the signals on the oscilloscope are incorrect, that is, they “jump” as shown in the photo, then you can safely change the DPKV.
Instructions for replacing the controller
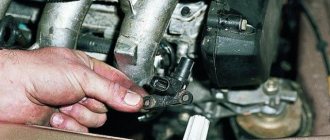
Replacing the crankshaft sensor is carried out as follows:
- First of all, you need to turn off the ignition.
- Then open the hood and find the location where the DPKV is installed. The wiring connector should be disconnected from the controller.
- Using a wrench, usually a 10mm wrench, you need to unscrew the screw that secures the controller.
- Before dismantling the device, it is necessary to make appropriate marks where it is located. After this, the device must be removed.
- Then a new controller is installed taking into account the marks. The device is connected to the on-board network; a connector is installed for this purpose. Now start the engine and check the operation of the device; if everything is normal, then the replacement can be considered successfully completed.
Resistance check
The third tester diagnostic method is a comprehensive one, which allows you to measure insulation and inductance.
For this diagnosis you will need:
- network transformer;
- megohmmeter;
- inductance measuring device;
- voltmeter, preferably digital.
This is what the indicators of the DPKV signal look like when checked with an oscilloscope. This is what the indicators of the DPKV signal look like when checked with an oscilloscope.
It is better to carry out the check in the garage, and it is desirable that the temperature be around 20-22 degrees, this will allow you to take more accurate indicators. Here you will also need to measure the winding resistance, we talked about this in the first method.
- Once the resistance has been measured, it is necessary to determine the inductance value; use a meter to do this. If DPKV is working, then this indicator should vary around 200-400 mH.
- After this, take a megohmmeter; you will need to measure the insulation value. In the case when the voltage is about 500 volts, the insulation resistance should be no more than 20 megohms.
- If the timing shaft is magnetized, you will need to demagnetize it, otherwise the engine will not work. To do this, use a network transformer. Having taken all the indicators and analyzed them, we can draw a conclusion about the serviceability or failure of the regulator. Of course, if the indicators deviate from the norm, then the device can be considered inoperable and, accordingly, it needs to be replaced.
When installing a new regulator, pay attention to the previously marked marks that you placed when removing the DPKV. Do not forget also that the distance from the core to the synchronization shaft should vary around 0.5-1.5 mm.
How to check DPKV yourself - 3 different ways
Before you start checking the synchronization sensor with instruments, you must mark its initial position on the engine. After removing the electronic device, inspect it for external damage. If the sensor is dirty, it is necessary to clean it, including removing corrosion from the contacts, if any, using gasoline or alcohol. If there is no external damage to the sensor, you can begin to diagnose it using instruments.
How to check the crankshaft position sensor with an ohmmeter
In order to check the crankshaft sensor with an Ohmmeter, you must perform the following procedure:
- The first thing to do is to inspect the device while it is installed on the car, or rather, check for a gap between it and the synchronization disk. It is quite possible that there is no gap there due to the fact that dirt has adhered to the sensor or disk, which led to the violation.
- If everything is in order with the gap, we will remove the device from the car.
- The next stage is assessing the external state. The sensor body must be intact, without signs of damage, the core must be clean, the contact terminals must be free of traces of oxidation, and the wires must not be damaged.
- If external contamination is visible on the DPKV, you can wash it before checking (to do this, use only pure gasoline or alcohol), and also clean the contacts with a file.
- After cleaning, rinsing and drying, you can start taking measurements. To do this, switch the multimeter to ohmmeter mode and connect the probes to the sensor contacts.
- When measuring, a working DPKV should show a resistance in the range of 550-570 Ohms.
Checking the inductance of the crankshaft sensor
Checking the inductance of the crankshaft position sensor is a more complex method. To do this you will need:
- voltmeter, preferably digital;
- megohmmeter;
- inductance meter;
- network transformer.
For correct indicators when measuring the sensor, the recommended air temperature is 20-22 0 C. We measure the winding resistance with an ohmmeter and the method indicated above.
To measure the inductance of the crankshaft speed sensor winding, an inductance meter (inductive coil, capacitance and resistance) is used. The inductance should be in the range of 200-400 MHz.
Using a megohmmeter, the insulation resistance is checked. This parameter at a voltage of 500V should not be higher than 20 MOhm.
If during the repair of the sensor the synchronization disk is inadvertently magnetized, then demagnetization is carried out using a network transformer. Based on the results obtained during test measurements, you receive data about the sensor’s malfunction, or, conversely, its serviceability
When installing an old or new sensor, carefully install it in the seat according to the marks. Do not forget about the distance that should be between the synchronization disk and the core (0.5-1.5 mm)
Based on the results obtained during test measurements, you receive data about the malfunction of the sensor, or, conversely, its serviceability. When installing an old or new sensor, carefully install it in the seat according to the marks. Do not forget about the distance that should be between the synchronization disk and the core (0.5-1.5 mm).
How to Test a Crankshaft Position Sensor Using an Oscilloscope
A digital oscilloscope allows you to effectively monitor and find faults in injection system sensors. Now we will talk in detail about checking the crankshaft sensor using an oscillogram:
The crankshaft position sensor (CPS) is the most important in the injection system; it synchronizes the operation of the electronic engine control unit. The VAZ DPKV signal is a series of repeating electrical voltage pulses generated by the sensor when the crankshaft rotates.
The drive disk is a 60-2 gear, i.e. 58 equidistant teeth and two missing teeth for synchronization. When the drive disk rotates together with the crankshaft, the depressions change the magnetic flux in the sensor's magnetic circuit, inducing alternating current voltage pulses in its winding. The oscillogram of the inductive DPKV has the following form:
Here it is worth paying attention to the signal amplitude and pulse shape. If the turns in the sensor winding are short-circuited, the signal amplitude will be reduced
Also, from the oscillogram it is easy to calculate the runout of the drive disk and damage to the teeth. On some foreign cars, a Hall sensor is used as a DPKV, producing rectangular pulses.
And this is how the crankshaft and camshaft position sensors of Nissan engines work synchronously. Based on the rising edges of the signals, the displacement of the shafts relative to each other can be determined.