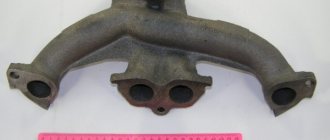
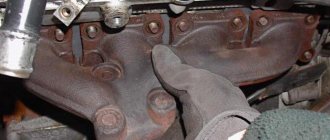
You've probably heard such a slang and quite common word among car enthusiasts as VAZ 2114 pants. If you have no idea what it is, then everything is simple, it's just the exhaust pipe of the exhaust manifold.
The product is used to remove exhaust gases directly from the internal combustion engine. And it got its original name for the shape of the structure (one end of the pipe has a split and closer to the opposite edge smoothly flows into a single pipe) with the shape of the pants. This is how the popular name “clung” to the product.
From a design and reliability point of view, the most vulnerable point in the exhaust pipe is the sealing gasket at its connection to the manifold. Over time, the insulating element simply burns out or becomes deformed from exposure to high temperatures, especially since the thickness of the gasket metal is quite small.
What is a car muffler for?
Regardless of the make and year of manufacture of the car, all its systems serve one purpose - to ensure stable operation of the engine and movement. The exhaust system may seem insignificant compared to systems such as the brakes or fuel. However, it is the vehicle's exhaust system that has the most direct impact on engine performance.
The muffler is an integral part of the exhaust system . Its main purpose is to remove exhaust gases outside the car. In addition, the part also serves to reduce noise, since residual fuel can burn in the exhaust system pipes.
The pipe comes out from the rear left side of the car
How to attach
The muffler on the VAZ 2114/2115 is attached to the car body. To ensure that the pipe is securely fixed and does not vibrate during movement, two fastening methods are used:
on rubber suspensions.
Bolts and nuts for fastening the muffler pipes are made of special heat-resistant alloys
The muffler is attached directly to the exhaust manifold with bolted connections, which guarantee complete tightness of the joints. The middle part is also fixed with bolts and nuts. And the resonator and exhaust pipe are suspended on special hooks on the bottom with elastic bands. These suspensions are easy to remove and put on, but at the same time provide rigidity even when driving on uneven roads.
Schematic design of the exhaust system on a VAZ 2114/2115
The gas exhaust system of the VAZ 2114/2115 consists of several parts. Connecting to each other in series, all parts ultimately serve one purpose - reducing noise and removing exhaust emissions outside the body.
1 — bracket for fastening the exhaust pipe; 2 - gasket; 3 — clamping device for the bracket; 4 — additional muffler; 5.7 — “pillows” for muffler suspension; 6 — main muffler; 8 — clamp connecting the muffler pipes; 9 - neutralizing device; 10 — hinge sealing ring; 11 - sensor that monitors the oxygen concentration in emissions; 12 — exhaust pipe for mufflers
Repair of exhaust system parts
- It is possible to weld parts of the exhaust system only if they have been damaged as a result of mechanical impact
- In the event that a pipe breaks, or a weld seam or tank burns out, you need to replace the entire element, it has already become unusable
- The only part to which this does not apply are metal expansion joints. They change regardless of the exhaust system itself
- The cost of the neutralizer in comparison with other elements of the system is decent. Therefore, many people change it to a stronger (flame arrester)
- The neutralizer is cut off, leaving only the connecting flanges, as well as a fist with flaring, and a flame arrester is welded in
- The cost of a flame arrester is much lower than a neutralizer. However, there is no afterburning of fuel residues. Therefore, its installation is permissible on cars with one lambda sensor. In addition, the flame arrester increases fuel consumption by about 10-15%.
Car owners often encounter the problem of fluid leaking from the cooling system. Often the reason lies in rusted or squeezed out plugs in the engine cylinder block. To fix the problem, just replace them with new ones.
Plug locations
- There are plugs on the sides and ends of the cylinder block that are squeezed out of the block when the coolant freezes in it.
- Two plugs with a diameter of 34 mm are located on the cylinder block on the side of the coolant drain plug, and two more on the oil filter side
- There is another plug with a diameter of 17 millimeters on the rear end side of the crankcase
- The last plug with a diameter of 34 mm is located at the front end of the cylinder block
These plugs are changed if the coolant in the cylinder block is frozen . The plugs can be changed without removing the engine. On a VAZ 2110, replacing the cylinder block plugs is done using a special tool. To do this you will need:
- beard or chisel
- hammer
- pliers
- durable screwdriver
- telescopic magnetic pointer (purchased at any automotive store)
- new plug
- sealant
- skin
Replacing plugs for a VAZ 2110 engine block
- Remove the negative terminal from the battery
- Drain the antifreeze from the cylinder block and radiator
- Remove the air filter along with the hose
- We disconnect the exhaust pipe together with the bracket and lower it down a little so that the flange is removed from the manifold studs
- Turn the movable sector of the throttle valve drive all the way and disconnect the throttle valve drive rod
- We unscrew the bolts securing the throttle valve drive bracket. We move the bracket without disconnecting the rod to the side so that it does not interfere with us.
- Remove the belt protective cover and cylinder head cover
- We unscrew the nut securing the tension roller and remove the roller along with the axle and a special spacer ring, then remove the timing belt from the camshaft roller
- We unscrew the bolt securing the pulley and remove the pulley along with the key.
- Unscrew the nut securing the timing belt to the block head itself
- If necessary, unscrew the bolts securing the head and remove the block head.
Now that we have access to the plugs, we begin replacing the plug of the VAZ 2110 engine block.
- We take a beard or chisel in one hand, and a hammer in the other
- Place the chisel on the edge of the plug
- Gently tap the hammer on the striking part of the chisel. The plug turns (Photo below)
We tap with a hammer on the striking part of the chisel, the plug rotates
- We pry it up and pull it out using pliers
- If the plug does not turn, drill a small hole in it, screw a knob into it and remove the plug.
- We use a telescopic pointer with a magnet if it is necessary to remove a plug that has fallen inside. We pull the failed plug to its hole and remove it with pliers
- Clean the edges of the plug hole from rust using sandpaper
- To increase the tightness, coat the edges of the installed plug with sealant
- Attach the plug to the hole
- We press it in using a suitable mandrel and a hammer.
How to replace a muffler on a VAZ 2114/2115
If you start having any problems with the muffler, it is better not to put it off for a long time. The life and health of the driver and passengers depends on how correctly the “glushak” works. In general, the replacement process itself begins with the selection of a new exhaust system kit. It is best not to save money, but to purchase an original factory one. This will delay the need for repeated replacement indefinitely.
In addition, it is recommended to change the fastening bolts during each replacement. It is necessary to choose products made from heat-resistant materials, since otherwise the bolts will quickly stick to the bottom and will be impossible to unscrew.
To ensure reliable operation, it is advisable to buy new rubber suspensions in advance.
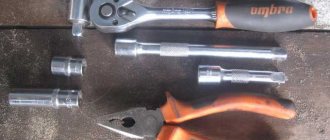
What tools will you need?
To work you will need a simple set of tools:
two open-end wrenches for 13;
brake fluid or WD-40 lubricant;
screwdriver with a flat thin blade.
How to remove a muffler without a hole
The easiest way is to use an overpass or inspection hole - in this case, you can more conveniently crawl under the car body and carry out the necessary operations. However, drivers often do not have the opportunity to use such devices, so they use a regular jack.
To remove the “glushak” from a VAZ 2114/2115, you must:
Jack up the rear left edge of the vehicle.
Make sure the machine is stable.
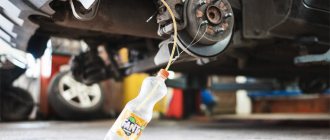
Reach under the body and moisten all pipe connections and bolts with lubricant.
Wait 10–15 minutes until the liquid is absorbed.
After which you can begin to unscrew the bolted connections. If the bolts cannot be unscrewed with regular wrenches, it is recommended to cut them off with a chisel and hammer. However, you need to act extremely carefully so as not to catch the bottom.
After the pipe has been unscrewed, all that remains is to remove the part from several rubber hangers. To do this, the body is raised slightly. If the rubber band is tight, you can pry it off with a screwdriver.
The dismantled muffler is pulled out from under the car.
The muffler on the VAZ 2114/2115 is attached to the bottom with five hangers
How to install a new one and secure it correctly
Before you begin installing a new muffler, you need to clean all strategically important places under the bottom: hooks for attaching rubber bands, brackets for bolts. Install the product in the reverse order:
First, pull the muffler under the car body and position it in the position in which it will be fixed.
After this, hang the exhaust pipe and resonator on rubber hangers. Make sure that each connection is secure and the part will not fall off the hooks at the first road pothole.
Next, start tightening the nuts on the bolts. Screw it all the way, but without fanaticism, as you can break the thread.
Lower the car from the jack.
After this, it is recommended to check the performance of the VAZ. It will be enough to start the engine and rev it up a little.
Video: replacing the muffler
Replacing the resonator
- The resonator is attached to the muffler using a crimp clamp with an O-ring;
- It is attached to the neutralizer by means of a floating flange (two bolts) and flaring;
- On the opposite side of the neutralizer there is a “fist”;
- It is often problematic to unscrew the knuckle mounting bolts; they are simply cut off with a grinder and replaced with new ones;
- If suddenly you don’t have a tool at hand, we clean the places where the bolts are attached and treat them with a “liquid wrench” (WD-40 or its equivalent);
- Unscrew the bolts and remove the muffler clamp;
- We remove the resonator from the suspension rubber bands, change the rubber bands if necessary;
- Then we hook a new resonator onto rubber bands and attach it to the muffler so that the pipe running from the resonator to the muffler is parallel to the ground;
- When there is wear on the neutralizer fist or there are burrs, grooves or rust on it, it is necessary to lubricate the connection with a special high-temperature sealant;
- Using new bolts and nuts, tighten the flanges of the catalyst and resonator;
- The neutralizer is attached to the resonator by means of a flange connection (two bolts), to the receiving pipe (pants) by means of a spring-loaded connection and a pair of flares, between which there is a graphite or metal-asbestos ring.
What is a car muffler for?
Regardless of the make and year of manufacture of the car, all its systems serve one purpose - to ensure stable operation of the engine and movement. The exhaust system may seem insignificant compared to systems such as the brakes or fuel. However, it is the vehicle's exhaust system that has the most direct impact on engine performance.
The muffler is an integral part of the exhaust system . Its main purpose is to remove exhaust gases outside the car. In addition, the part also serves to reduce noise, since residual fuel can burn in the exhaust system pipes.
The pipe comes out from the rear left side of the car
How to attach
The muffler on the VAZ 2114/2115 is attached to the car body. To ensure that the pipe is securely fixed and does not vibrate during movement, two fastening methods are used:
on rubber suspensions.
Bolts and nuts for fastening the muffler pipes are made of special heat-resistant alloys
Malfunctions on VAZ cars of the tenth family
AvtoVAZ specialists conducted research, the results of which revealed that the car body, being a closed structure, has its own peak harmonics and can resonate at a certain frequency. To suppress spurious frequencies emitted by both the vehicle engine and those shielded by the body, it is necessary to use the range from 60 to 400 Hz, corresponding to medium and high engine speeds. A change in noise characteristics can be caused by making minimal changes to its design.
How to replace a muffler on a VAZ 2114/2115
If you start having any problems with the muffler, it is better not to put it off for a long time. The life and health of the driver and passengers depends on how correctly the “glushak” works. In general, the replacement process itself begins with the selection of a new exhaust system kit. It is best not to save money, but to purchase an original factory one. This will delay the need for repeated replacement indefinitely.
In addition, it is recommended to change the fastening bolts during each replacement. It is necessary to choose products made from heat-resistant materials, since otherwise the bolts will quickly stick to the bottom and will be impossible to unscrew.
To ensure reliable operation, it is advisable to buy new rubber suspensions in advance.
What tools will you need?
To work you will need a simple set of tools:
two open-end wrenches for 13;
brake fluid or WD-40 lubricant;
screwdriver with a flat thin blade.
How to remove a muffler without a hole
The easiest way is to use an overpass or inspection hole - in this case, you can more conveniently crawl under the car body and carry out the necessary operations. However, drivers often do not have the opportunity to use such devices, so they use a regular jack.
To remove the “glushak” from a VAZ 2114/2115, you must:
Jack up the rear left edge of the vehicle.
Make sure the machine is stable.
Reach under the body and moisten all pipe connections and bolts with lubricant.
Wait 10–15 minutes until the liquid is absorbed.
After which you can begin to unscrew the bolted connections. If the bolts cannot be unscrewed with regular wrenches, it is recommended to cut them off with a chisel and hammer. However, you need to act extremely carefully so as not to catch the bottom.
After the pipe has been unscrewed, all that remains is to remove the part from several rubber hangers. To do this, the body is raised slightly. If the rubber band is tight, you can pry it off with a screwdriver.
The dismantled muffler is pulled out from under the car.
The muffler on the VAZ 2114/2115 is attached to the bottom with five hangers
How to install a new one and secure it correctly
Before you begin installing a new muffler, you need to clean all strategically important places under the bottom: hooks for attaching rubber bands, brackets for bolts. Install the product in the reverse order:
First, pull the muffler under the car body and position it in the position in which it will be fixed.
After this, hang the exhaust pipe and resonator on rubber hangers. Make sure that each connection is secure and the part will not fall off the hooks at the first road pothole.
Next, start tightening the nuts on the bolts. Screw it all the way, but without fanaticism, as you can break the thread.
Lower the car from the jack.
After this, it is recommended to check the performance of the VAZ. It will be enough to start the engine and rev it up a little.
Video: replacing the muffler
How to remove the resonator
The resonator needs to be changed only after a new muffler has been installed. The sequence of work aimed at dismantling the device:
- The resonator is secured using a crimp-type clamp and an O-ring.
- The connection to the neutralizer is made using a floating flange, which consists of flared pipes and two bolts.
- The fist is located on the opposite side of the resonator.
The work must be carried out on a cooled engine.
Quite often it is not possible to unscrew the bolts, so to make the work easier, you just need to cut them off using a grinder. Be sure to install new bolts during reassembly. If you don’t have a grinder at hand, then you need to use a penetrating lubricant, for example, WD-40. Apply this composition to all threaded connections, then wait 20-30 minutes.
Unscrew all the bolts and remove the clamps on the resonator. After this, you need to remove the old resonator from the rubber suspensions. Be sure to evaluate the condition of all rubber products. If they show signs of wear, install new ones during reassembly.
How to repair a “glushak” with your own hands
The muffler on the “fourteenth” and “fifteenth” is considered one of the most vulnerable points of the car. The fact is that due to exposure to high temperatures, the metal quickly burns out, that is, the tightness of the system is broken. Therefore, the part must be changed as soon as there is a suspicion that it is not working.
Reasons for failure
Most often, mufflers “burn out” - that is, due to hot exhaust, the metal inside the housing begins to thin out, which ultimately leads to the appearance of holes. However, this is not the only reason why the silencer may fail:
using a homemade device - handicraft products do not differ in quality and long service life;
mechanical shocks from uneven roads - dents and deformations of the pipe also lead to loss of tightness;
Rust and corrosion sooner or later affects even the highest quality original mufflers.
In general, all of the above factors influence service life to some extent. The car owner can easily identify all of the above faults - just drive the VAZ into the inspection hole and visually examine the muffler. In addition, when deformations, burnouts and corrosion reach their “peak”, the part will begin to make characteristic sounds when moving - gurgling, sharp pops, knocking.
Why is the muffler knocking?
This part on the VAZ 2114/2115 can make knocking noises only in two cases:
it hits the body;
When moving, it touches the gas tank housing.
In any case, it is necessary to immediately take measures to eliminate this malfunction. Most often, the problem lies in severe wear of the rubber suspensions. It is enough to change them and the muffler will again return to its normal position under the bottom of the car.
Pendants are inexpensive, so you can buy new products without spending any money.
In some cases, the silencer begins to knock when its elements have been installed incorrectly - for example, after replacing the resonator or exhaust pipe. In this case, you will need to double-check that all fasteners and gaskets are installed correctly.
Citizens! It's simple! I had a knock and I was cured in five minutes! The pipes are connected with a clamp, and inside there is a spherical ring. But the connection is not movable. By changing the angle between the pipes at this connection, we change the center of gravity of the entire exhaust structure. You can also change the slope of the pipe arc, thereby moving it away from the gas tank. Experiment! Repair is a scam. They will loosen the clamp, change the degree and charge you 800. Tough!
Marseal
https://autolada.ru/viewtopic.php?t=227961
What to do if the plug is clogged
During vehicle operation, dirt, soot, fuel impurities and other sediments will inevitably accumulate in the exhaust system pipes. Gradually, they will settle on the walls of the muffler and clog its working space.
Gasket for pants VAZ 2110 8 valves
- To the beginning of the forum
- Forum Rules
- Old design
- FAQ
- Search
- Users
Maybe put two gaskets.
Maybe put two gaskets.
I don’t care either hehe. I still think it all depends on the landing gear and whether the exhaust system is caught on anything
My pants most likely pulled when I grabbed the steam resonator, although I later tried to straighten them out, but the result was zero, just replacing the pants, but now damn it, the muffler is still burned out
I changed my pants for new ones - it still hurts
Another option is hot sealant. Only after tightening the connection do not start it for at least 8 hours. In general, copper nuts are evil.
And look at the surfaces of the manifold and pants - where the cut begins, a path usually burns out, and the new gasket will also burn out along it. The medicine is a sealant (hot, usually red). Apply over the entire adjacent surface. Only if you give gas under load until the cutoff, it will still burn out (press through).
They also put a damper for these vibrations between the pants and the resonator (I don’t remember what it’s called). It costs us about 1000. It's no fun to pay. The cuts and cuts are not very annoying, and I’m already used to it, and not much) But I suffered for a long time at first. Every week I changed the gaskets and tightened the nuts
Regarding graphite, it’s a good idea, but then the nuts may come loose.
Talk about fantasies - recently it went wrong, it turned out that one of the nuts was half unscrewed, and the second simply flew away. Without any graphite. I just bent the locking plate badly when I changed my pants.
Z.Y. And if you make a bellows (aka corrugation), just cook it, I tried it on self-tapping screws with sealant - namu. I took it off and threw it away, it always breaks.
My pants most likely pulled when I grabbed the steam resonator, although I later tried to straighten them out, but the result was zero, just replacing the pants, but now damn it, the muffler is still burned out
Another option is hot sealant.
My pants most likely pulled when I grabbed the steam resonator, although I later tried to straighten them out, but the result was zero, just replacing the pants, but now damn it, the muffler is still burned out
I changed my pants for new ones - it still hurts
the master said you put in crappy gaskets, they burned through, the gap increased and hello to the silence - it was China or something, cardboard was present - in general, he chose the one he needed in the store and still haven’t known the problem for a year now. Additionally, I installed locking plates - there are factory ones in the Murzilka. T
Well, which ones should be installed, there are three types: 1) asbestos-containing 2) non-asbestos 3) metal?
I installed one like this and it burned out the next day
then I installed 2 of these - it was quiet for about a week, then it started to hook somewhere
I'm looking at this and a change of pants
Source
Video on replacing the exhaust pipe:
You've probably heard such a slang and quite common word among car enthusiasts as VAZ 2114 pants. If you have no idea what it is, then everything is simple, it's just the exhaust pipe of the exhaust manifold.
The product is used to remove exhaust gases directly from the internal combustion engine. And it got its original name for the shape of the structure (one end of the pipe has a split and closer to the opposite edge smoothly flows into a single pipe) with the shape of the pants. This is how the popular name “clung” to the product.
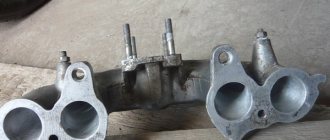
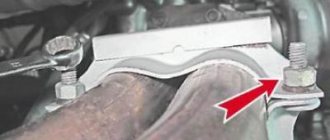
From a design and reliability point of view, the most vulnerable point in the exhaust pipe is the sealing gasket at its connection to the manifold. Over time, the insulating element simply burns out or becomes deformed from exposure to high temperatures, especially since the thickness of the gasket metal is quite small.
Symptoms of a problem
The main sign indicating possible problems with the gasket of the VAZ 2114 pants is a changed sound (bass) from the exhaust pipe when the engine is running. When an element wears out, you will immediately hear and identify disturbances in the operation of the exhaust system. This will increase the noise level and exhaust sound. However, it is worth understanding that such signs may indicate failure of other components of the exhaust system (for example, the resonator). To accurately determine the possible causes, conduct a thorough diagnosis.
Fault diagnosis
To determine operational problems, you should start the car engine. It is best to carry out the activities together, so that one person sits in the driver’s seat and, at the command of the second, increases the operating speed of the engine. The second person should be located in the inspection hole or under the overpass exactly under the bottom of the car. When the speed increases, you need to carefully inspect the entire exhaust system line, record the source of increased noise and possible leakage of exhaust gases. If you have decided to replace the problem unit, read below for instructions on how to change pants on a VAZ 2114.
Causes of breakdowns of the VAZ2114 exhaust pipe
Since the unit is attached directly under the bottom of the car, and our Russian roads leave little to be desired, the most common occurrence is driving into a hole (even worse if it is hidden under a puddle) with subsequent damage to both the exhaust pipe itself and the place where it connects to the muffler. The second most common reason is the vulnerability of the gasket itself. The fact is that it is constantly exposed to a strong influence of hot exhaust gases, therefore, in an aggressive environment, the destruction of the product (burnout) accelerates. “Please note that if you have diagnosed wear or damage directly on the pipe itself, you should replace not only the unit that is damaged, but also the sealing gasket. This approach will ensure the best durability and wear resistance of the entire pipe section, and the old gasket will not become a bottleneck in the entire exhaust pipe.”