What is a major overhaul
Overhaul is a set of repair work related to the replacement of parts that cannot be repaired (mainly pistons, rings, gaskets) and the repair of parts that can be restored to factory condition. After the overhaul, the engine is restored to its power performance indicators (power, compression, noiselessness and smooth operation). Unlike routine or unscheduled repairs (for example, the washer fuse blows or the heated rear window 2107 does not work), a major repair involves repairing the entire engine, and not individual parts. Therefore, this type of work costs a lot, requires experience, time and, preferably, a warm, well-lit garage if the driver wants to make capital with his own hands.
Since the engine is the heart of the vehicle, its repair must be carried out in compliance with all rules and regulations, accuracy and skill.
average price
The cost of repairs depends on the amount of work that needs to be done. The master can evaluate this only after disassembling and checking all components. At the initial stage, it is impossible to say exactly how much a major overhaul will cost and what spare parts will be needed.
Cost of work for Ford engines in service
Ford cars are widespread in Russia, so it’s easy to find spare parts for repairs. Almost every car service center provides overhaul services for Ford engines.
In the price list, services indicate approximate prices; for these units they start from 20,000 rubles. So that the driver understands what the final cost is made up of, car services indicate the price for individual work: removing and installing the engine, measuring compression, replacing oil seals and others.
Do-it-yourself VAZ overhaul price
VAZ car engines have a simple design compared to new units. Therefore, car enthusiasts repair it themselves.
A major engine overhaul costs 25,000-30,000 rubles. This cost includes work on boring, grinding, repressing, as well as spare parts that may be required. The price for overhauling a VAZ engine depends on the cost of spare parts and the amount of work.
When to overhaul an engine
Both gasoline and diesel engines burn out their resource after completing their allotted service life in engine hours (if the engine has been running for 1 hour, this is 1 engine hour) or mileage in thousands of kilometers.
If the following signs appear, it is necessary to overhaul the internal combustion engine:
- You have to add engine oil, it goes somewhere.
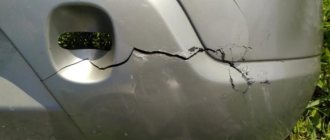
- Mechanical damage to the engine (crack in the block).
- Compression in the cylinders is below acceptable.
- Constant smoke from the muffler is blue or bluish (dark gray) thick and in large quantities.
- Knocks are heard (it could be the liner turning, etc.).
- The car doesn't pull as well as before, especially when going uphill.
- When checking the spark plugs, they are always dirty, with carbon deposits, and covered in oil.
- Fuel consumption has become higher than before.
- A lot of gases enter the crankcase.
- Low oil pressure in the system.
- The motor overheats under light loads.
- The engine runs intermittently.
These reasons do not necessarily indicate the need for a major overhaul of the internal combustion engine. If there are many such signs and they are repeated, then it’s time to trade in the car or do it yourself.
Based on the signs, they determine what kind of repair the engine requires:
- current or continuous repairs (repair or replacement of individual parts, for example, painting a bumper);
- technical repairs according to the schedule (repair or replacement of worn parts that have exhausted their service life);
- unscheduled repair of the internal combustion engine (this is when the service life has not yet expired, but for some reason the engine has broken down);
- major or major repairs, or capital repairs are done both according to schedule after a given service life, and after the final breakdown.
Recommendations for proper engine operation
Doing an engine overhaul with your own hands is only partially possible. Because we need machines, the cylinder head and cylinder head have to be sent for boring and grinding. You can do the rest of the work yourself. The simpler the car, the easier it is to repair. Making capital on VAZ, GAZ, UAZ, NIVA cars yourself is not difficult.
To increase the engine life of any car you need:
- buy high-quality spare parts and consumables;
- undergo maintenance in a timely manner;
- the most important thing is to change the engine oil every 6-7 thousand kilometers;
- A neat, smooth ride without jerking also increases the service life of the car.
After a major overhaul of the engine, the oil must be changed at the following intervals:
- After 500 km of travel - the first replacement.
- After 1000 km of travel - the second replacement.
- After 1500 km of travel - the third oil change.
- After 2000 km of travel - the fourth replacement and, further according to the schedule, every 10-15 t.km.
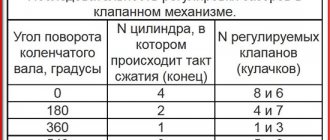
The video shows some types of internal combustion engine overhaul work.
What is the engine mileage before major overhaul?
The mileage life of an average car is considered to be about 200 thousand km, after which its characteristics decrease and it’s time to invest in some capital. There are cars with a lifespan of 1 million km (million-dollar engines are called), although now there are rumors that the lifespan of new expensive cars, which used to be million-dollar, now have a much shorter lifespan. The more often a car is repaired, the more financially profitable it is for auto manufacturers and auto parts stores, but this spoils the reputation of a brand or a specific car model.
In some cases, with severe wear of the internal combustion engine or severe breakdowns, it is more advisable to do an engine swap.
The manufacturer AvtoVAZ has set the average mileage for VAZ 2114 cars = 150 thousand km. On average, all Russian cars have the same indicators. But, if various problems are corrected in a timely manner, the engine life can easily withstand 250 thousand km. The service life of foreign car engines is, on average, 200,000 - 300,000 km before overhaul.
What is included in an engine overhaul?
Overhaul of diesel and gasoline engines is done in stages:
- Disassembling the internal combustion engine.
- Parts washing and cleaning.
- After cleaning, an experienced auto mechanic is able to determine how badly certain parts are worn and whether they can be repaired or better replaced. They do troubleshooting, that is, after the cylinder head (cylinder head) has been removed, it and the cylinder block (cylinder head) are checked for chips and cracks; examine the cylinders for scuffs and scratches; determine the gaps of mating parts; inspect the condition of the pistons for the presence of chips, shells, carbon deposits; inspect the crankshaft connecting rods; study of the internal combustion engine crankshaft; fingers; bearings; parts of the gas distribution mechanism are also checked (valves, rocker arms, etc.). They also compare the dimensions of important parts with the factory ones.
- After troubleshooting, it is necessary to assess the degree of wear of the entire engine: what to change, what to leave, what to repair.
Tips for repairing internal combustion engines
- If you have never had to completely disassemble an engine, then it would be more correct and better to invite a friend who understands it.
- It is advisable to carry out disassembly in a warm and well-lit garage.
- During disassembly, place all bolts, washers and nuts in a box with partitions, do not throw everything in one bucket.
- During disassembly, remember the sequence if you are doing this for the first time.
- If you don’t know what the spare parts are called, take the old parts to the store and show them to the seller.
Dismantling and disassembly
Depending on the make and model of the car (engine design, number of cylinders, type of gearbox), the engine removal process may vary. The engine location on front-wheel drive and rear-wheel drive is also different.
Carburetor engines are much easier and faster to disassemble, since they are not stuffed with electronic devices, in the presence of which, in order to get to the engine itself, you have to carefully dismantle them all.
So, if you have to capitalize Kamaz, for example, then its diesel engine from the Yaroslavl YaMZ-236 plant will take about 10 hours to dismantle. If you do the same work with heavy-duty Kamaz analogues, it will take more than 30 hours.
And to disassemble a VAZ engine, it takes about 3 hours. And the engines of foreign passenger cars will take about 10 hours.
It is necessary to disassemble slowly, throwing bolts and nuts anywhere. With disassembly, diagnostics, so to speak, have already begun.
How to remove the engine
To remove the engine from the engine compartment, you will need the following:
- Disconnect all plugs from the sensor connectors installed on the vehicle. You don't have to label them, since each connector has its own shape.
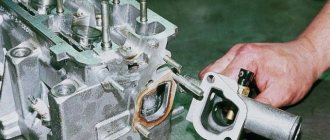
- Remove the radiator pipes, unscrew the fuel hose, and then loosen the engine mounts.
- Loosen the bolts securing the gearbox to the engine. If the engine is installed longitudinally, then it is advisable to loosen the gearbox mount in order to move the unit back.
- Unscrew the bolts securing the exhaust manifold to the exhaust pipe.
- When nothing is blocking the engine, use a chain with a tap or other device to remove it from the engine compartment.
Taking this opportunity, you need to wash everything under the hood, as well as process the connectors and wires.
Defects of elements during internal combustion engine capitalization
The defect in this case is mechanical, that is, it is necessary to check visually and with the help of measuring instruments the wear of parts.
Troubleshooting of internal combustion engines includes the following work:
- inspect the crankshaft and measure its dimensions, check for bends and alignment;
- inspect the cylinder block body (BC);
- check the parts of the connecting rod and crank mechanism for play and the condition itself: pistons, cylinders, rings, pins, connecting rods;
- inspect the cylinder head housing (cylinder head);
- gas distribution mechanism parts;
- determine the maintainability of parts and assemblies.
On this page of the site I will explain how to disassemble the engine and determine the repair method
Since the engine has been removed, without the head, we can say that half the work is already done, all that remains is to disassemble it, at home it is easier to disassemble it on an old tire, first we begin to remove the pan.
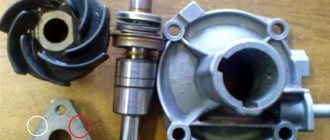
Photo. Engine with pan removed.
Pay attention to the photo, the 2nd and 3rd connecting rods are blue and dry, then remove the oil pump and start unscrewing the connecting rods, but be sure to immediately pull it out after unscrewing the connecting rod, put a cushion on it and attach it, the cushions cannot be changed, each connecting rod has its own cushion .
Photo. You can see the torn splines in the oil pump drive gear.
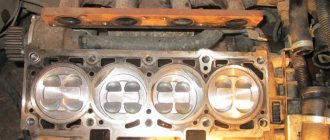
Once the connecting rod and piston are removed, you can immediately determine the wear of the piston engine (the piston with the connecting rod is pushed up the engine), looking at this piston, you can see that gases have broken through the rings, this is indicated by carbon deposits on the piston skirt. Also, when you run your finger along the cylinder, you feel a small step at top dead center, this indicates that there is wear in the cylinder.
Photo. Piston with connecting rod.
I measure the piston, it is 79mm. This means that this engine has never been bored, and there is room for two more borings. I decide to bore the block for the first repair, these are 79.4mm pistons.
Photo. Jammed liner.
I unscrewed the liner from the jammed connecting rod, and here I need to decide whether to replace the connecting rod with a new one or leave this one. Not everything is so simple here, of course, if you have extra money, you can immediately buy a new connecting rod and adjust it to the weight of other connecting rods. But I have been working on engines for a long time and have seen all sorts of breakdowns, the most important thing in the connecting rod is that the liner in the connecting rod bed does not turn and the piston pin sits very tightly, and the fact that it turns blue from heating is not scary. So the owner of this six was lucky, the liner in the connecting rod did not turn, so I leave these connecting rods, which of course affects the price of spare parts.
Photo. Intermediate shaft sprocket.
After removing the connecting rods, unscrew the intermediate shaft sprocket and remove the chain.
Then unscrew the clutch basket and the flywheel itself, to make it easier to unscrew the flywheel, put a piece of wood or a large key in the crankshaft so that the crankshaft does not turn when unscrewing the flywheel.
Next, untwist the crankshaft cushions, but be sure to remember which cushion is in which place; cushions cannot be swapped. Remove the crankshaft and unscrew the engine mounting ears; they will interfere with the block boring. Usually I don’t unscrew the pump; if everything is fine with it, then there is no point in removing it and wasting time.
What spare parts are needed for engine overhaul?
After completing the troubleshooting procedure and sifting out those that are suitable for restoration and those that are not, you need to order new parts to replace the unusable ones. When you already know what spare parts are needed, you don’t need to delay ordering and purchasing them, since new parts still need to be prepared for installation.
Spare parts for overhauls for gasoline engines:
- Liners (main and connecting rod).
- Piston group parts.
- Connecting rod pins.
- Connecting rod bushings.
- Valves (all, both intake and exhaust).
- Oil scraper rings.
- Gaskets (full set).
- Valve guides and seats.
- Pump with repair kit.
- Oil filter and pump.
- Other related details.
Grinding the block and crankshaft
After the issue with spare parts has been resolved, they begin to repair and restore the block and crankshaft of the internal combustion engine. Using a milling and surface grinding machine, the layer of the seat of the cylinder head and the block itself is removed until there are no shells or chips left. It happens that there are several deep shells, due to which you have to remove the layers in several passes. Usually, depending on the degree of damage, layers of 1 mm, 0.5 mm, 0.25 mm, 0.1 mm, 0.05 mm thick are cut off. After this, they begin to grind the surface to a mirror shine.
For crankshaft grinding, there is a special table that shows the thickness and efficiency values after repair compared to a new factory one.
| Type of repair | Thickness, mm | Efficiency compared to new |
| Repair No. 1 | 0,25 | 80-90% |
| Repair No. 2 | 0,50 | 70-75% |
| Repair No. 3 | 0,75 | 65-70% |
| Repair No. 4 | 1,00 | 50-55% |
| Repair No. 5 | 1,25 | 40-45% |
| Repair No. 6 | 1,50 | Less than 30% |
| Repair No. 7 | 2,00 | Not applicable since 1995 |
Where to begin?
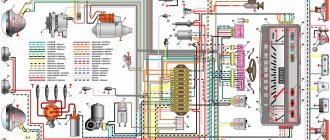
Of course, with information. We get a manual that tells you in detail and with diagrams how to repair your particular brand of car. We find a catalog on the Internet that contains spare parts for this car in order to immediately determine prices and, possibly, place an order in the online store.
Preparing tools:
- keys - ratchet, torque;
- mandrels for clutching pistons, caps;
- desiccant for valves;
- micrometer;
- heads;
- device for adjusting valves;
- two-legged or three-legged puller;
- stethoscope;
- tweezers;
- support post;
- hydraulic chain hoist;
- puller set.
Repair of the block head (cylinder head of the internal combustion engine)
Although it is not difficult to carry out repair work on the cylinder head, for some reason many people try to send it to a service center.
Repair of the block head consists of the following types of work:
- We replace the camshaft (all that is in this engine).
- We change the suction and exhaust valves.
- We change the guide bushings.
- We change valve stem seals and seats.
- If there are cracks in the cylinder head, then we either change the head and grind it again, or weld these cracks with argon.
What driver actions lead to a quick overhaul?
Late oil change
Accelerated engine wear can be caused by your delay in changing the oil and replacing the oil filter, which leads to increased friction forces of engine parts and mechanisms in poorer and more unfavorable conditions for them.
These forces arise due to the fact that there is a decrease in the main quality properties of the oil, such as viscosity, the formation of additives, and the growth of deposits on parts and channels. In addition, a large amount of waste wear products is generated in the engine lubrication system.
Poor quality oil
In addition, low-quality motor oil can accelerate engine wear. Low-quality oils, which do not have the full range of necessary properties and useful components in their composition, increase the ability to form various tar deposits.
All this can lead to strobing of the channels (like a blood clot in human blood vessels) for the passage of the oil mixture, and this leaves parts and mechanisms without lubrication - and as a result, the process of engine wear is accelerated, scuffing and jamming are formed.
Filter status
The third factor affecting engine wear is the poor condition of the fuel and air filters, as well as a loose connection in the intake system, which can lead to dust and dirt getting inside. engine, which accelerates the process of wear and tear, and primarily the engine cylinders of the internal combustion engine and the piston.
Adjustment and minor damage
Another factor that contributes to the acceleration of engine wear is the late elimination of various malfunctions in the engine and incorrect adjustment of its parts.
For example, if the camshaft “knocks,” then most likely it will be the main source of stable contamination of the lubrication system.
In addition, the destruction of engine pistons and combustion chamber surfaces can be caused by:
— incorrectly adjusted ignition timing; — some inaccuracies in the operation and malfunctions of the fuel injection system; — malfunctions in the engine control system; - incorrectly selected spark plugs for your car model.
All of the above can contribute to detonation in the ignition system, and as a result, failure of the piston and combustion chambers. Cylinder heads can be deformed by high engine heating as a result of breakdowns in its cooling system.
Rubbing engine parts can “break” faster if the oil film in the rubbing mechanisms and parts is not cooled enough and becomes less durable. If the car is diesel, then possible burnout of the pistons due to malfunctions in the fuel equipment.
Operating mode
In addition to all of the above, engine wear is also affected by the mode in which you operate your car. The service life of your car can be reduced by 30 percent or more if the engine operates constantly at the maximum possible loads and at high engine speeds (sharp gas and sharp brakes are the main enemies).
Driving moderation is a very important point in the longevity of a car engine.
Assembly and installation of internal combustion engines
Sequence of engine assembly after major overhaul:
- Install the half-shaft bearings and seat the crankshaft.
- Install connecting rods and piston group parts.
- Correctly install and tighten the yokes (arc-shaped crankshaft mounting).
- Install the gaskets correctly, check that the gasket does not cover the channel holes.
- Installation of covers covering the motor.
- Install the oil pump and water pump.
- Install the engine crankshaft pulley. We have already learned how to remove the crankshaft pulley.
- Install the cylinder head.
- Install the pan, crankcase.
- Collect small knots.
If you decide to make a capital with your own hands for the first time, after all the work before assembly, it is better to carry out the assembly with an experienced specialist in this matter. The lifespan of the entire car depends on the quality of the assembly.
Engine assembly, step-by-step instructions
Assembling the motor involves the following steps:
- You should start from the moment where you finished disassembling the engine. Before installing the crankshaft back, it is necessary to replace the old bearings and thoroughly treat the new ones with oil. Don't confuse them.
- Then you need to heat the connecting rods in oil and carefully insert new pins into the pistons. Next, we put on new rings - put on the oil scraper ring first, then the second compression ring, then the first compression ring. You should put the rings on as carefully as possible so as not to damage them. Be especially careful when putting on the second compression ring because it is made of cast iron.
- Now we install the finished pistons into the cylinder block. For this you need a mandrel. If you don't have one, you can make your own mandrel. To do this, take a tin strip to wrap it around the piston head and clamp the mandrel with pliers. After this, we adjust the optimal position of the connecting rod and slowly mount the piston in place.
- We return the crankcase cover to its place and install the engine in the vehicle. We tighten the cushions, install the flywheel and clutch, and mount the gearbox. We return the manifold, cylinder block cover, generator and carburetor to the car.
- We turn the crankshaft several times and, if the battery is fully charged, start the engine.
Run-in after capital
The most enjoyable process in such work is the necessary running-in for the engine with new parts. During break-in, new parts are ground in, so it is not recommended to immediately apply a large load. It is recommended to run-in for up to 2000 km without jerks or sudden starts.
There are several break-in methods:
- Running in cold on a stand.
- Cold running without a stand. This method is common, especially in the CIS countries. After preparing everything necessary (engine oil and coolant are filled in), without starting the engine, tow the car at speed 3 for 2 hours. This method is not recommended. By the way, a very important reminder: motor oil has a code and symbols for additives; before purchasing it, it is advisable to learn how to decipher the markings of motor oils, after which you can make the right choice yourself.
- Hot running. This method involves starting the engine and letting it idle for 3 minutes, then turning off the engine. And they do this several times, only waiting for the engine to cool down. Then, after short starts, start the engine and let it run for 1 hour. During break-in, the engine is inspected for leaks and other indicators. After running in, adjust the valve clearances and set the desired ignition. If contact ignition is installed, it is recommended to install electronic ignition instead of the old one. It reduces fuel consumption and generates high voltage up to 24 kilovolts, while contact ignition can supply no more than 18 kilovolts to the spark plug. Thanks to this, even dirty spark plugs produce a spark.
- Natural run-in. It is run in under the following conditions: smooth ride, speed no more than 60 km. After overhaul without installing new liners, running-in is carried out up to 2 thousand km. If new liners were installed, then 4 thousand km.
Many people recommend breaking in only when cold, but some experts recommend breaking in both cold and hot.
Abroad, they say, car service centers have run-in and test benches for internal combustion engines. Using special electronics, this stand shows the service life of a restored engine.
If you decide not to do the overhaul yourself, but to send it to a service center, you will receive a guarantee for the repaired motor. The guarantee is given depending on how you choose, some for 20 thousand km, others for 30 thousand km. mileage
When your engine is seriously ill
I once had to personally observe how an engine literally died. No, the car was moving, but it was doing it with great difficulty. At the same time, my friend claimed that everything was fine, this was the usual behavior of his car. But I somehow doubted that the engine on a relatively new Audi should work exactly like that.
My suspicions were confirmed a few days later, when a friend took the car to a service station, and the result of the check was an unpleasant verdict - major repairs or a landfill. By the way, my advice to you. Living in Samara, Moscow, St. Petersburg or any other city and being the owner of a car, make useful acquaintances with car service workers. This will allow you to receive services at a high level, and for the service station you will be a regular and therefore profitable client. It is better to spend more money on trusted specialists than to try to save money by doing repairs in dubious garages.
So that you, my dear friends, do not bring the car to its limit, I have prepared a list of the main symptoms indicating the approaching end of the life of your power unit.
If you notice the signs below, know that you urgently need to send your car to a good car service center and have the engine repaired:
- Soot appears on the spark plugs every now and then, although you regularly clean it or change the spark plugs;
- oil is consumed with activity close to fuel consumption;
- Blue or bluish smoke comes out of the exhaust pipe;
- The engine's appetite increases significantly; you have to stop by the gas station more often;
- low compression in cylinders;
- the car loses power at least 15%
- a lot of crankcase gases are formed;
- knocking noises are heard when the power unit is operating;
- the lubrication system experiences a shortage of pressure;
- the engine constantly overheats, the temperature sensors go off scale;
- the engine is unstable in different modes, etc.
We recommend: HBO for Suzuki Grand Vitara
Just keep in mind that the end of the engine’s life and the need for major repairs is indicated by a set of symptoms presented. If symptoms appear separately, this may indicate a malfunction of individual components or even ordinary consumables. So if you have blue smoke coming from your rear tires, don't panic.
Stages of overhaul
If you watch various videos about major repairs, and also study the instructions, then all the work can be divided into several stages.
- Disassembly and cleaning. Without disassembling and cleaning the engine, it is impossible to objectively say where there are problems, which components are out of order, what needs to be changed, and where repairs can be done. A full check of literally every element forms the final cost of capital. In addition to purchasing spare parts, you also have to pay for the services of the masters themselves. It is not uncommon for the amounts to be comparable.
- Making decisions. Here the master, together with you (if your presence is necessary), decides what to do with this or that node. It's not always rational to change everything. Sometimes simple repairs can return the unit to its previous good condition.
- Working with the cylinder block. One of the main stages. When capitalizing, it is bored, honed or sleeved. At the same time, a complete replacement or restoration of the crankshaft may be required.
- Reassembly, testing and starting at idle speed. You should not begin reassembly until you are sure that the work was done correctly. After all, then you will have to disassemble and redo everything again. The assembly must be approached very responsibly. When the engine is assembled, basic adjustments, adjustments and further running-in are carried out.
Post-capital run-in
Many people forget about such a concept as running-in, which must be carried out after completing a major engine overhaul.
If you follow all the rules and carry out the repairs professionally, then after restoration the engine can receive a resource no less than its original safety margin provided by the manufacturer.
In fact, the break-in is carried out according to the same rules that must be followed after purchasing a new car from the showroom:
- Before driving, you need to warm up the engine briefly;
- gradual acceleration is replaced by smooth braking;
- You can drive at low speeds;
- Driving in high gear is prohibited;
- It is strictly not recommended to brake with the engine;
- You cannot drive for a long time at the same speed and speed;
- trailers, towing and transportation of heavy loads is contraindicated.
And you should do this for the next 1 thousand kilometers. This is the minimum value. Although experts say that optimal performance after running-in is achieved after approximately 5-10 thousand kilometers. Increase the load on the engine gradually so that you do not have to contact the car service again. Already by 30 thousand kilometers the car can be operated in the manner familiar to you, hitch trailers, accelerate to high speeds, etc. But is it worth doing this?!
Don't forget to change lubricants. The first replacement is made approximately 1000 kilometers from the start of the run-in, and then after 5 thousand. Another mandatory replacement is carried out after approximately 6-8 thousand km. All subsequent activities are carried out at the usual intervals, as before the major overhaul.