Denis [den10031996]
31.05.2018,
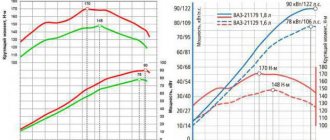
The appearance of the Lada Priora car in 2008 caused a sensation among fans of the domestic brand. First of all, the 21126 engine with a lightweight piston group, which was modified by German engineers, attracted attention. The engine life is often greater than what the manufacturer indicates (200,000 km, in fact more). In the article I will talk about how to correctly select and repair an engine in order to get a little more power and a longer service life.
A small digression. Due to the high cost of high-quality parts, many will consider my overhaul option impractical, but in my case, the engine life, in the worst case, will be at least 350,000 km. Some parts will be tuning.
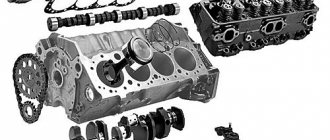
List of spare parts and prices: cylinder block
- Pistons. STI company. Piston material is forging. The pistons have grooves for the valves so that if the valve belt breaks, the piston cannot be removed. The point of a forged piston is that it maintains strength while being lightweight and is also resistant to detonation. The compression ratio increases, instead of 11 it will be 11.8. The piston surface is coated with Molycote anti-friction coating.
- We buy standard connecting rods, they are durable and light.
- Mahle piston rings. Many car enthusiasts know about the reliability of this company, so the rings do not need any special introduction.
- We leave the flywheel standard; if desired, you can remove 1 kg from the surface.
- Crankshaft oil seals are from the domestic company BRT, which has been showing its best performance for a long time.
- We also purchase domestic inserts.
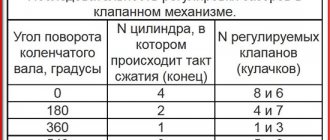
Camshaft marks
The VAZ 21126 engine uses two switchgears. One of them is needed for optimal operation of the intake valves, and the second is installed in order to regulate the movement of the exhaust valves.
Each camshaft has its own pulley, which is not recommended to be replaced with another. This pulley allows the camshaft mechanism to operate correctly. A phase sensor is installed on the right side of the pulley.
The marks are located on the pulleys. They are located on the crown of the ledge at the bottom. Experienced mechanics call them movable because they move with the rotation of the camshaft.
Attention! Beginning car owners should remember that the marks have different sizes. It all depends on the manufacturer who made the pulley.
To see the marks, experienced mechanics advise wiping the pulley with a clean rag to get rid of dirt and dust. Then you will notice a small notch in the metal.
But the crankshaft marks will help all parts of the 126 engine from the Lada vehicle work equally. At the output of the crankshaft there is a gear. And this gear is connected to the device by means of a key. This is where the mark for correct installation of parts is located. Because if the position is incorrect, the key simply will not fit as expected.
The notch is made in the form of a slot or a conical hole. It is found on the outside of the engine pulley.
Additional guidelines are also applied to the outer engine housing so as not to make mistakes when setting marks. To do this, install another mark on the rear side of the timing belt housing. It is needed for the correct alignment of the camshaft pulleys.
Another notch is located on the engine oil pump. It is needed for the correct orientation of the crankshaft. And it will be difficult to find the last mark. It is located on the flywheel.
There is a small cutout in the flywheel housing. According to the standard, it is covered with a rubber plug. It is pulled out and inserted with pliers.
Cylinder head
- The camshafts are new from the factory.
- Aluminum timing gears with adjustment.
- AMP valves are nitrided. They are resistant to high temperatures.
- Bronze valve guides and valve seats. Bronze has the ability to dissipate heat.
- Valve seals Victor reinz.
- Standard valve springs.
- The empty cylinder head is ground to a smooth surface and protrusions in the bores are removed to obtain a smooth surface.
- I recommend purchasing cylinder head bolts from a Fiat car from Payen. They are able to maintain high compression throughout their entire service life.
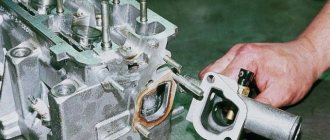
Cylinder head repair
We mark all hydraulic compensators with numbers using an ordinary clerical touch and put them away. An ordinary magnet will help you pull them out. We dry out the valves and remove the oil seals (valve seals), the valves into scrap metal, the oil seals into the trash. We clean all channels. We take the head for grinding, just in case. After washing it again with kerosene after sanding and blowing it with air, we begin to assemble it.
We arrange the freshly purchased valves in the sequence in which they will stand in the cylinder head and begin to grind in one by one. Lubricate the valve stem with clean oil and apply lapping paste to the edge.
We insert the valve into place and put a valve grinding tool on the valve stem. The stores sell a device for manual lapping, but since this is the twenty-first century, we are mechanizing the process. We take the old valve and cut off the rod from it, select a rubber tube for it of such a diameter that it fits tightly. The rod is in a reversible drill, one end of the tube is on it, the other is on the valve being ground in. At low speeds we begin to grind the valve, constantly change the direction of rotation and periodically press it to the seat or weaken the force. On average, the valve takes about twenty seconds. We take it out and wipe it. The valve is considered ground in if a uniform gray strip of at least 1.5 mm wide appears on the chamfer.
The same stripe should appear on the valve seat.
Video of manually grinding valves
For a sixteen valve head, everything is the same, only there are twice as many valves.
After lapping, all valves and seats are thoroughly wiped and washed with kerosene to remove any remaining lapping paste. We check for leaks. We tighten the old spark plugs and put all the valves in place. Pour kerosene and wait three minutes, if the kerosene does not run away all is well, otherwise we grind the valves on this cylinder.
We had to grind four valves again, after which the kerosene stopped flowing.
We stuff new valve seals.
We put the valves in place and dry them. Before doing this, lubricate the valve stems with clean oil. After lubricating it with clean oil, we put the hydraulic compensators in place and, covering them with a clean cloth, remove the head out of sight. We're done with the cylinder head.
Attachments
- We purchase the intake manifold from PRO.CAR. Such a receiver allows you to level out the torque plateau so that the thrust that appears at the bottom does not drop sharply to 6000 rpm.
- We leave the throttle valve at the factory.
- Injectors from ZMZ 406 have a higher throughput and are also less prone to clogging.
- Luzar water pump “Turbo” version.
- The remaining elements of the cooling system are installed at the factory.
- The oil pump can be left standard, just install new gears or increased performance gears from PRO.CAR. Be sure to purchase a new oil pickup.
- Reinforced timing belt kit from Gates.
- Insert type exhaust manifold instead of catalytic converter.
- New spark plugs and ignition coils.
- Gasket set.
- Reinforced engine mounts.
Before installing the parts, you need to give the cylinder head for grinding and installation of new parts. After which assembly of the bottom is required.
When is it time to change?
When operating the car, you should constantly ensure that the cylinder head is sealed against the block itself so that there are no leaks of working fluids. Like all car components, the cylinder head requires regular maintenance. Parts that are under constant load require more attention. These include components of the gas distribution mechanism: valve seals, valves, camshaft seals, gasket. The service life of its components and assemblies depends on the quality of car maintenance.
Cylinder head repair
Replacement of consumables should be carried out according to the recommendations specified in the Lada Priora service manual. Oil seals and gaskets should be replaced as they wear out or if they are externally damaged. There are a number of operations that require dismantling the cylinder head: modification and grinding of seats, replacement of valves, crimping of valve seats and bushings, and others.
The cylinder head on a Lada Priora 16 cylinders must be replaced if chips, cracks, and signs of corrosion are detected during its visual inspection. During repairs, the following work can be performed:
- change gaskets;
- camshafts are being replaced;
- change hydraulic compensators if they are faulty;
- change bent valves if the timing belt breaks.
Motor assembly
For high-quality assembly, you need a table of tightening of engine bolts and nuts, and use a torque wrench to tighten all engine bolts. Each bolt must be lubricated with copper paste, and before installing the liners, lubricate the crankshaft journals well.
When installing new pistons, the cylinders also need to be lubricated with oil. After installing the pistons, you need to turn the crankshaft several times. If the shaft rotates without hesitation, then the assembly of the bottom was successful. Be sure to lubricate all rubbing parts with oil to ensure an oil film when starting the engine. In places where sealant needs to be applied, this should be done using Victor Reinz sealant, then leaks from under the valve cover will disappear.
Required Tools
Repair work requires a set of certain tools - this can simplify and speed up the process.
To repair the engine and valves, you need the following tools:
- Set of keys.
- Screwdrivers.
- Valve spring extractor.
- Pullers for valve stem seals.
- Tweezers.
- New valves.
- Cylinder head gaskets.
An important point: valves can only be purchased as a set. There is no point in removing and installing only one valve, because soon the other valves will also break.
About filters and oils
I immediately recommend pouring oil no lower than Motul 5W40, which will provide all rubbing surfaces of the engine with an oil film. Oil and air filter from Bosch.
What is the approximate cost of the above spare parts?
- The bottom of the motor will cost 24,000 rubles.
- Cylinder head 16500 rub.
- Mounted 20,000 rub.
- Oil and filter 5000 rub.
In total, excluding work, spare parts cost 65,500 rubles, or $1,100. Such repairs for a domestic car are too high, since the assembled unit 21126 will cost 75,000 rubles, but in our case you will have an engine with a higher compression ratio, higher compression, good pick-up from below, reduced fuel consumption, power of approximately 120 hp and a resource of 350,000 km minimum. If the belt breaks, the valves will no longer meet the valves; it will be enough to set the marks and install a new belt. Since there will be a long intake manifold and an exhaust manifold without a catalyst, the engine will “breathe” more freely, which means fuel consumption will decrease and power will increase.
An important factor is proper running-in and timely maintenance, which will contribute to the stable operation of the engine throughout its entire service life. I strongly recommend the following activities:
- every 7-8 thousand km. change oil and all filters;
- With each oil change, remove the oil receiver and clean it;
- clean the throttle valve every 20,000 km;
- pour G11 antifreeze into the cooling system and change it every 3 years;
- pour gasoline with octane number A-95;
- change the timing belt every 50,000 km.
If you want to increase engine power by installing wide-phase camshafts, a direct-flow exhaust system, a throttle valve with a diameter of 52-56 mm, boring the cylinder head channels, and get 150 hp at the output, then the engine life will be reduced to the factory mark of 200,000 km. For stable operation of the engine, you should not install “shafts” with a very wide phase, otherwise the engine will operate unstably and “spit” gasoline into the exhaust pipe.
Results
Whether it is worth investing in repairing the engine of a domestic car - everyone chooses for themselves. It is known that the service life and stable operation of an engine require serious investments.
Today we brought one of the old clients to the Priora, as it turned out, the jammed pump broke the belt and, as a result, the valves were bent.
But progress at AvtoVAZ does not stand still, and if on the engines of the tenth family the valves were simply bent, then on the Priora 126s the connecting rods also lose alignment and, if they are not changed, there is a high probability that the engine will begin to eat oil and, accordingly, your money. Glory to the designers of AvtoVAZ!
But every cloud has a silver lining, there are sets of pistons for 126 engines with grooves that do not bend the valves. In this article we will describe the procedure for repairing the cylinder head after a broken timing belt, as well as replacing the piston. Removing and installing the timing belt is described in this article, so we will not dwell on it in detail.
To perform this procedure, torque wrenches are required!
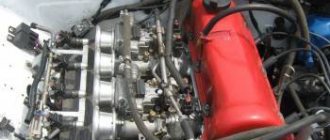
How to remove the receiver on a Priora
Tools that may come in handy: - 10mm socket; - key 13; - screwdriver.
To remove the intake manifold you will need:
- Due to the fact that in the next steps of the instructions there will be manipulations with electrical wiring, it is necessary to remove the negative terminal of the battery.
- The next step is to remove the plastic screen (cover) from the engine housing. This is done so that it does not interfere with your work.
- After which, it is necessary to remove power from the four ignition coils and dismantle them. To do this, pull out the contact chips. Take a 10mm socket (or a wrench of the same size) and unscrew one fastening bolt on each coil. Simply pull the coils upwards using the necessary force. Now they can be removed. There is no need to remove the spark plugs themselves; they will not interfere with removal. On the other hand, it is advisable to take advantage of the situation and check their condition (gap and spark quality).
- Our next task is to dismantle the throttle assembly. The receiver cannot be removed without removing it. To remove the throttle and avoid excess antifreeze leaking out of the cooling system pipes, you need to prepare first (unscrew the cap of the expansion tank with coolant). To remove the throttle, it is necessary to disconnect all the pipes connected to it, including those responsible for the air supply (corrugation) and cooling. In order to remove the assembly itself, you need to unscrew the two fastening nuts with a wrench or a 13mm socket. Now the assembly together with the sealing strip can be removed, and at the same time inspected and, if necessary, cleaned.
- At this point, locate and remove the crankcase ventilation hose. To do this, loosen the tightened clamp using a flat-head screwdriver and pull it towards you.
- The next step is to dismantle the dipstick structure to check the oil level. It is attached to one screw, which must be unscrewed.
- Now the most important thing is to remove the Priora 16 valve receiver. Doing this is not as difficult as it seems. First of all, we need to unscrew the nuts from the three connecting bolts at the junction of the block and the manifold. It is most convenient to work from a repair pit or using a lift, having previously dismantled the underbody protection of the car. After that, you just have to unscrew two additional nuts.
- It's time to move into the engine compartment and unscrew the two special mounting bolts that are located on the right and left of the receiver housing.
- After which the receiver can be carefully removed.
- Depending on the type and configuration of components in your engine, you may need to unscrew, rotate or remove any component that prevents the receiver from being removed (for example, power steering or a generator).