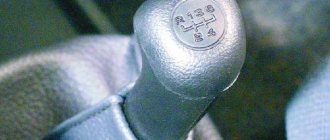
Even taking into account the fact that recently the demand for cars with automatic transmission has increased significantly, cars equipped with a manual transmission are still in demand.
A manual transmission is a device in which the driver selects gears manually (mechanically). In addition, this box belongs to a stepped gearbox, since the torque in it varies in steps.
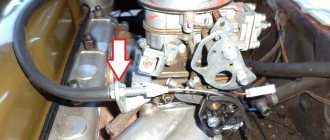
There are several types of manual transmissions, which differ from each other in the design of the device and the method of implementing control. Note that modern transmissions on budget cars are cable (cable manual transmission). In this article we will look at what a manual transmission cable is, as well as how to change the manual transmission cable if certain malfunctions occur.
Preparatory stage
Before you begin routine bicycle repairs, you need to stock up on certain tools. They will come in handy in any case and will last a long time. Basic tools for bicycle maintenance:
- hex keys of different sizes - it is advisable to purchase them immediately in a set;
- wrenches of different sizes - it is advisable to buy a set;
- screwdrivers – you will need both Phillips and slotted ones;
- pliers of different sizes;
- tweezers;
- mallet;
- end attachments;
- scissors;
- clamps.
These tools and devices should always be available, because they may be needed at any time. In addition to the above, it is worth purchasing:
- bicycle chain cleaning brush;
- sleeve wrench;
- bicycle chain squeezer;
- ratchet wrench;
- spoke key.
Necessary tools for repairing and servicing bicycles also include consumables - they should not only always be available, but also in sufficient quantity. Consumables in this case include:
brake fluid; oil for various parts; Please note: you need to have oil available for every part - fork, chain, pedals, and so on.
solvents; cleaners; hydraulic oil.
All these consumables will help not only to properly repair your bicycle, but also to maintain your vehicle in almost perfect condition.
Particular attention should be paid to lubricants - the choice of them on the market is simply huge, you can trust sellers, but with caution. To avoid mistakes, you should remember the following recommendations from experts:
- Any liquid lubricant (I5A oil, for example) is only suitable for processing the rear hub drum and chain. This lubricant has an individual feature - it is excellent for spot use. But there is one critical point - if you plan to ride a bicycle in the cold season, then liquid lubricant cannot be used, since at subzero temperatures it quickly hardens and makes it difficult for the mechanisms to work.
- If there is no time to carry out full repair work, but you urgently need to lubricate the chain and cables, then you can use aerosol lubricants. They instantly restore the operation of all hinge joints and are easy to use - even a child can handle the job.
- For processing threads and bearing units, the best option is to use a thick lubricant.
First adjustment steps
To begin adjusting the handbrake, you need to make sure that one of three elements is present and accessible: a lift, an inspection hole or an overpass.
An overpass is a type of engineering structure that is intended to lay a road or communications above the ground.
Homemade overpass for adjusting the handbrake on a VAZ 2110
At home, most often only the inspection hole is accessible. If you cannot take advantage of any of the above conditions, then you can make do with a kind of support trestles, which are a rigid structure installed under the rear part of the body after it has been lifted with a jack. In addition, you need to prepare two wrenches size “13”, as well as pliers.
- lower the parking brake lever to its lowest position;
Carrying out the replacement in stages
The process of replacing the cable is very similar to replacing the switch itself.
Attention! Due to different designs, it will not be possible to use the same method. The replacement steps themselves will consist of 12 steps:
The replacement steps themselves will consist of 12 steps:
The rear derailleur should be located at the smallest sprocket. Using wire cutters you will need to bite off the end of the cable and loosen the screw used for clamping. But before you perform this action, you need to remember the initial position of the clamped cable
There are only two options: above the screw or below the screw, this is very important for correct gear shifting. Most likely you need a 5 mm hexagon, use it to loosen the shifter fasteners, and then remove it and put it aside. Now access to the protected element is completely open. To remove the cover, you will need to turn it counterclockwise, so the lock will unscrew and go to the shifter. Thanks to the removed cover, the end of the cable located under the spring becomes visible
Carefully study its location there so that you can easily pull it out and re-secure it in the future. Using the tension regulator, pull out the entire cable. Gently slide the spring to the side to gain access to the end of the cable so you can release it. Remember this sliding motion because this is also what the spring will need to move when installing the cable. We replace all the freed space with a new cable. It does not have to be identical to the one that stood before. For precise installation, use a handy tool, such as a screwdriver or perhaps an awl, to guide the end of the cable. After the last steps, carefully review the position, it should stand correctly and not stick out. Now install the shifter cover. This time the lock needs to be turned clockwise until it is fully tightened to prevent breakage. We install the shifter in the place it previously occupied. The cable is stretched until its beginning appears on the other side. This is where it becomes clear whether the cable is suitable. If it does not fit through the braid, then most likely you will have to replace it. If the cable has passed further and you notice its beginning, then we check the location of the switch again. It should be exactly opposite the small star. We apply the cable, remember where it was attached, from above or below, and we can tighten the retaining screw. As promised, this is the last step. To eliminate possible problems, cut off the remaining cable using wire cutters; leaving a couple of centimeters will be enough.
After all these steps have been completed, the cable can be considered replaced. To make sure that no problems will arise on your next bike ride, you should check it. The check should be carried out on the switch and shifter. Testing must be carried out on a bench. But of course, there is no such opportunity and I don’t want to go anywhere for it. Therefore, carry out the most rigorous check yourself. After all, your health is more valuable.
Testing on a stand, and even more so testing on your own, can be very different from actually riding a bicycle. Take this into account.
Types of construction
Replacing the parking brake cable does not require major intervention in the rear drum or disc brakes. You don't even need to remove the rear brake pads to replace them. The nature of the work primarily depends on whether your car has rear disc or drum brakes, so we will consider the replacement process on both design options.
On most cars, the new handbrake cable is attached to an adjustment mechanism in the passenger compartment, while in some designs the replacement is made entirely from under the bottom of the car.
Reasons for replacement
- Break. Most often, the cause of a break is poor fasteners, as a result of which the cable hangs from under the bottom and can be torn out. A less common reason is fixation in brackets without a protective sleeve. In the latter case, vibration and the movement of the cable when the handbrake is raised lead to rubbing of the insulation and the cable itself on the metal bracket. If the cause of the break is not eliminated, the new parking brake cable will soon suffer the same fate.
- Souring. Moisture and dirt can get inside the rubber ring. If in this case you rarely or not use the handbrake at all, corrosion will block the cable inside the insulation (sometimes this happens with only one circuit).
- The handbrake doesn't hold, but the adjustment range is no longer enough to restore the system's functionality. This happens if you frequently apply the handbrake while driving or leave the car for a long time with the handbrake activated, even if the car is not parked on a slope.
The cable rarely stretches, so if you decide to replace it due to poor operation of the handbrake, first of all we recommend that you familiarize yourself with the process of adjusting the parking brake.
How to deal with stuck-on elements
Unscrewing stuck nuts and removing soured drums is the main problem when replacing the parking brake cable yourself. How can you reduce the number of broken bolts and twisted threaded connections?
- Thoroughly clean bolts, nuts, studs with a wire brush to remove corrosion and dirt.
- Before unscrewing, apply several blows to the bolt head and nut. If access to the element allows, blows should be applied perpendicular to the axis of twist. Under no circumstances should you hit exposed threads!
- After tapping, fill the fasteners with penetrating lubricant. If you don't have liquid wrenches like WD-40 on hand, you can use brake fluid. By tapping the bolts and nuts and creating microcracks in the areas where they stick, you loosen the joint and open up access for the lubricant to penetrate inside. Penetrating lubricants need at least 20-30 minutes to work, but if you are not in a hurry to replace, then it is better to leave the wetted parts for 40-60 minutes before attempting to unscrew.
- Unscrew the bolts in several stages. Even if the bolt gives in, alternate unscrewing with tightening and using liquid wrenches.
How to Replace the Drive Cable on Shifters and Brakes
A bicycle derailleur is a capricious thing and requires periodic adjustments, in particular, adjustment of the cable tension. The brake system drive also becomes unstable from time to time. This will be indicated by weak pad movement, poor performance and reduced braking efficiency. Despite this, the procedure for adjusting and installing a new cable is simple and accessible when repairing a bike.
Best articles: Cycling computer
Caring for brake and transmission cables for bicycles and jackets:
Trim frayed ends only with special tools: semicircular scissors, chisel or hacksaw. Once a season it is necessary to lubricate the cables with a thick compound. The caps should tightly close them from the external environment.
Damaged or excess pieces of shirts are trimmed using a grinder or a grindstone. After trimming, it is advisable to straighten the coils from the inside so that the cable does not rub against them.
The cable must be replaced with a new one in the following cases:
- movement inside the braid is difficult;
- there are gaps;
- the threads stick out in different directions or are bent;
- rust on the shirt or cable;
- broken or damaged shirt.
If suddenly there is a need to change the cables to the switches, it’s okay. This is done in literally five minutes. Progress:
- Release the old cable from the gear shifter.
- Pull the shirt out of the mounting sockets on the frame.
- Inspect the shell for damage. If there are no serious defects, it can be left.
- Remove the metal cable from the jacket.
- Insert a new cable into the shirt (or buy them as a set, which is recommended), secure them in the sockets and connect to the switch and shifter.
- Be sure to set the switch to work.
So, the transmission is tuned, now it's time to update the brake cables. First, unhook them from the lever and brake. We inspect the shirt for damage. Typically both the drive and the braid wear out at the same time, but sometimes you can get lucky. If there are noticeable damages and fractures, the shirt is in no way suitable for use. If you insert a new cable into it, it will be of no use: the faults will not hold the tension.
Remove the old cable: loosen the adjusting and fastening screws in sequence. If the shirt is suitable for further use, remove it from the braid. Brake cables are slightly different from the type of handlebar. Therefore, before you buy it, you should look at whether the handlebars on your bike are straight or curved.
If the cable was purchased separately from the sheath, lubricate it a little. The kit does not require lubrication at the replacement stage - everything is fine inside
Installing a new cable on the bicycle frame and connecting to the brake and handle
- Place metal caps on the ends of the shirt.
- Insert into mounting sockets.
- Place the boots on the ends and tighten the mounting screws.
- Temporarily tighten the adjusting bolts.
- Set the optimal tension: the brake should respond instantly to pressing the handle.
That's how easy it is to install a new drive cable on the brake system.
The installation procedure for these components is not only inexpensive, but will also avoid more serious problems with the gear shift mechanisms and braking system. Now that all the cables have been replaced and adjusted, you can safely roll out your bike towards new achievements.
Replacing the handbrake cable:
1. Release the vehicle's parking brake by releasing the handbrake control lever all the way down.
2. Remove the brake drum of the corresponding wheel.
4. Under the car body, it is necessary to unscrew the lock nut and the parking brake adjusting nut and remove the equalizer from the rod.
5. You need to remove the hummock tip from the control.
6. Remove the end of the cable sheath from the bracket on the body.
7. The brackets on which the cable is attached should be bent.
8. Having previously removed the rear brake pad, the cable tip should be disconnected from the lever.
9. On the rear axle beam, loosen the cable holder fastening nuts and remove the cable from it.
10. You need to remove the handbrake cable from the grooves of the bracket.
11. Next, pull the cable out of the brake shield.
12. Installation of the cable is carried out in the reverse order, it should be taken into account that the cables in the bracket are installed crosswise. After completing the cable installation operations, the handbrake must be adjusted.
Handbrake equalizer VAZ 2110
First unscrew the locknut from the outer end of the cable, then the main nut. After removing them, the equalizer is removed.
Nut and locknut of the brake cable VAZ 2110
Now you should remove the car's brake pads. This must be done in order to disconnect the second end of the cable from the lever.
Dismantling the brake pads of the VAZ 2110 and disconnecting the second cable tip
- Once both ends are free, the cable can be removed from behind the brake guard.
- After you have changed the cable, all the above steps are performed in reverse order.
Replacing the cable in a bicycle derailleur
Since replacing a cable is a repair process, the person doing it will need a certain tool kit:
- a set of hex keys (and it must contain a 5 mm key);
- and wire cutters.
Moreover, the procedure for replacing the rear derailleur cable is almost identical to the process of changing the front derailleur. Only the latter will need to be set to easy gear before loosening the cable clamp screw
Well, the designs of these two switches are somewhat different - you also need to pay attention to this. It’s also worth remembering how the cables were routed before replacement.
Also, after the cable replacement procedure, you should definitely adjust the rear (or front) derailleur.
Actually, the replacement is carried out in stages, sequentially, step by step:
- The rear derailleur is set to a position strictly opposite the smallest bicycle sprocket. The end of the cable must be cut and the clamping screw loosened. And first you need to remember in which part of the screw (top or bottom) the clamped end of the cable was located. Since this circumstance can have a significant impact on the correctness of gear shifting.
- Using a five-millimeter hexagon wrench, you need to loosen the shifter fasteners and then remove it. This will give access to the protection cover.
- The cover latch must be turned counterclockwise to remove.
- And the removed cover provides the repairman with the opportunity to see the tip of the cable under the large spring. And you need to take a good look at how it is installed there in order to understand how best to remove it.
- The cable must be pulled out completely, assisting the process through the tension regulator channel.
- To help the cable head release, you need to carefully move the spring away. And in exactly the same way it will need to be removed when installing a new cable.
- A new cable must be installed in the vacant space. And you need to stretch it tightly to the location of the old cable. For convenience, you can guide the cable with the end of a thin screwdriver or even an awl. And at the end it is better to make sure that the cable is installed exactly as it should be.
- Now you will need to put the shifter cover in its original position. And secure it with the previously removed lock, this time turning it clockwise.
- The shifter is installed in its place immediately before pulling the cable through the braid.
- The cable is pushed into the braid until its end appears in the area of the rear derailleur. And there is one significant nuance. If the cable “doesn’t want” to fit into the braiding, it always gets stuck and clings to something, it (the cable) will probably have to be changed.
- At the very end, you need to make sure that the rear derailleur is directly opposite the smallest of the bicycle chainrings. Attach the cable and secure it to the screw.
- Cut off the excess cable with wire cutters, leaving only 3 centimeters, and crimp its tip.
After the procedure for replacing the gear shift cable on a bicycle, it is necessary to thoroughly test the functionality of the shifter. And the switch too. This must be done before the bike begins to be used to its full potential. It must be tested on a special stand. And if this is not done, then the brakes may fail at the most inopportune moment.
Just keep in mind that the bench test and the conditions of the real road can vary greatly.
What to do if it is not possible to change the clutch cable on site
If one day it happens that the clutch pedal is “lost,” it means that with a high probability we can say that the cable has broken and needs to be replaced. It is important in this difficult situation not to give in to panic, which will not lead to anything good.
First, calmly turn off the car engine. Turn on the emergency signal. If, after looking under the hood, you are convinced that your fears about damage to the part are not in vain, do the following:
- Sit behind the wheel and engage first gear. It is quite possible to do this even with the engine turned off and the clutch pedal not working.
- Look in the rearview mirror to make sure you are driving safely. Start the engine. The car should jerk forward, making several jerks. You must immediately press the gas pedal to start moving.
There is a chance that you will only be able to drive in first gear. However, if you have some minimal skills, you can change gears even if the clutch is faulty. In this case, you just need to try to catch the right moment. For everything to work out, accelerate to the required speed, take your foot off the gas pedal, and place the shift lever in second gear. To stop, use neutral speed.
In case of a complete stop, you must adhere to some rules. The most important thing is that you should never brake when going uphill, because it will be very difficult to get going, almost impossible. In this situation, the battery will not withstand the attempts.
It is more correct to stop on a flat section of the road or downhill. Of course, the best option is to call a tow truck. Then the vehicle will be delivered without any problems to the desired location, where the part will be replaced, and the gearbox will not be damaged.
What are the conclusions from all of the above?
- If the clutch cable breaks, this is not a death sentence. With such a defect it is quite possible to move on. But the driver does not always have time to catch the moment and engage the desired gear in time, which can cause slight damage to the gearbox itself.
- It’s good if you can get to the parking lot on your own, without outside help. Otherwise, you should stop on the side of the road and think about your further actions.
- Under no circumstances should you stop before going up, as it will be almost impossible to start.
- Immediately after starting the engine, press the gas pedal.
These recommendations can be relied upon in other situations. For example, if the release bearing is damaged and the clutch breaks.
Transmission repair stages
The repair includes adjusting the front and rear derailleurs, as well as checking the condition of the cables, chain, cassette and rollers.
Best articles: Do you need documents for a bicycle?
If you see that the cable has broken or is about to break, you should replace it. To do this, buy a suitable cable from a sports store, and then do the following:
- Unscrew the bolt holding the cable.
- Disassemble the shifter and remove the cable from it and from the shirts. It is also recommended to replace shirts!
- Clean the shirts and pour a drop of oil into them for better cable glide.
- Thread the new cable through the shifter and then through all the shirts.
- Proceed to configure the switch.
- Bite off the excess part of the cable and secure its end with a special tip.
Over time, the chain becomes unusable. It is recommended to have several chains in stock and change them every 100 kilometers, because the cassette deteriorates due to chain wear. Multiple chains will wear out more slowly and the cassette will last longer. You can determine the condition of the circuit using a special tool. It is impossible to repair the chain; you just need to replace it if necessary.
If the chain is in good condition, simply remove it, clean and lubricate it. Remove excess with a napkin or dry cloth.
Important points
Video: how to change the handbrake cable mechanism on a ten
What cables and shirts are used on modern bicycles
Bicycle cables are made from a large number of thin steel wires. Evenly intertwined with each other, they form a wear-resistant and durable metal fiber.
Over time, the strength of each thread decreases unevenly, resulting in “weak areas” where they can break, as well as come out and bend. To improve resistance to mechanical stress (and extend service life), a layer of polymer is applied. An advanced and durable option is the use of stainless steel.
During active use, the cable not only experiences mechanical stress. In addition, dirt or dust may get inside the braid. To protect the metal, special lubricants are used. The most durable and durable Teflon is widely used.
The shirt is also available in several versions. There are three types of cable braids:
- twisted,
- SIS braid,
- upgraded SIS-SP.
Twisted braid is a metal wire twisted into a spring. The metal is covered with a layer of plastic on top. The inner surface of the metal springs is lubricated to reduce friction between the cable and the braid. The price of cables with this braid is the lowest in the series, however, it has become a thing of the past, and it is increasingly difficult to find it on sale.
SIS is essentially the same spiral braid. Its difference from a twisted shirt is that instead of a thin wire, sheets of metal are twisted into a spring. Instead of conventional lubricant, “long-lasting” and cleaner Teflon is applied inside. Currently, it is this type of braiding that has begun to be used on gear shift and brake cables.
SIS-SP is a parallel braid whose threads are held back by a polymer layer. Unlike a spring shirt, this shirt does not change length, while balancing the tension of the cable itself. Thanks to this, both the brakes and the shifters work more accurately. The internal cavity of SIS-SP jackets is lubricated with silicone grease.
It is much easier to tighten the cable on a compressible jacket than on a parallel-woven one.
Guide to replacing the transmission shift cable
- Remove the battery tray. See Battery Tray Replacement
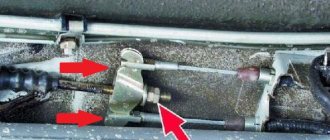
- Remove the selector lever and shift lever cable (2) from the transmission control module housing (3).
- Remove the range selector cable from the bracket (1) by pushing the clamp rings back.
- Volkswagen Passat Variant Red line Logbook Electric trunk drive
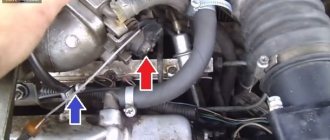
- Move the floor mat to gain access to the gear shift lever and selector lever cable end (1).
- Remove the nuts of the insulating sleeve (2) of the gear selector lever cable.
- Remove the gear shift lever and its cable from the transverse partition inside the body.
- Unlock the clamps (2) for adjusting the shift lever cable and the gear selector lever.
- Snap the cable clamps (1) of the gear selector lever, disconnecting it from the gearshift lever housing.
- Remove the gear shift lever and shift cable assembly from the vehicle.
- Install the gear shift lever and shift cable assembly into the vehicle.
Note:
Don't delay yet.
Using a sliding motion, install the selector and shift lever cables onto the selector lever and the adjustment locks (2) of the shift lever cables.
Using a pushing motion, install the cable holders (1) of the gear selector lever onto the gearbox shift lever housing.
Install the gearshift lever and gearshift cable inside the vehicle.
Note:
Install the guide with the white mark facing up onto the crossbar. Do not intertwine the cables.
Move the floor mat to gain access to the gear shift lever and selector lever cable end (1).
Install the cable hub and shift lever nuts to 10 Nm (89 lb-in).
Install the gear shift lever and its cable (3) onto the transverse partition inside the body.
Check for correct installation.
Install the selector and shift lever cables onto the selector lever (2) and the shift lever cable bracket (1).
Install the selector lever and shift lever cable to the transmission control module housing (3).
When to remove cables
The Lada Granta has a cable gear change mechanism that is more capricious than the rocker “brother”. During operation, carefully monitor the condition of the unit. Be sure to adhere to the “culture” of gear shifting. Jerks are detrimental to synchronizers and gears. The cables will also get it.
For some, removing the Grants gearbox cables will seem like an easy procedure, for others it will seem like a labor-intensive process, a la removing the gearbox on a Lada Granta. Such work is often carried out at a technical service station (STS). The cables are replaced in pairs.
Indications for a trip to a service station to diagnose the drive: play when shifting gears or their unclear engagement, extraneous noise in the gearbox or difficulty changing speeds, “sticking” of the gearshift lever.
Take the traffic rules knowledge test for a cyclist!
Time limit:
out of 15 tasks completed
Questions:
- 1
- 2
- 3
- 4
- 5
- 6
- 7
- 8
- 9
- 10
- 11
- 12
- 13
- 14
- 15
Information
To be able to obtain rights, please click Next
You have already taken the test before. You can't start it again.
The test is loading...
You must log in or register in order to begin the test.
You must complete the following tests to start this one:
results
Correct answers: out of 15
Your time:
Time is over
You have scored
a maximum of 15 points
| Place | Name | Recorded | Points | Result |
| Table is loading | ||||
| No data |
Your result has been recorded on the leaderboard
Captcha:
- 1
- 2
- 3
- 4
- 5
- 6
- 7
- 8
- 9
- 10
- 11
- 12
- 13
- 14
- 15
- With answer
- With a viewing mark
Step-by-step instruction
The stability of gear shifting depends on the stretch of the cable and the presence of damage. In this case, the drum is rotated clockwise to the correct position. In some situations, the drum is tightened until the chain jumps smoothly. If the problem persists, the cable must be replaced. You can replace a torn or damaged product yourself.
When the problem is in the spring, it is cleaned of contaminants, then lubricated and checked. No adjustment or adjustment will be required if the speed operation is restored when the fault is eliminated. Before adjusting the switches, you need to check for deformation of the cock plane.
The malfunction could have started after the bike was dropped or hit. In this case, the vehicle is checked for deformations. Broken screws, frames and ears are replaced. Then the transport functionality is checked again.
After all checks, you can adjust the front derailleur and rear derailleur. Otherwise, manipulations will not help. Any malfunctions can negatively affect ride quality and lead to unexpected serious breakdowns and injuries. It is useful to carry out transmission adjustments as a preventative measure for vehicle health.
Before starting the adjustment, you need to check for deformation of the cock plane
Rear derailleur
Owners need to know how to properly set the speeds on their bike. Self-regulation requires compliance with the instructions:
- move the chain to the small sprocket;
- unscrew the screw;
- loosen the cable tension;
- adjust the screw with the letter “H”;
- pull the cable.
Check the functionality of the switch mechanism. Crank the pedals several times and watch the chain flipping. If the problem persists, tighten the cable more. After checking, move the chain to a large sprocket and adjust the tension of the screw with the letter “L”.
You can adjust the switching if you have screwdrivers, hex keys and pliers. It is not necessary to register the transport itself. It is advisable to prepare a cloth for cleaning parts and lubricant in advance. Adjustment of the limiters is possible after checking the serviceability of the components of the mechanism.
Rear derailleur designShift pattern
Front derailleur
Step-by-step instructions will explain how to set up the gear shifters on your bike. The process comes down to adjusting the tension and gear limiters. Setting the transfer quality is important. It is worth eliminating the gaps in advance and replacing deformed parts. You can configure the front derailleur according to the following scheme:
- the chain is moved to the smallest sprocket;
- remove the fixing element;
- loosen the cable tension;
- adjust the frame with a screw with the letter “L”;
- the cable is pulled;
- fixed with a screw.
The chain is moved to the middle sprocket and checked. If necessary, adjust the frame again and fix the correct cable tension. The drum on the left coin will help you quickly achieve the correct tension. The front gear derailleur is checked.
Any cable tension is released at minimum speed. To complete the adjustment and quickly adjust the front derailleur, after correcting the position of the cable, secure it with a bolt and repeat the check.
Gear shifting should be correct. Adjustment may be required due to looseness, wear of parts, or damage. You can carry out the work yourself if you familiarize yourself with the design of the mechanism in advance, study the instructions, and follow the algorithm exactly.
Front derailleur deviceSetting
Problems with gear shift faults
Problems may be the following:
- Shirts are broken - you need to check their integrity. This can be detected visually if there is a visible defect resulting, for example, from a bicycle fall. The braid will spring back and will not transmit the impulse of the cable to the switch. Or low-quality copies. There is only one way out - replace the damaged element;
- Rust has accumulated under the end of the braid, the wires are coming out or are all frayed;
- The components (wires) of the cable itself are worn out (it unravels and gets stuck in the braiding) and the necessary lubrication is completely missing, as well as the presence of rust and oxide. Everything should be replaced. The priority is polished cables (smooth) for bicycles.
Professionals do not recommend filling old versions of the cable with lubricant, since after just one or two kilometers of riding a bike, sand sticks to the lubricant and gets clogged inside, which aggravates the situation. It is better to replace worn components.
Signs of a faulty clutch cable
If a vehicle experiences constant loads or is operated in difficult conditions, the cable often breaks. However, such a nuisance can happen to any car, even if the mileage is not very high.
In addition, improper driving leads to rapid wear of the cable. For example, abrupt starting at high speeds. Another cause of breakdown is constant pressing of the clutch while driving, which leads to slipping.
The following signs indicate that the cable is faulty:
- The pedal is pressed hard. If everything is not in order with the cable, the pedal begins to stick. The driver feels resistance as it is pressed very tightly. The cable breaks and the pedal falls under too much pressure. In a situation where the pedal “fell” to the floor, the part must be replaced.
- The clutch slips. A cable malfunction is indicated by the fact that the clutch begins to slip frequently. Slipping is a spontaneous gear shift situation. For example, due to the uncontrolled operation of the clutch mechanism, the car begins to move even when the neutral gear is engaged. Slipping usually occurs as a result of the engine being overloaded, such as when driving uphill or accelerating rapidly.
- No switching. This malfunction can occur when the cable breaks or stretches. This happens especially often when the clutch fails and the pedal fails. The mechanism stops working. As a result, the engine begins to function stationary, despite the gear being engaged. To extend the service life of the cable, experts recommend constantly lubricating it.
We recommend
“Clutch pedal sensor: functions and malfunctions” Read more
- Other signs . Inspect the cable carefully. If there is a leak, this indicates a malfunction. This type of damage occurs as a result of a broken or disconnected cable. If it just comes unhooked, you need to firmly secure it in its original place, otherwise, change it.
If this part does not influence the disks, the car begins to move jerkily and twitch.
Purpose of cables and braids
The shift cable on a bicycle is the connecting thread between the shifter and the derailleur. It is a very strong metal straight thread. The job of this cable is to take all the forces and transfer them to the mechanism, thereby operating the gear shift. Depending on which gear is selected, by pressing the lever the cable tension becomes stronger or weaker. When the cable tension is optimal, the switch is in working condition.
With the help of a braid of cables (shirts), the force is transmitted to the mechanism into the rear stay. The braid also protects the cable from mechanical damage. It is a twisted metal wire, usually coated with polymer on top. At the ends there are lugs, from which a section of cable appears for adjustments.
A cable is a set of thin strands of steel that are intertwined and together formed into a reliable, damage-resistant metal fiber. Over time, the threads can wear out and the strength of some of them decreases, thus, damaged areas appear with breaks, kinks and individual wires coming out. Therefore, the fiber is coated with a layer of polymer or stainless steel, this improves wear resistance and significantly extends the service life of the cable.
In addition to mechanical influences, cable wear is also influenced by external factors - moisture, dirt, dust. In order to protect the metal from external influences, lubricants such as Teflon are used - one of the most durable and hardy.
Braids on the market are presented in three types: twisted type, SIS type and improved SIS-SP type.
The twisted type of shirt is a spring made of metal wire, covered with plastic on the upper side. Inside, the metal springs are treated with lubricant so that the cable rubs less against the jacket. Cables with such a shirt are the most budget-friendly and are practically not produced today.
The SIS type jacket is similar in type to the twisted one, but the material from which the spring is twisted is more durable - metal sheets. A more durable and clean material, Teflon, is also used inside. This is the most common type of braid today.
SIS-SP braid is parallel woven. The threads are held back by a polymer layer. The length of this braid, unlike the previous ones, does not change, but the tension of the cable is adjusted. This ensures more accurate operation of the shifters. The inside is treated with silicone.
Which clutch cables are better to buy – original or not: opinions of car owners
- The Chinese did not disappoint! “I purchased a mechanical “cartridge” made in China. I paid only a few dollars, I’ve been using it for three years, constantly pulling the clutch. I was pleased with the work of the Chinese. But if you want to change the auto-adjustment cable, I advise you to buy a more expensive, original one. Because the mechanism is not fully thought out and cannot be repaired, in which case it will only have to be replaced.”
- No problems for two years now
“My cable didn’t break, but stuck halfway through the pedal stroke when returning. That's why he kept lifting it with the toe of his boot. I wanted to change it. I studied all the most acceptable options and decided to buy the original. Although expensive, it closed the issue. It's been two years now. There are no problems driving in traffic jams.”We recommend
“Repairing the gearbox rocker: how to disassemble and adjust” Read more
- It’s not necessary once at a time
“The other day I had to change the original of the old version. The breakdown occurred at 390 thousand km. They changed it again to the old original version. So far I'm happy. But a friend has already replaced the originals three times with a mileage of 30–35 thousand km. Here, it seems to me, we’ll be lucky with our modern technology.” - I always carry a spare one with me
“I had to change it more than once, as it constantly broke off after 10 thousand km. One new one even broke after a thousand km. Then the sector completely collapsed. Then I changed it to the original and took the cable from the donor (the donor used 120 thousand km, I don’t know how much before it). Looks like new. The result is crisp gear shifting. At 10 thousand mileage I removed and inspected everything. Despite the fact that everything is fine with the cable, the habit of carrying a spare one remains, in case you have to change it.” - In fact, there is no difference
“I took a non-original one, drove about 30,000 km. A few days before the New Year, I received a “gift” from the car. I was lucky that I was able to exchange it for a new one before the holidays. The price for the original version in almost all companies is approximately 3-4 times higher than for the non-original one. Judging by experience, both options work fine up to 30 thousand km, then they need to be changed. That is, there is no point in overpaying. Of course, the external data of the non-original is worse. For example, the rubber of the cuffs is so thin that it resembles condoms (and even those may be more reliable). And what should you choose? I changed it again to a non-original one. Here chance decided for me, since on December 31st the store only had these in stock. Relatives could only be ordered after January 3rd. This is as Zhvanetsky wrote: “And these are three...but today. And those yesterday were five..., but big..., but yesterday...". But at least I saved money.”
How to change the clutch cable on a VAZ video:
How to change gears on a bicycle correctly?
The rules for shifting gears are simple and not so numerous:
- You only need to shift when the bike is moving. If you don't turn the pedals, nothing will happen.
- When shifting, the load on the bicycle chain should not be heavy. Switching should occur softly and smoothly.
- Don't switch gears when going uphill. The speed must be set in advance.
- The correct speed change is a step change, i.e. at a time - one speed. This will save the chain and nerves.
- If you have a classic system (3x8), then each front sprocket has its own personal rear sprockets. This will protect the chain from distortions.
The large chainring is used for cruising. Medium is needed for poor asphalt, on dirt roads, etc. The small sprocket is invaluable when riding on steep climbs, sand, tall grass, etc.
You can install the most expensive switches on a bicycle, equip it with the coolest shifters, but it will be impossible to ride it. And another unsightly-looking bike, assembled from unknown components, but made by a real master, will “roll”, pleasantly rustling the transmission.
Shifting gears on a bicycle is a complex and organic system. It cannot be divided into separate elements: everything must correspond to each other, and then the bike will “fly”.
Oil leakage from the gearbox, reasons for where to look for a breakdown
If oil is leaking, then the gearbox seal is likely to be damaged. In the case of a gearbox, oil leaks when the oil seals or seals are damaged, which wear out due to an imbalance in the input shaft, final drive or differential. The consequence of the gearbox leaving a stable state may be a violation of the cable fasteners, gearbox supports or engine mounts, as well as possible problems with the drive, which are in close contact with the differential.
The weak point in the design of many Renault Meganes is the engine supports, which often fail. The engine, with its unstable operation, disturbs the gearbox from a stable state, loosening the input shaft, main gear and differential. As a result, the initial damage is caused to the seals and seals.
Their tightness is broken and the oil finds its way out. Loss of high-quality lubricant leads to cables and solenoid valves overheating and subsequent destruction. Therefore, timely repairs, replacement of oil seals and identification of the main cause of imbalance in the operation of the differential, clutch of the internal combustion engine and automatic transmission can save the input shaft, gears, and cable from troubleshooting.
Bicycle handlebar shifters - description
The shifter is the external feature that distinguishes a multi-speed bicycle from a single-speed one. At the beginning of their development they were installed on the bike frame, now for the convenience of cyclists they are placed on the handlebars. Their professional name is shifters.
If the bicycle is equipped with two speed switches, then two shifters are installed on the handlebars: one, for controlling the front derailleur, is usually mounted on the left handlebar handle, and for the rear derailleur, on the right.
If the bike is equipped with only one rear derailleur, for example, internal or combined, then the shifter will only be on the right.
Design and principle of operation
The design structure and principle of operation of the shifter are elementary, and little has changed since their appearance.
It consists of several parts: a shifter handle, a moving block, a locking spring, a moving block lever, a wound cable and a housing. This design is created in order to “feed” the cable and fix it.
The principle of operation of shifters in the gear shift system is that when the position of the lever changes, the length of the connecting cable changes, which in turn affects the speed switch - a change by one control division in the shifter corresponds to switching to the next (lower or higher) gear.
Best articles: Bicycle from Lenta for 7999 rubles: is it worth buying?
How to change it yourself
Let's look at the process of replacing the handbrake cable on a car with rear drum brakes using the Daewoo Matiz as an example.
- Remove the center console.
- Loosen the left and right cable loop locknuts.
- Remove the thrust bracket, and then remove the cable from the grooves of the bracket.
- Next, you need to remove the cable from the roller groove. For convenience, you can sacrifice the integrity of the floor carpet - cut it at the location of the roller mechanism. It is also advisable to unscrew the handbrake lever bracket from the body.
- The roller has a movable connection on a sleeve, which is fixed with a stopper. To release the cable, the stopper will need to be removed.