Replacing the rear wheel hub bearing using the example of a VAZ 2110
On a VAZ 2110, as well as on any other front-wheel drive Lada, changing the rear wheel bearing is somewhat easier than the front one. Having the necessary pullers and a minimum set of plumbing tools on hand, you can completely cope with the work yourself. It is recommended to follow the following sequence of actions.
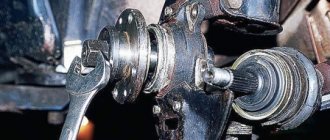
- 1. Remove the protective boot of the hub on the wheel and while the car is still standing on the ground, flare the hub nut using a hammer and a small chisel;
- 2. Loosen the hub nut, wheel mounting bolts and drum mounting studs, otherwise you can “drop” the car from the jack, performing this work in weight. Then jack up the rear of the “ten” from the side of the bearing to be replaced;
- 3. Unscrew the bolts securing the VAZ 2110 wheel completely. Then we place it under the bottom of the car to secure the jack. You can even put a wooden board on top of the wheel and loosen the jack, partially transferring the load from it to our additional insurance;
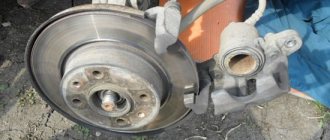
- 4. Unscrew the drum mounting studs and try to remove it. If it doesn’t want to come off easily, we’ll try to gently knock it down with a hammer or use a puller with rotary grips;
- 5. The previously flared and torn off hub nut should unscrew from its axis without any problems;
- 6. At the next stage, we will again need our puller used earlier. We will use it to remove the hub and bearing from the suspension axle;
- 7. Using special pliers or round nose pliers, remove the bearing retaining ring from its seat.
The main part of the work is almost completed. Further replacement of the VAZ 2110 wheel bearing is just a matter of technique. The old bearing can be removed from the hub using a special puller or using a tool and a hammer, holding the VAZ 2110 hub in a vice. It is most convenient to press the new bearing in with a puller, having previously lubricated the internal contacting surfaces with Lithol. But if you prefer just a piece of pipe with a diameter similar to the outer ring, nothing bad will happen.
If the noise comes from the front wheels, then the algorithm proposed above will not be enough. You will have to unscrew a little more bolts, and the hassle also increases equally. We devoted the next section of our article to how the bearing on the front wheel hub is replaced.
Method using tools
Having come up with the bearing, the engineers immediately took care of making a special tool for its removal. This is necessary for quick work of specialists and the elimination of financial investments. It will be impossible to remove stuck and rusty ones by displacement. To extract them, they came up with tools - pullers, drifts.
Foreigners use a special puller - its legs are inserted into the treadmill inside the ring, and then unclenched, fixing the part. Now all that remains is to pull out the bearing with a little effort.
A standard puller is a threaded shaft screwed onto special holders. Bringing the puller to the bearing, clamp it and pull it off the axle with gentle rotational movements. When removing, it is important to avoid distortion.
If the case is completely hopeless, you will have to use welding or a grinder, if the size of the bearing allows this. The cut parts can be easily removed from the socket or removed from the axle.
Do not despair even in the most difficult case. Each repair is a special case and does not require a ready-made solution. Removing a part is often easier than installing it. If it is not possible to apply knowledge of physics or there are no special tools, the bearing can always be destroyed and pulled out in parts.
How to properly replace the front wheel hub bearing of a VAZ 2110
The replacement considered using the example of the VAZ 2110 is perfect for almost any front-wheel drive Lada, since the design of the mechanism is similar. Let's start again by loosening the wheel bolts and flaring the hub nut. You just have to jack up the car from both sides. If this is not done, the anti-roll bar will interfere with its operation, pushing parts of the suspension upward. The further sequence of actions can be described as follows.
- 1. We tilt the VAZ 2110 caliper to the side, removing it from the guide. Next, the guide itself is also removed. To prevent it from hanging on the brake hose, tie it to the bottom of the car;
- 2. Unscrew the two bolts securing the ball joint to the brake disc protection and move the support lever to the side;
- 3. Now you can easily remove the brake disc and hub assembly from the grenade splines (CV joint);
- 4. Unscrew the two bolts securing the steering knuckle to the strut and you can proceed directly to replacing the bearing - the brake disc and hub assembly have been dismantled.
Correct wheel bearing diagnosis
The sequence of actions must correspond to the following algorithm:
- The wheel to be diagnosed is removed so that it can rotate freely. In this case, the car is either placed on a lift, or a working jack is used;
- You have to spin the wheel to make it clear. That its rotation is free. There are cases where noise occurs, the cause of which is insufficient brake release of the wheel, while well pads rub against the drum or disk;
- You need to rock the wheel, taking it by both edges, upper and lower, both towards you and away from you. After which the procedure is resumed after a ninety-degree turn is made.
When play is detected, a check is made to see how the hub nuts are tightened. This is where a large-levered crank comes in handy. In addition to being designed to withstand high forces, the size of its socket head is considered to be the most suitable.
You will also need a technical specification for automotive equipment indicating the tightening torque for the bearing nut.
Actions are carried out in the following sequence:
- The nut cap is removable for protection;
- If there is a cotter pin, it must be removed;
- While driving, an assistant must press the brake device to secure the wheel;
Using a prepared wrench, the tightening torque force is checked. If the bearing meets specifications but there is still play, the bearing must be replaced.
Disassembly
Required : engage first gear and place shoes under the wheels. Prepare a narrow chisel, a 30mm socket, pliers, a needle file and a standard set of tools. The wheel bearing can be replaced on a level surface, but it is more convenient to do so on an inspection ditch or a lift.
Procedure:
- Remove the hub cap.
- Straighten the dented shoulder of the wheel bearing nut in two places using a narrow chisel.
- Loosen the hub bearing nut using a 30mm socket. The head and driver must be strong enough to transmit the required force.
| If while driving you notice that there is something humming in the front suspension, then most likely the problem is in the front wheel hub, in the bearing. You can replace the front wheel bearing yourself, but this will require some experience. |
Loosen the wheel mounting bolts, and then hang both front wheels, otherwise the anti-roll bar will interfere with dismantling, pushing the suspension elements up. Remove the wheel, the brake pad guide together with the caliper and the brake disc (tie them so that they do not hang on the brake hose).
Recommendations
Replacing wheel bearings may vary from vehicle to vehicle. Modern cars may be equipped with various easily damaged electronic devices that must be removed when replacing a bearing. Therefore, if you are not a highly qualified car mechanic, it is better to entrust this work to car service specialists.
It is also worth doing a wheel alignment after replacing the wheel bearing. An adjusted wheel alignment will improve the car's road holding on turns and straights, eliminate vibration, and also reduce tire wear and fuel consumption. Vibration may also occur due to a crookedly inserted bearing. To eliminate it, you need to knock out the bearing again and check the tightness of the wheel nuts.
Stories from our readers
“Fucking basin. "
Hi all! My name is Mikhail, now I’ll tell you a story about how I managed to exchange my two-wheeler for a 2010 Camry. It all started with the fact that I began to be wildly irritated by the breakdowns of the two-wheeler, it seemed like nothing serious was broken, but damn it, there were so many little things that really started to irritate me. This is where the idea arose that it was time to change the car to a foreign car. The choice fell on the melting Camry of the tenth years.
Yes, I had matured morally, but financially I just couldn’t handle it. I’ll say right away that I am against loans and taking a car, especially not a new one, on credit is unreasonable. My salary is 24k a month, so collecting 600-700 thousand is almost impossible for me. I started looking for different ways to make money on the Internet. You can’t imagine how many scams there are, what I haven’t tried: sports betting, network marketing, and even the volcano casino, where I successfully lost about 10 thousand ((The only direction in which it seemed to me that I could make money was currency trading on the stock exchange, they call it Forex. But when I started delving into it, I realized that it was very difficult for me. I continued to dig further and came across binary options. The essence is the same as in Forex, but it’s much easier to understand. I started reading forums, studying trading strategies. I tried it on a demo account, then opened a real account. To be honest, I didn’t manage to start earning money right away, until I understood all the mechanics of options, I lost about 3,000 rubles, but as it turned out, it was a precious experience. Now I earn 5-7 thousand rubles a day. I managed to get the car buy after half a year, but in my opinion this is a good result, and it’s not about the car, my life has changed, I naturally quit my job, I have more free time for myself and my family. You’ll laugh, but I work directly on the phone)) If If you want to change your life like me, then here’s what I advise you to do right now: 1. Register on the site 2. Practice on a Demo account (it’s free). 3. As soon as you get something on the Demo account, top up your REAL ACCOUNT and go to REAL MONEY! I also advise you to download the application to your phone, it’s much more convenient to work from your phone. Download here.
- Remove the washer by unscrewing the wheel bearing nut all the way.
- Insert bolts (about 130mm long with M12x1.25mm thread) into the two holes of the brake disc. Screw the bolts into the hub holes to a depth equal to its thickness.
- We press out the hub by sharply hitting the bolt heads with the brake disc.
- Unscrew the fastening of the ball joint to the steering knuckle and remove the CV joint from the bearing hole.
Hub unit design
It is important to understand the design of the hub itself in order to safely replace the bearings. Popularly, the hub assembly is often called the steering knuckle, because mechanical energy is transmitted through it to the wheels. The bearing plays an important role in the operation of the unit, since if it breaks, it will cease to function normally.
The device of the car hub unit
Note! There are several types of wheel bearings (ball, tapered and others). But the replacement occurs according to the same algorithm for all types of parts.
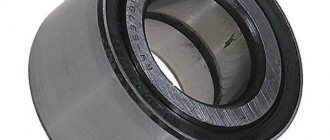
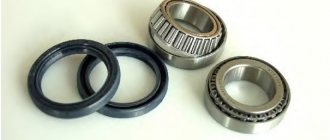
Wheel bearing structure
The bearing consists of several parts: the outer and inner ring, the cage, and the rolling element. To reduce the coefficient of friction, grease is used. During operation of the part, rotation is transmitted through the rolling body. The inner and outer bearings have no connection with each other, since the outer one is connected to the steering knuckle, and the outer one is connected to the car hub. The transmission of torque to the wheels occurs thanks to splines located inside the hub assembly.
Be sure to use hub lube
Assembly
Clean and lubricate the inner surface of the steering knuckle. Use a puller to press the new bearing into the steering knuckle. In this case, the large puller washer rests on the steering knuckle from the inside so as not to damage its mud rings, and when pressing, the new bearing can be pressed through the old bearing, which will transmit force only through the outer ring. Install the retaining ring. Use a puller to press the hub into the bearing. Now the puller washers rest against the inner race of the bearing and the hub.
We carry out further assembly in the reverse order, tighten the bearing nut to the prescribed torque and be sure to lock it by jamming the collar.
In conclusion, I would like to note that replacing a hub bearing on a new car is not difficult, but if the suspension parts are many years old, then removing the hub and other elements will be very problematic. Replacing the wheel bearing is shown in the video:
By the way, do you know how to check the suspension yourself?
Replace the wheel bearing yourself...
Wheel bearing and its replacement
It’s not often that you notice an unpleasant noise in cars when driving, which increases with increasing speed. Usually the noise disappears when turning sharply, but this is a temporary phenomenon. As a rule, this situation may indicate that the front wheel bearing of the VAZ 2110 needs to be replaced. Experts recommend replacing both bearings at once. But in this article we will look at how to replace the front wheel bearing on a VAZ 2110.
Why do you need to change bearings?
- Maximum or average bearing wear;
- Finding an element under prolonged pressure during aggressive driving;
- Impaired balancing of the chassis system, so an urgent decision is made on how to remove the bearing and replace it with a new one;
- The appearance of atypical sounds, creaks when the car is moving, impacts of the cardan on the lower body of the vehicle;
- Detection of wheel play will also force the driver to think about how to remove the bearing from the shaft, carefully install new parts in their seats and return safe maneuverability to the car;
Replacing the front wheel bearing
Replacing the front wheel bearings of a VAZ 2110
Note! The work must be carried out on a level basis, but the ideal option would be to use an inspection pit or a lift.
Of course, changing the bearings of the front hubs is much more difficult than in the case of the rear ones, but with the right approach everything is quite doable. In such a case, you need not only special knowledge, but also appropriate tools. Having provided all the necessary conditions, replacing the front wheel bearings of a VAZ 2110 on your own will take place without any difficulties.
Replacing the front wheel bearing of a VAZ 2110
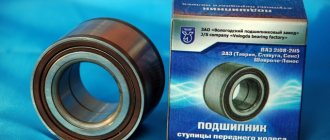
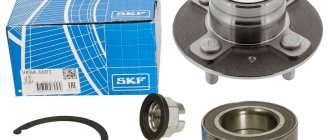
Before starting repair work, you need to select a suitable bearing. Experts recommend buying domestic auto parts, for example, “Samara” or “Vologda” production. It is advisable to make sure that it is Russian products that are sold, since China successfully produces copies. Carrying out any repair is not complete without certain devices, in which case you will need:
- puller for installing bearings;
- mandrel - a piece of pipe of the required diameter, which will be used to knock out the hubs;
- 30-size head with a reliable collar;
- spanners 17 and 19 sizes.
After the preparatory steps, they begin repairs, which are recommended to be carried out following the instructions provided. So:
- First, the vehicle is put into “manual control” and 1st gear. As a rule, it is necessary to install anti-underrun chocks under the rear wheels.
- The wheel bolts are released and, using a size 30 wrench, the bearing nuts are unscrewed from the front hubs. Provided that the car has alloy wheels, you cannot do without removing the wheel. You can unscrew the hub nuts only by pressing the brake pedal, so it is best to perform these actions with an assistant.
The main signs of wheel bearing failure
There are the following signs by which you can recognize that there is a malfunction in the wheel bearing:
- The occurrence of wheel play, no matter what - lateral or along the axle. This problem can be accompanied either by uneven wear of the tire tread, or when driving straight, the car constantly moves to the side, or the steering wheel begins to beat, as is the case with insufficiently correct wheel balancing;
- The presence of a hum (noise) in the hub area that changes its tone depending on the speed at which the car is moving. Due to inexperience, drivers may attribute such sounds to violations in wheel alignment adjustments or attribute them to a special reaction of the tire treads.
Three replacement options
Replacing the front wheel bearing of a VAZ 2110 is easy and simple
Subsequent actions can be performed according to one of 3 options. The first method involves replacing bearings using pullers, and it is not necessary to unscrew the steering knuckles of the machine. In the second case, you will have to dismantle the steering knuckles, and further work will be carried out on a workbench using a vice and pullers. If you choose the third option, you will have to completely remove the stand and change the bearings using a vice.
VAZ 2110 front wheel bearing removed using a puller
Note! Each of the above methods has its pros and cons, so before defining them you need to consider them in more detail.
- Method one, in which the steering knuckles are not dismantled
The advantage is that you do not have to touch the bolt that regulates the camber. The disadvantages include an inconvenient position when changing the bearing. In such a situation, it is problematic to carry out actions without a lift or inspection hole. In addition, in this position it is inconvenient to knock out the hubs and press in the bearings.
Front wheel bearing VAZ 2110
Using this method, the work of changing the bearing is carried out more conveniently and easily, but a problem arises in violations of the machine’s camber adjustment. Before unscrewing the steering knuckle mounting bolts from the strut (see Replacing struts on a VAZ 2110: how to do it right?), you need to put two marks.
Note! One mark will correspond to the position of the adjustment bolt to the strut, and the second will correspond to the position of the knuckles.
During the assembly process, you need to take into account the coincidence of these two marks. It is unlikely that you will be able to achieve initial accuracy, but the errors will be minimal. This method is ideal for those who need not only to replace one wheel bearing, but also to repair the chassis, namely changing ball joints, steering ends and silent blocks of levers.
This is perhaps the most difficult method, since you have to remove the strut, unpress the steering tip, as well as the fastening nuts that secure the upper support to the base of the body. Change the bearings only after removing the strut from the car. This task is not easy, it will require more time, but this is an excellent method for those for whom the two previous methods did not work.
see also
Comments 30
I sawed out two pieces like this, clamped them in a vice and pressed them together
Beautiful. You simply, without strain, pressed it out with a vice. Respect and respect. This is the most practical advice, I will definitely draw a bold cross over the workbench so as not to forget this advice. One problem, how to make such a wedge? You can't cut it off with a grinder, you need to polish it, otherwise it will bite. I have three sandpapers in the garage, but I doubt that I can keep such a part on the plane of the stone. You need a familiar milling machine. Previously, I would have had one like this, made me a vice with a magnet for a drilling machine. But overall the idea is cool. Good luck with your inventions.
I made a wedge from a 5mm strip, first flattened it on a rail, then finished it off with a grinder and an emery wheel, it’s simple and you don’t need much.
Probably of all the tips, the most correct one would be to use a chisel first between the cage and the nut, move it a little, and then use a chisel to split the cage, but that’s just my opinion. It's up to you to choose and make sure you don't damage the shank.
I support it 100%. Or warm up the clip.
As a last resort, a reverse hammer can help. If there is welding, then weld a piece of tube along the diameter of the bearing and use a reverse hammer.
On the sharpener, you cut on both sides, without overheating, not all the way, you can turn it with a suitable open-end wrench. It will fall apart on its own
and be sure to warm up the clip.
drive a wedge between the cage and the second nut. Wedge - chisel.
put the anchor in the assistant's hands, he places the clip on the anvil on top, put a hammer or something like that and hit it
Use a grinder to saw down the clip, and then knock it off with a chisel
I’ll just assume: hold the rotor in a vice with some pieces of wood, turn the nut (counterclockwise, as much as possible, apply tension on the bearing race), remove it, tap it with a bronze hammer on the race in a circle (from the sides), and maybe it will come loose. Maybe I could weld something and press it out, I don’t know, I wouldn’t cut it, maybe I could carefully grind out a groove with a milling cutter and hit it to create a crack. Well, that’s it—thoughts from what I saw.
Could be so:
the plastic impeller will fly apart from this.
and what does the impeller have to do with it? Do you need to take both off? It sits on a steel shaft and rests against a steel washer. This puller should be inserted between them.
Sorry, it's morning, my brain is working a bit dull. I agree that it will work as an option.
make cuts for a two-legged puller in the holder, or weld a piece of pipe with ears onto the holder and pull it off with the same puller
here's a noona puller
I've been thinking about such a puller for a long time, but the price is stopping me