In this article we will talk about carrying out maintenance of the steering rack of a Lada Priora car with electric power steering. On cars with electric power steering, a simple rack is installed without any special fluid in it. Below in the article the entire process of its repair, as well as possible signs of a malfunction, will be described in detail.
The steering mechanism on Lada cars, starting with model 2108, has a steering rack. It is designed to move steering rods along a horizontal plane, which helps turn the car's wheels.
The design of the slats is quite simple and reliable, with the exception of one small drawback - a plastic bushing.
This bushing is made by the manufacturer from low-quality plastic, which soon leads to play in the rasp in it and the appearance of an unpleasant knock when moving on paving stones.
There is a rail between the engine and the passenger compartment, perpendicular to the exhaust manifold and attached with two brackets to the engine shield.
Lubricating the Lada Kalina steering rack without removing it - step-by-step instructions
Author: ides · Published 07/12/2016 · Updated 07/12/2016
Hello everyone. Today at VAZ Repair we’ll talk about the steering rack, or more precisely, about how to lubricate the steering rack on Kalina without removing it . The work is not difficult, so it, like many other works, can be safely done at home. The steering rack on the Lada Kalina is the same as in the “ten” and, just like on the VAZ 2110, it is not resistant to faults , so from time to time you have to “tinker” with it.
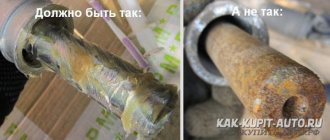
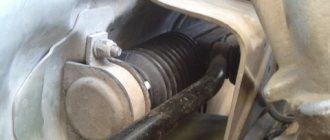
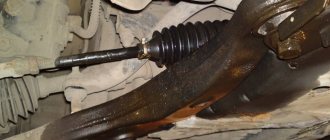
I already wrote about the signs of a faulty steering rack in the article: “Signs of a faulty steering rack. Diagnosis of gur with your own hands,” so I won’t focus too much on this at this stage. The need to lubricate the steering rack arises in the event of poor or difficult operation of the latter. To understand whether the steering rack needs to be lubricated, just look under the boots, which are attached to clamps at the ends of the rack. In my case, the rack rod was dry and looked like this (see photo):
Of course, it would be better to completely remove the steering rack and inspect all its parts, but this work takes much more time and is necessary only in extreme cases, when the rack not only needs lubrication, but is completely faulty. By the way, how to replace the steering rack is written in this article.
What will you need for the job?
For work you will need: several plastic clamps; lubricant (“Litol” or “Fiol” or some alternative); a syringe and a piece of tubing from a medical “system” (preferably); side cutters or knife (for cutting off the old clamp).
How to lubricate the steering rack without removing it - step-by-step instructions
1. So, first of all, we get to the anthers and bite off with side cutters or cut off with a knife the old clamps that secure the steering rack anthers.
2. Next, we evaluate the condition of the lubricant and its presence; as you saw in the photo above, my rack was completely dry. Also inspect the rack boot; if it is damaged or cracked, it needs to be replaced.
3. Turn the steering wheel as far as possible to the left or right (depending on which side you are working on) so that the rod goes inside the rack and does not interfere with filling the lubricant, then take a syringe with an extension (a piece of tube from a medical “system”), if you have one, of course, fill it lubricant there and squeeze the contents of the syringe into the cavity of the steering rack. If there is no syringe, fill it manually using a screwdriver or something similar to a spatula.
4. When the grease is full, take the boot and put it in place, after which we fix it with a plastic clamp.
5. Now we repeat all the above steps on the other side, remove the boot, turn the steering wheel in the opposite direction and fill the rack with lubricant.
6. We put on the boot and secure it with ties.
7. For greater reliability, you can turn the steering wheel left/right, thereby pumping the lubricant, as it were, and then repeat the procedure again. However, if you turned the steering wheel all the way and used a syringe with an extension, then I think there is no need for re-lubrication.
After lubrication of the Lada Kalina steering rack is completed, we assemble all the tools, wash our hands and check the work. The steering wheel should become smoother and softer. If lubrication does not lead to anything, you will have to look for the problem elsewhere. Perhaps it lies in critical wear of the rack parts or is associated with steering tips that need to be replaced.
Source: 7bm.ru
Causes of leaks
There are several common reasons why the steering rack leaks:
- The main thing is driving with torn rubber covers. Moisture penetrates through the holes and gets onto the shaft, causing corrosion. The rusty surface becomes rough and begins to rub the seal lip. The slightest gap is enough for oil to escape under pressure.
- Failure to comply with the rules for handling the hydraulic booster. Holding the steering wheel in the extreme position for a long time leads to an increase in pressure inside the chambers and squeezing of the seals. If the driver constantly repeats the mistake, oil leaks from the rack will inevitably appear.
- Adding unsuitable hydraulic fluid or other composition that destroys the rubber of the seals.
- Long-term operation without replacing fluid that accumulates debris and small chips. In this case, the oil seal leaks due to abrasion.
- Critical wear of the hinge joints of the steering tips with the shaft. Due to the dangling rod, air and moisture penetrate under the boot, causing corrosion. The process then proceeds according to the scenario described in the first paragraph.
Steering rack repair is possible, and the cost of the event depends on the degree of wear. In some particularly advanced situations, the unit cannot be restored.
What lubricant to use for the steering rack
The steering mechanism is one of the main elements of vehicles, which bears considerable responsibility for the life, health and safety of the driver. Steering rack lubrication requires special attention, without which it is impossible to transmit steering rotation to the wheels. Indeed, during the process of friction, the metal parts of the car are constantly exposed to heat and wear out to the point of being unusable. The processing of parts makes it easier to turn the steering wheel, and if there is an electric or hydraulic booster, it extends their service life.
A steering rack is a device that allows you to control the synchronous operation of the front wheels using the steering wheel.
A few words about types of devices
The differences in such mechanisms can be easily seen by owners of cars that have driven different models. They can immediately point out not only external and design differences, but also the sensations when driving a car. Today, several types of such mechanisms are installed on cars, they can be like this:
- Mechanically driven devices;
- Hydraulic driven mechanism;
- A unit based on an electric drive.
Today, the most modern devices are electrically driven racks, but the most widespread are still devices with mechanics or hydraulics as a drive. The electric drive and hydraulics in this device are designed to reduce the force on the steering wheel when the driver rotates it.
How to lubricate the steering rack?
A wide variety of lubricants are sold in stores. But how to choose the one that is most suitable.
All lubricants differ in their base, which is determined by the thickener. Based on this property, the following types of lubricants are divided:
- calcium and graphite (solidol). This type of lubricant has performance characteristics that satisfy many car enthusiasts and a relatively low price. But at the same time, solid oil does not tolerate low temperatures;
- complex calcium. This lubricant is more resistant to low temperatures, but absorbs moisture and is prone to heat strengthening;
- sodium and sodium-calcium. Unfortunately, this type of lubricant is not at all resistant to moisture, so it is not so common. But it can withstand a high temperature range;
- lithium It is gaining popularity due to lithol, which is used on all parts and components of the car and has a low cost on the market. The only drawback of the lubricant is its gradual squeezing out of parts as a result of liquefaction. It is this material that is best given preference when processing the steering rack;
- barium and hydrocarbon. They are resistant to water, have good preservation properties, but contain a large amount of soap, are difficult to produce on an industrial scale and do not withstand low temperatures;
- copper. Withstands extremely high temperatures and operates under high pressure, often used in tire fitting work. But it does not withstand moisture well.
Eliminating backlash
Of course, major repairs are not necessary in every case, and replacement of component parts is also not always necessary, because:
- On the VAZ 2109, the steering rack is adjustable, and if you know how to tighten the steering rack mechanism, then you can remove steering knocks without any financial investment at all
- This is possible, of course, if the knocking is caused by operational or factory control play
- To adjust, you should use a trestle or inspection hole, find the adjusting nut under a layer of dirt, then use a special wrench “17” to tighten it
We disassemble the rack
When you have eliminated the play, but the knocking has not disappeared, then the steering rack on the VAZ 2109 must be disassembled and repaired:
- Repairing the rack yourself will not be difficult, of course, if you know in what sequence the operations need to be performed
- First, we remove the steering rack, and if everything is in order with the rods, then it is not necessary to remove them, just unscrew them from the unit and that’s it
- Then we clamp it in a vice or in a special device for repair.
- And then remove the clamps securing the protective cap, boot, right support and spacer ring
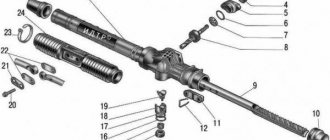
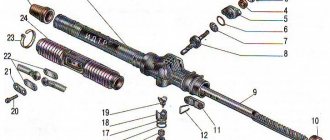
- Subsequently, all other parts are removed (photo with diagram below), including complete pressing out of the bearings
- Then the parts should be cleaned of dirt as thoroughly as possible, followed by washing them in kerosene
- And after cleaning all the parts, they should be very carefully inspected for signs of tears or other damage.
- If small scuffs can be easily removed with sandpaper, all heavily worn parts, and especially damaged ones, must be replaced
- The same approach applies to bearing troubleshooting.
- In their particular case, if there is the slightest doubt about the performance of these devices, parts should be replaced immediately
- You should also understand that tightening the steering rack itself, the procedure, in principle, is not a difficult operation to perform with your own hands
- But disassembling the steering wheel, and even more so replacing it, may require special skills from you; in addition, you will need competent instructions
- When you have absolutely no time or desire to carry out such operations yourself, or you do not want to delve into all the intricacies of this process, then the best option for you would be to perform all repair work in a specialized automobile workshop
- You, of course, understand that the price of specialist services will cost more than self-repair
- Moreover, the amount of the invoice that you will receive may vary greatly.
- For example, carrying out troubleshooting is one cost, but a complete repair is a completely different one.
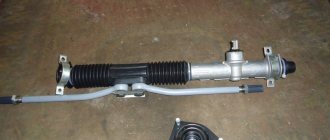
Schematic structure of the steering rack, it clearly shows what is removed and then put back on
- It is worth noting that the steering rack is not the cheapest component of a car, so few people dare to replace the whole thing right away.
- Everyone starts by trying to repair the existing device.
- It happens that it is enough to simply adjust it so that the malfunction disappears, or perform a partial repair by replacing the bearings
- Of course, the diagnostic procedure, as well as subsequent repairs, is impossible without disassembling
- Only by disassembling the steering rack will you get a complete picture of the condition of its parts, which parts require improvement (grinding, for example), and which should definitely be replaced
- Repair in almost any case will be much cheaper than a complete replacement
- And if you repair the rack yourself, you will also save on the cost of auto mechanic services
- To carry out independent repairs, as has been mentioned more than once, you will need a repair kit, specific keys, as well as a set of bearings and grease.
- Not a lot of money is spent on purchasing components
- However, if you have replaced all the bearings, as well as seals and lubrication, and still have problems with the operation of the machine, then you will still need the services of specialists to determine the exact cause of the failure or replace the “serious” (major) components
- The most remarkable thing is that in the conditions of the modern total “deficit” of finance, a complete replacement of the entire unit is resorted to only in extreme cases, when there is nothing left to repair in the old one
How to lubricate the steering rack?
It is impossible to change the oil or lubricant of the rack without dismantling it. And for this it is absolutely not necessary to send the car to a service center. Before applying new lubricant to mechanism parts, you must first get rid of the old one by first disassembling the part. You need to prepare the lubricant and a couple of clamps in advance, and then get to work. It is important that the lubricant is also suitable for the materials from which the anthers are made.
- First you need to lift the left side of the car, turn the steering wheel to the right and remove the wheel.
- Then clean the surrounding area a little.
- Loosen the reusable small tie on the right boot and cut the large inner disposable tie.
- By sliding the corrugation up the shaft, you can see the presence of lubricant.
- Next, lubricate, sparing no material, the rail and the boot itself from the inside. Turn the steering wheel all the way a couple of times and add more lubricant. Reinstall using a pre-purchased clamp.
- Carry out the same operation on the left side.
Replacing the steering column of a VAZ 2107
Replacing a steering column is a rather difficult task, but it can be done independently if you have some experience in car repair. You will need the following tools:
- Wrenches 17 (socket and open-end).
- Socket heads for 17 and 30.
- Handle with ratchet.
- Mount.
- Hammer.
- Collar.
The column is removed in the following order:
- Disconnect the battery.
- Remove the steering wheel.
- Remove the steering shaft housing.
- Remove the wire block from the ignition switch.
- Remove the ignition switch.
- Remove the steering column switches.
- Remove the steering shaft clamped in the column.
- Using a 30mm socket and a powerful wrench, unscrew the steering column mounting nut. The tightening force here is significant, so the knob must be a fairly long lever. If you can’t unscrew it, you can lengthen the knob by putting a piece of pipe on it.
- Unscrew the 3 bolts securing the column to the body. The procedure is not easy - the distance between the parts and the body is too small, the bolts are difficult to keep from turning. A handle with a ratchet will come in handy here, which will speed up the process.
- Remove the column from the shaft. To do this, you need to knock the column off the tie rod splines using a pry bar. This must be done in jerks, resting your feet on the body.
- Unscrew and remove the shaft seal installed at the bottom of the column.
After dismantling the old column, it is necessary to clean the seat from dirt. Before installing a new column, you should check the condition of its hinge joints and needle bearings. If everything is in order, you can begin installation, which is done in the reverse order of removal.
When installing a new VAZ 2107 steering column, you must pay special attention to ensure that all fastening bolts and nuts are well tightened. Considering how important this unit is for driving a car, play, and even more so, slippage of the steering column splines can lead to tragic consequences
When installing the steering wheel, pay attention to the position of its spokes. After completing the installation of parts and connecting the wire block to the ignition switch, you can connect the battery
Column replacement completed
After completing the installation of parts and connecting the wire block to the ignition switch, you can connect the battery. Column replacement is complete.
Alarming symptoms
No matter how often you change the steering rack lubricant, unfortunately, it cannot extend the life of all parts of the mechanism indefinitely. Therefore, if the following factors are detected, it is recommended to immediately stop using the vehicle and contact a service center.
- Increased steering play.
- Turning the steering wheel requires more effort than before.
- Traces of steering rack lubricant leakage were found.
Knocking and extraneous sounds in the steering mechanism. They usually appear when making a sharp turn or turning the steering wheel, or when hitting protruding parts of the road. To make sure that the cause is in the rack, you need to:
- place the car on a flat surface;
- get out of the car and open the hood;
- unscrew the wheel until it stops in both directions;
- Listen carefully to where the sound comes from when you turn the steering wheel sharply.
Timely diagnostics will protect your car from possible future serious breakdowns and sudden expenses.
All lubricants have a different set of characteristics (composition, properties, cost). And if the question arises about which lubricant to use, then it is better to give preference to lithium. The best on the market are considered to be Litol-24, Fiol, Tsiatim and Severol. They are moisture-resistant, have a long processing interval, reduce vibration, do not wash off, and contain antioxidant and wear-resistant additives. Steering rack lubricant must have a high load-bearing capacity to avoid extrusion.
If a low-quality lubricant is used in operation, which does not meet the listed qualities, then this will soon lead to wear of individual parts and assemblies of the steering mechanism. It is important to always listen to your car, pay attention to warning signs in time, carefully choose which lubricant to lubricate, lubricate the steering rack in a timely manner and be responsible in choosing a lubricant.
Source: automorum.ru
Lubrication
For VAZ cars, the only steering rack lubricant recommended by the manufacturer is FIOL-1.
1. Lubrication during assembly. First, the rail and the internal cavity of the housing are lubricated.
- A generous coat is then applied to the plastic sleeve.
- Lubricant is placed in the seat for the needle bearing.
- The rail is installed in the housing.
- The steering gear shaft is lubricated.
- Grease gets clogged up in the bearing.
- The stop is lubricated.
- Screws and stoppers are installed.
- The casing and anthers are put on.
2. Lubrication without removing the rack. After cutting through the plastic clamps, the side protective caps are removed.
For convenience and greater efficiency, you can use a syringe with a nozzle made of a rubber hose of such a diameter that you can insert it between the rail and the body. The hose must be pushed from the side where the rod bolts are attached.
At this point on the bushing there is a cut through which the lubricant will pass into the space behind the bushing and lubricate the steering mechanism.
How to lubricate the steering rack in the absence of FIOL:
- Litol. It is the most suitable lubricant to replace the recommended one. Has good lubricating properties and durability.
- Solid oil. Not recommended due to its tendency to dry out over time and lose its lubricating properties.
- Graphite grease. For the same reason as grease, it is not entirely suitable for lubricating the rack.
The steering mechanism is a fairly important unit, on the serviceability of which depends, among other things, the life of the vehicle crew. Modern cars use a steering rack.
The rack-and-pinion mechanism has an open design (unlike a worm gear); lubricant for the steering rack can be supplied by the driver in a garage.
This design also has a drawback: at the slightest leak, moisture and dirt enter the mechanism, and the lubricant quickly fails.
Our material will tell you how to choose the right consumables for the steering mechanism.
We treat the sucker
S. Elfimov, Samara
The well-worn suction cup of the bracket that attaches gadgets to the windshield has completely “weakened” and began to fall off. To restore its functionality, I cut out a washer from linoleum about two millimeters thick, the outer diameter of which is equal to the diameter of the suction cup, and the inner diameter is 10-15 mm smaller. To facilitate installation, the washer can be made split (as in the photo). We install the washer between the silicone suction cup and the bracket. The deflection of the suction cup will increase, and the bracket will stop falling off.
Don't crunch
On Priors, Grants and Kalinas, the gearbox often crunches when shifting - as a rule, when engaging reverse gear, as well as first and second. An Internet search showed that the problem is widespread, but no one has really dealt with it. Many people blame the gearbox control drive and weak synchronizers. However, I encountered a similar phenomenon after replacing the clutch cable. Repeated adjustments did not bring success - the defect disappeared, but not for long. I found the medicine by accident: when I pulled the clutch pedal towards myself, the gears began to engage clearly for some time. The cause of the defect is a defective spring of the ratchet mechanism located in the “cabin” end of the cable. In the meantime, until you change the spring or cable, I recommend tightening it after several presses on the clutch pedal so as not to torment the box.
You can't ruin the rack with oil
I have a VAZ-21104. After six years of operation, at a mileage of 200 thousand kilometers, the steering rack began to jam when the steering wheel was in the “near zero” position. At the bottom of the steering mechanism there is a thrust (adjusting) nut with a hole that is closed with a rubber plug. I filled a medical syringe with gear oil and put a rubber tube on the nozzle. He took out the plug, poured oil into the cavity, and then immediately closed the hole with the plug. Five years have passed since then, the total mileage is 355 thousand kilometers, and the rack does not jam. And further. The habit of leaving the front wheels in the “straight” position when parking will help keep the protective steering gear cover intact longer.
Signs of breakdown
By means of steering racks, rotational movements from the steering wheel through a rack and pinion mechanism are transmitted to the rotary levers, which turn the front wheels with rods.
If you find one of the symptoms listed below on your car, be sure to conduct a full diagnosis of the condition of the unit, and then repair it.
Signs of a faulty steering rack include:
- A grinding noise is observed in the rack area when the steering wheel is rotated;
- The steering wheel periodically sticks;
- Lubricant begins to leak from the seals;
- The steering wheel has noticeable play.
These symptoms may also indicate problems in other components of the steering mechanism, but first you must check the condition of the rack, disassemble it and decide whether to replace or repair it.
Quick replacement
A. Lupandin, Moscow
When replacing the crankshaft position sensor on a VAZ-2110 with a 16-valve engine, there was a hitch - over many years of use it had turned sour, and its mounting bolt broke off right under the head. Heavy application of penetrating lubricants did not work. A long screwdriver and a hammer helped. Using a screwdriver against the end of the sensor, I tried to touch it with a hammer, first in one direction, then in the other. Happened!
I discovered that the metal bushing from the eye on the body had stuck to the bolt and remained on it. This is why the sensor could not be removed! I pulled off the bushing with pliers without much effort. But how to attach the new sensor? Do not remove the oil pump cover to drill out the remaining bolt! I did this: I lubricated the sensor ear to protect it from souring, and with two plastic clamps on both sides I pulled the sensor to the seating surface. The connection is reliable, especially since the sensor is centered with a piece of the bolt.
Diagnostics
Error codes
c1044 - incorrect sequence of the rotor position sensor (RPS)
c1621 - incorrect voltage 5V
c1622 - speed signal circuit failure
c1011 - car engine speed signal circuit, no signal - the signal from the idle sensor (or the standard tachometer through a voltage limiter) is divided by 4 and applied to the tachometer input,
c1022 - error, voltage of the main output of the torque sensor - it is possible that the shaft cover has rubbed the insulation and the middle, green wire shorts to ground
Pen, hold on!
S. Levin, Moscow region
The Nissan X‑Trail T31 (2007–2014) suffers from an unpleasant disease. In winter, the cable running from the outer handle to the lock mechanism freezes in the sheath - and its tip flies out of its seat. If this happens, you need to remove the door trim and first apply a moisture-resistant and moisture-displacing lubricant to the cable. And to prevent such a nuisance from happening again, I advise you to secure the tip on the handle lever with a plastic clamp. Take a more expensive clamp so that it does not burst due to frost. And cut the protruding end short.
Dear car experts! When sending tips, do not forget to provide your postal address with a six-digit code, last name, first name and patronymic (in full), as well as a telephone number for contact. This will greatly simplify and speed up sending you your well-deserved prizes.
You can send your tips to [email protected] . If possible, illustrate your own know-how with photographs and/or diagrams.
Prizes for the authors of our selection:
- external universal battery 12,000 mAh from AirLine
- mobile charging station AkkuEnergy PowerBank 5400 mA
. from Heyner - ZIC oil canister from SK Lubricants
- Rolf oil canister
- Osram daytime running lights
- ASTROhim car cosmetics set
Source: www.zr.ru
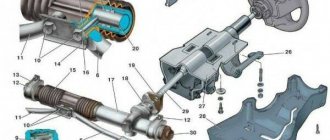
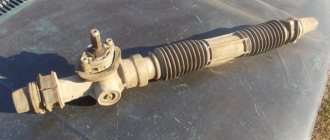
Priora steering rack device
Removing the Priora steering rack
You will need : remove the front wheels and prepare tools (a 13mm socket, a 15mm wrench, a 19mm spanner, a large slotted screwdriver, pliers, a mounting blade and a hammer).
Inside, remove the lower part of the intermediate shaft from the splines of the gear shaft:
- Unscrew the fastening bolt nut using a 13mm socket.
- Pull out the bolt.
- Release the terminal connection using a large slotted screwdriver.
- Remove the lower part of the intermediate shaft from the splines of the pinion shaft.
To remove the Priora steering rack without tie rods, disconnect the inner tie rod ends from the steering mechanism:
- Remove the retaining plate for the inner tie rod ends by using a flathead screwdriver.
- Unscrew one bolt completely using a 15mm spanner and loosen the other bolt.
- Turn the connecting plate downwards.
- Remove the steering rod. We remove the second steering rod after unscrewing the second bolt.
To remove the Priora steering rack along with the steering rods , you will have to disconnect the outer tie rod ends from the swing arms of the shock absorber struts:
- Unbend and then remove the cotter pin using pliers.
- Unscrew the ball pin fastening nut partly using a 19mm spanner.
- Press out the finger using a special puller. If it is not there, then insert a mounting blade between the swing arm and the outer tip, and then hit the end of the swing arm with a hammer.
- Press the ball joint pin all the way out using a large slotted screwdriver.
Now, to pull out the steering rack with or without rods:
- Unscrew the two nuts securing the steering rack bracket to the front panel using a 13mm socket.
- Remove the two brackets.
- Remove the steering rack through the window in the left wheel arch, having first moved it forward to remove the gear shaft from the hole in the front panel.
If you remove the Priora steering rack yourself, then you will need at least 1 hour.
Causes of steering malfunctions
| Cause of malfunction | Remedy |
| Increased free play of the steering wheel | |
| Loosening the nuts securing the ball pins of the rods | Check the presence of the cotter pin, tighten the nuts and secure them |
| Increased clearance in ball joints of rods | |
| Wear of rubber-metal joints of rods | Replace the rods |
| Increased clearance between rack stop and nut | Replace worn parts and adjust the steering mechanism |
| Noise (knocking) in the steering | |
| Loosening the nuts of the ball joints of the rods | Check and tighten the nuts |
| Increased clearance between rack stop and nut | Replace worn parts, adjust the steering mechanism |
| Loose steering gear | Tighten the steering gear nuts |
| Stiff steering wheel rotation | |
| Damage to the upper suspension strut bearing | Replace the support |
| Damage to the support sleeve or rack stop | Replace damaged parts, apply lubricant |
| Low pressure in front tires | Set normal pressure |
| Damage to parts of ball joints of rods | Replace damaged parts |
| Damage to parts of the suspension shock absorber strut | Replace or repair the suspension strut |
| The bearings of the upper steering column shaft are damaged | Replace bearings |
| Electric power steering is faulty | Replace the electric booster and shaft assembly |
- How to diagnose LADA electric power steering without a scanner
- How to get rid of a knocking steering shaft
- Do you need steering rod plugs?
Keywords: Lada Priora steering wheel | Lada Kalina steering wheel | Lada Granta steering wheel | steering mechanism Lada Priora | steering mechanism Lada Kalina | Lada Granta steering gear
4
Found an error? Select it and press Ctrl+Enter..
Installation of steering rack Lada Priora
Before installation, check that the rail is installed in the middle position. To do this, using sliding pliers, use the flat on the gear shaft to rotate the shaft in any direction until it stops, then turn the shaft in the opposite direction two full turns and turn the shaft so that the flat on the shaft is located vertically on the right side along the direction of the car. Otherwise, the installation of the rack is carried out in the reverse order.
The steering rack of the Lada Priora is the same as the rack of the Kalina or VAZ 2110-2112 of the new model and has a catalog number: 11183-3400010 (rasp inside 21100-3401068). Price approximately 3500 rub.
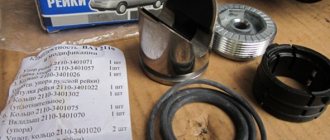
Repair
The first thing you will need to carry out your own repairs is a repair kit. They are available at almost any auto parts store. However, we strongly recommend that you buy only high-quality kits so that the result of your DIY repair lasts as long as possible.
The proposed kits are incomplete and complete. You will definitely need the following kit components:
- Needle bearing;
- A pair of rubber seals for the bushing;
- Support sleeve made of plastic;
- Set of gaskets;
- Spring;
- Retaining rings;
- Support bearing;
- Drive gear;
- Boot cover;
- Rail;
- Set of ties for the boot.
An incomplete repair kit does not include a gear and rack.
But you will only need such a kit if you are planning to carry out a major overhaul of the unit. Now that the kit is ready, the tools are available, and there is also enough free time, you can get to work.
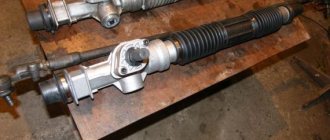
- First, remove the boot, end caps and stops. As you disassemble elements, even the smallest and insignificant at first glance, be sure to evaluate their current condition. If necessary, all worn-out elements will be replaced with new ones taken from the repair kit.
- Using an octagon, unscrew the screw plugs, which will allow you to remove the springs, retaining rings, and thrust bushings.
- Remove the bearing and check if it has any play. The repair kit includes a new bearing, so if the old component is in satisfactory condition, it is better to replace it immediately. It’s not for nothing that you took on such a complex process to get everything done 50%.
- Remove and inspect the drive gear. Next, you can completely remove the rail itself.
- Be sure to replace the support shaft bushing, not forgetting about the rubber bands. They are also included in the kit.
- Take your time to remove the rubber bands from the sleeve. First, insert the element into the crankcase, after which you can cut off the elastic with scissors or a sharp knife.
- The most difficult step is replacing the needle bearing. To remove it, you will need a special key. But you can do without it. In this case, arm yourself with a 1.5 mm drill bit and a drill. Using a drill, make a hole in such a way as to loosen the end of the bearing. Use a punch to knock out the old bearing from the crankcase.
- Before installing the new needle bearing, be sure to thoroughly clean the steering rack housing of accumulated debris and steel shavings from drilling.
- The hole made cannot be left. To eliminate it, you can mix metal filings with superglue. This mixture will harden quickly and give an excellent result.
- Lubricate literally everything that can be lubricated in the steering rack assembly. Experts advise using Litol 24 or other lubricants of similar quality. It wouldn't hurt to lubricate the CV joints.
- Reassemble the unit by following the reverse sequence of dismantling.
Repairing the steering rack yourself allows you to significantly save on replacement, plus you can gain vast experience in performing far from the simplest work related to your VAZ 2109. But you can do it easier, without taking any risks, by contacting a trusted car service center.
Checking status
Having completed the repair, you should not think that now the steering rack will serve tens of thousands of kilometers and will no longer cause you trouble. Like many other components, the condition of the rack must be periodically monitored.
| What to look for | Your actions |
| Mounting nuts and bolts | These fasteners are subject to vibration after repair as they are used. Therefore, it is recommended to check and tighten them every 250-300 kilometers. |
| Rail boot | You can check it a little less often, approximately every 500-1000 kilometers, depending on the operating conditions of your car. Due to different quality, some anthers can last quite a long time, while others will require replacement after 10 thousand kilometers. The choice is yours which parts to use |
| Rail | The rack itself should be constantly monitored. Listen to the behavior of the steering mechanism, pay attention to the above signs of malfunction. As part of a scheduled technical inspection, be sure to include a check of the steering racks in the list of activities. |
The repair cannot be called complicated, but it takes quite a lot of time. Plus, it is extremely important to perform all operations as carefully and efficiently as possible. Otherwise, the result will not last long and you will soon have to interfere with the design of the VAZ 2109 steering unit again
What is the steering rack for front wheel drive cars?
In cars with front-wheel drive, there is no way to install the classic, long-proven front wheel steering control system. The transverse installation of the motor and power drives to the wheels will not allow this to be done. Therefore, the cumbersome system of levers was replaced by a steering rack. Its main task is to transfer force from the steering wheel to the steering arms.
Important! Most Priors are equipped with electric power steering (EPS) and not power steering. This is a feature of this model.
Location and design of the Priora steering rack with EUR
To save space, this element of the Priora control system is located on the wall of the engine compartment. On the bulkhead between the engine and the interior of the Priora. The rack is connected to the steering column located in the cabin.
Steering rack device
This important Priora control unit is assembled from the following components.
- The rack is mobile.
- Frame.
- Splined shaft with bearing.
- Metal case (casing).
- Seals and seals.
- Fasteners and accessories (bolts, nuts).
- Springs.
- Rubber cover for the mechanism.
The basis of this mechanism is a metal pin (rail), so to speak. There are teeth on one part of it. They are mated to the steering wheel drive shaft, located at right angles to the supporting pin. This is, in fact, the well-known worm gear. The rotating shaft moves, engaging the teeth, the rack inside the casing. The protective casing has a special slot for attaching tie rod ends. In the center of the pin (rack) there are special holes for tips, which are connected through special levers to turning wheels.
Malfunctions and their symptoms in the Priora steering rack with ESD
Most often, the rubbing parts of this unit fail. It is quite easy to determine whether the steering mechanism is broken or simply worn out. This will be marked by the following signs:
- The steering wheel is difficult to turn.
- When entering a turn, tapping and grinding noises are heard from the mechanism.
- While driving, when using the steering wheel, sensitive shocks are transmitted from it to the hands.
In general, the handling of the Priora is significantly deteriorating.
During the inspection, the technician will determine the need to replace the Priora steering rack by visual inspection. Usually, he grabs the rod with his hand, and his partner turns the steering wheel. Based on excessive play and extraneous sounds, the technician makes a verdict.
Attention! This device is completely repairable. Ready-made repair kits for the Priora steering rack are available for sale. There are separate articles on this topic.
A little about the structure of this node
The main task for any design of devices that control a car is the transmission and transformation of the rotational movement of the steering wheel into translational movements of the steering tips. The main element of such devices are steering racks. Its design necessarily includes a rack and pinion. It is with their help that the rotational movement of the steering wheel is transmitted to the wheels.
The gear is connected to the steering wheel; when it rotates, its teeth cling to the same teeth on the rack and push it in the direction the driver wants. From the rack, these movements are transmitted to the steering rods; they are installed at both ends of this device. These rods are connected to the steering ends. They are designed to transmit steering movement to the front wheel pins.
Only by studying and understanding how this mechanism works can you avoid its failure ahead of schedule.
It is important to know and understand the principle of maintenance, what time limits are allocated for this, what lubricants can be used for this without fear of harming this device. The timing of routine maintenance is affected by the mileage of the vehicle at the time of maintenance and the condition of the parts of this unit. The longer the period of use of this mechanism, the more careful the approach to maintenance should be.