Alas, the build quality of the VAZ 2114 radiator and the cooling system as a whole leaves much to be desired, which is why it can fail over time. The main disadvantage of the OS (cooling system) of the “fourteenth” model is the need for constant monitoring, regular maintenance and repair.
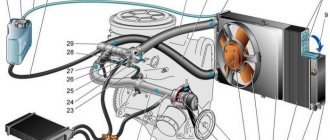
The solution to these issues is complicated by the fact that the cooling system of the injection engine on the VAZ 2114 is quite complex and includes 28 elements. The most convenient way to get to know them is on a special chart.
How the OS works
The electric fan is located on the electric motor shaft. Depending on the indicators of the sensor, it is turned on or off. One of the main elements of the OS is a thermostat valve with a storage tank , which senses changes in air temperature.
If the fluid temperature is around 87 degrees, the main valve turns on and sends fluid through the large circuit. At a temperature of 102 degrees, the valve stops at 8 mm.
Replacing the coolant
To normalize the cooling system on a VAZ 2114, sometimes it is enough to replace the coolant. To determine when this needs to be done, you should know some nuances:
- The effective life of antifreeze is 2 years, and antifreeze is 5 years;
- Typically, replacing antifreeze is required after a mileage of 20-40 thousand kilometers, depending on operating conditions;
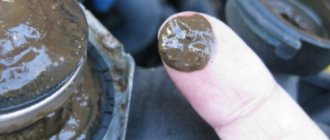
- A changed color of the composition indicates that it needs to be replaced.
antifreeze as a liquid , since it has a long service life and does not wear out the system so intensively. in favor of antifreeze is its affordable price.
Before adding new fluid, the system should be flushed. For this:
- Drain all existing coolant from the system;
- Screw the plugs tightly;
- Fill with high-quality distilled water to the maximum;
- Start the engine and bring it to operating temperature;
- The revolutions should be about 3 thousand. Avoid overheating the engine;
- After turning off the engine, leave the car for 7 minutes, after which the water is drained. If the system is heavily contaminated, the procedure must be repeated until completely clean distillate begins to pour out.
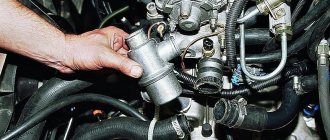
How to replace the heater valve VAZ 2114,2113,2115
On cars of the VAZ 2113-2114-2115 family, a heater valve from the VAZ 2108 is installed. The valve itself is designed to regulate the flow of coolant. The problem is that over time this faucet oxidizes and jams. This may cause coolant to leak.
What causes a faucet to leak?
A leaking faucet is a very common situation. In the spring, when the sun is already very hot, we turn off the interior heating. If the summer is hot, then there may be a situation where we never turn on the heating. Well, in the fall, when it gets colder, we try to turn it on and as a result a leak appears. This happens because the tap turns sour if it is not used for a long time. Once a leak appears, the faucet must be replaced. At the same time, you can replace the cabin filter.
Which faucet should I buy?
In auto stores you can see three types of cranes:
- Regular factory
- Ceramic
- Ball.
How are they different?
An ordinary factory faucet costs about one hundred rubles. There is a rubber membrane installed inside it. Such a tap is very unreliable and often turns sour. You should not install it in your car.
The ceramic faucet is the most reliable. That is why it is recommended to install it. The body of this faucet is made of plastic, and the locking elements are made of ceramics. It is worth considering that the throughput of a ceramic faucet is lower than that of a ball faucet.
A ball valve is much more reliable than a regular factory one. Instead of a rubber membrane, a ball with holes is installed in it. Such a tap is also susceptible to souring.
How to find the stove tap.
In order to gain access to the faucet, you need to remove the side panel at the passenger's feet.
Why the OS does not work
If you don’t know which cooling radiator is best to choose for the VAZ 2114, look at the existing one. Buy an analogue from the manufacturer, or purchase a device with the closest characteristics.
The fourteenth model is equipped with an aluminum radiator with two additional tanks. The radiator design includes:
- Radiator;
- Upper tank with pipes;
- Bottom tank with pipes.
Tools and materials
To replace the heater radiator in a VAZ-2114 you do not need expensive and complex tools or equipment. It is enough that almost every car enthusiast has a new spare part in his garage. To complete the job you will need:
- new heater radiator - aluminum or copper;
- a set of ring and open-end wrenches, you can use a set of sockets with a ratchet;
- curly screwdriver;
- set of hexagons;
- container for draining antifreeze;
- fresh coolant, no more than 4 liters.
Additionally, it is better to stock up on rags to wipe off antifreeze that has spilled into the cabin; in addition, you will need a stop for the torpedo - a wooden block of 50x50 mm, about 40 cm long, is perfect.
Radiator replacement
The replacement procedure itself is as follows.
- Unscrew the plug from the expansion tank and the cylinder and radiator plugs.
- Drain the coolant into a large container.
- Disconnect the radiator ventilation system from the battery.
- Remove the silicone pipes of the VAZ 2114 cooling system by disconnecting them from the radiator and tank.
- Remove the mounting bolts from the casing.
- Hold the radiator and remove the skin and fan together.
- This will completely free the radiator, so you can easily replace it with a new one.
- Assembly of the unit is carried out in reverse order. After replacing the radiator, start the engine and check the efficiency of the new unit.
Main causes of malfunction
There can be several reasons for such problems, but the most common are:
- Worn or damaged pipes.
- Incorrect connection of pipes.
- Broken stove tap.
- Radiator failure.
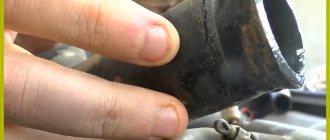
The first of these reasons - wear of pipes - can occur for natural reasons during operation, since the chemicals contained in coolants have a corrosive effect, which is complemented by the influence of high temperature.
In addition, the hoses of the VAZ 2114 stove can be easily damaged by over-tightening the clamps on them. When such damage occurs, fluid leaks from the system.
In total, VAZ 2114 cars have 4 pipes. Two of them are located under the hood and two in the cabin.
Their damage, which led to a coolant leak, can be judged by the following indirect signs:
- there is a constant drop in the liquid level;
- a specific smell appeared in the cabin;
- A puddle of coolant forms under the car or in the passenger compartment while parked.
If at least one of these signs is observed, then urgent diagnostics of the pipes should be carried out and their replacement.
Tightening the clamps on the pipes should be done with medium force. Over-tightening may damage them.
Radiator repair
In some cases, the radiator can be repaired, so you don’t have to buy a new spare part.
Most often, liquid leaks at the junction of plastic and metal parts. If there is a small leak, you can pour a special liquid with a coolant mixture inside the radiator. Thanks to its special composition, this product will seal the defects that caused the leak. If the damage is serious, repairs will no longer save the situation; you will still have to replace the radiator.
To check the tightness of the radiator, you can conduct a simple experiment at home.
- Fill the bathroom with enough water to submerge the radiator.
- Close all pipe openings tightly.
- Lower the radiator under water about 30-50 centimeters. Apply a pressure of 0.2 MPa to it.
- Watch what happens. If bubbles appear, the system is not sealed and needs to be repaired or replaced.
Repair and replacement of faulty stove elements
It is completely impractical to change the VAZ 2113–15 stove. First of all, this is quite expensive - buying a new stove without a tap and pipes will cost 4-5 thousand rubles. Moreover, replacing the heater is very labor-intensive - you will need to completely remove and then reinstall the panel. The job may take a full day and will require an assistant. It is much easier to identify the faulty element and replace only it.
Restoring the stove radiator
If a stove radiator is clogged from the inside, you can try to clean it of scale and deposits with various household cleaning products, such as Comet, Krot, Silit, or other chemically active substances. Some car owners use Coca-Cola for this purpose.
It is better to carry out the flushing procedure with the radiator removed, but you can do without dismantling it. To do this, drain the coolant from the system, remove the pipes from the radiator and pour a cleaning agent inside. Then the engine starts, the heater turns on and runs for several hours. After this, the radiator is thoroughly washed by connecting a hose with running water to it and dried with compressed air.
In the event of a leak, restoring the radiator is much more difficult. This can be done by soldering. However, most radiators are made of aluminum, damage in which can only be soldered with a powerful soldering iron using special fluxes and solders. But even in this case, there will be no guarantee that the radiator will be fully operational. It is much easier to replace it - a new product for the VAZ 2113-15 costs about a thousand rubles.
Replacing a stove radiator without removing the panel
The VAZ 2113–15 instruction manual states that access to the radiator can only be achieved after dismantling the panel. However, craftsmen came up with an algorithm for replacing the radiator with only partial disconnection of the panel from the body. To do this you will need:
- crosshead screwdriver;
- keys for 7, 10 and 13;
- a container for draining coolant from the cooling system with a volume of at least 5 l;
- a wide and shallow container for draining liquid from the heater radiator;
- dry rags;
- oilcloth or thick polyethylene film.
The radiator is replaced as follows:
- We drive the car onto an overpass or inspection hole.
- Disconnect the negative terminal from the battery.
- Using a 10mm wrench, unscrew the bolts securing the engine protection and remove the protection.
- Place the container under the drain plug, unscrew it with a 13mm wrench and drain the coolant.
The bolt plug for draining the coolant is unscrewed with a 13 key - Unscrew the cap of the expansion tank. This is necessary to speed up the drainage of antifreeze by equalizing the pressure in the system with atmospheric pressure.
- After draining the coolant, screw the plug back in.
- From the passenger compartment, close the heater tap by moving the control lever to the extreme left position.
- Move the front passenger seat all the way back and fold out its backrest.
- In the center of the panel, use a Phillips screwdriver to unscrew the self-tapping screw covered with a plug.
The self-tapping screw is closed with a plastic plug - From the passenger seat, unscrew the four screws securing the left panel cover.
- Unscrew the four screws securing the instrument panel.
The instrument panel is secured with four self-tapping screws - We unscrew the six fastening screws (three on top and three on the bottom) and remove the steering column casing.
The steering column cover is secured with six self-tapping screws - Disconnect the connectors from the cigarette lighter and radio.
When replacing the radiator, you need to remove the cigarette lighter and radio connectors. - Remove the plastic covers of the stove control levers.
Remove the plastic covers on the damper control levers - Unscrew the two screws securing the upper part of the center console. Disconnect the console.
The upper part of the console is attached to the sides with two self-tapping screws - Unscrew the screws securing the diagnostic connector.
To remove the connector you need to unscrew two screws - We completely dismantle the console.
Before removing the console, you must disconnect all electrical connectors. - We unscrew the screws securing the panel base to the body.
The base of the panel is attached to the floor with two screws - Unscrew the four screws on the side panel fastenings (top and bottom).
On the sides the panel is attached to the body with self-tapping screws at the top and bottom - We unscrew the screws securing the panel to the base according to class=”aligncenter” width=”458″ height=”404″[/img] In the center the panel is attached to the base with self-tapping screws
- We remove the electronic control unit.
All connectors are disconnected from the control unit - We slightly lift the panel on the right side and fix it using improvised means.
The partially dismantled panel is pulled back and fixed - When access to the radiator is open, cover the floor under it with oilcloth, on which we install a container for collecting coolant.
To prevent coolant from spilling on the floor, you will need a shallow, wide container. - Using a Phillips screwdriver or a 7mm wrench, carefully unscrew the clamps securing the pipes;
The pipes should be removed gradually, allowing the coolant to flow into the container without pressure. - Drain the coolant from the pipes and radiator.
- Unscrew the radiator mounting screws.
The radiator is secured with four screws - We remove the old radiator.
- We install a new radiator.
- We put the pipes on the fittings and secure them with clamps.
- We assemble the panel in reverse order.
Thermostat problems
When the temperature reaches 95 degrees Celsius, the liquid begins to flow through the thermostat. Due to the operation of this unit, the engine requires a minimum of time and resources to warm up. The thermostat is located between the radiator and the engine.
Most often there are two types of faults.
- The valve closes. If the engine is not warmed up, it is difficult to maintain speed. It may simply stall.
- The valve opens. During frosty periods, you can operate the car, but you must turn on the heating at maximum speed. Otherwise, the power unit will simply overheat.
If you are unable to move the valve while repairing the thermostat, don't be afraid to lightly tap the housing with a simple screwdriver. This will solve a common problem.
When the thermostat is completely disassembled, the pipes are hermetically sealed, which will prevent coolant leakage. Only after this can you start working.
In general, the choice between antifreeze and antifreeze should not be a problem for you. Choose antifreeze. Although it is more expensive, it lasts longer and allows you to minimize possible problems with wear and tear of the cooling system. The imaginary savings due to antifreeze are not called that for nothing. In the future, you will pay much more to fix the damage caused by the use of antifreeze.
The VAZ-2114 car uses a hidden engine cooling circuit with an injector. It is highly complex and includes 28 elements. Traditionally, the assembly of the cooling system of this car is not of high quality. Therefore, throughout the entire period of operation, it requires constant monitoring, regular maintenance and repair. In this regard, many owners of this car are interested in the nuances associated with independent maintenance, repair and operation of the cooling system, among which the most common questions are:
- 1. How to properly replace the coolant mixture?
- 2. How to flush the cooling system?
- 3. How to remove air from the VAZ-2114 cooling system?
- 4. How to properly replace the cooling system pipes?
Major failures of the expansion tank
The most common failures of the coolant reservoir are:
- cracks (appear over time as a result of depolymerization of the plastic from which the case is made);
- rubbing (occurs due to poor fixation of the tank, leading to its periodic contact with the body of the machine and abrasion of the plastic wall);
- destruction of the thread on the neck (can occur either from old age, as a result of depolymerization, or from careless handling);
- failure of the tank plug or its jamming (most often occurs on tanks that have been in use for a long time).
Thus, almost all breakdowns are in one way or another related to the destruction of plastic and the violation of the integrity of the tank or its plug.
Every motorist should remember that the most important element of the tank is its plug, which is responsible for regulating and relieving excess coolant pressure. As soon as it is noticed that it is faulty, you should immediately replace it, since traveling with a faulty cap can lead to swelling, deformation and even explosion of the tank.
Briefly about the car
The VAZ-2114 hatchback is a fairly popular car that can still be found both on domestic roads and on the roads of the entire post-Soviet space. It was produced by AvtoVAZ OJSC from 2003 to 2013 and was one of the variants of the restyled series of the Samara-2 (VAZ-21093) family of cars.
During mass production, various engines with the same type of cooling systems were installed on it, which operate on the principle of internal heat exchange using a special cooling mixture of the “Tosol” type.
Cooling system diagram
Purpose, location and design of the VAZ 2113–15 stove
Unlike classic Zhiguli models, the VAZ 2113–15 stove copes with its duties quite well. If it is in good working order, the inside of the car will always be warm. The air flow distribution system is also implemented quite well, so the windshield, even in severe frost, is completely cleared of ice in a few minutes.
Purpose of the heater
The main function of the stove is to heat the interior and windshield. Hot air supplied through the duct system to the windshield prevents it from freezing in winter. In the warm season, the stove is used for forced ventilation of the interior.
Location and design of the stove
The VAZ 2113–15 stove is located in the front part of the cabin under the center console of the dashboard. Only the heater controls and deflectors through which air flows are brought into the cabin.
The interior heater of the VAZ 2113–15 is closed by the center console
The stove consists of the following elements:
- casing;
- radiator;
- tap;
- inlet and outlet pipes;
- electric motor with a cylindrical impeller;
- windshield defroster;
- control valve;
- foot air damper;
- control module (mode switch, resistor, damper control levers).
Operating principle of the stove
The operation of the stove is based on heat exchange between the heated coolant (coolant) and the air entering the cabin. The basis of the design is the radiator. It is a system of tubes within which heated coolant supplied from the power unit circulates. The tubes are equipped with thin lamellas, allowing for more efficient heat transfer to the air.
The radiator is covered by a casing, which is the body of the stove. On one side there is an electric fan that pumps air into the device. By varying the fan rotation speed with a switch that changes the resistance of a special resistor and located on the central panel, you can regulate the intensity of the air flow entering the cabin.
Circulating between the radiator lamellas, the air heats up and enters the passenger compartment through air ducts located in the front part of the heater. The distribution of flows is carried out using three dampers, one of which (control) regulates (opens or closes) the flow of air into the cabin, and the other two (air blowing for the legs and windshield) change its direction.
The basis of the design of the interior heater is the radiator
The stove can be completely disconnected from the engine cooling system using a tap that shuts off the coolant supply to the radiator of the heating system.
Maintenance
Regular maintenance of the cooling system comes down to checking the level of the coolant mixture in the expansion tank and monitoring its color. It is recommended to check before each trip or, in extreme cases, regularly every 500 - 600 km.
The level of the coolant mixture in the tank must constantly exceed the minimum level by 2...3 cm. Checking the level and adding fluid must be carried out only on a cold engine. The mixture intended for topping up must be of the same type as the liquid poured into the system. Mixing different types is not recommended.
IMPORTANT! In the event of an emergency, you can add clean water to the liquid, but the cooling ability of the mixture deteriorates, and the presence of water contributes to corrosion on metal parts. In addition, in winter, the diluted mixture can freeze and damage both the radiator and the engine. Therefore, the coolant mixture diluted with water must be drained as soon as possible and, after repairing and flushing the system, it must be filled with the recommended coolant.
Repair or replace the tank?
Some drivers, having noticed that the expansion tank 2114 is leaking, try to repair the crack with glue or epoxy resin.
It should be noted right away that doing this is absolutely not worth it. After all, such repairs, as a rule, are short-lived, and with active use, even the most reliable adhesive seam can leak.
In addition, as already mentioned, the appearance of cracks in the tank is a sign of aging of the plastic caused by depolymerization - the volatilization of a number of fractions from the material that give it plasticity.
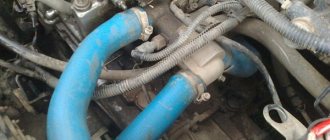
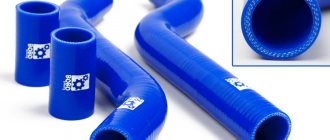
Replacing cooling system pipes
The cooling system of the VAZ-2114 car uses 4 rubber pipes:
- upper supply pipe - supplies cooled liquid from the radiator to the engine;
- lower outlet pipe - removes the heated liquid below from the engine to the radiator;
- two short pipes that connect the water pump and thermostat to the system.
If the pipes fail, they must be replaced. In this case, it is best to purchase silicone pipes.
To remove old and install new silicone (rubber) pipes, you need a set of wrenches, several screwdrivers and silicone lubricant.
Repairs associated with replacing pipes must be carried out in the following order:
- 1. Disconnect and remove the battery;
- 2. Drain all coolant mixture;
- 3. Remove the fan, soundproofing upholstery, trim and frame trim from the windshield;
- 4. Clear access to the air collector by removing its fastening elements;
- 5. Remove the front housing and release the clamps that hold the pipes;
- 6. Remove the pipes from the fittings and install new ones (silicone or rubber) in their place. Secure the new pipes with clamps. Before installation, it is recommended to lubricate the rubber pipes with silicone grease. It is also advisable to lubricate the clamp screws with silicone grease. Subsequently, this will allow you to easily unscrew them;
- 7. Install all the removed parts in their places, flush the system and fill it with new coolant mixture.
The process of replacing the expansion tank
Having talked about the main malfunctions, we will now figure out how to replace the coolant reservoir of the VAZ 2114.
The first thing you will need for this is to select the appropriate set of tools, namely:
- a set of keys;
- pliers;
- screwdriver;
- sandpaper.
In addition, you should immediately prepare new clamps.
Before you start replacing, you should take sandpaper and thoroughly sand all the inlet holes of the new tank. This is necessary for better contact with the pipes. If you don’t do this, but leave everything “as is” (that is, rough), then the expansion tank pipe 2114 may not fit tightly.
The replacement of the tank itself should be performed in the following order:
- If the car was running, you should turn it off and wait for the coolant in the system to cool.
- After the liquid has cooled, you should unscrew the nuts securing the adsorber (for this procedure you will need a 10mm wrench).
- Remove the adsorber.
- Pump out the antifreeze from the expansion tank (the most convenient way to do this is with a syringe (rubber bulb), making sure that all the liquid is removed).
- Place a small basin under the tank (in case of possible leakage).
- Unscrew the top tube from the old tank and screw it to the new one (it is responsible for draining excess coolant from the radiator).
- Remove the old tank.
- Unscrew the lower pipe from the old tank and connect it to the new one (at the same time, during the installation process it is advisable not to change the position of the pipe and not lower it down).
- Place the new tank in place and secure it.
- Fill the conservator with coolant up to the Max mark, but not higher.
- Check the connections for tightness.
- If there are leaks, tighten the fastening clamps.
As you can see, replacing the expansion tank is very simple and does not require much time or effort. After it is completed, you should check the serviceability of the new cover. To do this, start the car and wait for the coolant to heat up. As soon as it boils, the fan on the radiator will start working. At this moment, you should carefully monitor the lid - it should rise and relieve excess pressure. If this happens, then everything is fine.
Finally, it is worth noting one important point. It often happens that after replacement the tank only lasts a couple of months and begins to leak. This is caused by its abrasion against the metal body of the machine, leading to thinning of the plastic and the formation of cracks. In order to avoid this, it is enough to install a piece of rubber or other soft but elastic material between the tank and the body.
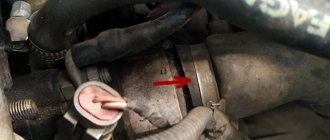
Removing air from the cooling system
Often during repairs, air enters the cooling system, which forms an air lock and interferes with the normal operation of the entire system. In order to remove such a traffic jam, there are several ways. Simplest:
- warm up the engine to operating temperature and turn it off;
- unscrew the coolant pipe clamp on the throttle body;
- remove the heating pipe of the throttle assembly, bleed the air and after the coolant begins to flow out, put it back on the fitting and tighten the clamp.
Changing the coolant strictly according to the maintenance regulations
It is important to change the coolant frequently to prevent engine damage, because Over time, it loses its properties and is subject to heating.
To carry out work on changing antifreeze or antifreeze, you need to know the important components:
- Know the period during which you can use cooling liquid, antifreeze for 2 years, antifreeze for 5 years.
- Monitor the mileage for fluid changes, usually from 20,000 to 40,000.
- Check the condition of the fluid, paying attention to the color; if the color has changed after use, the fluid must be replaced.