During the process of installing a new speaker system, the owner may have the following problem: how to connect tweeters (tweeters) so that they work efficiently and without problems?
The essence of the issue is the complexity of modern stereo systems. For this reason, in practice there are often cases when installed tweeters either work with distortion or do not work at all. By following the installation rules, you can avoid possible difficulties - the procedure will be as quick and simple as possible.
In what places is it recommended to install tweeters?
Manufacturers recommend many places to place tweeters, most commonly at ear level. In other words, aim them as high as possible at the listener. But not everyone agrees with this opinion. This installation is not always convenient. It depends on the specific circumstances. And the number of installation options is quite large.
- Corners of mirrors. During the trip they will not cause additional discomfort. Moreover, they will fit beautifully into the interior of the vehicle;
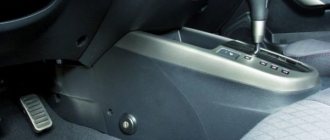
- Dashboard. Installation can even be done using double-sided tape;
- Podiums. There are two options here. The first is to install the tweeters in a standard podium (which comes with the tweeter), the second is to make the podium yourself. The latter case is more complicated, but it guarantees a better result.
Where is the best place to point tweeters?
When designing car audio, you can choose one of two options:
- each tweeter is directed at the listener. That is, the right tweeter is directed at the driver, the left one is also aimed at him;
- Diagonal installation. In other words, the tweeter on the right is routed to the left seat, while the speaker on the left is routed to the right.
The choice of one option or another depends on the individual preferences of the owner. To begin with, you can point the HF speakers towards yourself, and then try the diagonal method. After testing, the owner himself will decide whether to choose the first method or give preference to the second.
Installation
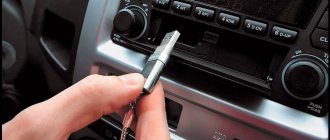
How to install and connect a horn without an amplifier directly to the radio? The first step is to make or purchase a podium for the speakers.
In most cases, the podium is supplied with the column, but in some cases you need to make it yourself. This does not require special knowledge, and it is enough to simply measure the dimensions of the speaker and cut a podium to fit these dimensions. When you lack knowledge or tools, it is recommended to contact a specialist.
Horns are installed in two ways:
The options are equivalent to each other and when choosing, you need to rely only on the layout of the car’s interior and audio system. It is recommended to try two variations, and only after that make a final choice.
Diagonal horn placement
The installation location depends on the location of the audio system, and in most cases, it is selected individually for each speaker.
Connection features
A tweeter is an element of a stereo system whose task is to reproduce sound with a frequency from 3000 to 20,000 hertz. The radio tape recorder produces a full spectrum of frequencies, ranging from five hertz to 25,000 hertz.
The tweeter can only reproduce high-quality car audio with a frequency of at least two thousand hertz. If a lower-frequency signal is applied to it, it will not be reproduced, and if the power for which the mid- and low-frequency speakers are designed is high enough, the tweeter may fail. At the same time, there can be no question of any quality of playback. For long-lasting and reliable operation of the tweeter, you should get rid of the low-frequency components that are present in the general spectrum. That is, make sure that only the recommended range of operating frequencies falls on it.
The first and simplest way to cut off the low-frequency component is to install a capacitor in series. It passes well the high-frequency frequency band, starting from two thousand hertz and more. And does not pass frequencies below 2000 Hz. In fact, this is a simple filter, the capabilities of which are limited.
As a rule, the capacitor is already present in the speaker system, so there is no need for additional purchase. You should think about buying it if the owner decided to acquire a used radio and did not find a capacitor in the tweeter kit. It may look like this:
- A special box to which a signal is sent and then transmitted directly to the tweeters.
- The capacitor is mounted on the wire.
- The capacitor is built directly into the tweeter itself.
If you do not see any of the options listed, you should purchase the capacitor separately and install it yourself. In radio stores their range is large and varied.
The range of filtered frequencies depends on the type of capacitor installed. For example, the owner can install a capacitor that will limit the range of frequencies supplied to the speakers at three or four thousand hertz.
Note! The higher the frequency of the signal supplied to the tweeter, the more detailed the sound can be achieved.
If you have a two-way system, you can choose a cutoff from two to four and a half thousand hertz.
Preparation
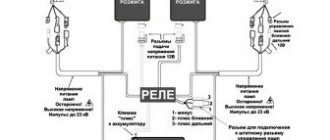
At the preliminary preparation stage, the car owner develops a connection diagram for the amplifier, taking into account the location of standard equipment. If additional loudspeakers (for example, a subwoofer or tweeters) are installed in the vehicle structure, it is necessary to consider the method of installing the devices. Based on the data obtained, the car owner purchases power cables, interconnect cords with tulips, additional decorative elements and other parts necessary when installing amplification equipment.
Wires
To connect the amplifier to the vehicle's on-board network, you need a special cable designed for the current consumed by the additional equipment. The cord is selected based on the power of the installed components, taking into account additional heat losses (up to 30%). For example, when switching a 2-channel amplifier with a nominal power of 200 W, the thermal load must be taken into account, which is approximately 60 W. The resulting power value requires the use of a cable rated at 21.6 A (it is recommended to make a safety margin of another 10-15%).
To calculate the wire cross-section, there are special tables that display the dependence of the cable diameter on the transmitted current. For installation, use a cord with a copper core that does not collapse under vibration loads
When purchasing a cable, you should pay attention to the thickness and characteristics of the insulation, since low-quality materials spontaneously crack when the temperature drops to -15°C
Fuse
It is necessary to install a fuse in the power supply circuit of the amplifier in the car to prevent the product from igniting in the event of a short circuit (for example, due to destruction of the insulation of the power cables). The design of the equipment includes standard protection elements; an additional insert is located near the battery terminal. To properly connect a car amplifier, you must use fuses with a rating of no more than 50 A.
Interconnect cable
The mounted amplifier must be connected to the head unit using a special interconnect cable equipped with metal mesh protection. The screen reduces the likelihood of interference occurring during the operation of the ignition system and electronic components of the vehicle. It is not recommended to lay patch cords near standard control units and electric motors installed in the vehicle's air conditioning system.
Other Features
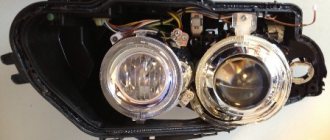
Today, the most common tweeter option is the electrodynamic system. Structurally, it consists of a housing, a magnet, a coil with a winding, a diaphragm with a membrane, and power wires with terminals. When a signal is applied, current flows in the coil and an electromagnetic field is formed. It interacts with the magnet, mechanical vibrations occur, which are transmitted to the diaphragm. The latter creates acoustic waves, and sound is heard. To increase the efficiency of sound reproduction, the membrane has a specific dome shape.
Car tweeters typically use silk membranes. To obtain additional rigidity, the membrane is impregnated with a special compound. Silk is characterized by its ability to more effectively cope with high loads, temperature changes and dampness.
In the most expensive tweeters, the membrane is made of thin aluminum or titanium. This can only be found on very prestigious speaker systems. They are found quite rarely in a typical car audio system. The cheapest option is a paper membrane.
In addition to the fact that the sound is worse than in the two previous cases, such equipment has an extremely short service life. And this is not surprising, since paper cannot ensure high-quality tweeter performance in conditions of low temperature, high humidity and high load. When the car increases engine speed, an unusual sound may be felt.
Don't forget that you can also set up the tweeter using the radio. Even the cheapest models have the ability to adjust the high frequencies. In particular, mid-price models have a built-in equalizer, which greatly simplifies the task.
After installing the tweeter, you need to configure the audio system, and how to do this, read the article “How to configure a radio.”
What are tweeters or tweeters?
If you have not used speakers before or made do with the classic versions, then most likely you are not familiar with the equipment called Twitter. Before buying it and installing it, you should understand the main purpose, advantages when listening to music and the operating features of this system.
From the name itself it is clear that during operation the equipment reproduces characteristic sounds of a certain frequency, similar to squeaking. This is achieved by incorporating high-frequency sound vibrations into the work. Since standard models have a wide range of usable frequencies, they make the music sound monotonous and desaturated. Therefore, special variations have been developed that can be used to emphasize high-frequency sounds, providing volume and expressiveness to audio recordings.
Twitter is a small speaker that is installed together with the main speaker system in order to improve the parameters and characteristics of the audio recordings being played.
Video on how to install tweeters
Car audio systems rarely use only one full-range speaker. This scheme is used only in exceptional cases, since one loudspeaker gives a satisfactory sound picture, where there are mainly mid frequencies, and the low and high ranges are weak and inexpressive. Component acoustics with two or more acoustic emitters require a crossover.
Typically this is a passive filter using capacitors and inductors that suppresses a certain frequency band. The tweeter limiter attenuates or nearly attenuates all frequencies below 2500 Hz and allows high-frequency content to pass through. The filter, designed to connect the low-frequency head, cuts off frequencies above 150-200 Hz. Thus, the range of reproduced frequencies is divided into two bands designed to work with a specific speaker.
Types of subwoofers
Car woofers equipped with a custom housing can have a built-in amplifier or are connected directly to the car radio. The use of an additional amplifier allows you to relieve the head unit. To perform adjustments across frequency ranges and match the signal with other acoustic devices, a separate crossover is placed. The subwoofer volume is adjusted using a separate rotary potentiometer mounted on the body of the product.
The design has a special bass reflex, which provides expansion of the frequency range due to the resonance effect. There are designs of low-frequency devices in which the loudspeaker is placed on a dividing partition inside the housing.
The passive subwoofer is connected through the rear speaker connectors or to special plugs located on the head unit. Such a switching scheme increases the load on the electronics of the radio and negatively affects the operation of the components of the car's acoustic system. But since equipment without an amplifier has a low price, car owners are interested in the question of whether it is possible to connect a subwoofer while minimizing loss of sound quality.
How to connect crossovers to car speakers
A passive separation module is a small board with radio elements. A regular block has 6 pair terminals:
- ULF output
- Twitter connection
- Connecting a subwoofer
Connecting the crossover to the speakers is not difficult. Some models allow you to clamp the wire under a screw, and some are equipped with a terminal block. The terminals where the amplifier output is connected are labeled “Input” or “Amplifier”, the terminals intended for the high-frequency “tweeter” are marked “Tweeter”, and the subwoofer is included in the terminals "Woofer." More complex devices have an additional pair of contacts for the midrange speaker. Thus, the filter divides the audio range into three bands. The diagram for connecting the crossover to the speakers includes the correct wiring inside the car.
Instructions for setting up a 4-channel amplifier
Generally, there are three types of amplifier settings you need to know. All of them are given below.
Amplifier setup for four speakers but no subwoofer
Setting up an amplifier for a subwoofer and speakers
Tuning for local gain
Note. If the car radio in the car is a new version, adjusting the amplifier may not be necessary. These radios already have automatic Bass Boost settings. If this is the case, then you will just need to adjust the Level rotator.
Connecting speakers via crossover
To correctly connect crossovers to speakers, you need to observe the polarity, which is indicated for each pair of terminals. To do this, you need to use special cables for speaker systems. Since the wire is clamped under a screw, a stranded copper wire in polyvinyl chloride insulation is used between the limiter and the speaker. Quality cables have polypropylene foam insulation, and the best separator and speaker cables have Teflon insulation.
How crossovers for speakers are connected. Often on forums you can read about oxygen-free or monocrystalline copper, the use of which in speaker cables improves the sound and makes it richer. This is purely a marketing ploy. All differences between ordinary copper and these “prestigious” grades lie beyond human perception and do not have any effect on the sound quality. It is useless to use silver plated copper cables.
Installation rules
When installing additional or new speakers, you must follow a number of rules that will help improve sound quality and eliminate the possibility of short circuits:
By following the rules described above, you can achieve the highest sound quality and protect the wiring from short circuits.
Bottom line: you can install horns in your car yourself. But if you have doubts about your own abilities or do not have the special knowledge required for installation, it is recommended to contact specialized auto repair shops so that the car owner is completely confident that the installation is correct and the sound meets all expectations.
Source
Connecting speakers via crossover
The cross-section of the conductor is very important when driving speakers through a band-pass filter. It directly depends on the power of the speaker system and the resistance of the dynamic head. If we omit all the calculations, it turns out that for a speaker with a power of 100 watts and a resistance of 4 Ohms, you need a cable with a minimum cross-section of 2.0 mm2. The lower the acoustic resistance, the greater the current will flow in the circuit. When connecting loudspeakers, it is recommended to take a 20% margin over the cable cross-section.
Connecting the crossover to the speakers should only be done with real copper wire. Particularly dangerous when connecting elements of a sound system is the use of cheap cables from some Chinese manufacturers. Instead of copper, they use copper alloy or copper-plated steel. Both are strictly contraindicated in car acoustics. In addition to poor sound quality, there will be uncontrolled heating of the connecting wires, which can lead to dangerous consequences.
Sound settings
You can connect the amplifier to the car radio yourself. After installing all the elements, you need to configure the system as follows:
The above settings allow you to achieve the best sound of the created system. If the amplifier is part of the radio, then the setup is carried out through the built-in functions of the device.
When installing a speaker system, laying the cable, you should choose the shortest path; it is not recommended to create a large number of connections, since they significantly reduce the reliability of the system.
Connecting a crossover to speakers without an amplifier
You can connect speakers via a crossover not only from the output of a low-frequency amplifier, but also from the output of a music center or car radio. It should be taken into account that passive separation systems are made of discrete elements, which is why the sound level will be lower than when working with a low-frequency amplifier. In this case, much will depend on the speakers used. Some models allow high-quality work only as part of a powerful system with good ULF.
Theory. Connection types
In electrical engineering there are two types of connections - series and parallel. With a series connection, the resistance is summed up; with a parallel connection, it becomes lower than the smallest of the connected ones. This is something worth remembering and will come in handy in order to connect your speakers correctly.
Basic formulas for parallel and serial connections
There is also a mixed connection. This is when serial chains and parallel connections are “mixed”. In this case, calculation formulas are used, gradually arriving at one of the “pure” circuits - parallel or sequential.
Mixed compound and its conversion to "simple"
The figure shows the sequential transformation of a complex mixed connection into a simple one.
How to install crossovers for speakers
To avoid problems with how to connect a crossover for speakers, you need to follow the installation rules. Do not lay power and speaker cables together. This may cause low-frequency interference in the speakers. The same effect is caused by crossing cables. The band limiter is not a device whose operation requires any intervention, so the blocks can be placed in any convenient location. The main thing is that no dust, dirt gets in there and there is no elevated temperature. The blocks do not have a sealed housing, so negative external factors can lead to disruption of internal soldering and failure of the speaker system. It is advisable to tin the ends of the copper cable with a thin layer of solder before clamping it with a screw. This will reduce copper oxidation and the formation of an oxide film. Broken contact between the speaker and the amplifier is especially dangerous. Lack of load leads to breakdown of the output transistors.
Some crossover modifications consist of two first-order filters in series. Such models have a signal attenuation switch on the front side. When connecting a first order filter, the attenuation of unnecessary frequency band is 6 dB per octave. The crossover design allows you to connect a second link and get an attenuation of 12 dB. When connecting a crossover to speakers, it is desirable that the filter controls be accessible.
Leave a request and we will call you back within 48 hours!
A tweeter is a type of speaker that reproduces the upper frequency range (2000 Hz - 20000 Hz). The quality of its sound directly depends on the angle at which it is located towards the listener. Installation of tweeters in cars can be done either with the help of specialists or on your own.
Do-it-yourself replacement of standard speakers
The least expensive way to improve the sound inside a car, both in terms of money and effort, is to replace the standard wideband speakers with two- or three-way coaxial ones.
The standard place for the “native” speakers is the lower front corner of the doors. For replacement, it is advisable to select speakers of the same size as the standard ones. Larger speakers generally sound better, but they will require a larger mounting hole in the door.
Installation Tools
To replace the speakers you may need the following tool:
- jigsaw,
- electric drill,
- Phillips and flathead screwdrivers,
- knife,
- soldering iron,
- pliers,
- set of car keys,
- panel puller,
- file,
- insulating tape,
- plastic clamps for fastening wires.
Video: learning how to independently connect speakers to a car radio
Selecting a mounting height
It is the tweeters that are a headache, even for experienced installers. These little speakers not only need to be placed in the right place, but also at the right angle in order for the scene to form correctly. Larger low-frequency speakers are always installed in one place - these are doors. Even component speaker manufacturers can't determine exactly where the tweeter will play best. Therefore, several types of fasteners are included in the kit. A popular option is the "cup". It is designed for installing a tweeter in a car either on a rack or on a dashboard. The kit may also include a housing for installation on a surface. The most expensive tweeter options can rotate inside the housing for more precise directionality.
The main reason why so much attention is paid to installation in a car is its purpose. The fact is that tweeters are one of the most important components for creating high-quality sound in a car. This is especially important if the system consists of two components. In this case, the setting of the sound stage directly depends on the HF. As for three-way systems, there are even more big problems here, because a midrange link is added. It is much larger and requires a closed volume.
No technician will be able to tell you where exactly in your case you need to install the beepers. Therefore, you need to look for a place for installation from scratch. To determine the correct location, you need to use high-quality recordings on which a monotonous voice is recorded. Most often in practice, a test disk is used for testing. It contains special entries that allow you to select the correct location for tweeters.
Active and passive
Another classification is passive and active. The main difference between these two types is the components from which they are composed.
Active ones consist of components that require constant operation of power sources. These are, for example, microcontrollers, amplifiers and other elements.
As for passive ones, they are created from elements that do not require power, for example, coils, as well as capacitors and resistors.
Another difference is that active ones can only be mounted in front of the amplifier, while passive ones have more choice - they can be mounted in front of the speaker itself.
Width selection
We’ve decided on the height of the stage, but what does the width depend on? The width of the stage depends on the angle of the tweeter. Just like with height, here you need to try all the options. The most popular version is when both speakers are facing each other.
Selecting the tweeter direction angle:
- to the salon;
- on reflection from the windshield.
The choice of radiation angle is one of the most important factors, since the matching of the HF and LF/MF speakers depends on it. The most favorable orientation when installing the tweeter height is the listener's mouth. If the angle of the tweeter is changed slightly, or the installation height is chosen, the stage will be disrupted and the sound quality will decrease.
It is important that when installing a tweeter in a car with your own hands, choose a location such that there are no reflective objects near it, within approximately a radius of 5 cm. This will make it possible to achieve a strong reduction in the number of standing waves in the RF path.
In the second case, achieving the correct scene will be much easier, since the physical location of the tweeters relative to the glass will be closer. The vast majority of tweeters play too harshly when directed into the cabin.
Purpose
In most cases, horn acoustics are designed to reproduce mid and high frequencies, allowing you to improve existing acoustics. The best effect is achieved when used with a subwoofer (amplifier) that reproduces low frequencies.
By adding and changing audio system components, you can achieve the desired sound in your car, and horns are excellent equipment to improve the quality of music in your car.
One popular place to connect horns is at the front of the car. The horns are installed frontally on the housing wall. A waveguide is formed inside with a hole facing outwards.
Another popular option is to connect horns to a system with a low-frequency amplifier, high-frequency and mid-range speakers. All of them are placed in a special case separately from each other, and allow you to achieve better sound.
To properly connect the horn to the radio, you need to use a capacitor. It is also recommended to carry out sound adjustments to properly distribute the sound and achieve maximum immersion.
Installation
Let's move on to installing tweeters in cars. For installation we will need:
- HF speakers;
- mounting brackets;
- first order filter (capacitor);
- wires.
First, you need to decide how you will connect the tweeters. There are several options, the cheapest and most popular is a parallel connection to the woofers via a capacitor. A more professional option is a channel-by-channel connection to an amplifier or to a processor, or a processor radio.
When connecting in parallel to the “midbass”, we take a two-core cable with a cross-section of at least 1.5 mm and solder “plus” to “plus”, and “minus”, respectively, to the “minus” of the cable going to the woofer.
According to the car's operating instructions, we disassemble the dashboard and remove the struts. We carefully route the wires, thereby making a hidden installation. After this you need to connect the capacitor. It should be recalled that the capacitor acts as a first-order filter and cuts off unnecessary frequencies with a cutoff slope of 6 dB per octave. Our passive crossover is soldered onto the positive wire that goes to the tweeter. If this is not done, the speaker will simply burn out. If you intend to connect a tweeter to an amplifier, it is important to remember that you need to turn on the high-pass filter and select a filter frequency of 4 kHz. In the future, it will need to be adjusted, depending on what frequency range the woofer plays in a two-way system, or the midrange speaker in a three-way system.
On the dashboard, the tweeter is attached in a cup with double-sided tape. In most cases, it comes with speakers. If it is not included in the package, you can buy adhesive tape at any hardware store.
As for rack installation, installation here also takes place using double-sided tape. But in this case, it will not be possible to send him to the salon. To do this, you need to contact professionals to cut a special hole into your rack. In this case, everything will look most aesthetically pleasing. The tweeter can also be embedded into the door card. To do this, a round hole is cut out in the door, and after that, using the installation kit, the tweeter is installed. It is important to remember that if you install the tweeter speaker with double-sided tape, you can always change the direction of the membrane radiation. But if you set it statically, you won't be able to change the direction.
Professional installers recommend trying all design options before final installation; only in this case will it be possible to create the correct scene. As stated earlier, proper installation of tweeters in a car may require serious intervention in the design of the A-pillars or door panels. If the tweeters are installed in the dashboard, then large holes will need to be made. In most cases, this operation is irreversible. So the old saying comes to mind: “Measure twice, cut once.”
Prevention is better, but cure is more frequent
Hi-Fi salon workers won’t let you lie; the phrase “It played in your house, but it doesn’t play in my house” is the best illustration of the problem of interior acoustics. That is, acoustics itself has no problems, but problems arise from those who try to ignore its existence.
Let's say a young family has found its own apartment. The first step is to draw up a plan for arrangement and repair. “We’ll put the refrigerator here, the washing machine in the bathroom, and the sofa in the living room.” We hang the TV opposite the sofa, unless, of course, someone comes up with the disastrous idea of driving it into a corner. Then, by the way, it may well turn out that the screen turned out to be opposite a window facing south - I personally have seen this more than once.
In order to uncompromisingly combat early reflections, optimize bass and reduce reverberation time, some home studio owners resort to the most radical measures, such as building walls from acoustic traps
Speakers are most often the last thing people remember, and God forbid, if this happens at least before the installation of the notorious sofa. It’s clear why: even if the future inhabitants of the apartment really like to listen to music, worries and expenses during a large-scale renovation are through the roof, they shouldn’t forget to order a toilet...
The result is predictable. The speakers find themselves driven into the corners of the room, and the subwoofer peeks out hauntedly from somewhere behind the curtain. As a result, the sound will most likely be worthy of the first car of a young hip-hop fan who is experiencing an acute shortage of financial resources and musical taste.
But it will never be possible to arrange the acoustics purely by chance so that your mother-in-law, a hereditary musicologist, comes to visit and plunges into deep euphoria. The fact is that the rules for the optimal location of sound sources almost always go against the established norms (not to say cliches) of interior design.
The fact that the acoustics of a room affects many things is evidenced, for example, by the profile of the work of the British company Oscar Acoustics. They make special decorations in office meeting rooms that improve the speech intelligibility of all meeting participants
It is important to understand that any room always acts as a resonator, shaping the character of the sound no less than, say, a violin deck. However, unlike the body of a violin, the shape of the room in the vast majority of cases does not contribute to euphony.
For example, a rectangular topology with parallel surfaces of a large area inevitably leads to the emergence of unwanted reflections and standing waves, turning the more or less flat (at best) frequency response of the speakers into a curve that most closely resembles an earthquake seismogram. Moreover, at different points in space, the shape of this curve can change in the most bizarre way.
Application
Loudspeakers are widely used in various walks of life. They are used in everyday life, in cultural and sporting events of various sizes (for loud music or start announcements), in transport and in industry. Currently, loudspeakers are widely used in the security field. Thus, these devices are used to notify people about fire and other emergencies.
Loudspeakers are often used to convey advertising information to people. In this case, they are installed in crowded places, for example, in squares, shopping centers, and parks.
The magical sound of horn systems
- It’s not difficult to verify that horn acoustics sound special. And there are all the prerequisites for such a sound. Firstly, horn acoustics are highly sensitive. This makes it possible to reproduce the most subtle nuances and convey the emotions of the performer;
- Secondly, horn speakers produce sound waves that are more “natural” in nature compared to the air vibrations coming out of traditional speakers;
- Horn acoustics can reproduce low frequencies, but their size depends on this. In other words, the lower frequencies you have to reproduce, the larger the size of the horn speaker must be.
Note. It is for this reason that horn acoustics are mostly used to reproduce midrange and high frequencies, but if you choose larger speakers, then the low frequencies will also be reproduced at the highest level.
- And that is not all. Low frequencies will be reproduced not just like that, but at the highest level. True, only the most subtle connoisseurs of sound can distinguish the difference in reproduction.
Note. It is interesting that recently there are quite often speakers where only the HF emitters are made in the form of a horn. For example, the same speakers of the Klipsch Reference series are made according to this model.
- High frequencies reproduced by horn speakers sound much louder. Needless to say, the HF quality is better than when using conventional tweeters.
Homemade horn acoustics
Recently, among the manufacturers of horn acoustics, I would like to single out the Italian company Zingali. The engineers of this company created an original horn emitter that simultaneously reproduces midrange and highfrequency frequencies, and at the same time looks beautiful.
Block-modular voice notification.
It is also worth mentioning the method of constructing a warning system based on functional blocks of distributed security systems.
One of these blocks is the addressable voice warning module “MPO-2M” from the Rubezh address system or “Rupor isp.02” from the Bolid system.
Connecting several sirens to such devices is not very convenient and not every installer can cope with such a scheme:
It will be impossible to build a more or less long warning line. The solution is to use several voice notification modules.
In some cases, it makes sense to use these devices if the fire alarm system is designed from the same line of equipment.
But what about the requirement “to ensure the broadcast of recorded soundtracks and/or live broadcast of messages and control commands through microphones”?
In GOST R 53325-2012 you can read:
The certificate of conformity 123-FZ and GOST R 53325-2012 for “Horn” devices says so for the slow-witted: taking into account clause 7.2.6.
But how to connect a microphone?
In the MPO-2M device you can see the “linear input for connecting an external audio signal” terminals - you can probably connect a microphone there.
But its use will not be easy at all.
How, for example, can you connect one microphone to two MPO-2M modules?
The “Speaker isp.02” module does not have microphone terminals at all - only the “GO and Emergencies” terminals.
Probably through these terminals it is meant “the ability to provide broadcasting of recorded phonograms.”
It seems that “the ability to broadcast” does not imply the real implementation of this broadcast, but just for show.
Here we see the block-modular approach at its worst.
Eh, now the designers will start making prefabricated hodgepodges from these blocks, but how to implement all this in practice - fuck it as you want.
I wonder why no one wants to use block-modular household appliances instead of ready-made finished products?
FakeHeader
Comments 88
Maybe you can tell me, I have a pair of x6c 4 ohm midranges. And a pair of HF MT15 Neo 4 ohms. If I connect the midrange with the HF in parallel, will the impedance be 2 ohms or 4 ohms? The HF is connected via a condenser.
If MF 4 ohms and HF 4 ohms are parallel, then the axis will be 2 ohms. It’s better on 4x xnalnik everything is pokanaleo.
And if the HF is through the condenser, the load also drops?!
Well, it only passes high frequencies. Resistance doesn't seem to do
I see... thanks for the tip
Tell me, I don’t know what crosses to put on the mids of the Alphard LW650 A6, thanks in advance
yes any! In general, I don’t see any point in putting crossovers on mids
how to properly connect Pionner stages to the Auditor amplifier. Can you provide more details for a beginner?
thank you) it just so happens that there are 4 speakers, 2 mids and 2 tweeters, and the amplification is 2 channel :-) as I understand it, it’s all done by crossovers)