I found fairly old photographs from the repair of a VAZ 2101 and decided to show and talk about how to replace the driver's door panel on a VAZ 2101.
Straight to the point. The door was dented by a careless driver, he backed it up - he opened the door - he messed a little - the door opened in the other direction... As a result, the limiter turns the frame and it plays on the outer part of the door - the panels.
What to do in such a situation? Yes, it’s quite simple, there are only a couple of options:
I will use the second option, since it is not easy to straighten a bent door like this; it will take a lot of time and money; it is more profitable for the owner to install a new panel. Also, one of the advantages is the fact that if you are making a car for yourself and want to make a high-quality door, then you will have every chance to coat the bend of the panel and door frame with seam sealant, this will help prevent the rapid appearance of corrosion in this bend. They do this on foreign cars; if the car is for yourself, then it makes sense to think about it.
Replacing the panel must begin with dismantling the door and completely disassembling it; everything must be removed, from the locks, handles and ending with the glass. Next, you need to use a screwdriver to unscrew the bend of the old panel:
Unfold the bend with a screwdriver
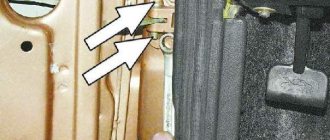
Under the nickel-plated molding at the top of the panel, it is spot welded to the frame; this place needs to be drilled out and the old panel removed. I usually don’t throw them away, but use them as metal for future repairs.
This is where you need to drill
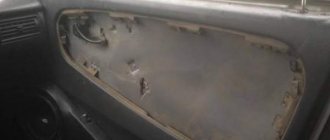
In the meantime, I have already removed the old panel, the frame needs to be cleaned to a shine, and the rusty areas must be treated with reactive primer.
“Bare” door frame of VAZ 2101
At the owner’s request, I simply primed the panel from the inside and, on the already installed one, sealed the gap between the frame stiffeners and the panel with seam sealant.
Primed panel, grent Ranal
Next, the new panel was placed on the frame and secured at the top with a semi-automatic device; this should not be done at many points, since the next step will be fitting the door; the bend of the new panel must be bent, but not bent completely. After trying it on, you may need to move the panel in one direction or another, adjusting it and bending the bend even more, fixing the panel on the frame. All this is done on a hung door.
Thanks for subscribing!
What and how to bend the folding on the panel? I do everything very simply, first I bend it slightly with a hammer, and then, placing 10mm plywood on the front side, I crimp the bend with pliers and finish the bend with a hammer.
Almost finished bend
Curved new VAZ panel
After the final bending and fitting of the door on the car, provided that everything is fine, you can, for reliability, grab the panel from the frames at points every 15-20 cm, this can be seen in the photo above.
VAZ 2101 door panel replaced
This is followed by grouting with transport primer, priming with reactive primer, then acrylic primer, sanding and painting.
Source
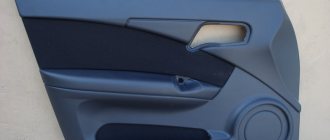
Replacing the door trim on a VAZ 2101-VAZ 2107
Welcome! Car door trim - it undoubtedly gives a different look to the car when you sit in it inside the cabin, because if you remove it, you can see the inside of the door, as well as the wires (If the door has electric windows), and this is often very unsightly, but Who knows, there are people who don’t pursue beauty and thereby create a sports car (In this case, everything is removed from the interior and only the steering wheel and one driver’s seat remain), but still not everyone needs this and therefore the trim will be in the car for a very long time (You could even say all your life) take its place in the cabin, while covering all the parts on which it is installed.
Note! In order to change the trim, you need tools, namely: You will need a screwdriver, in addition to it, we also recommend that you immediately buy holders at the auto store that hold the trim on the car door (There are seven holders in total that attach only one trim to the door, respectively, if you decided to change the entire door trim, you will need to stock up on 28 holders, they break very often because they are disposable and the broken ones are replaced with new ones, which cost a penny in the store)
Summary:
When should you replace your door trim? Everyone decides for himself when he needs it, someone changes it if the casing is torn, and someone changes it because it is very dirty (in paint, for example), but if it is very dirty, then do not rush go to a car store and buy a new one, try to wash off traces of dirt from the old one, if necessary, use special plastic cleaners or car interior leather cleaner, they clean well, in addition, they refresh the color of the part and give them a new look, and if you use them regularly, they will protect parts from their premature aging and the appearance of small cracks on them.
How to replace the door trim on a VAZ 2101-VAZ 2107?
Removal: 1) To remove the trim, at the beginning of the operation you will need to remove all the plugs that cover the screws securing the door handle to the car with a screwdriver, and after the plugs are removed, pick up a screwdriver and use it to remove all the screws that attach the handle and then remove it from the car door.
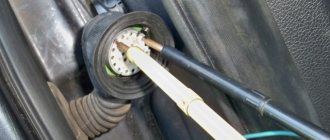
2) After the handle has been removed, proceed to removing the handle that raises and lowers the window at the car door. To do this, use a screwdriver as shown in photo number 1 to press the socket away from the lining, then slide the lining along the handle for lowering and raising the glass and remove it. (see photo 2), then remove the handle itself from the slots on which it is put on (see photo 3) and finally remove the socket itself, which is located under the handle and which you pressed out a little earlier (see photo 4).
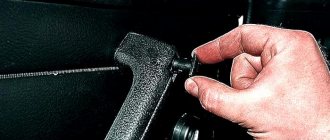
3) Next, use a screwdriver to pry up the door handle trim in the place indicated by the arrow and then remove it by threading it along the handle itself.
Note! This facing is held on by only two tendrils (Indicated by arrows in the photo below) and is very easy to remove, but just do not overdo it with force and do not break the tendrils of its fastening!
4) And at the end of the operation, pry up the trim that is attached to the door in seven different places using a screwdriver, as you can see in the small photo below, it is already indicated in which places the holders are located that secure the trim, in the same places and pry it off using a screwdriver a When all the holders are removed or broken, remove the trim and then replace all the broken holders with new ones.
Note! If your car also has a trim that is located under the glass and you don’t know how to remove it, then study the article that describes its removal in detail, and it’s called: “Replacing the door trim on a car”!
Installation: New door trim, installed in its place in the reverse order of removal.
Additional video: If you want to study in more detail the process of removing the trim from a car door, then watch the video that is located just below, but in it the trim itself is attached to the door in a slightly different way, that is, using screws that you will not have , well, if they do, then it was done homemade because the trim has never been attached to the door in this way.
Source
Interior lighting
Refinement of standard lighting will increase comfort in the cabin and embellish it. You can take a lampshade from Priora, as it has the required characteristics and looks impressive. For materials you will need: masking tape, a sharp knife, a marker, a 12" wrench and a screwdriver. First you need to remove the front roof visor. Use a marker to outline the location for installing the new lampshade. Cut the visor along this contour. Then you need to attach the lampshade and fill the seams with sealant.
Priora interior lamp
As for the power connection, it is advisable to run the new wiring along the right pillar. The negative is connected to the body, and the positive is connected to the lamp contact. It is better to make wire leads in the area of the glove box.
Since the interior lighting in the “classic” is very poor, many car owners resort to upgrading it
How to properly upholster and trim doors on a VAZ 2107 car
The standard upholstery looks very inexpensive, which spoils the exterior design of the Russian car. "Sevens" after 2000 are equipped with a similar type of trim, just like earlier versions of this model. The standard casing is a narrow fiberboard, which is covered with cheap black polymer.
The standard upholstery is attached to pistons, which become unusable every time they are removed, and as a result they need to be replaced. Replacing the standard cheap upholstery on the VAZ-2107 with more advanced materials, which will brighten up the interior of the car. What is essentially changing the door trim of a VAZ-2107 at home, we will find out further.
Of course, replace the standard upholstery of the door cards with the following materials, which differ not only in price, but also in quality:
Use any of the materials listed, but the most affordable and common ones when working are: dermantine, leather and vinyl. In addition to the main material, to change the skin you will need plywood 4 mm wide. It is recommended to replace standard fiberboard because it is quite weak and wears out quickly. Latches for fastening the upholstery, foam rubber and glue will also come in handy.
Homemade door cards for the VAZ-2107 are an average solution for upgrading the standard trim. To remove the standard cards on the “seven”, you will need to perform the following steps:
If the standard card is removed, the doors can be silenced. Audio preparation is carried out immediately if you plan to install speakers in the front doors.
Making maps on the doors of a VAZ-2107 on your own is painfully easy, especially if you have a handy tool. Before work, you will need to have patience and time, because it takes up to 3-4 hours to make one upholstery.
The standard card is used as a template for the production of a new one. It is enough to attach the template to a sheet of plywood, then mark and cut out the base (it is better to use a jigsaw for cutting). On the prepared base, you should mark and cut holes for attaching handles and levers. When tuning the doors of the “seven”, you can immediately install an electronic drive on the power windows.
During the work, special attention should be paid to the correct marking of the holes for attaching the card. If you make a mistake by a few mm, the product will not fit well on the door.
When the base is ready, you should use sandpaper to process the sawn edges. This is necessary so that the base is very smooth. We continue tuning the door trim of the "seven", why take a piece of foam rubber (it is best to use two-layer foam rubber, consisting of a base and fabric) and cut it out according to the card template.
How to remove the door card on a VAZ classic 2106
Essential to know! If the tuning involves the production of speakers and shelves on the door, then the frame of these products should be made first. We often see how to make podiums for the VAZ-2107 in the corresponding material.
Of course, make the shelf separately, then sheathe it and install it on the door card. It is much easier to make such a shelf if you make a whole product together with the door card.
Foam rubber is glued onto the plywood using special superglue. When the foam rubber is glued to the door card, we begin to cover it. You can sheathe it either with a single piece of material or in sections, you just need to sew them together with a “French seam”, which is durable and attractive in appearance. The pattern is made in such a way that in this case there are 50 mm allowances on all sides. This is necessary in order to avoid the appearance of “bald” places on the sides if there is not enough material.
The casing is stretched onto the card according to the following scheme:
We recommend: Dashboard VAZ 2107
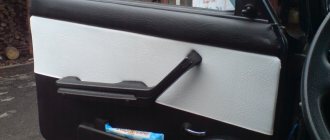
After covering the card, you can trim off any excess material. To prevent the upholstery from tearing at the place where the brackets are attached during operation, it is recommended to leave a small margin on the back side. Tuning of this kind is quite common, and is done in the same way for all remaining doors. Such a simple modification will significantly improve the appearance of the interior and radically transform the “Seven”. Below is a photo of car doors with the trim altered. Do the same for your own car.
Acoustic shelves and podiums for cars. (Saratov) | Topic author: Batilde
⚡⚡⚡ARE YOU LOOKING FOR QUALITY AND CHEAP COVERS (DOOR CARDS) FOR VAZ 2101-2107? THIS IS FOR US! 2500 PER SET! Cards with ECONOMY podiums for 16th speakers. ✅With pockets for small items. ✅Easy to install on standard clips. ✅A simple solution to refresh the interior and improve the sound. ✅We ship within Russia by Post and transport companies. Write in a personal message or ☎☎☎ Calls/Viber/Wats App+79271631611 ➡Site: http: www.autoobshivci-shop.com ➡On Odnoklassniki: https://ok.ru/akustiches ➡In Contact: https://vk. com/obshivki_class