Most modern internal combustion engines have a water cooling system. Antifreeze is used as a coolant, which does not freeze in winter, removes excessive heat from the power unit, and heats the interior space. Immediately after starting the engine, the coolant circulates for some time in a small circuit through the stove and the engine.
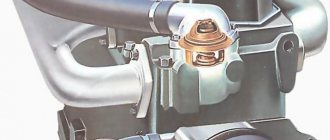
After heating the fluid to a certain temperature, a special thermostat valve opens, giving it a new path through the radiator and power unit. This is the main task of this device.
If the thermostat breaks down, the engine either takes a very long time to warm up or overheats greatly. As a result, fuel consumption increases and the power of the power unit decreases.
Lada 2112 › Logbook › Modification of the grant thermostat
Let me start with the fact that a year ago I installed a thermostat from a grant from BEHR. For a long time I was looking for a thermostat from this particular company in my city and in the end it was found. After installing it, the car began to warm up faster and the heater began to heat a little better, which is exactly what I wanted. After driving with it during the winter, I noticed that with it the car keeps the temperature while driving at 77-79, which is very low for the proper operation of our engine. In the heat of the summer, even in the longest traffic jams, the car was reluctant to warm up, which definitely made me happy, but in the end I decided to replace the thermocouple with a 92-degree thermocouple. The Wahler 3091.92D thermocouple fits into the BEHR housing without modifications. The search for this element in my city was unsuccessful... Either the price was higher than the price of the thermostat assembly, or the waiting period was more than a month. If I'm not mistaken, I was one of the first to install the BUBLS-64 grant thermostat. After recording about the installation, everyone pestered him with questions: what? How? and why?))) It was from him that I came across an idea for improvement for people like me who couldn’t find a thermocouple from Wahler that fits without much modification. This thermoelement was Wahler 3017.92D50. Again, it was not available anywhere and I was offered a Wahler 3017.92D2 instead. They differ only in the presence or absence of a gasket. To implement it, you need to grind a new plate, because... the native one is 1 mm smaller and the consequence does not completely cover the small circle and does not maintain a normal temperature. This element was purchased for 550 rubles and given to my father to make a plate for it. Let me tell you right away that the photos are not mine, because... I did it a month ago and didn’t even think about registering for a drive, so I didn’t take any pictures)) Here is a link to his used one. Modification of the Grant 2190 thermostat or even warmer.
Thermostat assembly from BEHR
Thermoelement and plate for it
After the modification, the stove began to fry and the consumption dropped by about 1.5 liters. With this element, the temperature on the go stays at 88-90 degrees. If anyone is interested in what and how, ask questions)
code Luzar LT 0191
OEM number: 2190-1306010 21200-5PA0A 2190-1306100
Opening temperature, ?С: 85
Where can I buy
Applicability for vehicles
Brand name – LT – LuzarThermostat
Thermostats are necessary to direct the flow of coolant in the cooling system of automobile engines, thereby regulating the temperature of the coolant.
- when the temperature rises (usually at ≈80ºC), the main thermostat valve opens while the bypass valve closes;
- the radiator is included in the cooling circuit;
- the coolant temperature drops;
- When the temperature decreases, the reverse process occurs.
If necessary. more details
Brand name – LT – LuzarThermostat
Thermostats are necessary to direct the flow of coolant in the cooling system of automobile engines, thereby regulating the temperature of the coolant.
- when the temperature rises (usually at ≈80ºC), the main thermostat valve opens while the bypass valve closes;
- the radiator is included in the cooling circuit;
- the coolant temperature drops;
- When the temperature decreases, the reverse process occurs.
If you need to purchase a thermostat for a car, you need to know a few simple rules.
The operation of a car thermostat is characterized by two parameters:
The service life of a car thermostat depends on the degree of professionalism of the manufacturer and depends on the following points:
- thermostat designs
- pairing parts
- production technologies
- technical production capabilities
- raw materials used
- level of control of finished products
general information
There are single-valve, two-stage and two-valve thermostats, as well as electronically controlled devices. Grants are equipped with thermostats Luzar LT0191 and Luzar LT0190 (costing from 450 rubles for the first, and from 800 rubles for the second), FENOX TS034E7 (costing from 800 rubles), VAZ-2123 (article 2123-1306010, cost from 650 rub.). It is worth mentioning such devices as VAZ-2101 GATES (article TH14580, cost - from 350 rubles), VAZ-2121 GATES (article TH15380, approximate cost - from 500 rubles), VAZ-2110 (article 21082-1306010, cost - from 600 rub.) and other devices. They are located between the engine and the radiator, but it should be noted that there are differences in the location of the thermostats on Grants with eight-valve and sixteen-valve engines.
Their main task is to prevent the movement of antifreeze through the radiator until the car engine warms up to the required temperatures. Accordingly, if the car engine does not warm up, then the coolant does not move in a large circle. Usually the thermostat is activated when the engine reaches a temperature of 80-95C. Among other things, the thermostat helps reduce the amount of harmful emissions released into the atmosphere and minimize engine wear.
The thermoelement located inside the device is made of brass, has a cylindrical shape and is filled with artificial wax. When the engine reaches a temperature of approximately 82C, this substance begins to melt, which causes it to expand. This sets the valve in motion, it opens, after which the antifreeze begins to circulate through the car’s radiator. Turning off the motor causes the wax to solidify inside the thermostat and close the damper.
Below we will talk in more detail about possible malfunctions of thermostats, provide instructions for replacing and checking them, and also share a technique for reworking and upgrading this part, allowing you to increase its response threshold to 92C.
Owner reviews
| № | Positive |
| 1. | Vladimir: I’ve been actively using the car for two years now, and there are no comments about the heating system. I know about the problem of premature valve opening, but for me it is not significant. |
| 2. | Kirill: after 45,000 km I noticed that the regulator opens the valve already at 81°C. I visited a service station, after diagnostics the technician said that the defect was known, but had not yet been corrected by the manufacturer. Comrades recommended shortening the stock rod. |
| 3. | Vitaly: after buying the car, I shortened the regulator rod by 2.0 mm, and the valve activation threshold increased to 87°. This is enough for me, I don’t need to increase it any more. |
| 4. | Dmitry: I knew about the problem of underheating even before buying the car, I prepared in advance. Instead of the standard core, I installed 3091.92 V at 90° C. Now the system works properly. |
| 5. | Gennady: at 80,000 km I replaced the flow regulator for the first time, did not install the original core, bought a Wahler: 3017.87 D. I have been actively using it for two months, no comments. |
| 6. | Alexander: a year has passed since the purchase of the car, the valve opens at 80°C. I know that the threshold is low, but it doesn’t matter to me. I did not notice any increased fuel consumption. |
| 7. | Vasily: after purchasing the car, I replaced the antifreeze with imported one, installed a core from Wahler: 3017.87 D. |
| Negative | |
| 1. | Ivan: The car is a year and a half old, but I can’t fix the problem of early activation of the valve. On the advice of my comrades, I changed the cores, sharpened the stem, nothing helps. |
| 2. | Alexey: extremely dissatisfied with the car, the model is crude, there are many flaws and defects. You constantly need to dig around and fix breakdowns. |
| 3. | Vasily: the thermostat was replaced after a mileage of 50,000 km, after which faults were discovered in the ignition system and so on. |
Conclusion
The problem of early activation of the thermostat valve on the Lada Grant (2190) is known. Engineers are constantly looking for a solution. As alternative, effective methods, use the tips outlined at the beginning of the article.
Do not forget that the operating temperature of the engine also depends on the brand of antifreeze (antifreeze), its properties and characteristics, and the type of engine oil.
Often the cause of poor heating is other failures associated with the functioning of the cooling system of the equipment.
Why change the Kalina thermostat to a Grantovsky device?
There can be only two reasons why the original thermostat installed on the Kalina is replaced with a device from Grant:
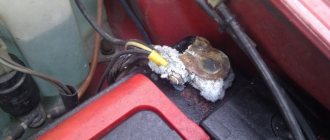
- Firstly, this is engine overheating when the power plant temperature needle is around +100 °C. This mode of operation can lead to jamming of the pistons.
- Secondly, there is insufficient heating of the interior in winter. In addition to the fact that it is uncomfortable to be in a cold car interior, this also causes the windows to freeze and you have to drive blindly. And this is a real danger to life.
This is due to the fact that the standard cooling system of the LADA Kalina does not know how to “de-air” itself. That is, if air gets into the small cooling circle, it will no longer be removed from the system. The process grows like an avalanche, air will continue to be sucked in constantly. This leads to the fact that the coolant does not flow to the radiator, the engine overheats, and cold air blows from the stove. The problem is solved by installing a thermostat from LADA Granta. As the owners of Kalina, who decided to take such a step, say, after reinstalling the thermostat, all problems were solved: the cabin became warm, and the engine temperature did not rise above +90 ° C.
Sequencing
- We place the car within the perimeter of the repair area.
- Loosen the clamp of the air supply pipe (Phillips screwdriver).
- Remove the mass air flow sensor (MAF).
- We unscrew the expansion tank cap and remove the vacuum.
- We unscrew the three clamps on the cooling system distributor and pour the waste into a plastic container (about 3 liters).
Preparatory processes before installation
- We press the block with wires from the engine control unit, disconnect the temperature sensor terminal.
- Using a key set to “13”, unscrew the negative terminal and remove it from the regulator body.
- Using the “8” head, we loosen the clamps of the supply pipe – the antifreeze return to the radiator.
Supply pipe clamps
- Remove the rubber pipes from the regulator.
Disconnect the rubber pipes
- Using the “13” socket, unscrew the two nuts that secure the thermostat to the wall of the cylinder block.
Two nuts - clamps to the block
- We remove the mechanism from its normal place and clamp it in a vice for preventive maintenance.
Clamp in a vice
- Using a Torx T-30 wrench, unscrew the three screws of the cover and remove it.
Removing the cover
- The connection between the cover and the body is sealed with a rubber gasket. We inspect it, if there is mechanical damage or deformation, we replace it with a new one.
- We grab the spring with pliers, press it, and release the metal plate.
Metal plate
- Release the regulator bottle.
Regulator bottle
- To check the functionality of the distributor, lower it into a container of water, gradually heat it up, bring it to a temperature of 85 - 90°C. We observe the movement of the rod. In good condition, it will move closer to the top.
Temperature adjustment
- We assemble the parts in the reverse order and install them in their original place.
Note to the driver!
Lada Granta › Logbook › Thermostat, replacement + thermoelement
I also brought this topic up for discussion here www.drive2.ru/l/512624482658025528/ But I don’t have the patience to hold on any longer, the temperature outside dropped to 5 degrees in the morning, and I’m already tired of warming up the car and after a long drive, the maximum I have is this
Full size you'll heat it up
I decided to change it completely, I couldn’t find the luzara, the 92 gram inserts also didn’t want to boil in traffic jams around the city in the spring, I decided to do it this way, take a thermos assembly + thermocouple.
Full size we only need the body
Full size thermocouple 88g.
Full size and full set, but we won't need it
We extract the full size using side cutters.
We remove the standard 85g thermocouple from the housing.
Full size standard is much heavier in weight than its analogue
We rearrange the thermoelement, put the spring from the new thermoelement, it is softer.
Full size heating up
Full size opening started at 88g
Full size fully opened at 94
We take the modified thermos and go to the car. I drained the antifreeze in a fashionable way through the RB hose using a compressor, drained about 2.5 liters
Removing the old thermos
Full sizeMore dead than alive
It’s good that I decided to take a new housing, the old one was not sealed, it was blown out easily, it is not surprising that the car could not heat up, part of the coolant was wasted. Naturally, it was not possible to save the factory gasket, I installed another one, which was much inferior in quality, and applied a thin layer of sealant for peace of mind
Well, then we move the coolant sensor to a new thermos and put everything back together
I filled it with coolant, started and drove the car so that the face was higher, waited for the fan to work, the stove blew out with heat, which means it was pumped, although the losses when removing the old thermos were about 200g. Now the results.
Full size in the city ranges from 87 to 90g -
On the highway at a speed of 100 km/h it cools down a little, but within 86-87 degrees. I'm happy with the work done, the stove worked fine, it heats up faster, it takes about 40 minutes to replace the thermos. I boiled the old thermos out of curiosity, it works, it only opens 80 degrees narrower and siphons into a large circle, I'll try to experiment, there's a thermoelement left from the new thermos, sharpen the stem , grind the thermos so that it is airtight and let it remain as a reserve. Good luck to everyone and smooth roads.
How to change the thermostat of LADA “Granta”
The LADA Granta is equipped with power units with 6 and 8 timing valves. The location of the thermostat in these models is different, and accordingly, the replacement procedure is also different.
To replace the thermostat on the eight-valve Granta version you need:
- Phillips screwdriver;
- socket wrenches for 10 and 13;
- crosshead screwdriver;
- key T30;
- container for coolant.
Replacing the LADA Granta thermostat (8 valve) is performed as follows:
- install the LADA Granta on a site that has a slope so that the front part is higher than the rear;
- unscrew the bolts securing the engine protection and remove it;
- place a container for coolant under the radiator;
- remove the cap covering the expansion tank;
- Unscrew the drain plug on the radiator;
- drain the coolant into a container;
- tighten the drain plug on the radiator;
- press the latch and disconnect the wiring block from the coolant temperature sensor;
- loosen the clamp securing the rear hose to the thermostat cover pipe;
- remove the hose from the pipe;
- loosen the clamp securing the front hose to the thermostat cover pipe;
- remove the front hose from the pipe;
- unscrew the nut holding the ground wire to the thermostat mounting stud;
- remove the washer and the ground wire tip from the stud;
- unscrew the two nuts securing the thermostat to the engine, remove and set aside the washers;
- pull the thermostat housing off the studs;
- remove the thermostat gasket;
Important: when removing or replacing the thermostat, the sealing gasket must be replaced with a new one!
- unscrew the three bolts holding the thermostat cover;
- remove the cover;
- press out the thermostat fixing plate, overcoming the resistance of the spring;
- turn the plate, remove it from the grooves and pull it out;
- remove the spring;
- pull the thermostat out of the housing.
The new thermostat is installed in the housing in place of the old one; further operations should be performed in the reverse order of removing the part.
Tip: before installing the hoses on the pipes, you should lubricate the latter with a thin layer of sealant, this will prevent possible leakage of coolant.
After installing the thermostat, it is necessary to fill the cooling system with antifreeze (coolant), start and warm up the engine, making sure that air pockets are removed from the cooling circuits.
To replace the thermostat on the sixteen-valve Granta version, you will need:
- crosshead screwdriver;
- key to 10;
- hex key 5;
- container for coolant.
The car must be placed on a level area, preferably with a slight slope, so that the front part is raised relative to the rear. Before replacing the thermostat, drain the coolant from the system. To do this, you need to remove the engine protection, open the expansion tank cap, place a container for coolant under the radiator and drain the latter by unscrewing the radiator drain plug. After the liquid has been drained, you can tighten the drain plug and begin replacing the thermostat. Removing the LADA “Granta” thermostat (16 valves) is performed as follows:
- loosen the clamps of the hoses supplying coolant to the thermostat cover;
- disconnect the hoses from the thermostat cover;
- Unscrew the bolts securing the thermostat cover;
- remove the thermostat cover from its seat;
- remove the sealing ring from the groove in the thermostat cover (it must be replaced with a new one);
- push down and rotate the plate that secures the thermostat in the lid;
- remove the plate and thermostat from the cover.