Linking a new key fob (also often called programming) causes difficulties, especially if the instructions from the delivery kit are lost. In the case of Tomahawk alarms, additional problems arise due to the fact that for very similar models from the same model range, the key fob programming mode can be activated in different ways: by mixing up the alarm model, you can try for a long time to get the new key fob to work and not get any results.
The principle of registering key fobs
Key fob programming is necessary in alarms without a dialogue code to synchronize the “floating” code. In such systems, to control the central unit, only one code message is used, encrypted using a constant algorithm, but with a key changing according to a certain law. Therefore, you have to write down the key fob both when you buy a new one, which is not initially synchronized with the alarm system, and when the regular ones have problems with communication. It is not for nothing that the operating instructions usually warn that you cannot repeatedly press the key fob buttons outside the communication zone with the car - the encryption key “goes” further according to a given algorithm, although from the point of view of the central unit it should not yet change. This explanation is quite schematic, but it makes it clear the principle of communication in such systems and the loss of control, which is easily corrected by re-registering a set of key fobs.
We especially note that an attempt to bind the Tomahawk key fob (and other alarm systems) one by one will lead to the fact that the remaining key fobs will no longer be perceived by the alarm system. The fact is that at the beginning of the programming procedure, for security reasons, the data on previously registered key fobs is erased; this does not make it possible to “additionally register” an additional key fob in secret from the owner, without having access to the standard ones. And therefore, all alarms have a Valet mode, which allows you to give the car for service without the need to transfer key fobs.
Basic rules and conditions for installing an alarm system
Nuances to consider when installing yourself:
- Installation steps are carried out with the on-board power supply turned off; to do this, the battery terminals must first be disconnected;
- anti-theft system modules must be installed secretly so that the criminal does not find them during a break-in;
- the Override button is installed in a hidden place, but the driver must have access to it from his seat;
- the installation of blocks and modules must be thought out so that these devices are not exposed to high temperatures and humidity;
- installation of the system and its connection must be carried out in accordance with the diagram included in the package;
- The main microprocessor module should be placed away from sources of interference - electronic devices and instruments.
The antenna unit should be installed away from electronics and metal objects to prevent interference.
How to attach a key fob Tomahawk TZ-9030, TZ-9031, Z-5, 9.3, 9.7, G-9000, 7.1, 8.1
These systems have a different operating procedure; they should not be confused with those previously described, despite the external similarity. The difference begins from the moment you enter the programming mode: here you need to turn on the ignition when the alarm is disarmed, do not hold down the Override button, but quickly press it 7 times. After the appropriate number of confirmation signals from the siren, you need to hold down the arming and disarming buttons on each of the key fobs being registered - for the main one in the Tomahawk TZ series they are on the front side, for the additional one in the top row. For the Tomahawk Z-5 alarm they are the first in the general row on both key fobs.
Signaling 434 MHz frequency
Although this signaling model is budget, it has two-way communication and has all the necessary functions, as well as the ability to receive a signal within a radius of 1 km from the vehicle. To bind and program the key fob, you must perform the following steps.
- You need to open the door and then insert the key into the ignition; you do not need to start the car.
- To enter the alarm service mode, press the corresponding button 7 times.
- After completing the previous steps, you need to turn on the ignition by turning the key in the lock. If the siren is triggered 7 times, the alarm will enter the binding menu.
- At this stage, press buttons 1 (closed lock marking) and 2 (closed door icon) on the remote control. They are held until a single beep sounds. If the flashing of the key fob pager was completed successfully, it will emit a melody.
- Then you need to turn the ignition to the Off position. After this, the car's headlights should blink 5 times.
Tomahawk Z-1 Programming
It would seem that all Tomahawk systems only have two options when linking key fobs. But Tomahawk Z-1 has its own algorithm. Just like with other alarms, first you need to disarm the car and turn on the ignition. But then the Override button is pressed eight times, the ignition is turned off, and the alarm confirms entry into the programming mode with eight siren signals, accompanied by flashes of the headlights or turn signals, depending on the connection of the central unit.
Tomahawk remote firmware
The reason for flashing may be the lack of response to the action from the key fob. This happens after accidentally pressing arbitrary buttons or due to inattentive handling. The second popular reason is buying a used car.
You can reflash the alarm in the same way as registering a new control device. The sequence of actions is maintained, which allows you to quickly change settings without experiencing discomfort.
Find out how to replace a Tomahawk 9010 battery.
What errors can occur when registering alarm key fobs?
If you cannot enter the programming mode, although the procedure exactly corresponds to that required for a particular model, you need to check:
- Does the Override button work? See if its connector is torn out from the central unit, if the wire is broken, if its contacts close when pressed.
- Is the ignition wire connected to the central unit? On alarm systems with auto-start, you are unlikely to encounter this problem, because otherwise the auto-start will not work.
But on one-way alarm systems, handicraft installers sometimes leave the ignition input on the central unit unconnected. Either the twist oxidizes and the wire breaks off. The easiest way to check the supply of “plus” is with an LED probe on the connector of the central unit.
If the Override button does not always work (dirty, worn contacts), then perhaps you should simply try to log in again, pressing the button less often, but harder.
Something else useful for you:
Auto engine start
By temperature
When installing the Tomahawk 9010 alarm system, an additional temperature sensor is hung under the hood. When autostarting the engine based on temperature, the system is guided by the readings of this sensor, and if an external sensor is not installed, then by the air temperature in the cabin.
To activate automatic engine start based on temperature, you must:
- simultaneously press buttons No. 4 (key) and No. 1 (trunk) - the parking lights will flash once, the siren will emit one beep;
- the melodic trill of the key fob will sound and two new objects will appear on its display: an icon depicting a fan and a warm-up temperature set by software;
- if the system is based on an external temperature sensor, the engine will start when the temperature drops below the programmed mark;
- If the system is based on the air temperature in the cabin, the engine will automatically start when the air warms up to the set temperature.
To disable this function, press buttons No. 4 (key) and No. 1 (trunk). The car will react with a double flash of parking lights and a double siren signal. The key fob will play a melodic trill again and the fan icon will disappear from its display.
ATTENTION! Automatic engine heating at a given temperature can be performed no more than six times within two hours
By time
To activate timed engine autostart, you must hold down buttons No. 4 (key) and No. 2 (silent security) - the car will honk, the pager will emit a melodic trill and an icon with a clock will appear on its display. From now on, the Tomahawk 9010 will start the vehicle engine every day at the same time when this function was activated.
To disable the daily autostart function by time, you must again press the buttons “4” (key) and “2” (silent security). The parking lights will flash twice and the system will confirm deactivation of the function with two beeps. The clock icon will disappear on the key fob display and a melodic trill will sound.
At regular intervals
The Tomahawk 9010 system allows you to automatically start the engine at regular intervals. To activate this function, you need to activate the daily autostart function, and then within 5 seconds select the corresponding button on the key fob and press it:
- No. 5 (lock) – engine starts every hour;
- No. 4 (key) – start the engine at intervals of 2 hours;
- No. 1 (trunk) – starting the engine at intervals of 4 hours;
- No. 2 (silent security) – starting the engine at intervals of 12 hours.
The system will remember the selected interval. The engine will be started for the first time immediately after the programming session is completed.
Reprogramming non-working key fobs
Often an attempt to re-register key fobs is needed because the car refuses to disarm. But without disarming the system, you cannot enter the programming mode.
To do this, use the disarming method provided for a specific system, and only then try to register the key fob as usual. For example, on Tomahawk Z-3, TZ-7010, S-700 and others you need:
- Open the car with the key and turn on the ignition.
- Press Override the number of times corresponding to the first digit of the secret PIN code (factory value 1).
- Turn off the ignition and immediately turn it back on.
- Enter the second digit of the code, which is set to 1 by default.
- Turn off the ignition, the car will be disarmed at this moment.
On the Tomahawk Z-1, where there is no PIN code for protection, press the Override button 10 times with the ignition on and without closing the door.
After disarming the car, be sure to try to register the entire set of key fobs - this will allow you to immediately understand where the problem was.
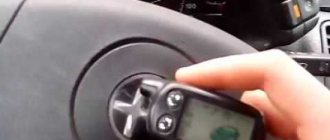
The ability to fully control the Tomahawk anti-theft system is provided to car owners as a result of linking the remote control. Also, the need for configuration may arise if the device is lost and replaced with a new one. To correctly program the Tomahawk 9010 key fob and other alarm models, you need to perform a certain procedure.
Linking a new key fob and flashing the old one
Programming problems and their solutions
Download instructions for the Tomahawk 9010 alarm key fob
Video “How to program a key fob?”
Comments and Reviews
Why is the key fob not registered?
Reasons why it is impossible to attach the remote control may include:
- a dead battery that needs to be replaced;
- mechanical malfunctions, unreliable contact with the on-board network;
- oxidation of contacts on the microprocessor and transceiver;
- incorrect installation of the transceiver;
- system software glitch (often occurs in Tomahawk D900, S700, 7010, 9000 alarm systems);
- active radio interference;
- dead battery.
If the key fob is written incorrectly, it will be impossible to adapt it. It is important to find the appropriate alarm and remote control models. Violation of the sequence leads to failure of action. And it is also important to choose the right setting option for a certain type of signaling, which will ensure long-term trouble-free operation.
Video instruction. Find out everything about proper programming of the Alligator key fob.
Linking a new key fob and flashing the old one
There are several methods to reprogram and link a new or old key fob to the Tomahawk 9020, 9030 and other models. In accordance with the instructions, the memory of car alarms of this brand allows you to register four remote controls. To ensure the operation of the main and additional functions that are controlled by buttons, the remote control device must be correctly programmed.
Record
How to record a keychain:
- The ignition is activated; the car engine does not need to be started.
- The Override service key is pressed. If the “signal” was installed independently, the car owner must know where this button is located. Typically installers will mount it under the dashboard, but the mounting location will be more discreet. When installing, specialists are guided by the fact that an attacker can gain access to the key, as a result of which the anti-theft installation will be hacked.
- The button is pressed until four siren beeps are heard. This means that the “signaling” has entered the key fob programming mode.
- The service mode button is released.
- To flash and register the remote control, on the device, simultaneously hold down the buttons for opening the luggage compartment and muting the sound. The siren speaker will sound several times. If this happens, the programming procedure was completed successfully. One beep will sound when setting up the first key fob, two - when programming an auxiliary one, three - when linking a third, etc.
- To exit setup mode, do not touch the buttons on the remote control for six seconds.
If the key fob has not been linked, it will be deleted from the alarm memory.
Alexander Bochkarev told how to activate the service mode in the Tomahawk 9010 car alarm.
Reprogramming
The procedure for reprogramming the Tomahawk 9010 key fob and other models is as follows:
- The key is inserted into the lock and the ignition is activated. There is no need to start the power unit.
- With one hand, simultaneously click on the luggage compartment opening keys on the remote control and the button in the form of a crossed out loudspeaker, and with the other you need to press the service mode button.
- The siren speaker should emit five beeps.
- Then all pressed buttons are released.
- If all steps are completed correctly, press the trunk release button and the button in the form of a crossed out loudspeaker again. The vehicle's turning lights will flash several times.
How to reprogram an old remote control
You can reinstall an old pager into the program by deleting it and then adding it to the alarm. To remove a key fob from a whitefish, you must reset it, then follow the standard procedure to enter the remote control.
Why do you need to reprogram
The key fob is reprogrammed for the following reasons:
- incorrect response to user commands;
- lack of response to driver manipulations;
- response is too long;
- Device freezes.
How to reset settings
On common Tomahawk models, resetting settings is performed as follows:
- turn on the ignition;
- click on Override a certain number of times;
- wait for the system response;
- click on the service button again;
- Press and hold the indicated keys on the key fob.
After completing the operation, the settings will return to the factory state.
How to set the time
The operation should be performed:
- hold down the F key until the clock image starts flashing;
- buttons with the image of an open trunk and a crossed out speaker scroll through the minutes;
- to set the clock, press F again and scroll through the keys indicated above;
- To exit the menu you need to leave the pager alone for 8 seconds.
Programming problems and their solutions
If you program the remote control yourself, problems may arise in the operation of the alarm. The key fob is sometimes not recognized by the system; the installation does not allow you to turn the security mode on and off. The problem is due to the fact that the unidentified device cannot transmit the code over the communication channel and perform various actions related to setting up and using the alarm.
How to act in such cases:
- Find the manual for the alarm model installed on your car.
- Study the manual. It should contain information regarding programming the remote controls. Try following the steps described in the instructions.
- If there is no documentation, try the three configuration methods described above.
- If this doesn't help, look into the reasons. Perhaps the alarm does not receive or send a signal due to mechanical damage. Inspect all system components. Pay attention to checking the contacts on the connectors of the control module and transceiver. If possible, test the electrical circuits with a tester. If damaged wires are found, they must be replaced. If there is oxidation on the contacts, the connectors must be cleaned.
- If the problem persists, you should diagnose the control unit. The problem sometimes lies in its functioning. The control device may need to be re-flashed. We recommend entrusting this task to specialists.
Reset to factory settings
A factory reset can be performed using the built-in button. To do this proceed as follows:
- turn on the ignition;
- Press the Override button 10 times in a row;
- turn off the ignition - the alarm sounds 10 trills;
- press the Override button once – the alarm emits one trill;
- press button “5” (lock);
- turn on the ignition - the side lights flash 5 times.
When resetting the alarm to factory settings, all manipulations must be performed promptly and without delay.
Video “How to program a key fob?”
The TIP-TOP channel described the procedure for setting up and linking a new remote control to a Tomahawk car alarm in model 9030.
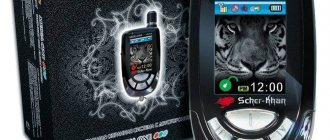
The Tomahawk 9010 key fob, equipped with a feedback unit and display, is designed to control the complex and receive information from sensors located in the car. The car owner can remotely start the engine or set up an automatic warm-up procedure.
Temperature sensor Tomahawk 9010
The Tomahawk 9010 alarm system is equipped with the option of remote engine start and stop. This is possible thanks to a standard temperature sensor that monitors the state of the power plant cooling system. The element is resistant to shaking, vibration and water ingress. However, standard moisture protection is not effective if there is heavy ingress of water - you should wash the engine carefully, as there is a risk of getting the equipment wet.
The sensor itself looks like a small plastic device connected to the head module via a long wire. The sensor is mounted inside the engine compartment on plastic clamps. Experts recommend placing the device in close proximity to the cooling system. Typically, users mount the part on the outlet pipe from the motor. At this point the measured temperature will be most accurate.
Functional
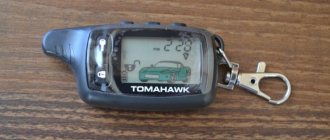
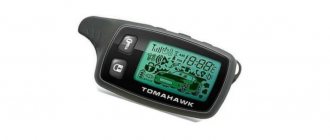
The Tomahawk security system key fob is equipped with 5 keys protected by a special rubber cover. To power the circuits, an AAA battery is used, mounted in a special compartment. The purpose of the buttons is described in the operating instructions; explanatory pictograms are printed on the surfaces of the keys. To warn the owner, a built-in buzzer is used and a vibration signal is provided.
The LCD screen contains icons to help you monitor operating parameters and function status. The display contains an icon of the battery status and a control scale for determining the coverage area of the transmitter. The display has a zone in the form of a car silhouette, which helps to identify an activated or faulty security zone. Separate icons indicate opening panels; in addition, there are indicators of alarm and warning zones of the shock sensor.
The kit includes an additional remote control with 4 keys and a control diode. The buttons are marked on the surface of the parts with white paint. The control indicator allows you to determine autostart using the key fob.
Download Tomahawk alarm operating instructions in PDF format
You can download service manuals for controlling Tomahawk remotes using the following links:
| Manuals in Russian for the use and installation of alarm systems | |
| Operating instructions Tomahawk 9010 | |
| Operating instructions Tomahawk 9020 | |
| Operating instructions Tomahawk 9030 | |
| Operating instructions for Tomahawk X5 |
How to register a key fob
Registering a remote control device means pairing the radio transmitter of the key fob with the receiver located in the processing unit of the complex. The owner of the car registers the remote control, ensuring correct decoding of the encrypted signal. The programming method depends on the model of the security complex.
For example, to enter setup mode on 9020 series devices, you need to press the hidden Override button 7 times. The owner then registers the device by simultaneously pressing buttons with open and locked symbols. The security system informs the owner about the serial number of the remote control by giving sound signals. The alarm memory is designed for 4 remote controls; when you try to write a fifth device, the registers are reset.
Record
Do-it-yourself programming of a new key fob includes the following steps:
- After turning off the complex, the ignition support circuit should be activated; the engine does not need to be started.
- Find in the depths of the instrument panel the key used to configure the parameters of the complex.
- Keep the button pressed until you enter the alarm settings (accompanied by a 4-fold short beep from the siren). The owner then releases the button.
- Press the combination of buttons on the remote control (with icons of a silhouette of a car with an open trunk and a crossed out loudspeaker). The keys are held until the siren is activated, which confirms that the remote control code has been entered into the memory of the security complex.
- The owner can bind 4 key fobs to the Tomahawk 9010 alarm system, the entry into the memory of each remote control is displayed by the corresponding number of siren signals. All previously programmed devices are automatically deleted after the start of the procedure.
Video: diagnostics of anti-theft system options 9010
The “paladinMgn” channel in its video talked about testing some of the functions of the Tomahawk 9010 alarm system using a key fob without installing the system on the car.
Do you have any questions? Specialists and readers of the AUTODVIG website will help you ask a question
Was this article helpful?
Thank you for your opinion!
The article was useful. Please share the information with your friends.
Yes (100.00%)
No
X
Please write what is wrong and leave recommendations on the article
Cancel reply
Rate this article: ( 1 vote(s), average: 5.00 out of 5)
Discuss the article:
How to use
The Tomahawk alarm operating instructions contain sections explaining how to control functions using key fobs. The documentation contains tables indicating key combinations and information on programming functions using the remote control.
Starting security mode
To enable the protection mode, you can use a main type key fob or an auxiliary device. When you briefly press the TZ 9010 remote control button, marked with a lock icon (with a closed and open handle), the doors are locked and the security zones are activated.
The owner can connect electric windows to the complex, which will automatically raise the windows when the security system is turned on.
The manual for the complex states that a triple signal from the siren indicates the detection of a faulty zone.
Starting security mode without sound
The programmable mode is activated using the key located with the symbol of the crossed out speaker. After turning on the security, the driver briefly presses the button. The external lighting on the car is activated, and an icon in the form of a crossed out loudspeaker appears on the screen. If unauthorized access is attempted, an alarm mode is activated, accompanied only by flashing hazard warning lamps or side lights.
Disabling security mode
The protection is disabled by pressing the button with the icons of a locked and open lock. After giving a double signal from the lighting equipment and siren, the door locks are unlocked and the blocking of the start circuits is removed. The remote control panel displays a symbol of a lock with an open shackle, and the loudspeaker indicator turns off. On the Tomahawk TW 9020 or 9030 alarm remote control there is a separate button designed to turn off the protection (indicated by an icon in the form of a lock with an open bracket).
Locking and unlocking doors
The alarm allows you to block the locks after starting the power unit. To enable the function, you need to briefly press the button marked with the unlocked and locked icons. To turn off the lock, you will need to press the key again.
Remote engine start
To remotely start the engine using a car alarm, you will need to press the key with the key icon. After a triple signal is given by the siren and external lighting equipment, a start attempt is made. If the car’s engine starts, an icon in the form of a cloud of exhaust gases will be displayed on the display. The power unit operates within the programmed time; the parameter changes when adjusting the central unit. The driver can add operating time by pressing the combination of keys with a key and a locked lock.
Entering programming mode for remote start functions
To enter the Tomahawk auto-start alarm programming menu, the following algorithm is performed:
- The ignition system in the car is turned on; for this, the key is set to the “ACC” position. The power unit does not start.
- The emergency service mode entry button is pressed six times in a row. If you did not install the anti-theft system yourself, the location of the key should be checked with the installer.
- Then the ignition is turned off by setting the key to “Off” mode.
- Using the button to enter the emergency service mode, you select the line with the required option in accordance with the programming table. Each time you press a key, the system moves to the next function.
- Using the communicator and its buttons, the desired parameter is selected in accordance with the table.
- To exit the settings menu, the user must take no action for ten seconds.
| Number of presses on the emergency button | Option Description | Key fob buttons | |||
| 1 time | Turbo timer | 1 min | 2 minutes | 3 min | 6 min |
| 2 times | Operating time of the power unit after remote start | 5 minutes | 10 min | 15 minutes | 20 minutes |
| 3 times | Interval for hourly car engine start | 1 hour | 2 hours | 4 hours | 24 hours |
| 4 times | Air temperature at which the engine will start | -5 degrees | -10 degrees | -20 degrees | -30 degrees |
| 5 times | Enabling the security mode with closing the door locks when the engine is started remotely | Disabled | Included | ||
| 6 times | Activation of external lighting devices when starting the engine remotely | Flashing | Works continuously without blinking | Disabled | |
| 7 times | Closing door locks when the protection is turned on after a remote stop of the power unit | Disabled | Included | ||
| 8 times | Mode for preparing the vehicle for remote start | Auto | Safe | ||
| 9 times | Turning on the ACC ignition conductor when starting the engine remotely | ACC. Activated simultaneously with the IGN1 contact and turns off when the starter mechanism is turned on | IGN. Activated simultaneously with the IGN1 contact and does not turn off when the starter is cranked | Starter 2, turns on when the mechanism is cranked | Starter 3, turns on before the starter device is activated |
| 10 times | Monitoring the functioning of the power unit by impulse / operating time of the starter mechanism at startup | Engine fluid pressure controller/0.8s | Engine Oil Pressure Controller/1.2s | Engine fluid pressure controller/2s | Tachometer, starter operating time - less than 3.6 s |
| 11 times | Power unit type | Petrol | Diesel | ||
| 12 times | Temperature units for autostarting the engine | Celsius | Fahrenheit | ||
| Number of presses on the emergency button | Option Description | Key fob buttons | |||
| 4 times | Monitoring the operation of the power unit according to indications | Voltage in the vehicle's on-board network | Based on signals from the engine fluid pressure controller | By tachometer | — |
| 7 times | Locking the door locks when starting the engine remotely | IGN2 contact is activated, but door locks do not lock when autostarting | IGN2 contact is disabled, but door locks do not lock during remote start | IGN2 contact is activated and door locks are locked during auto start | IGN2 contact is disabled and door locks are locked during remote start |
| 8 times | Delay in activation of the starter mechanism before remote start of the power unit for diesel and gasoline engines | 2 seconds - recommended for gasoline engine | 10 seconds – recommended for diesel power units | ||
| 15 times | Units for measuring the temperature level in the car interior for auto start/engine blocking type | Celsius, additional interlock normally open | Fahrenheit, additional interlock normally closed | Celsius, additional blocking normally closed | Fahrenheit, additional interlock normally open |
| 16 times | Turbo timer | Disabled | 1 minute | 3 minutes | 6 minutes |
| Number of presses on the emergency button | Option Description | Key fob buttons | |||
| 1 time | Activation of contact IGN3 during remote start of the power unit | ACC. Turns off when activated and cranked by the starter mechanism of the crankshaft | IGN. The contact element does not turn off when the starter device is turned on. | Starter 2. Activated when the starter mechanism is activated. | Starter 3. Turns on until the starter cranks the crankshaft. |
| 3 times | Selecting the transmission type/preparing mode for remote engine start | Automatic transmission | Mechanical transmission with automatic preparation for remote start | Manual transmission with safe preparation for remote engine start |
Possible problems and their solutions
If the security system does not respond to pressing the remote control buttons, it is recommended to check the condition of the battery. After replacing the battery, the key fob is configured (in accordance with the recommendations set out in the instructions for use). If the receiver and transmitter are out of sync, you must re-flash the control panel. Then the owner sets up the key fob and checks the functionality of the complex.
If the key fob is not registered according to the standard algorithm, then you must simultaneously press the keys on the transmitter marked with the icon of a crossed out loudspeaker and with the silhouette of a car with an open luggage compartment. At the same time, the owner presses the setting key with the other hand. If the procedure is correct, the machine will sound the siren five times. The driver releases all pressed buttons. Then a complex action is made on the buttons on the remote control (with the speaker symbol and the silhouette of the car), which allows you to record the device code in the alarm system.
If it is not possible to register the key fob, then a visual inspection of the alarm components and switching harnesses is carried out for the presence of mechanical damage. The integrity of the cables is checked with a test device. Dirty contacts are cleaned with a special solution.
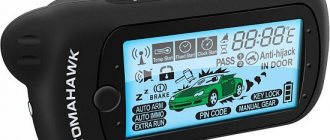
Tomahawk 9010: Icons and Buttons
Buttons located on the main and additional key fobs:
- 1 – designation “closed lock”;
- 2 – designation “key”;
- 3 – designation “icon of a car with an open trunk lid”;
- 4 – designation “speaker crossed out with two dashes”.
Note: The 5th button is located only on the main key fob - the designation “F” in a circle. To inform the driver about the status of the alarm, there are many different icons on the liquid crystal screen of the main key fob: the parking brake is on, the locks are locked, the trunk lid is open, the battery charge level, operation in security mode, temperature measurement scale, activation of the anti-theft mode, etc.
Additional Tips
It's best if you actually have a soldering iron on hand. And it is recommended to carry out experiments on older models of car alarms, then it is easier to calculate the required temperature level. And it’s even better if you have the opportunity to use a special soldering station. Then the screen will not be damaged.
The main thing is to remember that on a car alarm screen of normal quality the contacts will be glass and not flexible.
Other options can simply be thrown away immediately. It doesn't matter what kind of cover they have.
Repair recommendations
When you need to find a new LCD screen, buyers are advised to look at how many contacts there were on the old one. On the PCB itself, the details are easily visible. For example, if there are 22 contacts on the old one, then the same model must be ordered on the new one.
If only a black spot is visible on the screen, then replacement is definitely necessary. In this case, the cover is removed. The repair does not affect it.
If necessary, complete separation of the cable from the display is allowed. The main requirement is cleaning the contacts; it solves most of the problems associated with the device. Or those that are caused by the body itself.
Additional features
LCD alarm key fobs always have a backup battery. It is turned off while the vehicle itself is running.
Additional batteries are included so that the anti-theft device remains in working condition, even if the engine itself in the car is already running.
Electrical circuits and installation methods are different for each Tomahawk key fob system. It is important for users to follow the directions listed in the included instructions. Then the case will not be damaged, nor will the case or the screen itself.
Antenna analogues
Antenna compatibility can be determined from the table:
| Model | (Underlined is a complete analogue) |
| Tomahawk X3, X5 | X3, X5, TV-9020 or TW-7010 |
| 9.9 | Will fit 9.5 |
| Tomahawk D-900 | Antennas you can use: D700; LR-950; TW-9010. And also T Double Yu-7000 or from TV 9000; |
| 9.3 and 9.3 at 24V | Change to: 9.7 CAN or 9.7 |
| Tomahawk TW-7000 | TV-9010, TW-9000; D-900; LR-950 or from D-700 |
| Model T Double Yu-7010 | Can be replaced by LR-1010 or T Double Yu-7010; And also from: TV-9020; X5; X3 |
| T Double Yu-7100 | Use TW-9100 antenna |
| Model T Double Yu-9000 and TV-9010 | Compatible: TW-9000 or 7000; T Double Yu-9010; D-900. And LR-950, D-700; |
| Alarm T Double Yu-9020 | The following are suitable: TW-7010 or LR-1010; X5; X3 |
| Security system S-700 | Use TZ-9010 or SL-950 |
| Model TW-9100 | TDablYu-7100 |
| Anti-theft complex LR-950 | Can be replaced: D-900, TW-9000; TV-7000 and TW-9010 or D-700; |
| LR-1010 | Use from model TW-7010 or 9020; X5; X3. |
| Alarm system SL-950 | You can purchase the TZ-9010 or S-700 antenna; |
| Security system TZ-7010 and TZ-9020 | Suitable TZ-7010 or TZ-9020; as well as Z5; Z3; H1 |
| Device TZ-9010 | S-700 or SL-950 |
| TZ-9030, TZ-9030 – 24V | Suitable model H2 |
| Alarm Z3, Z5 | Use: Z5; Z3; TZ-9020 and TZ 7010; switch H1 |
| 7.1 | From 7.2 CAN |
| 7.2 CAN | Device from 7.1 |
| 9.5 | 9.9 |
| Model 9.7 | Use 9.3 – 24V or 9.3, 9.7 CAN |
| TW-4000 | Replace with TV 9020 or 7010; X5; X3; LR-1010 |
| Alarm 9.7 CAN | Suitable antennas: 9.3-24, as well as 9.3, key fob 9.7 |
| Receiver D-700 | Best: D-900; LR-950; TW-9010, TV-9000 or T Double Yu-7000; |
| Security complex G-9000, G-9000 CAN | Interchangeable |
Restoring system functionality
It is recommended to always have an additional key fob battery in stock, this will save you from a dead clicker with an LCD in stock. If the battery is too weak, some cars will start to lock up. Only timely repair of the device will help avoid unpleasant situations. From the tools we need:
- screwdriver with new battery
- lubricant
- We already have the case and the screen.
First, you need to check the back of the LCD device to examine where the battery is located.
You can easily unscrew the bolts with a screwdriver, doing it yourself. It will become an indispensable assistant in situations where simple manual work is impossible. The battery is removed and replaced with a new one. The cover does not need to be changed if it is not broken. Small boards require careful examination; contacts are transmitted through their connections. The device is definitely dirty, as is the case, if one of the following problems is present:
- Presence of black and gray areas.
- An unclear pattern of metal on the surface.
- Fuzzy drawings. Or when the system reboots.
You can wipe the key fob boards with lubricant. Just do this very carefully, otherwise there is a high probability of damaging the device with your own hands. Then you need to wait a while until everything dries.
Sometimes the causes of malfunctions lie in system failures. A display that is broken can also cause problems. The cover does not affect this.
Possibility of cable repair and replacement
Usually this part is changed when the time comes. Many are trying to use heat to restore this structure. But this is a temporary solution, which will last literally for 1-2 months.
Then problems will arise again, and the screen will simply go dark. Therefore, it is better to solve the problem by completely replacing the cable. Some sell repair kits, but there are also ready-made products that allow you to carry out repairs.
Let's look at the option with a repair kit. The main thing is that the contact tracks on the new acquisition coincide with what was there before. Even if the drawing itself has a mirror image compared to the old one, that’s okay. It’s easy to glue them, just warm them up and then press them. The body is not damaged.
In some cases, you can make a new cable while carrying out repairs. To do this, use a wire with a medical plaster. The pitch of the contacts is first marked on a piece of paper. A patch is stuck on top. Then there will be no malfunctions.
It is better to choose a patch so that its width matches the train itself. But you can also glue narrow materials with an overlap. You will need a stranded wire, you need to unravel it. The main thing is to cut the pieces so that there is a certain reserve. With a given step, the pieces are superimposed on each other, in parallel. The body is put back together.
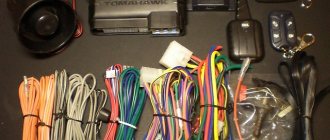
Alarm installation
In order to complete the installation yourself, first of all we prepare the necessary tools. In our case, everything is standard, but you will need: screwdrivers, a screwdriver, corrugation, adhesive tape, resistant electrical tape, a multimeter. A multimeter will help us in working with electricians; it is better to use its electronic version. Also, if you plan to connect the alarm to the central locking, you will need a probe to determine the necessary wires.
Installation of alarm elements
Don’t immediately rush to connect all the wiring; first, secure all the elements included in the kit. You can start with the siren. We fix it under the hood, pointing the hole down. The device should not be very close to the heating elements of the engine. Then we mount the hood end switch. Any hole will do for it; it shouldn’t rest against anything from below.
Installing elements under the hood
The next step is to install the temperature sensor. This is where you have to pick up the wires. We install the sensor itself closer to the engine so that the temperature it will determine can be as current as possible. Now let's connect the two wires. We pull one (black) to ground, the second to the hood limit switch. It must be combined with orange-violet.
Important! All places where wires are soldered are rewound with special electrical tape that can withstand temperature changes. Its color is chosen depending on the color of the car's electrical system, usually it is black.
Wires from already connected devices must be routed into the interior under the hood. Now we glue the antenna with double-sided tape to the windshield and install the LED.
Electrical connection diagram
In order to properly connect the electrics, read the diagram in advance and understand it. An incorrectly connected alarm system will, at best, work poorly, and at worst, it will destroy all the electricity in the car.
Important! When working with electrical wiring, disconnect the negative terminal from the battery.
To connect the brake lights to the alarm, we find a white-green wire under the brake pedal and connect to it. To check the correctness of the choice, use a multimeter. When the pedal is pressed, it should show +12V. Next, we display the signal for the turn signals and dimensions. To do this you will have to remove the dashboard. After this procedure, we place the shock sensor in any convenient place. It can be secured either with double-sided tape or simply screwed onto a screw. Finally, you need to connect the remote launch, we use the diagram. Now we pull all the wires to the control unit. This completes the electrical work.
Alarm control unit
There are two points left that we have not covered. It is recommended to place the control unit box itself in a place that will not be conspicuous. Sometimes it is also secured under the instrument and steering panels in the depths. But the more unpopular the installation location is, the better it will be for you. Standard schemes are known not only to car owners, but also to car thieves.
The central locking is connected to the alarm depending on its type. Initially, it is worth determining what type your central lock is. If it operates on a positive or negative pulse, you find these wires using a probe and connect them to the control unit. To check the operation of the system, replace the negative terminal.
Emergency activation and deactivation of the alarm system
If the car does not respond to the key fob, you can use the emergency activation and alarm disabling function.
Emergency alarm activation
To activate an emergency alarm, you must:
- turn on the ignition, but do not start the engine;
- press the Override button eight times;
- turn off the ignition.
The car will react with a single flash of the parking lights and a single sound of the siren. After 20 seconds, the system will automatically turn on the security mode.
If, 20 seconds after the emergency activation of the alarm, any of the security zones are triggered, the car will notify the user of this by flashing the parking lights four times and sounding the siren four times. After this, the user will have 20 seconds to disarm it. If this is not done, the system will activate the alarm mode.
Sources
- https://voditelauto.ru/%D1%82%D0%BE%D0%BC%D0%B0%D0%B3%D0%B0%D0%B2%D0%BA-9010-%D0%B8%D0% BD%D1%81%D1%82%D1%80%D1%83%D0%BA%D1%86%D0%B8%D1%8F-%D0%BF%D0%BE-%D1%8D%D0% BA%D1%81%D0%BF%D0%BB%D1%83%D0%B0%D1%82%D0%B0%D1%86%D0%B8%D0%B8/
- https://kazak-mo.ru/tomagavk-9010/
- https://KrutiMotor.ru/instruktsiya-tomahawk-9010-nastrojka-signalizatsii/
- https://kodobd.top/brelok-tomagavk-9010-instruktsiya/
- https://autodvig.com/alert/tomahawk-tw-9010-instruktsiya-po-ekspluatatsii-66662/
- https://AutoTuning.expert/avtosignalizatsiya/tomahawk-tw-9010-instruktsiya.html
- https://carlasart.ru/avtosignalizatsii/instruktsiya-po-ekspluatatsii-signalizatsii-tomahawk-9010-s-avtozapuskom.html
- https://DaciaClubmd.ru/alarms/tomahawk-tw-9010-instrukciya
- https://manualza.ru/tomahawk/tw-9010/clyu1
- https://avtobez.com/signalizacii/tomahawk-tw-9010-instruktsiya-po-ekspluatatsii-12601/
- https://prometey96.ru/ekspluataciya/tomagavk-9010.html
[collapse]