Purpose, design and replacement of the VAZ 2110 crankshaft pulley
VAZ engines have two, slightly different modifications of the torsional vibration damper and crankshaft hubs, in other words, the pulley.
On a VAZ 2110, the crankshaft pulley can be made as a block, or also have a separate system with a hub - a damper. When the production of the “ten” had just begun, the crankshaft vibration damper was a single unit, and was secured with only one central bolt. Along with the injection VAZ 2110, a damper appeared. It is bolted to the hub.
Crankshaft gear: structure and functions
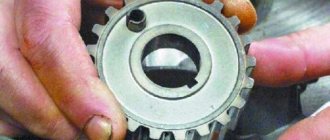
The crankshaft gear is the gear through which the engine equipment rotates. Depending on engineering solutions, it has the shape of a gear with teeth for a chain or belt.
Crankshaft Gear for Chain
Crankshaft Gear for Belt
As a rule, timing gears (lower) and oil pump drives are installed on the crankshaft. The gears are mounted with a tight fit, fixed on the keyway, and pressed with threaded fasteners.
Crankshaft gear malfunctions
Common crankshaft gear problems include:
- Natural mechanical wear of the teeth. High speeds and vibrations affect the contact surfaces of gears. Over time, wear appears on the gears, and they are replaced with new ones. The wear on the timing gear can negatively affect the valve timing;
- Wear or damage to the keyway of the crankshaft gears. The fact is that even a slight gear play, which will not have a noticeable effect on the operation of the engine, will eventually develop into a problem. The crankshaft gear backlash will increase. If the problem is not addressed, the keyway may become severely damaged, requiring the crankshaft to be replaced.
Replacing the crankshaft gear
The easiest way to remove the gear from the crankshaft is if the shaft itself is removed from the engine. As a rule, gears are installed on the shaft with interference, so a puller will be required. The sequence is as follows:
- install the puller and by rotating its rod, gradually “press out” the gear;
- Remove the gear from the shaft, remove the key, and inspect the keyway on the shaft.
Replacing the crankshaft gear
To mount the gear, you will need a round attachment similar to a steel tube, which will easily fit onto the shaft. Necessary:
- install the key;
- lightly press the gear;
- placing the tube on the shaft, rest it against the gear;
- lightly tapping the tube with a hammer to “seat” the gear into place.
If you only need to replace the gear, this can be done without removing the engine and crankshaft. Removing the crankshaft gear must be done after the engine has completely cooled down and the car has been immobilized.
Let's consider the procedure for replacing the timing gear of a VAZ 2110 engine.
- The first step is to remove the timing case;
- Then install the timing mechanisms according to the marks on the crankshaft and camshaft pulley (this is necessary so as not to disrupt the engine’s timing);
- If you did everything correctly, the marks on the flywheel should match. To check this, remove the rubber plug on the gearbox;
- Then you need to fix the rotation of the engine. For this it is better to use special clamps. If this is not possible, you can insert a regular flat-head screwdriver into the transmission inspection window;
- Unscrew the pulley and remove it;
- Check the position of the mark on the timing sprocket;
- Loosen the timing belt tension roller and remove the belt;
- Remove the crankshaft gear and inspect the keyway;
- Reassemble components and mechanisms in the reverse order of disassembly, checking the timing marks.
Remove the timing mechanism casing Remove the timing mechanism casing Install the timing mechanisms according to the marks on the pulley Install the timing mechanisms according to the marks on the pulley Remove the rubber plug on the gearbox Remove the rubber plug on the gearbox Check the position of the mark on the timing sprocket
You can change the crankshaft gear in a home workshop, but you should understand that an error in setting the gas distribution mechanism can lead to serious engine damage. If you do not have experience with such repairs, it is better to contact specialists.
Source: https://SwapMotor.ru/ustrojstvo-dvigatelya/shesternya-kolenchatogo-vala.html
Possible faults
Removal and, if necessary, replacement of the pulley may be required in the following cases:
- If the hub has turned. It must be said that most often this happens due to previous inept repairs. The fact is that the VAZ 2110 has a fixing sleeve in the seat for the damper, pressed into the gear. It tends to fall out of the gear, causing the hub to rotate;
- Oil leaked from under the front crankshaft oil seal;
- The lightweight crankshaft began to resonate strongly;
- The old-style pulley or damper is loose;
- The damper seat broke. In case of such a breakdown, a replacement is needed, preferably together with the crankshaft gear;
- If it is necessary to remove the crankshaft - for repairs, replacement of liners, half rings, converting it into a lightweight one, etc.
TS3 (Universal-3): it is not possible to remove the spindle pulley... - Tabletop machine Universal
I ask for help, has anyone encountered this and/or am I doing something wrong?
The situation is this: I brought the machine home to my apartment, turned it on and was horrified - it became obvious that with such a level of noise the neighbors would come running even during the day, and there was no need to talk about the evening. I decided to shake up all the bearings, removed all the pulleys, the electric motor, disassembled everything and didn’t even (t-t-t) break anything, but the spindle pulley doesn’t give in at all! I did everything I could - I filled it with VD and waited a couple of days for it to dry out, and I used a mallet and a pry bar - no way!
I re-read all the topics related to removing the cartridge, spindle bearings, who writes what - some used a screwdriver and everything came off, some used a pry bar, etc., but for me it really resists - a rubber mallet with a pry bar doesn’t work help.
Moreover, the spindle shaft moves back and forth by 5-7 millimeters when the mallet hits it, but nothing further.
And I had a suspicion - maybe my pulley with the gear behind it sits on this shaft after all on a thread?? (although someone wrote that the pulley just sits on the shaft, but it doesn’t even flinch even an inch!) Suspicion is strengthened by the presence on the pulley of two holes for a slingshot key, however, maybe this was done to fix the pulley for replacement and reversing belt? In the photo I marked these holes with red circles.
What to do? Continuing to hammer does not give any result at all, I don’t have any pullers, and I have doubts that a puller will help if the pulley doesn’t even flinch from the sledgehammer. I wouldn’t want to break it, but I need to remove it, otherwise I won’t be able to get to the spindle bearings. The bearings growl, so I decided to try changing them.
www.chipmaker.ru
Removing the damper
On a VAZ 2110, the damper is removed in the following sequence:
- Disconnect the ground from the battery;
- Remove the radiator fan and fluid coupling;
- After loosening the bolts securing the fan pulley, remove the belt;
- It is advisable to remove the radiator, but if it does not interfere, you can leave it, protecting it from damage from the engine compartment with a sheet of plywood or cardboard;
- Remove the pulley from the radiator fan;
- We gain access to the damper, unscrew the bolts, dismantle it;
- When removing the hub, you need to secure it from turning (for which there is a special tool).
Next we proceed depending on the purpose of the analysis. If you only need to replace the damper, we do it and assemble everything in the reverse order.
You should know that replacing the liners on a VAZ 2110 can be done either with or without removing the crankshaft. But this requires a special device, and besides, it is better to entrust such work to an experienced mechanic - a mechanic.
If the crankshaft was dismantled to replace the liners or half rings, then we continue:
8. Remove the lightweight or regular crankshaft; 9. We remove the half rings; 10. We evaluate the condition of the liners, and if they do not need replacement yet, then be sure to remove them and mark each of them; 11. But, unfortunately, no matter how carefully the owner treats his VAZ 2110, sooner or later the time for physical wear comes for the liners - they need replacement.
- Four repair kits of inserts are produced for the VAZ 2110. You need to buy them only as a set, and only in a strict sequence of sizes. Sometimes, however, situations are possible when you have to purchase them “through size”;
- thus, the crankshaft only lasts for four (and sometimes even three) overhauls;
- replacement of liners cannot occur without grinding the crankshaft. The only exception is if it is replaced with a new one. At the same time, an experienced craftsman can turn the crankshaft into a lightweight one.
But if replacing the crankshaft pulley is not such a difficult task, and almost any home craftsman can do it, then grinding and tuning the crankshaft should be entrusted only to experienced motorists.
When reassembling, please note that the groove on the hub must be aligned with the segment key. In addition, the bolt holding the hub requires a torque wrench. Its tightening torque should be 400 N/m.
How to remove a crankshaft pulley bolt: why is everything so complicated?
An understanding motorist usually spends less than a quarter of an hour on the process of dismantling the crankshaft pulley. But inexperienced drivers, when trying to remove this part without the help of others, are faced with an abundance of problems that they often simply cannot solve. The instructions for carrying out repairs and maintenance of any modern vehicle contain comprehensive information about the dismantling process, but, unfortunately, it does not help car owners.
First of all, difficulties arise with fixing the crankshaft. It is very difficult to dismantle it if the part is constantly spinning, “slipping” out of your hands. It is also unclear to many which side to approach the bolt that holds the pulley. Well, its powerful tightening usually makes the process of removing the unit very, very difficult, because dismantling under such conditions is fraught with damage to the body covering or parts of the engine compartment of the car.
All car manufacturers and car service specialists use enormous force to tighten the nut or bolt of the crankshaft pulley (on some vehicle models the mechanism is supported by a bolt, in others by a nut).
This is done specifically to avoid self-unwinding of this part during vehicle operation. If a bolt (nut) falls out while driving, it will be difficult to bring the car back to life in order to continue driving it, and the repair itself will cost, believe me, a pretty penny. In addition, the described fasteners increase the level of their own tightening without the help of others when the motor is running. And the final “indestructibility” of the bolt is assigned to the phenomena of coking, sticking, and corrosion.
How to unscrew
crankshaft
pulley on an automatic machine
without special tools.
Purpose
The crankshaft pulley serves to transmit rotation from the crankshaft to such important vehicle components as the generator, power steering and air conditioning. In addition to this function, in the injection engine there are special teeth on the damper-type pulley, which are read by the crankshaft sensor.
This is one of the most important indicators for the electronic motor control system, which is responsible for the correct operation of the entire unit.
If it fails (beating and deformation, cracks and tears), the VAZ crankshaft pulley will most likely need to be replaced. This part of the car can be repaired, but in very rare cases (if minor defects are detected).
It is not necessary to go to a specialized car workshop; if you have free time and skillful hands, you can do the replacement yourself, which will not only save money, but also increase your self-esteem.
Necessary tool
When disassembling an engine or partially replacing its components, it is often necessary to unscrew this element. Rare dismantling of this unit leads to the fact that over time the fastening bolt turns sour. In such a situation, you can decide on one of the ways to unscrew the fastener. To carry out the work you will need a set of tools.
Quick removal of the VAZ 2114 crankshaft pulley is only possible if you have the following tools:
- Jack for raising the car;
- Wheel chocks (bricks, boards, etc.) for securely securing the vehicle;
- Mount as a lever;
- Set of keys and heads: 17, 19, 13 and 10.
It is better to carry out dismantling work on a lift or pit. If this is not possible, ensure that the vehicle is supported by one jack. In addition to the set of tools listed, a lubricant such as WD-40 will not be superfluous. When you start work, treat the fastening and after 10-15 minutes proceed with removal.
Dismantling may be necessary when replacing the timing belt or oil seal. Such work cannot be done without removing this part. Rarely does a pulley need to be replaced. Even though this part is made of metal, it also deforms over time, causing problems with the crankshaft position sensor.
There are quite a few options for unscrewing the pulley, but in this article we will look at three main methods of dismantling.
Preparatory work
Before removing the crankshaft pulley, you need to prepare the necessary tool and perform preliminary procedures. In your work you will need the following tools:
- overlay key 19;
- pipe section;
- special pulley puller or pry bar.
Place a support under the front wheels, remove the connector from the ignition coil and set the gear shift lever to neutral. Unscrew the tension bolt of the generator by 3-3.5 cm, loosen the fastening bolts to allow it to move freely and remove the belt. After this, you can remove the crankshaft pulley 2110.
Dismantling and replacement
Regardless of the design, where the part is located, it is important to remove and install it in the same order. Depending on the location of the motor, the part is located in the front part behind the cooling radiator. But if the motor is placed across the engine compartment, then your hand will not reach the part. Because to remove the crankshaft pulley, you need to remove the right wheel. If it is difficult to change, it makes sense to pay attention to the drawing, the work will speed up.
The vehicle is rolled onto the inspection hole and secured so that the car does not move from its place. To get there and remove the structure, you need to unscrew all the parts that impede access (air filter, mud flaps, etc.). Remove the generator belt. Next, open the clutch block plug and insert a pry bar into the hole to lock the flywheel.
The elements of the part are characterized by strong fixation, so they are not easy to remove. To turn a part, it is necessary to make a lot of effort. If dismantling is performed for the first time, it will be difficult to unscrew the crankshaft pulley. The reason is that factory production is characterized by strong tightening of the component parts.
Important! The right screw pattern means that the unscrewing process occurs counterclockwise. The car part spins in the other direction, so if it has oxidized, it is not so easy to disassemble it; it is useful to use additional means.
How to unscrew the crankshaft pulley nut
When turning fasteners, it is important to follow the recommendations, then the process will take at least 15 minutes. The effort should be applied as close to the camshaft as possible:
- use a pry bar to pry it up from all sides;
- If necessary, use a special universal crankshaft pulley puller for this part.
The device is presented in the form of a hairpin with 2-3 grips. The end of the gripper is secured to the edges of the part, and the end of the pin is placed in the middle of the shaft.
Scroll clockwise. But not all brands of cars turn clockwise; in some cars, the work must be done in the opposite direction. In this case, it is important to put your gear lever in 4th speed and turn on the handbrake.
If you can’t turn it, the lever should be in the neutral position. The next step is to remove the candlesticks. The key is placed on the floor or on the rear side member and turned in the direction of movement of the device.
All maneuvers make it easier to scroll, so further actions must be performed manually; if necessary, lubricate with brake fluid or WD grease. In addition, tapping the edges of the head can make your work easier.
How to remove the crankshaft pulley bolt
To do the job efficiently, the disassembled machine is placed on a stump. The pin holds the part together and is usually found in front-wheel drive automatic cars. The thread is designed in such a way that it is tightened during the torque when moving.
It is necessary to perform actions that open access to the base. To do this, it is important to stop the rotation well. A mount is used as a fixation. The tool is inserted into the flywheel gears. It must be adjusted securely so that it does not fall out during the turning process. Therefore, it is better to do the work with an assistant. Next, put a socket head of the same diameter as the pin onto the pin, attach a lever and an extension (a piece of durable pipe). After this they begin to slowly unscrew it.
Important! The longer the extension, the easier it is to unwind.
People's automobile experience
The difficulty of dismantling lies in the specially selected strong connection, without play. The fasteners are tightly screwed. They practice using a pry bar, while slowly pressing on the back surface of the part.
Unscrew the locking bolt
The only bolt that secures the pulley to the crankshaft is not so easy to unscrew. The threads of this bolt coincide with the direction of rotation of the crankshaft, so if you do not have a pneumatic impact wrench, you will have to cope with this task with some trickery.
The crankshaft pulley bolt can be easily unscrewed using a spanner, a piece of pipe and your car's starter. We put a 19mm head on the bolt, and using a pipe we extend the handle of the key to the surface, and in such a way that it rests on the floor on the side opposite to the direction of rotation.
After that, we get behind the wheel, ask the nervous neighbors in the garage to leave and start the car with a quick movement of the key. The starter should not turn for more than a split second. After making five or six such attempts, you will be able to unscrew the “stuck” bolt without making titanic efforts. Be prepared to be accused of wasting the starter's resource, damaging your property, etc.
Yes, this method is not used in service centers, but there are witnesses to its effective implementation. Nothing was spoiled by this, except the mood of those who opposed this method of unscrewing bolts.
Stages of work
In order to remove the crankshaft pulley on a VAZ 2114, you need to dismantle some parts and components. The entire process of removing the crankshaft disc consists of the following steps:
- First, to dismantle the generator belt, you need to unscrew the locking bolt and loosen the tension bolt.
- Next, you need to lift the front of the car and remove the right front wheel.
- In the upper part of the engine compartment of the VAZ 2114, remove the air filter and the engine mud shield.
- Next, remove the alternator belt.
- To secure the flywheel from turning, you need to open the plug on the side of the VAZ 2114 clutch. Then insert a screwdriver or pry bar into the opened opening between the flywheel teeth. Fix the flywheel and unscrew the bolt
- Next we move on to unscrewing the fastener. To make it easier to unscrew, you need to apply special liquids to the threaded connection that corrode corrosion. For this purpose, special WD lubricant, brake fluid, and vinegar essence are suitable.
- Then the head of the key is put on and, using a lever, it is turned counterclockwise so as to tear the bolt from its original position. We put the head on the bolt
- If you are unable to unscrew the fastening element by hand, you can use the starter. Unscrew the fastening bolt
- Place the lever coming from the head against the spar or the floor in the direction of the shaft movement, and then turn the starter several times, giving the crankshaft a rotational impulse.
- After unscrewing the fastening element, you need to remove the crankshaft pulley. It is held in place by a key and is difficult to remove easily. You can use a special device with paws that cover the edges of the disk.
- If you don’t have a puller, you can use pry bars or screwdrivers by inserting them between the crankshaft and the pulley on each side, gradually moving the part to be removed away from the shaft. The touch point should be chosen closer to the crankshaft.
- Before removing the disk, it is advisable to tap it with a wooden hammer to avoid possible distortion. The part should be dismantled carefully so as not to damage the key and groove.
Read more: How to pull out a spar with your own hands Loading...
- First of all, we find access to the pulley so that we can access it with a key or ratchet.
- If the bolt cannot be unscrewed with a wrench, you can try to remove it using the starter.
- Alternatively, you can always use special removable devices.
Now about all this in more detail.
You need to be prepared for the fact that, depending on the car model, you will have to remove the coolant reservoir, the air filter unit, possibly the radiator and almost always the wheel. Quite often, such work has to be started by removing the right wheel. You also need to know the location of the ignition coil.
Pulley removal
A special key confidently holds the pulley hub on the shaft even with the bolt removed. A special puller allows you to perform this operation quickly with minimal effort. If you don't have it, you'll have to tinker a little longer. First, treat the interface between the pulley and shaft with a special liquid (like WD-40).
After this, you need to wait a little for the liquid to do its job. Using a pry bar, pry the crankshaft pulley around the circumference and swing it in the direction away from the engine. The procedure is long and tedious. The main task is not so much to remove the pulley hub as to avoid damaging the keyway.
Unscrew the pulley nut
The nut that holds the pulley at the end of the crankshaft indicates that we are working with a classic version of the engine, namely a VAZ-type car. So, before starting work, you need to prepare the necessary tool, namely a socket or socket wrench for “36” or “38”, you also need to prepare a piece of pipe about 30 cm (later you will find out why). It is better to do the work above the inspection hole. If this is not possible, then it is better to use a jack and definitely a tree stump (better to be safe).
We set the gearbox lever to the fourth gear position and turn on the parking brake mode (handbrake). We try to unscrew the nut using a wrench with a long lever while being under the car. If the attempt fails, you need to use another option.
Set the gearbox lever to the neutral position and remove the spark plugs. We install the key so that it rests (in the case when the length of the key is not enough, a pipe is used) against the floor or the rear spar in the direction of movement of the crankshaft. When the requirements are met, it is necessary to turn the ignition key to give short-term pulses. Sometimes the nut fits so tightly that you can’t get it off the first time. Mostly it is released on the third or fourth try. Once the nut is stripped, it can be tightened with a wrench.
How to unscrew and remove the crankshaft pulley of a VAZ 2110
From the very first release in June 1995, the VAZ 2110, or “ten” in common parlance, won the love of middle-class people. This model was produced for 12 years. Not difficult to maintain and easy to break down, as well as replacing some parts is easy to do yourself, without resorting to the services of a car service. This will save not only time, because the wait for the service center to take on the car can vary depending on the workload of the technicians, but also money. Engine VAZ 2110 8-valve injector, volume – 1.5 liters, front-wheel drive, M5 gearbox. Engine power 56 kW, torque 118 Nm. A huge plus is low fuel consumption.
The maximum speed is 170 kilometers per hour, while acceleration is 14 seconds. Very well suited for urban heavy traffic. Starts even at -25 degrees below zero. The chassis is made of high quality, excellent for holes and potholes. The suspension is strong. Power steering can be installed, but to order. The components are not expensive, even original ones can be purchased by a middle-class car enthusiast.
The interior is not very roomy, but it has a trunk capacity of 450 liters. The rear backrest reclines, the middle one reclines completely, and the side ones have a smaller deviation. Long loads can be easily transported. An internal combustion engine equipped with a belt drive, sensors and an electrical engine control unit control the operation of the systems. The most common breakdown for VAZ 2110 8 valves is engine friction.
- Poor quality fuel; as a result, one of the fuel system parts became clogged. In this case, you will have to study the fuel supply circuit and fix the problem. Doing this on your own is difficult and can take a lot of time. In this case, it is better to contact a car service.
- Damage to spark plugs and wires. You need to visually inspect everything and check the fragments with a tester.
- Malfunction of the electronic control unit and sensors. Home renovation enthusiasts cannot solve this problem. You will have to turn to craftsmen who have experience and special equipment.
VAZ 2110 8 valve injector has high technical characteristics. But, like all cars, over time some parts tend to wear out. The main breakdowns that car enthusiasts can fix themselves are replacing the Kalevala pulley of the VAZ 2110 8 valves. The gear or pulley of the VAZ 2110 crankshaft is one of the most frequently replaced parts. Their good service life is on average 3 years. Car owners will not find it difficult to replace it themselves as the process is simple. Having understood how to change the crankshaft gear, the driver will gain experience in repair work in the manual drive system of the gas distribution mechanism, but will also be able to further adjust the valve or make modifications.
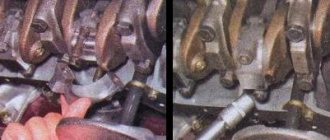
Checking the condition and replacing the timing belt
We check the condition of the timing belt on a cold engine (15–35 °C) every 15 thousand kilometers.
Use a 5mm hex to unscrew the four screws securing the front upper timing cover...
...and remove the cover. We hang the right front wheel and engage fifth gear in the gearbox. By rotating the wheel clockwise, we turn the engine crankshaft and inspect the timing belt. With normal belt tension...
Purpose and role of the crankshaft pulley
Purpose and role of the crankshaft pulley
Each drive of this car brand has 2 types of pulley:
- Block type.
- With a disconnected system with a bushing - a damper (acts as a shock absorber under heavy loads on the crankshaft).
At the very beginning of VAZ production, the pulley was one-piece and was fastened with one bolt. But with the advent of the injector, a damper was also mounted on the hub.
Why is it difficult to remove the pulley?
No. 1. Depending on the engine design, make and model of the car, the difficulty of removing the pulley varies. Some machines have a lot of space to comfortably carry out repair work, while others have very little free space. The pulley design elements cover the pulley.
The structure of pulleys is also different, there are 2 types:
Damper pulleys have an additional outer ring with an elastic band in their design, which absorbs vibrations and micro-vibrations.
Before you start removing the pulley, you need to loosen the tension nuts and bolts, remove the generator and power steering belt.
No. 2. In the factory assembly, the pulley is seated on the engine crankshaft, pressed with a bolt or nut and tightened with high compression force. Thus, the factory assembly is very strong. Therefore, if you have never removed the pulley, it will be more difficult to dismantle it the first time.
In addition to tightening with the maximum permissible force with a special torque wrench, during operation, the engine becomes very hot, the threaded connection is tightened even more and sticks. And external factors influence the outside, due to which the threaded connection may be subject to corrosion.
Some engine models cannot be repaired; they are disposable. These are, for example: 1AZ-FSE, 3UZ-FSE. Each power unit was examined in detail.
No. 3. If you disengage the clutch, the engine crankshaft can be freely turned with a wrench. Therefore, in order to unscrew the crankshaft pulley nut, you need to stop the shaft from turning. If, when you press the clutch, the speeds do not change, then it is not working. Air may have entered the system. In this case, you need to bleed the clutch.
Why are special technological holes made in pulleys? In auto repair shops, there is a special device for fixing the shaft, which must be bolted to the pulley and the shaft locked.
If there is no special device for fixing the shaft, which is screwed to the pulley, then you need to install good anti-roll devices under the wheels of the car and put 4th gear on the gearbox.
Or, the third option is to rest a pry bar against the flywheel teeth and fix the crankshaft from turning while unscrewing the pulley nut.
Another option is to insert a pin into the pulley hole, and install a pry bar around the pin and the second stop, as in this figure.
How to remove the damper
- It is necessary to disconnect the wire that connects the negative terminal of the electrical element to the body of the product from the battery.
- Remove the fan and coupling.
- Lightly undermine the choke pulley rod and remove the belt.
- Carefully, so as not to damage the heat exchanger, remove the gear from the fan.
- The approach to the damper opens. Then tighten the bolts slightly and remove it.
- When the hub is removed, it must be secured against rotation.
All engines consist of several systems and operate using a source of mechanized energy - the crankshaft. Some part of the tacking moment is redirected from it and driven into action by the shafts, generator, pump, etc.
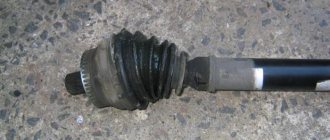
The crankshaft pulley 2110 is one of the engine parts of the gas distribution mechanism and additional components. Located in the front half of the crankshaft.
• Monitors angular velocity and shaft position. • Reduces noise. • Reduces the swing of the crankshaft.
The pulley is one of the most important parts of a typical engine.
Method 3
The stuck crankshaft pulley of the VAZ 2114 can be removed with some effort. Even an additional lever in the form of a pipe does not always help to remove the nut. In such a situation, you can resort to a rather tricky option for removing the spare part - using a starter. Because a working starter drives the flywheel and the pulley itself - its force can be useful for sharply unscrewing the fastener. Step-by-step instructions for removing a part in this way are simple:
- After dismantling the generator and timing belts, proceed to securely fix the nut with a wrench without blocking the pulley;
- The photo below shows one type of reliable fixation;
- Move the gearbox to neutral;
- For safety, remove the high-voltage wires from the spark plugs;
- Move into the car interior and sharply turn the key in the ignition a couple of times;
- Cranking the starter will cause the nut to loosen.
Before carrying out work, we also recommend treating the contact surface of the nut with a special lubricant. After this procedure, all fasteners can be unscrewed with ease.
Having torn off the nut, remove the part and carry out the necessary manipulations. When reinstalling the spare part, it is not necessary to tighten the nut with great force.
The only difficulty that arises when carrying out such a procedure: souring of the thread. Treatment with chemical lubricants only partially solves the problem, so when dismantling, use great force to successfully unscrew it.
Source
Reason for changing the crankshaft pulley
The crankshaft pulley of the VAZ 2110 is a reliable car part, but it can become faulty.
If you observe at least one item with the ones listed below, it’s time to change it:
- If oil leaks from the shaft.
- Feeling of increasing resonance.
- A crack in the damper seat (mechanism for reducing or preventing vibrations). Needs replacement along with the crankshaft gear.
- Hub rotation.
- If the crankshaft is removed for any repair work.
Reasons for dismantling the crankshaft
Dismantling the crankshaft on a VAZ-2114 may be required in the following cases:
- The reason that comes first is most often the replacement of the timing belt and other work that is somehow related to the gas distribution mechanism. Work should be carried out in accordance with the regulations, or if the mechanism fails.
- Another reason for dismantling is the failure of the crankshaft oil seals. They are changed when oil leaks occur in the places where they are installed.
Pulley fastening
On all VAZ-2114 vehicles without exception, the crankshaft pulley is fixed using a massive bolt, which can cause problems when removed.
A curved spanner wrench is good for fixing.
- First of all, this is due to its location, since it is difficult to securely and securely fasten the key or socket head.
- Secondly, even if you managed to position the key correctly, you will have to make every effort to dismantle it . This is due to the fact that at the factory it is tightened as tightly as possible in order to avoid the facts of self-unwinding. Also, the right-hand thread may not be the best for unscrewing it, which during operation only screws the pulley in tighter and causes the part to stick.
When performing work to remove it, it is best to keep WD-40 on hand.
Tool for getting the job done
To make the work easier, you need to prepare the following tool:
- Jack.
- Wheel chocks.
- Pry bar and flat blade screwdrivers.
- A set of keys.
- Socket heads and extension.
It is best to carry out such work on a lift or inspection pit.
How to unscrew the crankshaft pulley of a VAZ 2110
For a good overview and access to the car pulley, it is best to use an inspection hole or overpass. It would be a good idea to take an assistant because it is difficult to cope with some processes alone.
If there is no inspection hole, lift the car using a jack and you can begin dismantling, which consists of the following steps:
- To avoid breaking the bolt while unscrewing it, you need to treat it with some means (for example, WD-40) for better scrolling, since it can become rusty under the influence of temperature and other factors. As a result, it is very difficult to twist.
- Unscrew the bolt and carefully remove the right wheel, since the engine is located transversely, you will have to remove it to access the pulley.
- Remove the air filter present there.
- Unscrew the screws and remove the shield to protect the engine from dirt. [BR]• Remove the alternator belt, as well as all mechanisms that complicate access.
- Open the plug on the clutch box and insert a pry bar into the opened space to jam the gear teeth.
- Place a wrench with an extension on the bolt and turn it. Carefully remove using a special puller.
- We mount the new one, making sure that the notch on the pulley coincides with the tooth.
Often, beginners, when repairing their car on their own, are faced with not knowing how to remove the crankshaft gear.
The crankshaft gear is a part that powers the mechanisms in the drive. It has the shape of a gear with teeth; a chain or belt can be put on them. Typically, timing gears and oil pump drives are attached to the crankshaft. The gears are placed with a tight fit and secured with a connecting rod with threaded fasteners.
How to fix?
How this is done on cars with manual transmissions is briefly mentioned in this article, but our task is to perform the fixation on cars with an automatic transmission. For selected models, e.g. AUDI A6
, this won't be a big problem. You need to open the cap on the filler neck to fill the engine oil and turn the shaft until the “OT” symbol appears in the neck.
It shows that the piston is at top dead center, after which the shaft can be locked. This can be done as follows. Turn the TDC indicator out of the cylinder block, and in its place you need to screw a special fixing bolt. After this, you can begin to unscrew the pulley mount.
In some domestic and imported cars, there is a plug in the flywheel rotation zone
You need to carefully pull it out and ask an assistant to fix the shaft through the opened hole. To do this, you can use a pry bar or a powerful screwdriver.
The assistant will have to make some effort to keep it motionless.
The Ford Focus manufacturers also took care of the possibility of carrying out such an operation. There is also a plug on the cylinder block, which can be unscrewed to secure the shaft. To do this, insert a special rod into the opened hole, which you can make yourself. It is a cylindrical part about 65 mm long with a stepped shape. Its lower part has a length of 10 mm and a diameter of 4 mm. It is inserted into the groove of the crankshaft and locks it in a stationary state. The rest of the rod has a diameter of 8 mm, it acts as a guide into the opened hole.