02/09/2022 2,975 Electrical package
Author: Ivan Baranov
In order to increase comfort when driving a vehicle, modern cars use many different devices and devices. One of these is power windows (EP), thanks to which the driver just needs to press a button to open or close the window. This article provides a diagram for connecting power windows, as well as detailed instructions for this process.
[Hide]
Removing a standard window regulator
If you plan to install rear electric windows on the car, you will have to disassemble all the doors. Therefore, at the first stage, remove the trim from all the doors, and then begin disassembling the mechanisms. Having opened access to the cable mechanism and glass fasteners, you can begin dismantling. First, push the glass all the way up and secure it with tape.
After this, unscrew all the fastening bolts that are on the glass carriages. Moreover, you need to unscrew them both on the mechanism and on the glass. After this, you can pull the entire mechanism out of the door and begin installing the electrical one.
Lada 2114 SnowMan › Logbook › Window lifters without ignition
You stop, turn off the engine, take the key out of the ignition, press the power window button to close the window, BUT IT WAS NOT THERE
. When the ignition is turned off, the window switches do not work. Now, in order to close the window, you have to reinsert the key into the ignition...
I think you are all familiar with this situation.
I overcame this “illness” in the first days of using the car, long before I registered to drive. Due to the fact that during the drive I was asked more than once how I did it, I decided to post a detailed report.
And then I started by studying the materiel.
Electrical wiring diagram for VAZ 2114 electric windows
A little theory:
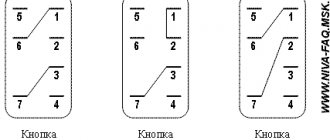
From the diagram it can be seen that the positive power window power wire passes through the K5 window relay and is open (pins 30 and 87). When you turn the ignition key, a plus is applied to the 85th contact of the K5 relay, the relay electromagnet turns on and closes the 30th and 87th contacts, after which a plus appears on the power window buttons.
Conclusion:
In order for the power windows to work without an ignition key, you need to bridge contacts 30 and 87 of relay K5 as in the figure below.
The red line indicates the jumper.
Let's move on to practice:
I will not impose on you any specific method of making a jumper; I will describe only the most common ones; you can choose any of these methods that seems most simple and convenient to you.
Method No. 2
Here I will describe another method of making a jumper. We will need: - 6.4mm MALE detachable terminal - 2 pcs - 5cm of wire We strip 5-7mm of insulation from each edge of the wire. Using a crimper, we crimp the connector terminals at the ends of the wire.
This is what should happen
We insert the resulting jumper instead of the K5 power window relay in the mounting block (the jumper is inserted between contacts 30 and 87).
Method No. 3
In this version, the role of the jumper will be performed by the K5 window relay itself with minor modifications. We take out the K5 relay from the mounting block, turning the relay over we will see the markings of its contacts. We take a piece of wire without insulation and wind it around relay contacts 30 and 87 (see figure below). We return relay K5 to its place in the mounting block.
Wire marked in red
Electric windows of the front doors of VAZ 2115, VAZ 2114 (connection diagram): 1 – mounting block; 2 – power window switch for the right front door; 3 – gear motor for the electric window of the right front door; 4 – motor reducer for the electric window lifter of the left front door; 5 – power window switch for the left front door; 6 – ignition switch; K5 – relay for turning on electric windows; A - to power supplies; B - to the external lighting switch
Many cars produced recently are equipped with electric windows. Often, power windows are installed only on the front doors. But previously, VAZ 2114 and VAZ 2115 cars were not equipped with electric windows at all. Such cars were equipped with conventional mechanical
lifts for both front and rear windows.
In the window lift mechanism, instead of a gear reducer used in mechanical window lifters, there is only a drum into the hole of which the output shaft of the gear motor is inserted. The gear motor consists of a worm gearbox and a DC electric motor with excitation from permanent magnets. Its design is similar to that of the windshield wiper gearmotor. The gearmotor is reversible, the direction of rotation of the output shaft depends on the direction of the current in the armature winding. To protect against overloads, it has a built-in thermobimetallic fuse.
Above is a diagram for switching on electric windows on VAZ 2114 and VAZ 2115 cars. Gearmotors 3 and 4 are switched on by switches 2 and 5 located on the armrest handles. The supply voltage is supplied to the switches when the ignition is turned on through fuse F6 and the power window relay K5, located in mounting block 1. If the power windows do not work, then it is necessary to remove the door trim and check whether voltage is supplied to the gearmotors, check the fuse and the power window relay, and restore broken connections in the wires, replace the faulty gearmotor with a new one.
Add a comment to the article
Power window
The vehicle configuration with electric windows contains additional bundles of wires that make up the VAZ-2114 window lift circuit. In addition, there is a control button on the front passenger door trim. On the driver's door there is a block of buttons that control all windows that have an electrical connection for the VAZ-2114 power windows.
The scheme has the following elements:
- Mounting block.
- Front passenger door ESP button.
- Front passenger door lift motor.
- Driver's door ESP electric motor.
- Driver's door switch button.
- Egnition lock.
The letter “A” in the diagram indicates the wires going to the power supply of the circuit, and the letter “B” indicates the wires going to the side lights.
Varieties
At the moment there are only two types of window regulators for cars:
- rack and pinion;
- cable
The last option is the simplest and most popular among owners of domestic cars, and therefore the most popular on the Russian market. Cable power windows are a motor with a gearbox and a coil. A special cable is wound around the latter, driving the upper drum. In turn, it is connected through splines to a standard window regulator. Replacing a VAZ 2107 window regulator of this kind does not require special skills, abilities and knowledge. Thanks to this, even a novice car enthusiast can change this mechanism.
Electric drive installation
Each set of electric windows comes with instructions that indicate the installation diagram of all drive elements, as well as a circuit diagram. It allows you to see how to connect electric windows to the vehicle's on-board network. The same instructions, which describe installing the drive on the “seven”, indicate how the holes in which the rack is attached are located relative to each other. Measure the distance using a ruler and caliper, mark the location of the holes using a marker.
Make a hole with a 5.5 mm drill inserted into a screwdriver or drill. The power window mechanism is installed through the right hole in the door. Next, align the holes in the rail with those you made in the door. All that remains is to secure the rail with 10mm bolts, which should be included in the installation kit.
Getting ready for installation: necessary tools
In order for the installation of power windows to go smoothly, you will need certain tools and materials. Here is a sample list:
- Electric drive kit for a specific vehicle. Please note that kits vary for all vehicles.
- Flathead screwdriver.
- Ruler.
- Calipers.
- A set of open-end and spanner wrenches.
- Marker.
- Set of socket wrenches or sockets.
- Electric screwdriver and metal drills.
- Silicone and CV joint lubricants.
Having prepared all these tools, you can begin installing the drives on the car.
Electrical work
Remember that using a power window fuse can protect all important components from short circuits.
The electrical setup procedure looks something like this:
- The electric motor must be supplied with voltage directly from the battery. In this case, the rotor should rotate and the entire mechanism should rise up. And you need to wait for the moment when the holes in the fasteners of the mechanism are aligned with those located on the glass carriages. Only after this can the glass be fixed.
- If there is no wiring (the installation of ESP is not provided for by the manufacturer), then it must be laid through the technological holes that are located in the door and body. You need to run wires to the instrument panel.
- You can place the control buttons in any convenient place, but it is best to place them in the door handle. But on domestic cars they are more often installed in the cigarette lighter area or near the handbrake.
- All moving parts of the electric drive must be lubricated - a CV joint type compound is suitable.
- Apply voltage to the entire system through the power window fuse and check operation.
- If there are no faults, you can install the casing and recheck.
The article shows a wiring diagram for the power window button. It is recommended to switch all power circuits using relays to maintain the integrity of the buttons.
What to pay attention to
On domestic VAZ cars, the installation of rear window lifters is approximately the same as the front ones. One difference is the location of the control knob. Therefore, you will have to drill holes in the door with a slight offset. And one more thing - one set of ESP, which can be found on sale, is designed for installation in two doors. Therefore, if you want to install equipment in all doors, you need to buy four sets. And connect the power windows according to the diagram given in the article. It includes a window closing system when arming - this doubles the ease of use of the car.
It is also recommended to completely assemble the kit in advance and then place it in the door. And the entire mechanism must be placed in the lowest position. If this is not done, then it will not be possible to install the drive through the technological hole.
Pay attention to the wiring diagram for the power window button; check it several times to avoid mistakes. When checking the mechanism, you need to look at how the glass moves and whether there are any extraneous sounds or creaks.
Wiring diagram for power windows. Installation of electric windows at News4Auto.ru.
Our life consists of everyday little things that in one way or another affect our well-being, mood and productivity. I didn’t get enough sleep - my head hurts; I drank coffee to improve the situation and cheer myself up - I became irritable. I really want to foresee everything, but I just can’t. Moreover, everyone around, as usual, gives advice: gluten in bread - don’t go near it, it will kill you; A chocolate bar in your pocket is a direct path to tooth loss. We collect the most popular questions about health, nutrition, diseases and give answers to them that will allow you to better understand what is good for your health.
Power rack-and-pinion windows
Rack and pinion window lifters are considered one of the most “long-lasting” compared to others. Rack-type ESPs operate on the principle of transmitting rotational motion from an electric motor to gears, with its subsequent transformation into linear movement of racks that perform lifting. In addition to reliability, window lifts of this type lift windows much faster and quieter than cable counterparts.
But, like everything in this world, rack and pinion windows are not perfect and have their drawbacks. The main disadvantage is that the gears need lubrication; without it, they very soon begin to wear out, and the power windows themselves cease to function normally. The second drawback especially concerns those devices whose manufacturers decided to “save” on metal parts and gave preference to plastic. The fact is that this material is fragile and is noticeably inferior in strength to aluminum, as a result of which the service life of such ESPs is reduced. Among other things, the rack and pinion mechanism is more bulky, so they are installed mainly in “large” car doors.
Cable-type electric windows
The main advantage of cable window lifters is their high maintainability. In the event of a malfunction, you can easily repair the mechanism, and spare parts can be found in almost any auto store
This advantage, at first glance, is insignificant, but as practice shows, most motorists choose this type of ESP without paying attention to the disadvantages of the cable mechanism. The fact is that the cable wears out or stretches over time; in addition, due to the low strength of the plastic guides, they often fail, and the electric motor is very prone to overheating
Lever type electric windows
Lever-type ESP successfully combines compact dimensions and a high degree of reliability. In such power windows, the motor turns a gear, which transmits rotation to one or more levers. In turn, the levers move the plate on which the glass is mounted. The main disadvantage of this mechanism is the uneven speed of glass movement; the higher it is, the slower the lifting will occur.
As for glass, regardless of the type of mechanism, it moves along guide channels or special rails.
Impulse and non-impulse windows?
In addition to the type of lifting mechanism, ESPs are divided into pulsed and non-pulse. The former are capable of operating in pulsed as well as normal mode. By “normal” we mean that the power window operates only when you directly press and hold your finger on the control key. The term “pulse” means a short touch, after which the glass itself will completely lower or rise.
Pulse power windows are most often equipped with five-position control keys; the lever is set in neutral mode, from which there are two speeds of lifting up and down. By moving the slider up one position, the window lifter will operate in “normal” mode, and the glass will rise exactly as long as you hold your hand on the key. The second position will allow you to fully raise or completely lower the window.
Apr 14, 2015
Window lifter malfunctions and ways to eliminate them
The operation of the window lifter is configured and adjusted by the manufacturer, so you should interfere with it extremely carefully and carefully, otherwise the mechanism may jam, crackle and crackle.
From personal experience, I advise you to carefully study the device and read the detailed troubleshooting instructions before starting to independently repair the window lifter mechanism. Even though many of them seem quite possible to fix with a screwdriver and a wrench, in some cases it may be necessary to completely replace the window regulator.
Before you begin self-repair, you need to study the structure of the window lifter and the principle of its operation.
Window lift creaking
At first glance, the creaking of the window regulator does not seem to be a serious malfunction, but you should pay attention to this signal, since this is the first sign that the mechanism is wearing out and may soon break. Methods to combat this symptom are extremely simple, accessible to everyone and do not take much time:
- lubricate the window lifter - lubricants from any manufacturer, widely available in car dealerships, are suitable for these purposes;
At the first sign of squeaking, the window regulator must be lubricated. - Replace the rubber bands in contact with the glass. When the window is open, dust and sand inevitably enter the car interior, which scratches the glass and rubber bands, resulting in a squeaking sound. The entry of dust and moisture through the gap between the glass and the seal can subsequently lead to jamming of the mechanism, so it is necessary to regularly monitor its cleanliness.
Window lifter jammed
The main reasons that the VAZ 2107 window lifter is jammed are as follows:
- failure of the welded joint connecting the cable bracket and the glass strip to which it is attached. In this case, you need to disconnect the window lift cable and weld the bracket;
- The cable is tangled or twisted inside the window lift mechanism. You can try simply removing and reinstalling the cable. In case of failure, the entire mechanism will have to be replaced;
- wear of the window lifter gears indicates a clear need to replace them.
Worn gear needs to be replaced
Glass falls
It happens that the glass falls and does not stay up. The reason for this may lie in the weakening of the tension roller, which creates the proper tension in the cable. To fix the damage, it is necessary to restore this mount. Another cause of the malfunction may be that the end of the cable has come out of the fastener. Then you need to remove the window regulator and try to wind the cable again.
It’s easy to check whether you carried out the repairs properly: in good condition, the window lifter handle rotates freely and effortlessly, the glass rises easily, without getting stuck and without any extraneous sounds.
Removing a standard window regulator
If you plan to install rear electric windows on the car, you will have to disassemble all the doors. Therefore, at the first stage, remove the trim from all the doors, and then begin disassembling the mechanisms. Having opened access to the cable mechanism and glass fasteners, you can begin dismantling. First, push the glass all the way up and secure it with tape.
After this, unscrew all the fastening bolts that are on the glass carriages. Moreover, you need to unscrew them both on the mechanism and on the glass. After this, you can pull the entire mechanism out of the door and begin installing the electrical one.
Standard windows
On domestic cars of the “classic” family, only manual power windows were installed. For example, the first “sevens” had rack and pinion ones, and the “nines” and “kopecks” had cable ones. Why were such mechanisms installed? It’s just that domestic designers tried to reduce the cost of the car, so for the sake of economy, devices with plastic gears were installed. And they fail quite quickly.
In the early 90s, the designers who developed the “sevens” realized their mistake and began installing cable-operated windows on the cars, but the drive was still manual. The peculiarity of such structures is that they are repairable. If in rack-and-pinion gears when a plastic gear breaks, the entire mechanism needs to be replaced (and it is very difficult to find it on sale), then if the cable system malfunctions, it is more than possible to carry out repairs.
The principle of operation of all mechanisms (both cable and rack and pinion) is the same - the system on which the glass is attached rotates with a handle. Depending on the type of window lifter, either the gear moves along a toothed vertical rack, or the cable is tensioned.
Which window lifters to choose?
Before installing and setting up power windows, as well as registering them in the ECU memory, you must select an ED.
Types of devices that can be found on sale today:
- Cable. Such devices are quite weak and they work much slower than other types. But installing window lifts of this type will require less financial costs, since the cost of the system as a whole is lower. The service life of such electric motors is shorter, but if the electric motor of the system fails, it can be replaced without any problems.
- River systems. Installing electric windows of this type will take a little more financial investment, but they work faster than cable ones. It should be noted that such electric drives are also not particularly powerful, and they also require periodic maintenance, in particular, lubrication.
- Articulating-lever systems. According to many experts, it is precisely these electronic devices that need to be installed and configured, since they work quite quickly, the noise during their operation is low, and they are also quite powerful.
ES kit for installation on a car.
Which type to choose is everyone’s decision. We will not give advice in this regard - it is already clear which devices are more effective and functional.
Adviсe
Let's give some advice.
In addition to calculating the load on the equipment in a specific connection, it is important to correctly select the wires that match the resistance in the circuit. Preference can be given to acoustic wires, which give the purest sound at the output, or to ordinary wires with R not lower than 4 ohms. To avoid damage and short circuit, the polarity of the contacts + to - should be strictly observed. When you turn on the radio for the first time to check, the volume should be minimal
If the sound is distorted, the equipment should be turned off immediately. This effect occurs when the polarity of the connections is not observed, which will have to be corrected.
Video of replacing the vacuum brake booster of a VAZ 2110
Backup video on how to replace the vacuum brake booster of a VAZ 2110:
Welcome! Vacuum brake booster - designed to make the brake pedal much easier to press, it only works when the engine is running, but when the engine is turned off, the vacuum booster will not work, all this is due to the fact that when the engine starts, the air filter housing begins to suck in air from the environment and it enters the intake manifold, air is taken from the manifold a little and goes into the vacuum chamber and therefore it starts to work only when the engine starts.
Note! To replace the brake booster, you will need: A set of all kinds of wrenches, as well as a couple of screwdrivers, and also for this task, a socket head and a wrench will be very convenient!
Where is the vacuum brake booster located? It is screwed to the car body with four nuts, or rather not the itself, but its bracket, the vacuum booster itself is secured to this bracket with two nuts, but they are easiest to remove as an assembly, i.e. unscrew the four nuts that secure the bracket to the body and then remove them, and when the vacuum booster with the bracket is in your hands, you will need to unscrew the two nuts and separate them from each other, but we will talk about this later in this article, a little lower .
When do you need to change the vacuum brake booster? If the brake booster fails, a hiss may appear when you press the brake pedal, and the speed may also go up and then down, in addition, the brake pedal will become difficult to press (This is equivalent to the fact that the car is turned off) basically this is there are all the symptoms that indicate that the vacuum booster has failed, it does not always happen that they all appear together in the car, but a couple of them will still appear when the vacuum booster becomes unusable (the main ones most likely, namely, tight brake pedal and floating speed).
Note! By the way, the vacuum booster can be checked for serviceability as follows: With the engine off, press the brake pedal 5 times and when the last press is made, hold the pedal to the floor, immediately after which start the car, if the pedal falls a little, this will indicate that that the vacuum booster is fully operational!
How does a power window work?
Such devices are installed inside doors. An electric window regulator consists of three main parts: a lifting mechanism, a control unit and a drive – an electric motor. It sets the lifting mechanism in motion, which is necessary to raise or lower the glass.
The mechanism, based on a worm gear, eliminates the possibility of closing the glass when encountering an obstacle, such as a hand. Rotation in such a mechanism is transmitted exclusively from the worm to the wheel. If, on the contrary, the mechanism is blocked.
There are several types of electrical mechanisms: cable, rack and pinion, lever, pulse. Let's talk about each of them.
Cable
This electric window lifter is the simplest. The cable is driven by an electric motor. The disadvantages include rapid wear of the cable and the possibility of overheating of the motor. On the plus side: it is very easy to repair, and spare parts are cheap. In addition, you can repair it yourself.
Rack and pinion
In such a window lifter, an electric motor drives gears, which in turn transmit traction to the racks. A rack and pinion window lifter is much more durable than a cable window lifter. It is also worth noting the quiet operation and relatively high glass lifting speed.
The downside is that over time the gears will have to re-lubricate, otherwise they will wear out and begin to “skip” teeth, which means they will raise the glass more slowly and make a cracking sound.
Lever
This is perhaps the most reliable and durable type of electric windows. The motor drives a gear, which distributes rotation to either one or two levers at once. Thus, they raise or lower the plate with glass. One of the disadvantages is the uneven speed of glass rise.
Impulsive
In the case of an impulse mechanism, a person has the opportunity to close or open the glass completely without constantly holding the button. A single press is enough and the glass will reach the end. Moreover, the button can take several positions: two up, two down and neutral. By pushing the button all the way, the glass rises without further holding. If you move it to position “two”, you can raise the glass to the desired height.
Electric windows are also installed independently, mainly on VAZ cars, such as “Five” or “Seven”. On sale there are both for a specific car brand and universal window lifters. Installing them does not take much time and effort, especially since there are plenty of videos on the Internet on how to do it correctly. Whether to put it or not is a matter of taste.
Finally, I suggest you watch a video that you want to watch again and again:
Installation of electric windows on a VAZ 2106
The main goal pursued when installing electric windows is comfortable control of the door windows. In addition, you do not need to be distracted from the road by turning the handles. Electric windows, which are currently produced for classic Zhiguli cars, are characterized by fairly high reliability, the possibility of self-installation and ease of control from a button. In addition, the mechanism can work in conjunction with the security system, allowing you to automatically close the windows when the car is armed.
Which ones to choose
Power windows can be installed in several ways:
- With the installation of an electric motor without any major modifications. This method is simpler and less expensive. However, there is a possibility of motor failure due to overheating.
- With installation of a separate kit. Despite the higher cost of such equipment, it is still justified by the reliability of the system during operation.
The most popular electric window lifters for the VAZ 2106 and other “classics” are rack-and-pinion mechanisms such as “FORWARD”. One of the main elements of the unit is the rack along which the gearmotor with gear moves. The latter are mounted on a metal carriage, to which the glass is fixed, and as a result of the rotation of the electric motor, the entire mechanism is set in motion. The set of the device in question consists of the following list:
- installation instructions;
- two electric windows;
- wiring harness;
- two switches;
- decorative plugs for holes.
Electric window kit contains everything needed for installation
How to install
To install the mechanism in question, in addition to the set of equipment itself, you will need:
- a set of keys;
- flat and Phillips screwdrivers;
- wires;
- circuit breakers;
- fastening elements.
Many car owners power their window lift motors from the cigarette lighter, which is simply convenient. If for some reason this option does not suit you, the wire will have to be routed under the hood to the battery. The device control buttons are also installed at the discretion of the owner: installation is possible either on the door, for example, in the armrest, or in the area of the gear shift knob or other convenient place.
We install electric windows on the “six” as follows:
- Remove the negative terminal from the battery.
- We lift the glass and secure it with tape, which will prevent it from falling when removing the old mechanism.
- We dismantle the mechanical device.
- We attach the adapter plate to the power window at a downward angle so that the glass lowers completely.
- According to the instructions, we mark and drill holes on the door for mounting the gearmotor.
- We fix the mechanism to the door.
- We lower the glass and attach it to the plate through the corresponding holes.
- We temporarily connect power to the electric motor and try to raise/lower the window. If everything works, install the buttons in the selected places, lay and connect the wires to them, as well as to the cigarette lighter.
- We install the trim, and then the plug, closing the hole under the handle of the mechanical window lifter.
Video: installation of electric windows on the “six”
Initially, mechanical windows were installed on the VAZ “Six”. Today, many owners of these cars replace them with electrical devices, which not only increases the level of comfort, but also avoids periodic repairs or replacement of the manual mechanism. Malfunctions that arise with mechanical window lifters can be eliminated by almost every Zhiguli owner, as well as installing a structure with a gearmotor. To do this, a standard garage set of tools and familiarization with the step-by-step instructions will be enough.
The device of window lifters VAZ 2107
Every car enthusiast knows what a window lifter is. Its functions are simple: open and close the window, thereby regulating the microclimate and level in the cabin. There are two types of window lifters: manual (colloquially crutches or meat grinders) and electric, controlled from the dashboard or individual buttons.
At the manufacturer's factory, the VAZ 2107 was equipped with manual window lifters, which have a fairly simple design. They are based on the operation of a mechanism to which glass is attached using special fixing devices. The side windows are lowered and raised by turning a handle located inside the cabin.
The standard window lifter of the “seven” is controlled by a handle and is very inconvenient to use
What kind of window lifters are there on the "seven"?
During its existence, the VAZ 2107 was equipped with two types of window lifters:
- Rack and pinion. They are considered more reliable. Installing this type of window lifter completely eliminates glass distortion. The mechanism works by transmitting the rotational force of the gear, which interacts with a linear rack, to the glass carriage. The main disadvantage is the need for constant lubrication, since the gears of the mechanism were made of plastic, which wears out quite quickly and can damage the entire mechanism.
Rack and pinion window lifters are considered more reliable, but require constant lubrication - Cable ones - due to their design, they are weaker and more often fail.
The fundamental element of this type of window lifter is a cable attached to the twisting mechanism. The device operates rather slowly due to the low functional properties of the drive, which with force overcomes the resistance of the sealing rubber bands. It may also happen that it begins to overheat and at some point simply fails. The advantage of this type of mechanism is its good maintainability, but too frequent need for repairs practically eliminates this advantage. Cable window lifts are more likely to fail, but are highly repairable
Programming and adjustment: features
After the unit is installed, you need to program the power windows. The unit registered in the ECU memory will work more efficiently. Training window regulators depends on the vehicle they are installed on, so there is no universal instruction for this process.
Let's look at an example of how to register an electronic signature using the example of a Ford Focus car:
- First, you need to press the ES control button and wait until the glass in the door rises all the way.
- Next, press the same button again and hold it in this position for several seconds.
- Now you need to lower the window; to do this, press the corresponding button until the electric valve lowers all the way. When the glass is in its lowest position, release the button.
- Then you will need to raise the glass again until it is in its highest position.
- After that, simply lower the window and try to raise it in automatic mode by pressing the button once rather than holding it down. If these steps do not help you, then repeat the entire process again. It should be noted that if this procedure is carried out on Focus 2 cars assembled in Russia, then such an operation will make it possible to train the electronic control system if the car is equipped with all four power windows. If your car only has 2 ES, then this algorithm will not work.
Selecting new devices
The rear and front ESP on the VAZ-2107 is very convenient. It is relatively inexpensive, can be installed without any problems, is fully equipped, and does not require additional parts. There is no unnecessary noise during its use. However, before installing power windows on the VAZ-2107, you need to choose the appropriate option:
- Russian models.
They are produced as “Forward” and “Granat”. - Foreign models.
They are supplied to the Russian market by the Chinese company Ningbo Stone.
Installation of electric windows on the VAZ-2107 is carried out in several stages. It should begin with a thorough study of the instructions, which detail the installation of the ESP on the VAZ-2107. The algorithm of actions will be as follows:
- You need to turn off the power to the car: turn off the ignition, turn off the battery. This is done to comply with safety regulations and to avoid injury.
- The old mechanical window lift needs to be removed.
- You should choose the most suitable location for placing the electric motor. The best location is considered to be the bottom of the door.
- It is necessary to mark places for fastenings. This is easy to do by placing the motor to the place where it will be located. After this, you need to drill holes.
- The power window lifter should be placed and securely attached. Factory power windows of the VAZ-2107 are equipped with screws for fastening, which often turn out to be unreliable. For stronger fixation, it is better to replace them with screws with nuts and a special washer-grower.
Nuts must be installed between the surface of the car door and the brackets of the electric window motor. Their task is to prevent friction of the cable on the door when the power window is operating on the VAZ-2107. Now you can move on to the second part of the installation:
- It is necessary to correctly position the lift cable between the rollers. According to the instructions, the cable tubes must intersect.
- It is necessary to determine the location of the electric lift keys. The optimal ones are the door handle and the dashboard of the car.
When installing the strip on the car door, you must lower the glass with extreme care and fix it in the mounting rail. Any careless movement can result in breakage of fragile parts.
The third part of installing an ESP involves working with electrical wiring. All manipulations should be carried out according to the instructions:
- Using a corrugated tube, you should stretch the wires to the car console. To avoid overloading the cigarette lighter, it is better to use a separate electrical cord with a fuse.
- You need to bring them out through the holes for the control keys located on the instrument panel, connect them and place them in a special place.
- Wires running inside the cabin must be insulated with plastic tubes and placed under the trim.
It should be remembered that connecting the power circuit of electric lifts to the on-board electrical network is impossible without using fuses. The circuit according to which the electrical wiring will be connected must ensure the operation of electric drives only in cases where the power unit is turned on.
The final part of installing an ESP on a VAZ-2107 involves the final adjustment of the mechanism. The setting will be completed correctly if, when the glass is raised to its maximum level, there are no gaps left between it and the seal. All that remains is to fasten the door trim back, and close the place where the handle of the mechanical lift was with a plug.
Most modern cars are equipped with such a necessary device as electric windows at the factory. This necessary and useful function greatly simplifies the process of raising and lowering the windows.
The VAZ 2106 cannot boast of this option in the factory configuration, however, its owners are not deprived of the attention of car equipment manufacturers who produce power window kits for self-installation. To install electric windows on a VAZ 2106, you must have some plumbing skills, as well as experience in carrying out electrical work.
Connecting power windows VAZ-2109
Owners of a VAZ 2109 car can replace power windows with electric windows. On 2109 cars, electric windows can be connected via standard wiring, which already has everything provided for connecting an ESP.
This circuit is used to connect ESP on more “rich” configurations of the nine and it is advisable to use it when connecting independently. Below are diagrams for connecting an ESP with fuse blocks of new and old models.
Wiring diagram for power windows on a VAZ 2109 with an old-style mounting block (17.3722):
- 1 - Mounting block
- 2 - Ignition relay
- 3 — Ignition switch
- 4 — Right door electric window motor
- 5 — Left door electric window motor
- 6 - Right door power window switch
- 7 - Left door power window switch
- K7 - Power window power relay
- A - To terminal “30” of the generator
- B - To the wiring harness block connected to the heater lever illumination display
- B - to the heater lever illumination display
- G - conventional numbering of plugs in the gear motor block
Installation and connection diagram for VAZ 2109 window regulators: step-by-step instructions with photos
- Before starting work, you must turn off the power supply to the vehicle's on-board network from the battery. Or we separately turn off the power circuits for the cigarette lighter and the backlight of the instrument panel and buttons, because The power supply wiring for the power windows will be connected to these circuits in the future.
- Remove the door trim. It can be removed quite easily, but it is better to stock up on mounting pins.
- First of all, we dismantle the mechanism of the standard manual window lifter, fixing the glass (for example, using office tape) in a position that provides access to the place where it is attached to the lifting mechanism.
- Unscrew the bolts securing the door glass to the standard window lifter mechanism.
- We dismantle the guide of the standard window lifter mechanism (trapezium). Unscrew the bottom nut:
- Two nuts in the middle:
- Top nut:
- The guide is free, now all that remains is to unscrew the three nuts securing our window lifter in the area of the rotation handle.
- We take out the entire door window lifter mechanism. To do this, we bring the lower pin of the guide into the hole in the door (see photo).
- By pressing with a screwdriver, we remove the upper fastening of the guide.
- Done, the window lift mechanism is disconnected. We take it out of the door cavity.
- That's it, the standard mechanism has been dismantled, let's start installing a new one. The new mechanism is attached using standard fasteners; you don’t have to drill anything new. We place the window lifter mechanism into the inner cavity of the door through the largest technological hole in an “assembled” form (otherwise it won’t fit), as if in the “open” position of the glass.
- We fasten the mechanism inside the door using two studs, which we insert into two holes that previously held the middle part of the guide of the standard VAZ 2109 window lifter. We combine them and screw on the nuts.
- The next task is to combine the mounts on the window lift linkage system with the mount on the glass. This can be done by supplying power to the power window motor contacts from an external power source, for example, any working car battery.
- When the lift mechanism is combined with the strip on the glass, we connect them using the bolts from the kit.
- It is advisable to lubricate the rubbing parts thoroughly.
- The mechanical part is complete, let's move on to the electrical part.
- We estimate the route for wiring from the door from the electric motor of the window lift drive to the installation location of the buttons - activators. The standard place for buttons in the high panel of the VAZ 2109 is two plugs to the right of the cigarette lighter, and we install them there. The hardest part is running the wiring from the door into the rack and then out of the rack under the dash. For this purpose, there are technological holes in the rack. You may need to use a special probe. The wiring is done with a wire with a cross-section of at least 1 mm. sq. We lay the wires in such a way that they do not touch any moving parts of the door or the ESP mechanism itself. We will take power for the electric windows from the cigarette lighter. We make electrical connections according to the following diagram: When the circuit is assembled, it is necessary to connect the battery power and check the correct operation of our system. We turn on the side lights and check the correct operation of the backlight of the ESP activator keys. If the backlight does not work, swap the sockets on the contacts of the keys, indicated in the diagram as 3 and 6. You can install the power windows in the standard way, here are two diagrams: Connection diagram for power windows on a VAZ 2109 with mounting block 17.3722 (until 1998) Connection diagram for power windows on VAZ 2109 with mounting block 2114-3722010-60, 2114-3722010-10 and 2114-3722010-18 (new model)
You can read more about the types of mounting blocks for front-wheel drive VAZs here.
We check the functionality of the window regulators. The glass should move smoothly, without jamming or jerking, and should not come out of the guides. To facilitate the movement of glass in the seal, it can be treated with silicone grease. All that remains is to reinstall the door trim. That's it, the installation of the window lifters is complete, let's enjoy the completed modification!
Connecting electrical wiring
- The first step is to measure the distance between the window motor and the buttons on the front panel. Using regular wire with a loop at the end, the wiring is pulled into the rack and under the panel.
It is important to know that the wire for pulling is selected with a cross-section of at least 1 millimeter square. If you neglect this rule, then there may be a risk of problems during installation and during connection of ESP contacts.
- ESP wires can be connected directly to the cigarette lighter, which is the simplest and most effective connection method. Experienced car enthusiasts choose a technically complex connection method, namely directly to the battery, as this guarantees more stable operation.
- After completing the work, it is necessary to attach the door trim, covering the resulting holes with decorative plugs. The installed mechanism must be checked - it is necessary to remove and close all the necessary parts, check the fastenings and contacts.