Owners of early Zhiguli models remember and know what problems arose in connection with the operation of distributors with a mechanical ignition distribution system. From time to time the car began to behave strangely: it would either stall at idle, or suddenly begin to move jerkily. The reason for this in most cases was burnt contacts of the mechanical breaker. With the advent of electronic ignition and a Hall sensor on the VAZ-2106, this problem immediately faded into the background.
Replacing the Hall sensor on a VAZ 2107
If after diagnostics it turns out that the DC is out of order, then it should be replaced immediately. How to replace a Hall sensor? You can perform the operation yourself, saving money on visiting a car service. To work you will need a simple set of tools:
- hammer;
- flat screwdriver;
- open-end wrench 13 mm;
- pliers or small pliers.
It is advisable to carry out the operation in a garage, with a well-lit workbench, behind which you can sit comfortably and lay out the removed parts of the ignition distributor. The process looks like this:
- Disconnect the negative terminal from the battery.
- We set the top dead center on the 1st cylinder or mark with a marker the location of the distributor on the body (so as not to adjust the ignition later).
- We remove the high-voltage wires from the ignition distributor cover.
- Disconnect the rubber hose from the vacuum regulator.
- Disconnect the 3-pin connector from below.
- Using a 13 mm wrench, unscrew the bolt securing the distributor to the engine (under the nut there is a washer and a plate, do not lose them).
- We remove the distributor from its seat and transfer it to the workbench.
- We unclip the fasteners on the distributor cover and remove it (it is recommended to inspect the ember, side electrodes and the housing for the presence/absence of defects).
- We dismantle the slider by first unscrewing 2 bolts with a flat screwdriver and then pulling it towards ourselves (it is recommended to disassemble the unit for inspection).
- Using pliers, remove the lower spring pin from the shaft or help it pop out with a hammer.
- We take out the lower oil deflector and washer (wipe them with a rag).
- We pull the centrifugal machine and pull the shaft out of the distributor housing. (It must be wiped with gasoline, diesel fuel or solvent, after which it is recommended to sand it with fine-grained sandpaper).
- Unscrew the screws of the vacuum corrector and remove it.
- Unscrew the 2 screws securing the three-pin block.
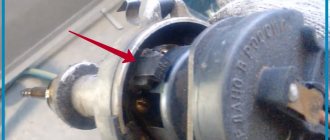
- Using a flat-head screwdriver, unscrew the 2 bolts of the Hall sensor on the support plate.
- We remove the wires from the seat and completely remove the DH.
- We are installing a new DH.
We assemble the distributor and the entire assembly in the reverse order. It is recommended to first wash all parts with a special composition, for example, carburetor cleaner or similar acetone-based products.
For reference. If you plan to pump up the “seven” with the BSZ installation, then experts recommend at the same time changing the spark plugs (brand - A17DVR) and installing a set of high-voltage “TESLA silicone” wires with copper contacts.
Checking the Hall sensor and replacing it
The Hall sensor is one of the most important elements of the contactless ignition system for gasoline engines. The slightest malfunction of this part leads to serious problems in the operation of the motor. Therefore, in order to avoid diagnostic errors, it is important to know how to check the Hall sensor and, if necessary, to be able to replace it.
We divided this material into two parts: theoretical (purpose, design and principle of operation of the Hall sensor) and practical - signs of malfunction, verification methods and replacement methods.
At the end of the article, watch the video instructions on how to replace the Hall Sensor yourself.
And before checking the Hall sensor for malfunctions, let's understand its purpose and operating principle.
What is a Hall sensor and how does it work
The Hall sensor (also known as a camshaft position sensor) is one of the main elements of the distributor. It is located next to the distributor shaft, on which a magnetically conductive plate, similar to a crown, is attached. There are as many slots in the plate as there are cylinders in the engine. There is also a permanent magnet inside the sensor.
The principle of operation of the Hall sensor is as follows: when the shaft rotates, metal blades alternately pass through a slot in the sensor. As a result, a pulse voltage is generated, which enters the ignition coil through the switch and, converted into high voltage, is supplied to the spark plugs.
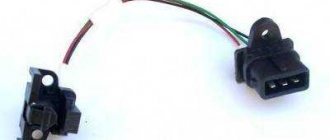
The Hall sensor has three terminals:
- one connects to the “mass”,
- the second is approached by a plus with a voltage of about 6 V,
- The converted pulse signal goes from the third terminal to the switch.
Signs of a Hall sensor malfunction
Hall sensor malfunctions manifest themselves in different ways. Even an experienced technician will not always immediately identify the cause of engine problems.
Here are some of the most common symptoms:
- The engine starts poorly or does not start at all.
- At idle, the engine runs rough and jerky.
- The car may jerk when driving at high speeds.
- The power unit stalls while driving.
If one of these signs appears, you must first check the serviceability of the Hall sensor.
Also, do not exclude other malfunctions of the ignition system found in cars.
How to check the Hall sensor
A simple way to check the camshaft position (Hall) sensor is shown in the following video.
There are several ways to check the health of the Hall sensor. Each motorist can choose the most suitable option for himself:
- Take a working sensor from a neighbor or at a car disassembly for testing and install it instead of the “native” one. If the engine problems disappear, then you will have to buy a new part.
- Using a tester, you can measure the voltage at the sensor output. In a working device, the voltage will vary from 0.4 V to 11 V.
- You can create a simulation of a Hall sensor. To do this, remove the three-pin block from the distributor. Then turn on the ignition and connect outputs 3 and 6 of the switch with a piece of wire. The appearance of a spark indicates that the sensor has failed.
If the test reveals that the Hall sensor is faulty, then it must be replaced with a new one.
Hall sensor replacement
Replacing the Hall sensor will not be particularly difficult. Even a novice car enthusiast can handle this work with his own hands.
The video below shows in some detail the process of replacing the sensor in the distributor of a UAZ car.
Typically, replacing a Hall sensor consists of several steps:
- First of all, the distributor is removed from the car.
- Next, remove the distributor cover and align the timing mechanism mark with the crankshaft mark.
- Having remembered the position of the distributor, you need to unscrew the fasteners with a wrench.
- If there are latches and stoppers, they should also be removed.
- The shaft is pulled out of the distributor.
- All that remains is to disconnect the terminals of the Hall sensor and unscrew it.
- By pulling back the regulator, the faulty part is carefully removed through the gap formed.
- The new Hall sensor is installed in the reverse order.
Checking the functionality of the Hall sensor not only allows you to accurately determine the cause of engine failure. Thanks to simple techniques, the motorist will save his time on repairs and also eliminate unnecessary waste of money.
Video on how to replace a Hall sensor with your own hands
Removal and installation of distributor (ignition distributor)
Step-by-step procedure for removing the distributor and replacing it with a new ignition distributor in a VAZ 2110, 2111 car.
The ignition system ensures the combustion of the working mixture in the cylinders of the internal combustion engine. The entire ignition system includes the ignition distributor itself (in other words, it is called a “distributor”), ignition coils, a spark timing sensor, spark plugs, and so on. But today we will talk specifically about the distributor. This part is installed on the camshaft of the car engine. Most often, distributor malfunction is caused by cracks in the housing caused by constant mechanical overloads or damage to the cover and slider.
If you decide to repair this part yourself, then read the article about repairing the distributor.
To remove the ignition distributor on a VAZ 2110 or 2111 car, you will need to perform simple steps, which are described in detail below.
Module design
The main purpose of this module in the operation of a car engine is to determine the current camshaft angle at each moment of engine operation. The module uses the information received to control the fuel injection system into the internal combustion chamber and activate the ignition. Fuel injection is carried out into the cylinder, which is currently located at the so-called “dead” point.
The module’s operation is based on the Hall principle, discovered back in the 19th century.
This sensor began to be actively used by car engine developers starting from the late seventies - the first half of the eighties of the last century. At that time, contact-type ignition systems previously used in automobile internal combustion engines began to be actively replaced by new, more reliable and safe contactless units, in which the Hall sensor played a major role.
The second name of the Hall sensor is a sensor that determines the position of the camshaft.
The English abbreviation for the name of this module is SMR. This part performs the function of generating and subsequently distributing voltage pulses that control the operation of the spark plugs and the automotive switch.
There are slots in the body of the device through which metal plates pass during operation of the motor shaft. The number of slots in the module coincides with the number of cylinders in the internal combustion engine. A magnetic plate is built into the sensor.
When the shaft rotates and the plates pass through the slots in the device, an electrical voltage is generated. Depending on the information obtained as a result of this process, the device supplies the switch with an unlocking electric pulse for the transistor, and voltage is applied to the ignition system to the coil. The resulting low-voltage signal, when transmitted to the spark plug, is converted into a high-voltage pulse.
The camshaft position sensor has three contacts:
- contact connected to the vehicle body;
- the terminal that receives a positive charge of 6 V;
- contact from which a modified electrical pulse is supplied to the switch device.
The use of a Hall sensor in ignition systems with an electronic operating principle gives the vehicle design two significant advantages:
- It avoids the use of a contact group, which is short-lived due to the fact that it constantly burns out during engine operation.
- This device allows you to provide a voltage of 30 kV to the spark plug, and not 15, as when using other design circuits.
In addition to the ignition system, the Hall sensor is also used in the tachometer, the anti-lock braking system and the braking system of the car. It provides increased engine performance and allows all vehicle systems to operate at a higher speed. As a result, the safety and ease of use of the car engine increases.
Starting the engine and setting the ignition
When you have succeeded in installing and connecting the BSZ, you may need to adjust the operation of the system. If, when installing contactless ignition on a VAZ 2106, the marks were not lost and the wires were connected correctly, the engine will start immediately. After the power unit starts, the engine should warm up, this will take a few minutes, you can help with the gas pedal. Then you need to adjust the ignition.
The adjustment procedure can be performed using several methods:
- by ear - this option is less accurate, but it will allow you to correctly configure the system;
- using a strobe light.
If the power unit does not start, and no action occurs when the starter device is cranked, you need to make sure that the “high voltage” is connected correctly. The problem may be turning the distributor cap when installing the system. If this happens, the slider will send a pulse signal to the fourth cylinder instead of the first. You need to screw the cover back and check that the wires are connected correctly.
The procedure for adjusting the advance angle is performed by turning the distributor body, the action algorithm is as follows:
With the power unit running, loosen the nut that secures the distributor housing. Slowly scroll the device clockwise and counterclockwise. You need to focus on hearing
It is important that the car engine runs as stable as possible. The rotation angle should be no more than fifteen degrees. When the power unit operates stably and does not trip, the nut of the switchgear is screwed in completely. Channel “Ato! moto-life" spoke in detail about adjusting the advance angle on contactless SZ
Channel “Ato! moto-life" spoke in detail about adjusting the advance angle on contactless SZ.
https://youtube.com/watch?v=W2vxBE_fxAo
A more accurate option to adjust the ignition timing on a VAZ 2106 is to use a strobe light.
The device is connected to the battery terminals, as well as the high-voltage cable of cylinder number 1
Then the power unit starts up, and the strobe light indicator is carefully brought to the marks installed on the block. The device will allow you to determine the location of the mark that is on the pulley when the engine is running. Using a wrench, the distributor nut is loosened and the assembly is rotated
It is necessary to ensure that this mark is combined with the last, shortest one
Using a wrench, the distributor nut is loosened and the assembly is rotated. It is necessary to ensure that this mark is combined with the last, shortest one.
When the setup procedure is completed, the car’s power unit warms up, you need to test the work done by driving it in different modes. If, as a result of pressing the gas, a metallic ringing is heard from the engine compartment, then there is detonation in the engine. This is due to the fact that the ignition timing is too early. To adjust, the distributor nut must be loosened and the device rotated clockwise a few degrees. There should be no detonation.
On a VAZ 2106, after replacing the ignition system, the idle speed of the power unit may increase as a result of improved spark formation. To reduce this parameter to the optimum (about 900 per minute), you need to tighten the fuel volume bolt. On Ozone carburetor devices, this element is large and is located on the right side, below the internal combustion engine. If the car has a Solex unit installed, then for adjustment a plastic lever mounted at the rear is used; it rests on the damper axis.
The Do-It-Yourself Car Repair channel spoke in detail about the procedure for adjusting the BSZ on VAZ cars.
https://youtube.com/watch?v=NbtcE2rEgPQ
Main aspects of the operation of sensors on the domestic “Six”
Any modern car is equipped with various regulators and controllers designed to monitor the condition of the components and assemblies of the car. Even the old domestic “sixes” in this case are no exception. You can learn more about what the oil pressure, fuel level, antifreeze temperature sensor is on the VAZ 2106 from this article.
On “sixes” and other classic models, a VAZ 2106 oil pressure sensor of type Mm393A is installed. The pressure indicator works on the principle of converting this parameter, which is created in the lubrication system, into resistance. The oil pressure sensor is installed in the engine cylinder block. A regulator is also installed here, which turns on the oil pressure light.
This element is triggered as a result of the closing and opening of contacts at a particular level of pressure in the system. The corresponding indicator on the control panel may light up if the characteristics are violated, namely, if there is little liquid in the system.
Designation of part elements
How to check the controller? You can check the engine fluid pressure sensor by removing the regulator from its installation location. After removal, you should turn the starter; you do not need to start the power unit. If everything is fine with the supply of consumables, then you need to change the regulator. You can tell about the oil supply by the splashing of liquid from the controller seat.
Fuel level
On the “sixes” a fuel level indicator of the BM-150 type is installed, the controller itself is mounted in the gas tank according to the scheme, and it is fixed with bolts. The FLS includes a resistor device and a float. In order for the controller to indicate the correct level of gasoline in the system, a resistor device is controlled by the movement of the float.
The fuel level indicator float itself is directly connected to the resistor using a lever, at the end of which there is a sliding element. Thanks to the latter, the gasoline reserve lamp on the dashboard can light up. If the controller adjustment is correct, then this light comes on when there are 5-6 liters of gasoline in the tank.
The controller diagnostic procedure is carried out by measuring the resistance level of the resistor device. If the gas tank is empty, this parameter should be about 315-345 Ohms, if it is half full - 108-128 Ohms, if full - about 70 Ohms. Diagnostics is carried out using a combined tester (the author of the video is VAZ 2101-2107 REPAIR AND MAINTENANCE).
DTOZH
As for the temperature indicator, the VAZ 2106 uses a TM-106 type device; this regulator is also often called a fan switch sensor. The controller itself is made in the form of a screw, which is connected to the cylinder block. As for the operating principle of the temperature sensor or fan sensor, it is similar to that described above. But only in this case is a thermistor element installed, which changes the resistance parameter depending on the temperature of the consumable material.
The correct operation of the engine depends on the fan switch on sensor, because if the temperature is too high and the fan does not start working, this will lead to overheating of the motor. There is an engine temperature indicator on the car dashboard, allowing the car owner to always know about its condition.
JOT and the fan switch on sensor on a carburetor machine are two different sensors, and on an injection machine there is one sensor.
Six DTOZH
Hall
The VAZ Hall sensor is a device that changes the output voltage level in accordance with changes in the magnetic field. This controller functions as a conventional analog converter device intended for switching power in the ignition system. On “sixes” the regulator is mounted in the distributor itself. Replacing the Hall sensor will be required if it is completely damaged, since it will not be possible to use a car with a failed controller.
Idle move
The VAZ idle speed control is usually remembered when the engine starts to work incorrectly. There are many reasons why a motor can trip, but quite often it arises precisely because of this element. The device is installed in the carburetor. If the motor is misfiring, first of all you need to bleed the regulator.
Video “Solving the idle problem”
How to rid yourself of the problem XX - watch the video (the author of the video is Nail Poroshin).
Purpose and types of distributors
The main distributor of the “six” is located on a horizontal platform made to the left of the engine valve cover. The unit shaft, ending with splines, enters the drive gear inside the cylinder block. The latter rotates by the timing chain and at the same time rotates the oil pump shaft.
The distributor performs 3 functions in the ignition system:
- at the right moment it breaks the electrical circuit of the primary winding of the coil, causing a high voltage pulse to form in the secondary;
- alternately directs discharges to the spark plugs according to the operating order of the cylinders (1-3-4-2);
- automatically adjusts the ignition timing when the crankshaft speed changes.
Various modifications of the “sixes” were equipped with different types of distributors:
- VAZ 2106 and 21061 were equipped with engines with a working volume of 1.6 and 1.5 liters, respectively. Due to the height of the block, distributors with a long shaft and a mechanical contact system were installed on the model.
- VAZ 21063 cars were equipped with a 1.3 liter engine with a low cylinder block. The distributor is a contact type with a shortened shaft, the difference for models 2106 and 21063 is 7 mm.
- The updated VAZ 21065 series was equipped with contactless distributors with a long rod, working in conjunction with an electronic ignition system.
The difference in the length of the drive shaft, depending on the height of the cylinder block, does not allow the use of the VAZ 2106 part on a 1.3 liter engine - the distributor simply will not fit into the socket. Installing a spare part with a short shaft on a “clean six” will also not work - the splined part will not reach the gear. The rest of the filling of the contact distributors is the same.
As a young, inexperienced driver, I personally encountered the problem of different lengths of ignition distributor rods. On my Zhiguli VAZ 21063, the distributor shaft broke off on the road. At the nearest auto store I bought a spare part for the “six” and began installing it on the car. Result: the distributor was not inserted completely; a large gap remained between the platform and the flange. Later the seller explained my mistake and kindly replaced the part with one suitable for the 1.3 liter engine.
Contactless ignition VAZ 2106
Some VAZ 2106 owners replace the contact ignition system with a contactless one. To do this, you have to replace almost all the elements of the system with new ones, but as a result, ignition is simpler and more reliable.
In a contactless ignition system there is no breaker, and its function is performed by a Hall sensor built into the distributor and an electronic switch. Due to the lack of contacts, nothing gets lost or burns here, and the resource of the sensor and switch is quite long. They can fail only due to power surges and mechanical damage. Apart from the absence of a breaker, a non-contact distributor is no different from a contact distributor. There is no gap setting on it, and setting the ignition timing is no different.
A contactless ignition kit will cost approximately 2,500 rubles. It includes:
- distributor with Hall sensor;
- an ignition coil whose design differs from that of a coil for contact ignition;
- electronic switch.
In a contactless ignition system, the function of the breaker is performed by a switch and a Hall sensor
All these parts can be purchased separately. In addition, new spark plugs (with a gap of 0.7–0.8 mm) will be required, although old ones can be adapted. Replacing all elements of the contact system will take no more than an hour. In this case, the main problem is finding a seat for the switch. The new coil and distributor are easily installed in place of the old ones.
Contactless ignition with microprocessor switch
VAZ 2106 owners who have knowledge in the field of electronics sometimes install contactless ignition with a microprocessor switch on their cars. The main difference between such a system and a contact and simple non-contact system is that no adjustments need to be made here. The switch itself adjusts the advance angle, referring to the knock sensor. This ignition kit includes:
- microprocessor switch;
- contactless dispenser;
- ignition coil;
- knock sensor;
- connecting wires.
After installing microprocessor ignition, there will be no need to adjust it
Installing and configuring such a system is quite simple. The main problem will be finding the optimal location for mounting the knock sensor. According to the instructions that come with the microprocessor system, the sensor must be installed on one of the outer studs of the intake manifold, that is, on the stud of the first or fourth cylinders. The choice remains with the car owner. The pin of the first cylinder is preferable, as it is easier to reach. To install the sensor, you do not need to drill the cylinder block. You just need to unscrew the pin, replace it with a bolt of the same diameter and with the same thread, place the sensor on it and tighten it. Further assembly is carried out according to the instructions.
The cost of a microprocessor ignition kit is about 3,500 rubles.
Setting up, maintaining and repairing the ignition system of the VAZ 2106 is quite simple. You just need to know the features of its structure, have a minimum set of plumbing tools and carefully follow the recommendations of specialists.
Replacing contacts on a VAZ 2101 distributor
- The car jerks when driving - 4 answers
- I can’t start a VAZ – 4 answers
- How to set the VAZ 2101 distributor? – 3 answers
- There is no spark to the spark plugs from the VAZ distributor - 3 answers
- How to change the ignition distributor of a VAZ 2101 without cranking the crankshaft? – 2 answers
The first step is to remove the terminal from the battery, then disconnect the wires from the ignition coil, disconnect the central high-voltage wire, and remove the distributor cover. Next, you need to set the position of the slider so that it is rotated at an angle of 90° with respect to the engine. With this approach, replacing the distributor will have virtually no effect on the ignition timing. You unscrew the spark plug of the first cylinder, plug the spark plug hole with a rag, and begin to manually turn the crankshaft pulley clockwise, if you look at the engine against the movement of the car, until the rag jumps out of the spark plug hole. It is best to turn the engine with a ratchet wrench specially purchased for this purpose (or made independently according to a sample). In order for the position of the new distributor to be the same as the old one, you need to make a mark on the cylinder block as shown in the figure.
Next, unscrew the nut securing the distributor, remove the washers and pull out the distributor. To install a new distributor, align the mark on the pulley with the long one on the block, insert the new distributor after first removing the cover from it, direct the slider electrode towards the first cylinder (if you look at the distributor cover) and place the distributor in its hole, fix the distributor, put the cover on, screw it on you start the spark plug, it should start anyway.
If it’s not very clear in words, you can see the article on removing the distributor here:
Read how to set up the ignition on a VAZ in our blogs:
Let's learn about the distributor on the VAZ 2106
How correctly the ignition system is configured in your car has a strong impact on the overall performance of the car. Therefore, it is necessary to know exactly what actions will have to be taken if the VAZ 2106 distributor suddenly fails.
Distributor 30.3706 VAZ 2106.
1 ignition distributor
; 2 wire for supplying current to the ignition distributor; 3 latch securing the distributor cover; 4 vacuum regulator housings; 5 aperture; 6 vacuum regulator cover; 7 vacuum regulator rod; 8 pipe for the vacuum hose from the carburetor; 9 lubricating wick (filt) of the cam; 10 support plate of the ignition timing regulator; 11 ignition distributor rotor; 12 side electrode with terminal for wire to spark plug; 13 ignition distributor cover; 14 central terminal for the wire from the ignition coil; 15 central carbon electrode with spring; 16 central rotor contact; 17 resistor for suppressing radio interference; 18 external rotor contact; 19 driving plate of the centrifugal regulator; 20 weight of the centrifugal ignition timing regulator; 21 lever axis; 22 breaker cam; 23 breaker lever; 24 rack with breaker contacts; 25 breaker contacts; 26 movable breaker plate; 27 capacitor; 28 ignition distributor housing; 29 roller oil deflector clutch; 30 bearing lock plate; 31 breaker movable plate bearings; 32 oiler body; 33 screws securing the stand with breaker contacts; 34 terminal clamp screw; and the groove for distinguishing the ignition distributors is 30.3706; b groove for moving the stand with contacts
Replacing Contacts of Trambler VAZ 2106
Repair distributor
VAS2106-2103 Repairing
the distributor
VAS2106 means replacing worn parts with new ones; you need to disassemble the distributor. For disassembly we will need: two keys for “7”, for “10”, “13”, screwdrivers, a set of flat probes, a special mandrel for squeezing and installing bearings, tweezers. If so, you can continue:
- First, unscrew the screws that secure the rotor to the distribution plate and remove it.
- With the rotor removed, mark all of the centrifugal ignition switch springs and weights with a marker so they don't get tangled up during reassembly. Once marked, remove the springs using a screwdriver and remove them.
- Next, disconnect the condenser and ignition coil wires by holding the nut on the moving terminal screw to unscrew the nut that secures the wires.
- Disconnect the capacitor by unscrewing the screw that secures it to the distributor body.
Remove the contact group by unscrewing the two mounting screws. Next, remove the lock and washers from the contact group. Using a screwdriver, remove the insulating washer from the spring plate, remove the moving contact from the axle.
- Further from the axis of the moving plate is the distributor, you need to remove the thrust washer of the vacuum regulator in front and the valuable rod with a screwdriver.
- Loosening the vacuum regulator
Remove the distributor housing in advance.
REPLACEMENT OF CONTACT
IN CLASSICAL. THIS SYSTEM AFFECTS GIVING, BUT ACTION.
VAZ 01-CLASSIC ignition switch.
Service ignition switch - VAZ Trembler
01-CLASSIC. replacement
cams, slider, capacitor.
Slide the pressure distributor on and press the anti-modal clutch locating pin pin off the distributor roller. Remove the coupling with the washer and remove the roller from the distributor body.
Loosen the screws that secure the bearing retaining plates and remove them, then remove the moving bearing assembly from the housing. Removing locking plates with washers is most convenient using tweezers.
This is a showdown distributor
completed. Repair distributor VAS 2106
it is necessary to begin after a visual inspection of all its parts and, after detecting various defects, replace worn parts with new ones.
- Use a capacitance meter to test the capacitor; its capacity should be 0.2-0.25 μF. If you do not have a device, it is better to replace the old Conder with a new one; for the money they are not expensive.
- Check the condition of the distributor
. There should be no signs of obvious development on its surface. If necessary, replace it with a new one. - Check the condition of the diaphragm in the vacuum regulator
(advanced angle). To check, press the stop and plug the fitting. If the membrane is working, it will hold the stop in the pressed position. - Check the status of your contacts. There should be no burning marks on the contacts, the surfaces should be flat and not cramped. dismantling contacts make file. The use of sanding cloth is not permitted. After cleaning the surface of the contacts, wash them with clean gasoline. If you cannot get rid of the burn marks, replace the contacts with new ones.
- Also replace the distributor housing bearing (bushing) if it shows signs of development. Use mandrels of the appropriate diameter to secure the press.
assembly distributor
disassemble in reverse order. After assembling the distributor, adjust the contact
automatic switches (see adjusting the gap) contacts VAZ Breaker
2106
), lubricate
the distributor
(see Lubricating
the distributor
) and adjust the ignition time after installing it on the engine (see Setting the ignition time).
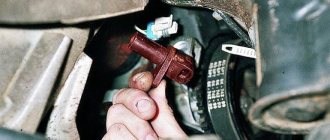
Installing a new Hall sensor to replace the faulty one
If a malfunction is detected, the part must be replaced with a new one. The procedure for this work, as a rule, does not pose any particular problems even for inexperienced car owners. To work, you will need pliers, a Phillips and flat-head screwdriver, and 6-13 mm wrenches to remove the ignition distributor from the car.
The procedure is as follows:
- disconnect the negative terminal of the battery;
- dismount the high-voltage wires from the distributor cover;
- unscrew the nuts that hold the distributor in its working position;
- dismantle the distributor;
- the crankshaft should be turned until the timing cover mark aligns with the pulley mark;
- indicate the location of the runner (camshaft rotor);
- disassemble the distributor to remove the crankshaft from it;
- remove the sensor contacts and twist the device itself from the distributor (the faulty module is removed through the gap created when the regulator is pulled out).
In order to install a new part into the unit, you will need to perform the entire described sequence of technological operations in reverse order.
After the new sensor has been installed, it must also be checked for functionality.
Any of the methods described above will be suitable for this. The malfunction may be due to improper installation of the sensor. If you are sure that everything was done correctly, you should seek help from professionals.
If you have determined that the Hall sensor has stopped working as expected, there is no point in repairing it - it is not that expensive, and replacing the broken part with a new one is not difficult. If you are convinced that the sensor is faulty, you should simply purchase it at the nearest auto store and replace the broken module with a new one.
Video about how the Hall sensor works:
Design and principle of operation of the BZ
Contactless or electronic ignition on the VAZ 2107 is installed on models with injection engines. Carburetor sevens were supplied from the factory with contact ignition systems, which have many disadvantages. If you plan to install a contactless ignition module, then before starting it won’t hurt to understand the issue of its design.
The ignition system is the mechanism by which a pulsed voltage is created to supply the spark plugs in order to promptly ignite the fuel-air mixture in the cylinders. The main disadvantage of contact SZ is that the contact groups require regular cleaning, replacement and adjustment. As soon as difficulties arose with igniting the combustible mixture, the car owner immediately knew where to look for the reasons.
With the advent of the BSZ, these difficulties automatically disappeared. To understand why, let’s look at the components of the mechanism:
- Electronic type switch with transistors.
- Double winding coil.
- A distributor or distributor equipped with a Hall sensor, a slider and a contact cover.
- Spark plugs with armored wires.
The BSZ diagram for the VAZ 2107 is shown in the photo below.
Based on this diagram, let's consider the principle of its operation:
- When you turn the ignition key, current is supplied to the primary winding of the coil, thereby creating a magnetic field.
- When the engine starts, power is supplied to the starter coil and the rotor begins to turn the crankshaft.
- In this case, the crankshaft rotates the distributor shaft, which is connected to the runner.
- As soon as the shaft with the slider rotates, this phenomenon is detected by the Hall sensor (along the protrusion on the shaft) and transmits the corresponding signal to the switch.
- When a signal arrives at the switch, the primary winding of the coil is de-energized (on the low-voltage side).
- A powerful discharge of about 25-30 kV is induced in the secondary (high-voltage) winding, transmitted to a moving contact located at the end of the distributor shaft.
- When the slider moves in a circle, it practically touches the contacts in the cover, a spark occurs between them, and a high voltage discharge is transmitted to each of the contacts in turn.
- This discharge flows through armored cables to the spark plug electrodes.
Pros and cons of the system
If you decide to install a carburetor-type BSZ on a VAZ 2107, then it is recommended that you first understand all the advantages and disadvantages of the device. The advantages of the mechanism under consideration include:
- The absence of contacts automatically eliminates the need for their maintenance. As a result, we have a more reliable system that does not require frequent maintenance.
- Stability of spark propagation through the cylinders, which is due to the absence of the breaking effect of the contacts using the cam method.
- A large discharge in the spark plug, the value of which reaches 25-30 kV, while in contact modules it does not exceed 12 kV. High voltage promotes a stronger spark and improved ignition of the fuel assembly, as well as its complete combustion.
- Simplified engine starting at low temperatures.
This system has much fewer disadvantages, and they consist in the impossibility of repairing the Hall sensor, which has a relatively short service life of up to 50 thousand km. In addition, such a system is more expensive, due to its design features.
What is included in the BEZ kit for the VAZ 2107
To convert the ignition system on a VAZ 2107 from contact to contactless, you will need to purchase a set of necessary equipment. The BSZ kit for a VAZ 2107 costs about 2.5-3 thousand rubles. The equipment package includes the following elements:
- Transistor switch type 3620.3734 with connector.
- Ignition coil type 27.3705.
- Distributor 38.3706.
- Connecting wires with connectors.
When remaking, you will also need to replace the spark plugs, the gap between the electrodes on which should be 0.7-0.8 mm. You will also need a set of high-voltage wires (preferably purchased with silicone insulation).
What is needed to install BSZ on the seven
The first BSZ kits, which were installed on injection engines, had an unreliable switch that often failed. At the same time, there was a need to replace it until the manufacturers improved the system. As a result, the weakest part of the contactless ignition module is only the Hall sensor.
How to check the Hall sensor
The need to check the Hall sensor arises when problems arise with the car’s ignition system, and therefore it is necessary to ensure that all its components are in good working order, in particular the idle air sensor. So let’s take a closer look at the principle of operation, signs of malfunction and how to check the Hall sensor with your own hands.
The principle of operation of the sensor and its features
In its operation, the sensor uses the physical Hall effect, discovered in the 19th century. However, they began to use it only in the 70-80s of the last century, when automakers began to switch from contact ignition systems to electronic ones.
The principle of operation of the sensor is quite simple. As the motor shaft rotates, metal blades pass through slots in the motor housing. It gives an electrical impulse to the switch, as a result of which the latter unlocks the transistor and supplies voltage to the ignition coil. It, in turn, converts the low-voltage signal into a high-voltage one and supplies it to the spark plug.
Structurally, the sensor has three contacts:
- for connection to “ground” (car body);
- to connect voltage with a “+” sign and a value of about 6 V;
- to supply a pulse signal from it to the switch.
The advantages of using a Hall sensor in electronic ignition systems are two main factors - the absence of a contact group (which constantly burns out), as well as a higher voltage on the spark plug (30 kV versus 15 kV).
Since Hall sensors are also used in braking and anti-lock braking systems and tachometer operation, the device performs the following additional functions for the car:
- increases engine performance;
- speeds up the functioning of all machine systems.
As a result, the ease of use of the car, as well as its safety, increases.
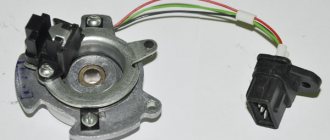
Hall sensor for VAZ 2107
Hall sensor for VAZ 2109
Hall sensor for VAZ 2110
Signs of a Hall sensor malfunction
Sensor failures manifest themselves in different ways . Identifying them can sometimes be difficult even for an experienced master. Here are some of the most common symptoms and problems with the Hall sensor:
- starts poorly or does not start at all;
- occurrence of interruptions in engine operation at idle speed;
- “jerking” of the car when driving at high speeds;
- The engine stalls while the car is moving.
If your machine has one or more of these symptoms, it is imperative to check the sensor.
How to check the Hall sensor
There are several verification methods . Briefly, they work like this:
Checking the serviceability of the hall sensor (diagram)
- Creating a simulation of the presence of a Hall sensor . This method of checking is the fastest and is suitable if there is power at the ignition system components, but there is no spark. For this purpose, the three-pin block is removed from the distributor. Next, you need to turn on the car’s ignition and connect (short with a piece of wire) outputs 3 and 2 (negative pin and signal contact). If during this process a spark appears , it means the sensor has failed . Please note that in order to detect sparking, you need to hold the high-voltage wire near ground.
- Checking the Hall sensor with a multimeter is the most common method. For this check, a multimeter (tester) is used. To do this, it is enough to measure the voltage at the output of the sensor. If it is working properly, then the voltage should be within 0.4. 11 V.
- Replacing a faulty device with a known working one . You can borrow it from friends who have a car with the same sensor. If after replacement the problems that bother you disappear, you will have to buy and replace the Hall sensor with a new one.
Hall sensor check
Hall sensor, checked with a multimeter.
Another common method is to check for resistance at the sensor . To do this, you need to make a simple device consisting of a 1 kOhm resistor, an LED and flexible wires. A resistance is soldered to the LED leg, and two wires of a length that is convenient for operation (not short) are soldered to it.
Then remove the distributor cover, disconnect the distributor and plug box. Next, check the serviceability of the electrical circuit. To do this, an electronic multimeter (voltmeter) is connected to terminals 1 and 3, after which the car’s ignition is turned on. obtained on the screen of the measuring device should be within 10.12 V.
Next, we similarly connect the constructed device to the same terminals. If you guessed the polarity correctly, the LED lights up. Otherwise, the wires must be swapped. The further procedure is as follows:
- do not touch the wire connected to the first terminal;
- We transfer the end from the third terminal to the free second;
- rotate the camshaft (manually or using a starter).
If the LED blinks while the shaft is turning, then everything is in order and the Hall sensor does not need to be replaced.
It is worth noting that the process of checking the Hall sensor on the VAZ 2109, Audi 80, Volkswagen Passat B3 and other cars is carried out according to the same scheme. The only difference is the location of individual parts under the hood of the car.
Hall sensor replacement
Replacing the Hall sensor VAZ 2109
Let's consider the process of replacing the Hall sensor on a VAZ 2109 car . This procedure is simple and does not cause difficulties even for novice car enthusiasts. Its algorithm is as follows:
- The first step is to remove the distributor from the car.
- After this, the distributor cover is dismantled. Next, you need to align the marks of the timing mechanism and the crankshaft mark.
- Then the fasteners are dismantled using a wrench. At the same time, do not forget to mark and remember the location of the distributor.
- If there are latches or stoppers in the housing, they must also be removed.
- At the next stage, remove the shaft from the distributor.
- Next, disconnect the Hall sensor terminals and unscrew the mounting bolts.
- The sensor is removed through the resulting gap.
- Installation of a new Hall sensor is carried out in the reverse order.
Conclusion
It is worth noting that there is no point in repairing the Hall sensor, since it is very inexpensive (about $3.5). If you are convinced that the car’s malfunctions are related specifically to the mentioned sensor, we recommend that you go to the nearest auto store and buy a new device. If you encounter any difficulties when checking or replacing the Hall sensor, please contact the technicians working at the service station for help.
Principle of operation
The sequence of action of the Hall sensors on the VAZ 2107–21099 is formed according to the Hall effect. In the resulting magnetic field, the sensor reads pulses from a full revolution of the distributor shaft. Signals are generated thanks to slots, of which there are exactly the same number as cylinders. The sensor itself is placed on the distributor support panel along with a magnet.
Energy comes to the sensor from the switch. There are also wires on the DC - mass and output pulses. The reverse voltage changes taking into account changes in the magnetic field. When receiving impulses, the commutator will supply electric current to the coil, which increases it and sends it directly to the spark plugs.
Module failure detection
A malfunction in the functioning of the Hall sensor causes extremely unpleasant consequences: the car stops starting or stalls. The engine stops working.
You can suspect problems with the sensor based on the following indirect signs:
- fuel consumption is unreasonably high, and the increase in consumption is observed suddenly, spasmodically;
- when the engine is running, the temperature rises too much, and this increase is observed consistently (this symptom is very unpleasant and requires contacting a service station as quickly as possible or self-diagnosis of the Hall sensor);
- on some car models, the gearbox mode switch can be fixed without the possibility of changing its position until the engine is stopped and restarted;
- the car engine does not start the first time or does not start working at all;
- at idle speed there are jerks and interruptions in operation;
- at high engine speeds the car moves jerkily and twitches;
- during normal operation the engine suddenly stalls;
- The corresponding alarm indicator lights up on the dashboard, and it lights up at idle speed, and turns off when the speed is increased.
If any of the above symptoms are observed while driving, you should immediately check whether the Hall sensor is working properly. At the same time, do not forget that there may be other problems in the ignition system, so in any case you cannot limit yourself to just checking the condition of the camshaft position sensor.
Electronic spark plugs
When installing BSZ on a VAZ 2106 model car, it is advisable to select and install spark plugs that are optimally suitable for electronic ignition. Along with Russian spare parts, the use of imported analogues from well-known brands is allowed:
- original spark plugs recommended by the manufacturer - A17DVR (M);
- NGK - BCPR6ES-9, BPR6ES-9;
- Bosch - FR7DCU, WR7DC;
- Brisk - DR15YC, LR15YC;
- Beru - 14FR-7DU, 14R-7DU.
Before screwing in the spark plugs, check the gaps between the electrodes with a flat feeler gauge.
The gap between the working electrodes of the spark plug is set within 0.8-0.9 mm using a flat feeler gauge. Exceeding or decreasing the recommended clearance leads to a drop in engine power and an increase in gasoline consumption.
Installing a non-contact spark generation system significantly improves the performance characteristics of carburetor Zhiguli cars equipped with rear-wheel drive. Unreliable, constantly burning contacts caused a lot of trouble to the owners of the “sixes”. At the most inopportune moments, the breaker had to be cleaned, getting your hands dirty. The first electronic ignition appeared on front-wheel drive models of the “eighth” family, and then migrated to the VAZ 2101–2107.