Adsorber or absorber, which is correct? Any internal combustion engine is a source of emissions of harmful substances into the environment. New methods are being invented and old ones are being improved to reduce harmful emissions. Today, environmental friendliness is the reputation of a car manufacturer. For example, in order to comply with the environmental friendliness of Euro 3 engines, a capture device must be installed in the vehicle design, which will ensure lower CO2 emissions.
What is an adsorber in a car, why is it needed and where is it located?
Today, the European environmental standard “Euro-6” is in force, according to which the emission into the atmosphere of hydrocarbon vapors resulting from the combustion of fuel is prohibited. To implement this task, a special device was developed - an adsorber.
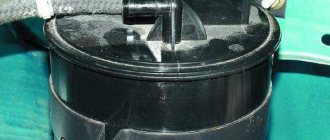
The name of the device comes from the word adsorbent (absorbent composition). The unit is mounted in the fuel system of a vehicle in order to absorb harmful vapors arising during the evaporation of fuel.
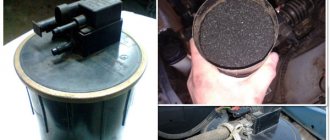
The absorbent is activated carbon, which fills the tank. It is this that absorbs harmful substances when the engine is not running. Otherwise, the vapors are sucked into the intake pipe and burned in the engine along with the combustible mixture.
This feature helps to increase the efficiency of the car. The result is a double effect: fewer harmful vapors enter the atmosphere and the combustible mixture is saved. Over time, the filter element becomes dirty and its effectiveness decreases.
The main sign of a malfunction is a “hissing” sound when the fuel tank cap is unscrewed. This happens due to the fact that fuel vapors have nowhere to go, and they “rush” out with all their might.
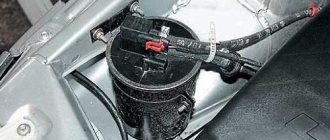
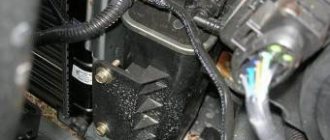
The location of the adsorber varies depending on the make and model of the car. So, in VAZ cars the device takes the form of a black can with a cylindrical shape. The device is often located on the right side in the direction of travel, in the near corner (near the headlight).
But for each model, the manufacturer determines the location of the device individually.
For example, in the VAZ 21099 the absorbent injector is located like this.
Problems with the purge valve
The most common problem with the purge valve is when it sticks or doesn't close completely. This may cause the Check Engine to come on.
In some vehicles, a stuck purge valve can cause difficulty starting immediately after refueling: the engine may run rough and jerk for the first few seconds.
CPA problems are common in many cars. Some early 2000s Hyundai models (Elantra, Santa Fe, Tucson, Tiburon) often have a stuck purge valve, causing trouble code P0441.
Similar problems are quite common in many European cars, including Audi and Volkswagen. In some Mazda vehicles, a faulty valve can cause code P0446 and other EVAP codes.
The purge valve is not very expensive and is easy to replace.
From what Euro standards is it established?
According to international requirements, the installation of an adsorber is mandatory on cars with Euro-2 standards and higher. As for the standard known in Russia (Russia-83), there is no installation of an adsorber here.
So, in VAZ-2108 cars there is no adsorber. Here the separator and the fuel tank are connected to each other using a drain tube.
During operation, condensation occurs and returns to the fuel tank.
In addition, the separator interacts with the atmosphere using a 2-way valve, which does not allow the pressure in the tank to increase or decrease.
The connection between the tank and the neck occurs using a gasoline-resistant tube, fixed with clamps. It turns out that when the pressure in the tank decreases (increases), fuel vapors escape into the atmosphere.
The system is organized differently in VAZ Priora cars. Here, the fuel vapors that entered the separator from the fuel container condense. The condensate then accumulates and returns to the tank.
A gravity valve is mounted in the upper part of the separator, which prevents the fuel mixture from leaking out of the tank if the machine overturns.
If the engine is started, the vapors of the fuel mixture are mixed with air masses and discharged through the throttle assembly into the intake pipe - to the cylinders of the power unit.
It turns out that fuel vapors in a stationary position of the car accumulate in the adsorber, and if the car is moving, they are purged by the valve and sent to the receiver and to the engine for afterburning.
According to Euro-2 requirements, the fuel tank ventilation must not come into contact with ambient air, and vapors must be collected and directed to the engine (or adsorbed by the device in question).
As for the Russia-83 standards, contact between the atmosphere and ventilation of the fuel bank is not prohibited.
How to check the adsorber
Now let’s move directly to the algorithm for checking the adsorber (its other name is the fuel vapor accumulator). The main task in this case is to determine how sealed its body is and whether it allows fuel vapors to escape into the atmosphere. So, the check must be performed according to the following algorithm:
- Disconnect the negative terminal from the vehicle battery.
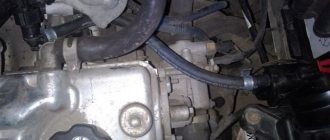
- First, disconnect all hoses and contacts going to it from the adsorber, and then remove the fuel vapor accumulator directly. This procedure will look different for different machines, depending on the location of the assembly, as well as the mounting means with which it was secured.
- It is necessary to plug (seal) the two fittings tightly. The first one goes directly to atmospheric air, the second one goes to the solenoid purge valve.
- After this, use a compressor or pump to apply a slight air pressure to the fitting going to the fuel tank. Don't overdo it with pressure! A working adsorber should not leak from the housing, that is, be sealed. If such leaks are detected, then most likely the unit needs to be replaced, since it is not always possible to repair it. In particular, this is especially true if the adsorber is made of plastic.
It is also necessary to perform a visual inspection of the adsorber. This is especially true for its body, in particular, for rust spots on it. If they occur, then it is advisable to dismantle the adsorber, get rid of the mentioned spots and paint the body. It is imperative to check whether coal from the fuel evaporation accumulator is leaking into the EVAP system pipelines. This can be done by inspecting the condition of the adsorber valve. If it contains the mentioned carbon, then you need to change the foam separator in the adsorber. However, as practice shows, it is still better to replace the adsorber completely than to engage in amateur repairs that do not lead to success in the long term.
The adsorber device, together with which devices it works
The device for absorbing harmful vapors of the fuel mixture consists of the following components:
- adsorbent composition (activated carbon);
- gravity (electromagnetic) valve;
- separator;
- purge valve;
- fuel drain pipes;
- steam hose.
The basis of the design is the adsorber, whose task is to collect harmful vapors that come from the fuel tank and prevent them from entering the atmosphere.
In this case, the adsorber will combine with:
- Fuel tank;
- Intake manifold;
- Atmosphere (through a separate valve installed on the air filter or at the inlet to the device).
The system valve is an actuator that combines the adsorber and the intake manifold.
How to check the adsorber
Many car owners may be interested in the question of how to check the adsorber and its purge valve when the diagnostics showed it to be faulty (an absorber error popped up). It is quite possible to make such a diagnosis in a garage, however, for this it will be necessary to dismantle either the entire adsorber or just its valve. And to carry out such a test, you will need metalworking tools, a multifunctional multimeter (to measure the insulation value and the “continuity” of the wires), a pump, and a 12 V power source (or a similar battery).
Principle of operation
Operating principle of the adsorber:
- When the car is stationary and the engine is turned off, excessive pressure of fuel vapor is formed in the fuel tank, which rises through the pipeline and is sent to the adsorber.
- The engine is running. The ECU (electronic control unit) of the machine, taking into account the current program and operating mode of the power unit, commands the solenoid valve to open.
- Fuel vapors accumulated in the adsorber are blown out through the vacuum that takes place in the intake manifold.
- Next, the vapors are sent to the intake manifold itself and to the combustion chamber. The result is obvious - the vapors burn out. As for the volume of vapor that enters the manifold, it depends on the opening time of the EM valve. The longer the path is open, the greater the volume of vapor available for combustion.
Motors equipped with a turbine have a compressor. The latter's task is to create a vacuum in the intake manifold.
That is why in special systems that provide vapor recovery on turbocharged engines, a 2-way valve is installed that operates and directs fuel vapor to the compressor inlet or into the intake manifold (in the presence or absence of pressure, respectively).
Automotive gasoline vapor trap: adsorber and its purpose
You should immediately understand the question of what an adsorber is and why it is needed on a car. Initially, it is worth noting that the correct name of this device is an adsorber, that is, it is written with the letter “d,” although many call it an absorber, which is not entirely correct. The difference between an adsorber and an absorber is that the first one accumulates vapors (in this case, gasoline) and holds them, while the second one completely absorbs the substance (that is, with the impossibility of their subsequent release).
We will find out why cars use an adsorber and not an absorber after understanding the purpose of this device.
A gasoline vapor collector is a kind of filter that prevents direct contact of gasoline with the atmosphere, which reduces the level of pollution. Such devices were invented after the introduction of the Euro-2 environmental standard, which prohibits atmospheric pollution with gasoline vapors.
The main purpose of the device is to temporarily absorb the vapors that form in the gas tank and use them for selfish purposes, that is, not just suppress, but transport them to the engine, where they will be supplied to the cylinders for combustion along with the fuel assembly.
Returning to the name of the device, we can safely say that the Priora and other modern cars use an adsorber that only temporarily accumulates gasoline vapor (which occurs while the engine is not running). The use of absorbers would not allow vapors to be directed into the combustion chambers of the engine due to their complete absorption by the sorbent.
This is interesting! Activated carbon is used as a sorbent in automobile adsorbers.
Pros and cons of the device
Like any other unit, the adsorber has its own positive and negative qualities that the car enthusiast should know about:
1. Advantages:
- No harmful fuel vapors enter the atmosphere.
- Fuel is saved because the vapors do not escape into the atmosphere, but return back to the engine for combustion.
- The unpleasant smell of gasoline disappears from the passenger compartment (this effect does not always occur).
2. Disadvantages:
- The adsorber has a substantial size, so it takes up a certain space under the hood.
- The engine operates unstably, and “swimming” occurs at idle (one of the main signs of a failed adsorber).
- High price. Installing an adsorber increases the cost of the car.
- Risk of the tank cap “shooting out”. This is possible in the event of a breakdown of the adsorber and prolonged accumulation of fuel gases in a confined space.
- Risk of deformation of the fuel pump. Ignoring the failure of the device also leads to this problem.
- Risk of accumulation of a flammable mixture in the intake manifold due to the inability of the adsorber to perform its functions. As a result, the stability of the motor is disrupted.
Malfunctions
The node is quite reliable; rare problems with it manifest themselves as:
- breakage of fittings due to natural aging of plastic;
- contamination of activated carbon from a long service life, up to complete obstruction;
- electrical and mechanical failures of the purge valve;
- short circuits and loss of contact in electrical wiring;
- loss of tightness of hoses due to rubber hardening.
All this leads to an increase or decrease in idle speed, uncertain starting, increased consumption and decreased traction. Usually the ECU notices deviations and displays an error on the instrument panel.
There is even a separate section of the standard error code table dedicated to gasoline vapor recovery equipment.
Why do some motorists remove it?
Many car enthusiasts decide to remove a functional adsorber, considering it an unnecessary element in the car. At the same time, not all motorists can justify their actions.
Some drivers are sure that the presence of an adsorber leads to a decrease in the dynamics of the car, others - to an increase in the “gluttony” of the vehicle, and to others such a device seems completely unnecessary.
There is also a category of car enthusiasts who remove the device if it breaks and do not return the new element to its place. The reason is the high cost of the adsorber, which was mentioned above.
The work of discarding the adsorber (if you know some aspects) takes no more than 5 minutes. All that is required is to put a fine filter on the separator tube.
In this case, fuel vapors are directed into the atmosphere. In this case, the tube from the valve is closed, and the ECU program is adjusted. If you do not perform the last action, an error appears.
Causes of malfunction of the adsorber on Priora and features of its self-check
The adsorber contains activated carbon in granular form, which gets wet over time, which reduces the level of air permeability. Typically, such a malfunction is accompanied by error on BC P0441. However, in addition, a more common problem is when coal particles enter the body of the solenoid valve and, accumulating in large quantities, do not allow it to close, which leads to the problem of floating speed on Priora.
The causes of adsorber malfunction are the following factors:
- Depressurization of the adsorber housing. Usually occurs in case of mechanical damage. If such a breakdown occurs, the part must be replaced.
- Damage to the integrity of the power supply wires of the solenoid valve. In this case, errors P0443/P0444/P0445 and P0446 are displayed. This could be an open circuit, short to ground, or low voltage.
- Air inlet fitting and filter element are dirty. Air enters the device through the inlet fitting, as a result of which accumulated vapors are purged. Through the fitting, contaminants enter the adsorber, which leads to a decrease in the level of air permeability. This causes the device to operate ineffectively.
To determine the cause of the malfunction, you will need to focus on the corresponding errors or symptoms. For example, if there is a suspicion of a violation of the seal of the housing, then it is necessary to remove the adsorber and inspect its condition. If no defects are found, then its tightness is usually checked as follows:
- the connections to the atmosphere and to the solenoid valve are plugged;
- compressed air is supplied to the remaining fitting connecting the device to the gas tank;
- the absence of signs of air leakage indicates the integrity of the adsorber housing.
Be sure to inspect the integrity of the power wires of the solenoid valve, and if necessary, call them. If there is a suspicion that the valve is jammed in the open position, then a simple and reliable way to check is to start the engine and plug the fitting connecting the adsorber to the atmosphere with your hand. If after this the engine operation changes, then the cause of the malfunction has been identified, and all that remains is to eliminate it by replacing the part.
It is important to note that if the adsorber is dirty, it must be replaced. This device is non-separable, and if a malfunction is suspected, it must be replaced. As for the resource, there are no exact figures here. The service life depends on many factors, including the quality of the device itself.
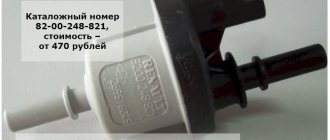
This is interesting! The adsorber on Priora has the following article number 2170-1164010. Its price is approximately 500-800 rubles.
Changing the device yourself
To change the adsorber, it is enough to perform a number of simple manipulations. In this case, there are two solutions - do the work yourself or go to a service station and entrust the problem to specialists.
The advantages of the first option are cost savings and high speed of work. The sequence of actions is as follows:
- Dismantle the old part, freeing it from the fixing elements and discarding the tube through which fuel vapors enter the throttle.
- Discard the block and wires.
- Connect the fuel outlet pipe from the separator and the purge valve.
- Remove the bracket by unscrewing the three bolts.
The work time is 15-20 minutes.
As soon as the faulty unit is dismantled, proceed with the installation of a new device.
Here the sequence is as follows:
- Connect a long piece of rubber tube to the hose through which fuel vapors flow into the purge channel.
- Connect the short part of the tube to the intake tube from the separator.
- Put the adsorber in place.
- Connect the vapor supply pipe to the purge channel, which is installed on the motor cover.
- Connect the block with wires.
- Install a tube between the purge channel and the adsorber. Make sure that the material from which the pipe is made is resistant to oil and gasoline.
How to change only the valve?
There are situations when only the adsorber valve needs to be replaced. In this case, it is enough to spend 5-10 minutes of personal time to complete the entire range of work.
The valve is sold in any store, and its price (for VAZ cars) is only 600-1000 rubles.
At the same time as the valve, it is worth changing the adsorber sensor, because its functions include controlling the valve. Replacement is required if there are noises that resemble crackling.
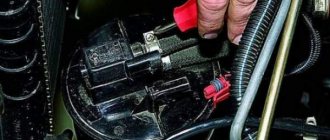
It is necessary to begin work by diagnosing the serviceability of the valve. This is done as follows:
- Prepare a couple of wires and a multimeter.
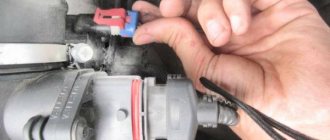
- Release the retainer and remove the harness block from the purge valve.
- Connect the negative conductor of the multimeter to the ground of the car.
- Turn the key in the ignition and measure the voltage at output “A”. Normal voltage is 12 Volts. If it is not there, then there are two options - the ECU has failed or the battery is discharged.
- Loosen the clamp securing the tube to the valve and remove the hose from the pipe. Using a screwdriver, remove the valve from the adsorber, and then apply 12 Volts from the battery. The “positive” wire goes to terminal “A”, and the “negative” wire goes to “B”.
- As soon as voltage is applied to the connectors, the valve opens (a characteristic click is made). If this does not happen, then the valve is changed.
The valve is replaced according to the following algorithm (using the example of the VAZ-2114):
- Discard the “minus” from the battery;
- Discard the plug from the CPA;
- Release the inlet pipe clamp to gain access to the valve;
- Remove the device from the mass air flow sensor and move it to the side;
- Bend the valve clamps and dismantle the device;
- Move the mount to the side one centimeter;
- Pull the valve along the grooves;
- Discard the supply fittings. There may be problems with the second fitting, which has a special latch. To dismantle it, you need to tighten the special plastic antennae. This is easy to do - just recess the latch when the fitting is slightly raised up.
- Installation of a new device is carried out using the reverse algorithm.
Installing a new adsorber valve
To replace an element, it is not necessary to contact a car service. You can do the work yourself using several Phillips screwdrivers. You also need to purchase a new valve (its markings must completely match the data on the old device).
After that:
- We find the adsorber.
- Remove the negative terminal from the battery.
- Disconnect the wire block by pressing the latch and pulling the device towards you.
- We loosen the fastenings of the solenoid valve and disconnect the hoses.
- We take out the old device (the bracket will come out along with it) from the absorber.
- We install the new device and put everything back together in reverse order.