Print this article Font size 16
It's no secret that you can't get far in a car without gasoline. Therefore, for the engine to operate, it is simply necessary that the entire fuel system functions in optimal mode.
In many ways, the fuel pump is responsible for supplying fuel to the engine, which the VAZ 2114 model is not without, of course. To solve a problem with a faulty fuel pump, you need to make sure it is at fault.
Symptoms of a problem
A malfunction of the fuel pump of VAZ 2114/2115 cars can be diagnosed by the following symptoms:
- when the ignition is turned on, there is no sound of the pump running;
- the engine does not start or starts with difficulty;
- the power unit is unstable at idle, the speed “floats”;
- “dips” appeared during acceleration;
- the motor has lost power.
The same signs also appear when other elements of the fuel system malfunction.
Before you begin diagnosing or replacing the fuel pump, you should make sure that:
- the fine fuel filter is not clogged (it is changed every 7 thousand kilometers);
- the injectors and fuel pressure regulator are operating normally;
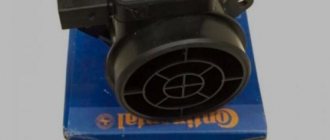
- The sensors for mass air flow, throttle position, and oxygen quantity are working properly.
If the detected malfunction is accompanied by the lighting of the “CHECK” lamp on the dashboard, you should set the error code and decipher it.
Where is the fuel pump filter located?
The fuel preparation system for VAZ injectors consists of two filters - fine and coarse filters. “Thin” is a metal cylinder with a fabric filling. It is located under the bottom, in the tank area. It is accessible from the “pit” or overpass, and in the absence of such, you can jack up the right side of the car and pave the wheels.
Location of the fine filter on the VAZ 2114
Important! Along with the coarse filter, the “fine” element must also be replaced.
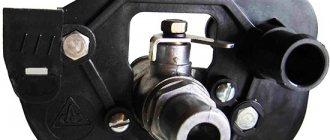
“Rough” is located in the fuel pump housing, in the fuel tank. To replace, you need to open the tank and dismantle the pump assembly. Replacing the VAZ fuel pump grid does not present any difficulty: even a beginner can handle the job.
“Coarse” fuel pump filter
Clean fuel pump mesh
« previous entry | next entry » May. 14th, 2008 | 09:34 am
The forums recommend conducting such inspections at least once a year. Symptoms of a clogged fuel pump mesh: the car becomes dull when changing gears, the car does not pick up speed well, failures at idle, to the point where the car stalls. Careless servicemen, depending on your flight of fancy, may advise you to replace: the fuel pump (1500 rubles), clean the injector by washing (1200 rubles, and with removal 1500-1600 rubles), replace the MAF sensor (and on our little ones it’s new at existential 42000), etc. .P. By the way, clogging of the fuel pump mesh is a common disease. If you don’t want to clean it, then a mesh from a VAZ 2110 will do. Only when installing it will you need to turn it 180 degrees, otherwise the fuel pump frame will not fit into its intended position. So, it was decided - remove, look and, if necessary, clean! To do this, we throw out all the junk from the trunk, move the front row of seats all the way forward. Fold and recline the rear row of seats. Remove the floor and trunk trim. Directly under the seats, in their usual position, we see a square hatch with electrical wiring connected to it. We remove the hatch; to do this, unscrew the fastening bolts with a Phillips screwdriver. The bolts are turned out, the hatch is moved as far as the wiring allows. In front of us is the upper part of the fuel pump frame, secured with 6 bolts for a Phillips screwdriver (4x8, sort of). On top of the frame there is a male-female connector. Remove the connector. The inlet and outlet pipes are suitable for the fuel pump.
Using the existing L-shaped inlet from the old gasoline filter, we plug them (it is very important to remember that the fuel system, with a working bypass valve, is under high pressure; before starting work on removing the fuel pump, to equalize the pressure in the system, open the gas tank flap and unscrew the filler plug from the neck gas tank) Reminder! You are working in a flammable environment. Follow basic safety rules
For example, it is a very bad idea to illuminate yourself with a lighter when the fuel pump is removed. Gasoline vapors are highly volatile and explosive!
Then unscrew the 6 mounting bolts. Carefully remove the frame with the fuel pump, floats and mesh. Cover the hole with a hatch. In general, it is good to perform this work with an almost empty gas tank. Mine was full. The problem with removal may be the fuel level float. Structurally, it is located on the same frame. Therefore, when removing the fuel pump frame, we take our time and act carefully. The mesh was covered with a brown coating, similar to marsh mud. The insides were not visible. We clean everything with the same carbocleaner with a powerful jet on both sides until the mesh becomes pristine white. Let the mesh dry for a couple of minutes. We inspect the fuel pump, electrical connections, and float. Everything is in order - we install the frame in place and assemble it in the reverse order. As a result, my gas pedal became sharper. The car reacts more actively to pressure and picks up speed faster. I'm happy.
How to replace the fuel pump mesh, also known as the fuel pump, on a VAZ 2113-VAZ 2115?
Note! Before we start a few words about this mesh, in fact, you don’t have to replace it with a new one, but you can first remove it and then wash it in gasoline; some dirt from such washing will come off the mesh and fall off, but still not all the dirt will fall off, so the best option, of course, would be to replace this mesh with a new one, and besides, it only costs around 50-130 rubles.
But still, if you find yourself in a situation where your mesh is very clogged and the car is moving jerkily, and you don’t have this mesh at hand, then you can really remove the clogged mesh and wash it in gasoline, and after all that it would be good to blow it out compressed air under pressure, for example a compressor, pump, etc.
Removal: 1) At the very beginning of the operation, remove the fuel pump itself from the car. (For information on how to remove the fuel pump, see the article: “Replacing the fuel pump on a VAZ”)
2) Then, when you remove the pump, take it in your hands or continue to hold it in your hand (Depending on the situation), and then turn the pump over so that it is directed from the bottom to the top, in general, so that the mesh is in front of your eyes, and after that, grab this mesh with your hand and simply pull it up, thereby it will move away and disengage, that is, it will be removed from the fuel pump.
Installation: The new mesh is installed in the same way as it is removed, but only in the reverse order, that is, you take the new mesh in your hands and simply put it on the place where the old mesh stood, but only put it on until it completely fits and rests, and when it is put on, check whether it sits well on the fuel pump or whether it is wobbly, and after checking, install the fuel pump in its place.
Signs of breakdown
There are several situations in which the pump or its components can be at fault. This will definitely have to be checked. Otherwise, you can spend a lot of money buying and installing a new fuel pump, but in the end it turns out that the problem is completely different.
- The engine will not start. This is not a clear sign of problems with the pump, but still. Therefore, first check the condition of the spark plugs, the presence of a spark, and the absence of traces of oil on them. Also check the electronic control unit.
- Pressure inside the fuel system. If the pump is operating normally, it will create a pressure of 3.2 bar. Depending on the type of engine in your VAZ 2114, the characteristics may differ slightly: For a 1.5-liter engine, the optimal values are 285-325 kPa;
- For a 1.6-liter engine, these characteristics in optimal operating mode will range from 375 to 390 kPa.
New and old coarse filter
Many people purchase the entire fuel module assembly at once, which includes a filter, sensor, float, intake chamber and the pump itself. Such a purchase will cost approximately 3,000 rubles. It is much more profitable and practical to buy a separate pump, which costs up to 1000 rubles. This is due to the fact that when the pump fails, the remaining elements almost always remain intact and are fully suitable for further use.
Reasons for replacing the fuel pump mesh
The main reason is low-quality gasoline or additives that are added to it for various purposes: from “flushing the injector” to increasing the octane number. In hot summer weather, these substances crystallize on the mesh, clogging it.
Signs of mesh contamination:
- idle speed fluctuates;
- The car periodically stalls when the gas pedal is suddenly released;
- jerks when driving, poor throttle response - the car is “stupid”, accelerates slowly, especially noticeable when driving outside the city;
- when you sharply press the accelerator, the engine “chokes”, does not operate above medium or low speeds, and it is impossible to gain speed;
- poorly or does not start at all, but “grabs” (the last stage of the “disease”).
Failures do not appear all at once, but develop gradually or occur suddenly after normal parking.
Replacing a gasoline filter on a VAZ 2114
The fine fuel filter looks like a cylindrical barrel filled with special paper (retains particles of dirt, rust, and debris larger than five to seven microns) and is attached to the bottom next to the gas tank under the luggage compartment. There are two built-in fittings along the edges, with input and output gas pipelines. There is a description of VAZ 2114 models with a filter device installed in the engine compartment.
For ease of work, it is necessary to install the vehicle above the inspection ditch, on an overpass, and use a special lift. No years of auto mechanic experience required. An attentive beginner can handle the task.
First step
- Relieve pressure in the pipeline.
- Remove the worn element.
- Install a new filter unit, fill with gasoline, and remove the air.
- There are options for completing the first step.
- Turn off the power to the fuel pump.
- Raise the rear seat. Open the metal cover of the technological hatch. Disconnect the power connector.
- Remove the fuel pump electrical circuit fuse.
The location of the fuse box is indicated in the album. There are three placement versions:
- on the torpedo air duct casing near the gear shift lever under the plastic cover;
- on the right side of the passenger side is the mounting block hatch (relays, fuses);
- There is a plastic box under the hood at the base of the windshield opposite the driver.
Start the engine, wait until it stalls.
Equalize pressure, bleed fuel.
- Manufacturers of the VAZ 2114 have provided for the installation of a spool valve on the fuel rail, similar to a wheel air valve.
- It is necessary to prepare, put rags.
- Disconnect the negative terminal of the battery.
- Eliminate the possibility of sparks, open flames, and smoking.
- Remove the plastic protective cap.
- Using the nipple cap, slowly unscrew the spool, gradually reducing the pressure.
Second step
While under the car, pay attention to the direction of the filter arrow (remember or mark it with chalk on the bottom). The nut version of the fittings will require open-end wrenches 17, 19. For latches, the help of pliers is enough
Sequentially, right, left, disconnect the tubes. Use 10mm wrenches to unscrew the bolted connection, loosen the clamp, and carefully pull the filter to the right.
Third step
- Install and secure the VAZ 2114 fuel filter (check the alignment with the arrow).
- Screw the spool back in.
- Connect the battery.
- Remove rags soaked in gasoline to avoid the possibility of ignition.
- Turn the ignition key. The operating logic of the control unit provides for filling the fuel system before starting and creating pressure. The fuel pump relay is activated briefly.
- A new, dry filter is impregnated.
- Turn off the ignition.
- Repeat the procedure with a time interval several times.
- Check the tightness of the connections of the pipes.
- Tighten the fasteners (if necessary).
- Start the engine.
- Operate the gas pedal.
Article Rating
Step-by-step instruction
Working with the mesh takes no more than half an hour, since the driver does not need to disassemble half of the VAZ 2114 car to get to this unit. To work, you will need a standard set of screwdrivers and wrenches. As additional materials, you may need WD-40, which will help unscrew stuck bolts, as well as rags for wiping the body of the VAZ 2114. If you plan to completely replace the pump, then you need to completely drain the gasoline from the fuel tank. It is not recommended to work with fuel in the tank. Replacement proceeds as follows:
- The negative terminal is removed from the battery. This is done in order to de-energize the car.
- Under the rear row of passengers, you need to unscrew the plastic protection, as shown in the photo below. Removing the cover to access the pump, which is done using a 17 key.
- The cover must be removed. This can be done using a Phillips screwdriver.
- The motorist now has access to the fuel pump. It is necessary to disconnect the unit from the power supply and then loosen it slightly. Next, you should remove the fuel hoses. In the case of the VAZ 2114, you will need the seventeenth key.
- The next step is to dismantle the main mounts of the fuel pump. The nuts are easily unscrewed with the 7th wrench. Next you need to remove the mechanism. Loosening and removing the unit fastening.
- You can find plastic containers in the tank, which can be removed if desired. When the fuel pump is dismantled, you can clean its mesh (filter). But it’s better to spend 60 rubles and buy a new one. A new mesh to replace, the asking price is 60 rubles.
- If necessary, the fuel pump can be completely replaced. It is recommended to buy the original model for VAZ 2114 cars.
You need to remove the fuel pump carefully, since the float that determines the fuel level is very fragile.
If desired, you can find a supported pump. To determine whether replacement is needed or not, the unit must be thoroughly inspected. But checking the fuel pump yourself is quite problematic, so before changing it, you can take the car to a car service center and check the pressure in the fuel rail.
Wiring
If the fuel pump fails, first of all, you need to make sure that the circuit was installed correctly. Three wires lead to its electric drive:
- one - to the fuel sensor;
- two - to the contacts of the motor itself.
A regular 12 volt light bulb will help you figure this out. It is connected to the power wires. When you turn on the ignition, it will light up - this means that the electrics are supplied correctly.
The lamp also checks the performance of the motor itself. In this case, it is connected to the protruding terminals of the drive, and its short-term flashing will indicate in this case a malfunction of this element.
Why the VAZ-2115 fuel pump does not work and what to do
Many call the heart of the car its power plant. However, it would be most correct to consider the fuel pump as such. Its functions, which are quite easy to verify, are very similar to those performed by the heart in the human body.
In this material we will talk about how to determine that it is the fuel pump on the VAZ-2115 that is not working, and we will tell you about ways to eliminate the detected problems. In reality, the failure of this unit has very characteristic signs that make it easy to distinguish it from other malfunctions that occur with the machine during its operation.
Most often, the car engine suddenly stalls while driving. Moreover, if you start the power plant again, very specific sounds are heard from under the hood, but the starter spins as if nothing had happened. Repeated attempts to move also end in failure.
Also, sometimes the car stops starting the first time. This problem usually occurs if it has been in neutral for some time.
The most typical symptoms of fuel pump failure are:
- the power unit of the car does not want to start;
- too low pressure level in the fuel system;
- engine tripping;
- loud “growling” of the engine at low speeds.
However, the first can happen for other reasons:
- problems with candles;
- ECU error;
- Some sensor is faulty.
The loud “roar” of the engine in the vast majority of cases indicates a failure of the fuel pump. Much less often, this indicates that the filters are clogged.
Why else might the pump motor not start? Here are the most common reasons:
- fuse blown;
- relay failure;
- mass break;
- failure of the electric motor installed in the pump;
- contamination of power terminals.
Other causes of fuel pump malfunctions
Quite often, unprofessional installation of additional electrical equipment or security anti-theft systems leads to the fact that the power to the fuel pump is lost due to mixed up contacts or other connection errors.
Finally, let’s add that the gas pump in the gas tank is immersed in gasoline, in which it is actively cooled. The habit of driving with an empty tank can quickly damage the electric motor of the fuel pump, as it burns out.
What functions does the fuel pump relay perform, signs of breakdown. Where is the fuel pump relay installed, how to properly check the fuel pump relay.
Video review of replacing the fuel pump mesh on VAZ 2114 and 2115
In this example, the design is the most understandable and simple, so there were practically no problems with this type of repair. There are other types of pumps that differ in their design, and there everything will be a little different.
It is worth keeping in mind that you should only buy a new mesh when you know for sure how it is installed on your car. The price of this part is usually no more than 50-100 rubles, so do not delay this procedure and perform it periodically to avoid clogging the fuel system.
It is also worth noting the fact that when removing the fuel pump, carefully inspect the internal condition of the tank, and, if necessary, thoroughly clean or rinse it to get rid of foreign particles and formations.
Removing, installing and replacing the fuel pump
The first thing to keep in mind is that all work on the car’s fuel system must be carried out with the negative terminal of the battery disconnected. It would also be a good idea to do this with an empty fuel tank, especially since with the fuel module removed it becomes possible to clean the bottom of the gas tank from sediment.
The second thing it is advisable to do is to remove the pressure inside the fuel lines so as not to get a stream of gasoline in your face or into the interior of the car. This can be done using a measuring nipple on the fuel rail and a thin screwdriver.
To work you should prepare:
Sequence of work
If there is a new assembled module in stock, install it in the reverse order. If it is necessary to replace individual components: the fuel pump itself, the level sensor or the primary filter mesh, we do this by disassembling the fuel module housing and removing the corresponding parts.
This procedure is unlikely to cause any difficulties - everything is quite obvious.
For a new type of fuel pump, you need a 10mm socket and a ratchet, similarly unscrew the ring in a circle and press out the fuel line clamps.
Cleaning the mesh in the non-collapsible fuel pump of the Skoda Octavia A5
My car is a late 12-year model and most of these Skodas have a dismountable fuel pump. The Czechs were helpful to me - I do NOT have a collapsible one. Well, okay. Doesn't really float. I did everything according to the reports from the drive. There is nothing particularly complicated.
In the article I will write what is needed to clean the mesh, steps with nuances and the photo report itself with explanations. Cat. I will post the numbers of the mesh for the collapsible pump in a separate article.
So, to work you need:
- hammer, - screwdriver, - plastic cup 2-3 pcs. - rags, - carburetor cleaner, - a toothbrush for cleaning, - a vacuum cleaner, - well, and cardboard where to put the fuel pump
STEPS:
1. I pulled back the sofa, see photo on how to do it correctly. We lift the sofa up and pull it towards the chair. We lift the carpet and see a round plug.
2. The plug contains a rubber plug with wires, which can be easily removed. Let's take it off. We put our finger in there and take out the completely round plug, we are not afraid of anything, nothing will break, it comes out easily.
3. Cover with rags around the gas pump so that gasoline does not accidentally get on the carpet, and so that it does not stink later.
4. Next, disconnect the plug with the wires. It was difficult for me to remove it. There is a little red thing, like a latch, lift it up and pull the plug up. I didn’t want to act, but then I did. Then I took the compartment back and took it off again and broke the little thing, now the plug can be removed without problems and is not fixed. Here, the main thing is to remove it carefully.
5. Next. Let's go get behind the wheel. We start the car and remove the pressure in the system, run the engine for 20-30 seconds and stall on its own, start it again and it stalls immediately.
6. Now let's go remove the blue hose first. How can I remove it without breaking anything? The blue and black hoses have chips that hold the hose. In the chip itself there is a button, like a stopper, small buttons, difficult to see but possible. We press the button and pull the piece with the hose up. That's it, she's in her hands.
7
Black hose, ATTENTION! We remove it in the same way and substitute a plastic cup, because gasoline will flow out of it under pressure. No gasoline flows from the blue hose
8. Place the glass under the gasoline and drain. It drains a little, 150 grams.
8.a. We make a mark where the arrow is.
9. Then take a hammer and screwdriver, and tapping counterclockwise, unscrew the ring. Don’t forget, there is an arrow where the pump was originally located, let’s mark it so that we can put everything in the same place later. Marked with a screwdriver, see photo.
10. The ring was removed. The pump slowly rises up, about 2-3 cm. There’s nothing wrong with that. Yes, I almost forgot. When we hit the ring with a hammer to unscrew it, dirt and dust still fly from the sides onto the pump itself. There is nothing terrible, you can immediately wipe it after removing the ring so that nothing gets inside the tank.
11. Remove the ring, carefully remove the pump, lift it up
It is important that the gas tank is almost at minimum, it’s easier this way
12. Raise the fuel pump carefully. Do not touch the fuel level float; it is located in the direction of the passenger seat behind the driver.
13. As soon as the float rests against the upper wall of the tank, bend the pump in the opposite direction and remove the pump without touching the float. Along the way, anyone with straight arms, without rushing, will understand the meaning of the matter.
14. I removed the pump, poured gasoline into the machine from the glass of the pump itself. We look inside the glass, everything is clean, except for a light coating on the walls of the glass, like pollen sediment. The filter itself is dark in color. No clogging or soot was found during disassembly. Cleaned the fuel pump with carburetor cleaner. Under pressure, I cleaned the mesh inside with a cleaner - the walls, all the mechanisms, wiped it with a rag where I could reach. The filter itself became visually cleaner, it drained all the dirty slurry into a glass, see photo. Then I put everything back in its place, in reverse order. The condition of the fuel pump mesh is good. Although I found threads where people generally tore off these nets and don’t worry, they drive without nets at all.
Actually, that’s all - use it for your health).
Collections on the topic:
Skoda 1.6 bse stalls while driving and does not start immediately - treatment The steering wheel icon on the Skoda panel is constantly on - what is it and how to fix it
The Skoda started to warm up - what could happen?
Lost idle speed - reasons and how to restore it yourself (from the manual)
Fuel pump malfunction on Skoda or another global scam!
It blows cold from the air duct - Skoda Octavia 2011, 1.6 MPI
Speed jumps on Skoda
The central locking button is faulty
Signs of breakdown
There are several situations in which the pump or its components can be at fault. This will definitely have to be checked. Otherwise, you can spend a lot of money buying and installing a new fuel pump, but in the end it turns out that the problem is completely different.
- The engine will not start. This is not a clear sign of problems with the pump, but still. Therefore, first check the condition of the spark plugs, the presence of a spark, and the absence of traces of oil on them. Also check the electronic control unit.
- Pressure inside the fuel system. If the pump is operating normally, it will create a pressure of 3.2 bar. Depending on the type of engine in your VAZ 2114, the characteristics may differ slightly: For a 1.5-liter engine, the optimal values are 285-325 kPa;
- For a 1.6-liter engine, these characteristics in optimal operating mode will range from 375 to 390 kPa.
There is no signal that is not sent to the pump. This happens when you turn the ignition key. During normal operation, the pump begins to vibrate slightly when turning the key. If this does not happen, be sure to check the wiring. Troubles the power unit. This is also not an ideal sign of a fuel pump failure. But you still have to check. It is likely that the culprit in this situation will be the pump. The engine jerks. Moreover, this happens at low speeds or even at start. There are two possible reasons for the situation - a breakdown of the pump itself or a problem with the fuel pump grid, which will have to be replaced.
New and old coarse filter Many people purchase the entire fuel module assembly at once, which includes a filter, sensor, float, intake chamber and the pump itself. Such a purchase will cost approximately 3,000 rubles. It is much more profitable and practical to buy a separate pump, which costs up to 1000 rubles. This is due to the fact that when the pump fails, the remaining elements almost always remain intact and are fully suitable for further use.
Popular breakdowns
Problems with the fuel pump can occur for several reasons. Therefore, your first priority is to determine the source of the problem. These may be:
- Fuel pump fuse;
- Fuel pump relay;
- Pump weight;
- Contacts;
- The pump itself.
If one of these elements fails, it can stop the normal functionality of the entire module.
Let us consider the situations with each of the specified elements of the fuel module in more detail.
Pressure
What exactly is a fuel pump? This is an element of the fuel system that allows fuel to pass through due to pressure. Therefore, if you take pressure measurements, you can get answers to many questions.
Let's give an example of normal pressure readings when checking in certain modes.
Contacts
The fuel pump includes three wiring:
- Plus (positive);
- Minus (negative);
- Fuel level indicator.
So, failure of the pump may occur due to a simple violation of the integrity of the wires. So if the pressure check shows normal, then we definitely examine the condition of the wiring.
To check, you will need a 12V lamp, which is attached to the external connectors of the pump with positive and negative contacts. Turn the ignition key. If the lamp blinks, contact is present. In this case, you will have to check the condition of the internal contacts.
If the pressure and wiring are normal, let's try to check the serviceability of the motor. It is this element that is responsible for moving fuel through the system.
- To check it, you will need the same 12V lamp;
- Attach it to any motor terminal;
- Turn the ignition key;
- If the lamp blinks, you will have to get rid of the motor and buy a new one.
Don't jump to conclusions. Before checking, look at the condition of the terminals and motor wiring.
Fuel pump weight
The contacts are fine, but the fuel level sensor may provide incorrect information. In this case, you definitely need to check the weight of the pump responsible for dispersing the fuel.
It often turns out that after prolonged use or driving on difficult road sections, the mass simply loses its fastening strength. Accordingly, if the mass falls off, the pump will not be able to work.
The mass is attached to the pump under the dashboard in the area of the hand brake. Therefore, when the driver turns on the handbrake, there is a possibility of hitting the ground contact, which is why it will fall off.
Putting the mass back in place is not that difficult. The problem is caused by the path to it. You'll have to:
- Get to the bottom through the interior;
- Remove the plastic under the handbrake;
- Remove the floor covering;
- Remove the grounding contacts;
- Clean;
- Secure it to the fuel pump as firmly as possible.
Relay
The fuel pump relay is located exactly where the ground is. Therefore, there should be no problems with the search.
With an ideally working fuel supply system, when the ignition is turned on, the relay instantly creates pressure inside the system, and then turns off.
If this process is disrupted, you will have to:
- Lift the front facing panel, which covers the contacts of the audio system and air conditioning;
- Take a look from the front passenger side;
- Find three relays;
- The lowest one is our desired pump relay;
- Turn the ignition key;
- If you hear a characteristic click from the relay, it is working properly;
- If there is no click, check the contacts. The reason is either them or a failed relay.
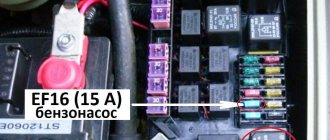
Fuse
All that remains is to check the condition of the fuse. This stage will make sure who the real culprit of the problems is - the pump itself or its fuse.
- Getting to the fuse is as easy as getting to the relay - through the hood or from the inside. The first option is preferable.
- Raise the hood and look in the area near the windshield.
- There is a dark-colored box located directly on the electronic engine control unit.
- Open the box and look inside for the topmost fuse.
- It has a current strength of 15A, as well as an inscription in English - Fuel Pump, that is, a fuel pump.
- Examine its external condition by removing it from the box.
- If the contacts are intact, then everything with the fuse is normal.
- If burnt contacts are clearly visible, consider purchasing a new device. Its price is affordable, so finding and replacing should not be a problem.
Pressure
First of all, you will need to measure the pressure in the fuel supply system. If the pump works as it should, it is about seven atmospheres. To check, the pressure gauge is connected to the ramp through the fitting there. Remove the cap from it and screw on the measuring device.
If everything is in order, then the readings will be as follows:
- 2.5 kPa (idle);
- 3 (ignition on);
- 7 (if you pinch the fuel outflow hose);
- 2.5-3 (increase in speed).
In the same situation, if after the ignition is triggered the pressure gauge does not show anything, then most likely the pressure regulator has failed.
When no changes occur even after gaining speed, then the issue here is clearly in the fuel pump. A slow change in readings indicates a clogged filter mesh.
Pressure system
The gasoline pump creates pressure in the fuel rail for normal gasoline supply functionality. Let's measure the pressure and we'll understand a lot right away.
Normal parameters of atmospheres in the system are as follows:
- Idle – 2.5
- Without pressure regulator tube – 3.3
- With pinched drain – 7
- We press on the gas - from 3 to 2.5.
Ignition – from 3
We will measure in these five states with a pressure gauge with a small range of atmospheres (up to 7, to reduce the error to a minimum). Under the hood we found a pressure fitting (just unscrew the cap in advance), attached a pressure gauge (hose) to the fitting and off we went. The ignition is turned on, the pressure gauge is zero: the fuel pressure regulator is broken. We press on the gas, the pressure gauge goes to zero: the fuel pump itself is broken (now you can do some shopping at a spare parts store). There may still be a situation. When the pressure gauge needle lazily rises, look at the condition of the fuel filter.
By the way, if you don’t have a pressure gauge, it’s sad and sad, because it’s an expensive pleasure. Similar diagnostics in the service will cost half as much.
Replacing the fuel pump on a VAZ 2114/2115
Before you begin work, you should relieve the fuel pressure in the system. Even when the pump is not working, the pressure can remain very high, which will lead to the pressure of a stream of gasoline during dismantling work.
To reduce the pressure in the fuel system of a car, it is enough to let it stand on level ground for three hours. The fuel pressure in the hoses and pipes will noticeably decrease, and replacing the device will take place without any difficulties.
Not in all cases it is necessary to replace the fuel pump with a new one; sometimes it is enough to simply repair it
Preparing tools
To make all stages of the work easier, you will need to prepare several tools.
As a rule, most car owners have all of them:
- crosshead screwdriver;
- flat screwdriver;
- open-end wrench 17;
- head at 7;
- extension for key.
How to remove a faulty fuel pump in a VAZ 2114/2115
The procedure for dismantling the fuel pump determines the following stages of work:
- Open the hood and disconnect the negative terminal from the battery.
- Raise the rear seat cushion inside the vehicle.
- There is a small hatch under the seat - it is under it that the fuel pump is located.
- Using a 17mm wrench you will need to unscrew all the nuts securing the hatch to the floor.
- Putting the hatch cover aside, you will need to disconnect the two wire blocks. To do this, you will first need to bend the fixing element on the plug.
- Next, using a 17mm wrench, you will need to unscrew the nuts on the fuel line and disconnect the fuel pipes.
- After this, the fuel pump itself will become accessible. Using an extension cord and a wrench, you will need to unscrew all the fasteners that connect the pump to the metal surface of the car.
- The best way to remove the fuel pump is to use a screwdriver to hook it onto the rubber ring.
How to install the fuel pump back
The procedure for installing the fuel pump in the VAZ 2114/2115 is completely reverse: that is, you will first need to insert the device into the cavity under the seat, and then connect all the disconnected wires and tubes. The final stage is closing the hatch and returning the rear seat cushion to its original place.
The ability to independently diagnose a fuel pump failure, as well as quickly replace or repair the device, will be especially useful for those drivers who are accustomed to servicing their car themselves. In addition, the procedure for checking the fuel pump and its repair cannot be considered particularly complex work, so even an inexperienced owner will be able to get the fuel pump into working condition without contacting a service station.
Sources
How to replace the fuel pump mesh, also known as the fuel pump, on a VAZ 2113-VAZ 2115?
Note! Before we start a few words about this mesh, in fact, you don’t have to replace it with a new one, but you can first remove it and then wash it in gasoline; some dirt from such washing will come off the mesh and fall off, but still not all the dirt will fall off, so the best option, of course, would be to replace this mesh with a new one, and besides, it only costs around 50-130 rubles.
But still, if you find yourself in a situation where your mesh is very clogged and the car is moving jerkily, and you don’t have this mesh at hand, then you can really remove the clogged mesh and wash it in gasoline, and after all that it would be good to blow it out compressed air under pressure, for example a compressor, pump, etc.
Removal: 1) At the very beginning of the operation, remove the fuel pump itself from the car. (For information on how to remove the fuel pump, see the article: “Replacing the fuel pump on a VAZ”)
2) Then, when you remove the pump, take it in your hands or continue to hold it in your hand (Depending on the situation), and then turn the pump over so that it is directed from the bottom to the top, in general, so that the mesh is in front of your eyes, and after that, grab this mesh with your hand and simply pull it up, thereby it will move away and disengage, that is, it will be removed from the fuel pump.
Installation: The new mesh is installed in the same way as it is removed, but only in the reverse order, that is, you take the new mesh in your hands and simply put it on the place where the old mesh stood, but only put it on until it completely fits and rests, and when it is put on, check whether it sits well on the fuel pump or whether it is wobbly, and after checking, install the fuel pump in its place.
Note! When everything is in place, check how the fuel pump works with a new mesh, to do this, start it first, it should start perfectly (First time), but only if the engine is working properly, and after it starts, drive a little on it, when driving, pay attention to how the car moves, that is, it should not twitch and its movement should be smooth!
Additional video clip: You can see in more detail about how to replace the mesh on a fuel pump using the example of replacing the same mesh on a VAZ 2110 car, they are replaced there absolutely identically, so watch the video and you’ll understand everything right away:
Source
Models of fuel pumps for VAZ 2114/2115 cars
VAZ 2114/2115 cars are equipped with 1.5 cm3 and 1.6 cm3 gasoline engines with a distributed injection system. A submersible electric fuel pump is used to supply fuel. It is part of the fuel module installed at the top of the gas tank (under the rear seat). In addition to the pump, the module includes a fuel accumulator (cup), a coarse filter and a fuel level sensor with a float.
To supply fuel in VAZ 2114/2115 cars, a submersible electric fuel pump is used
The VAZ 2114/2115 fuel pump is a conventional DC electric motor in a sealed housing with a one-way valve at the outlet. An impeller of a special shape is located on the electric motor shaft. Its rotation ensures the fuel supply.
The fuel module includes a fuel pump, a fuel accumulator, a coarse filter and a fuel level sensor
The fuel pump is powered from the vehicle's on-board network. The electrical circuit of the pump, protected by a fuse, is closed using a separate relay.
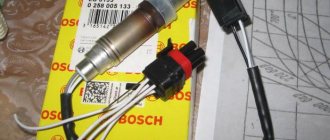
Electric fuel pumps for VAZ cars are produced by both domestic (Utes, SAAZ, Pekar) and foreign companies. The latest modifications of the VAZ 2114/2115 are equipped with BOSH pumps, which are distinguished by their high reliability, long service life and relatively low price.
Design of the electric fuel pump VAZ 2114/2115
Catalog numbers of standard fuel pumps for VAZ 2114/2115:
- 2112–1139009–12 — for engines with a volume of 1.5 cm3;
- 2112–1139009–01 — for engines with a volume of 1.6 cm3;
- 580453453 (BOSH) - for engines with a volume of 1.5 and 1.6 cm3.
These models differ in operating pressure. The former are capable of creating a pressure of 2.8–3.2 kPa in the fuel system, the latter - 3.7–3.9 kPa. BOSH fuel pumps are rated at 3.5 kPa.